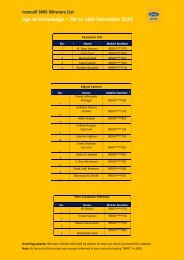
to download the configurations
to download the configurations
to download the configurations
- No tags were found...

You also want an ePaper? Increase the reach of your titles
YUMPU automatically turns print PDFs into web optimized ePapers that Google loves.
Change of CPE Configuration from Bridge Mode <strong>to</strong> Route ModeHow can I change from Bridge mode <strong>to</strong> Route mode?If your CPE is BM8301, use <strong>the</strong> following method <strong>to</strong> change your CPE mode:Firstly, set your IP configuration <strong>to</strong> manual. To this end, go <strong>to</strong> Control Panel from Start menu.Outdoor4
Open Network Connections in <strong>the</strong> current window.Outdoor5
Click on <strong>the</strong> Local Area Connection of your network card and go on <strong>the</strong> stages as defined below:134Outdoor26
For <strong>the</strong> outdoor CPE (BM8301), enter 192.168.0.* for IP Address and 255.255.255.0 for Subnet Mask.* : any figure from 2 <strong>to</strong> 254 (excluding 10)Outdoor172
Open your web browser and type http://192.168.0.10 in <strong>the</strong> address bar.In <strong>the</strong> opened page, write «admin» for both Username and Password and click on Login.Outdoor8
Choose «System» from <strong>the</strong> <strong>to</strong>p page menu and select «Working Mode» from <strong>the</strong> left menu. Then select Router and clickon Save Settings. Click on OK in <strong>the</strong> window opened.Outdoor213594
Apply only <strong>the</strong> <strong>configurations</strong> shown below:PKM: EnableAu<strong>the</strong>ntication Type: EAP-TTLS (Change EAP-TLS <strong>to</strong> EAP-TTLS in this part)• You need <strong>to</strong> change <strong>the</strong> domain from Irancell.ir <strong>to</strong> mtnirancell.com.Inner Au<strong>the</strong>ntication Type: MS-CHAPv2Identity: CPE MAC address@mtnirancell.com• The MAC address is mentioned here. If this part is blank, please go <strong>to</strong> page 22. Inner Identity: WiMAX ID@mtniracell.com• Please be noted that you should enter <strong>the</strong> MAC address without any space and colon. Password: WiMAX password(The password has been sent <strong>to</strong> you through Email and SMS at <strong>the</strong> time of registration)1Outdoor235410
Finally, you should reset your IP configuration <strong>to</strong> au<strong>to</strong>matic mode. To this end, click on Local Area Connection and take<strong>the</strong> following steps:Outdoor134211
1Outdoor23Now, your CPE is ready for operation. Open your web browser and search <strong>the</strong> desired site.12
How is it possible <strong>to</strong> change <strong>the</strong> CPE configuration from Route mode <strong>to</strong> Bridge mode?For CPE (BM8301):Firstly, set your IP configuration <strong>to</strong> manual. To this end, go <strong>to</strong> Control Panel from Start menu.Outdoor13
Open <strong>the</strong> Network Connections:Outdoor14
In <strong>the</strong> opened window, click on Local Area Connection of your network card and take <strong>the</strong> following steps:Outdoor134215
For outdoor CPE (BM8301), enter 192.168.0.* for IP Address and 255.255.255.0 for Subnet Mask* : any figure from 2 <strong>to</strong> 254 (excluding 10) 2Outdoor116
Open your web browser and enter http://192.168.0.10 in <strong>the</strong> address bar.In <strong>the</strong> opened page, write «admin» for both Username and Password.Outdoor17
Choose “System” from <strong>the</strong> <strong>to</strong>p page menu and select “Working Mode” from <strong>the</strong> left menu. Then select Bridge and click on SaveSettings. Click on OK in <strong>the</strong> window opened.213Outdoor5418
After rebooting your CPE, open your web browser and enter http://192.168.0.10. Then enter admin for both user nameand password in <strong>the</strong> opened page.Go <strong>to</strong> Security and select PKM from <strong>the</strong> left menu. Enter <strong>the</strong> following <strong>configurations</strong>:PKM: EnableAu<strong>the</strong>ntication Type: EAP-TLS (Change EAP-TTLS <strong>to</strong> EAP-TLS in this part)NAI: CPE MAC address@irancell.irYou need <strong>to</strong> change <strong>the</strong> domain from mtnirancell.com <strong>to</strong> Irancell.irThe MAC address is mentioned here. If this part is blank, please go <strong>to</strong> page 22.Please be noted that you should enter <strong>the</strong> MAC address without any space and colon.Outdoor1235419
Finally, change you IP configuration <strong>to</strong> <strong>the</strong> au<strong>to</strong>matic mode. To this end, click on Local Area Connection and take <strong>the</strong>following steps:1Outdoor34220
Outdoor12321Now, your CPE is ready for operation. Open your web browser and enter your WiMAX ID and password in <strong>the</strong>portal.
For outdoor CPE (BM8301), take <strong>the</strong> following stages:Firstly, set your IP configuration <strong>to</strong> manual, as per Page 4.Then open your web browser and enter http://192.168.0.10 in <strong>the</strong> address bar.In <strong>the</strong> opened page, write «admin» for both Username and Password.Go <strong>to</strong> Status and select WiMAX from <strong>the</strong> left menu.1Outdoor23Finally, set TCP/IP <strong>to</strong> au<strong>to</strong>matic mode as it is said in page 11.22