Kraftmaid 039 Design Ideas - Roberts Company, Inc.
Kraftmaid 039 Design Ideas - Roberts Company, Inc.
Kraftmaid 039 Design Ideas - Roberts Company, Inc.

Create successful ePaper yourself
Turn your PDF publications into a flip-book with our unique Google optimized e-Paper software.
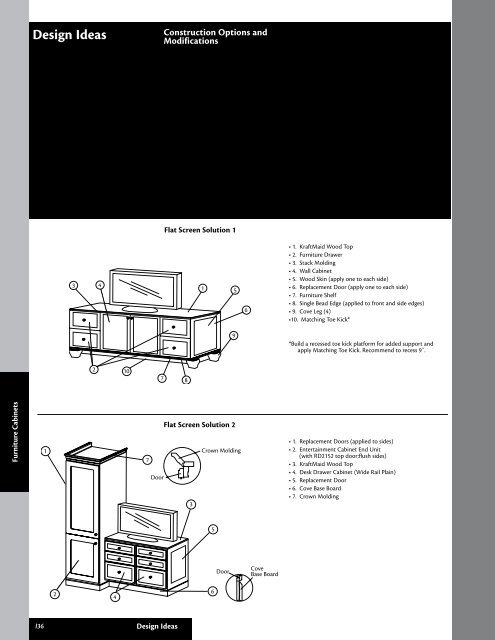
<strong>Design</strong> <strong>Ideas</strong>Construction Options andModificationsFlat Screen Solution 134156• 1. KraftMaid Wood Top• 2. Furniture Drawer• 3. Stack Molding• 4. Wall Cabinet• 5. Wood Skin (apply one to each side)• 6. Replacement Door (apply one to each side)• 7. Furniture Shelf• 8. Single Bead Edge (applied to front and side edges)• 9. Cove Leg (4)•10. Matching Toe Kick*9*Build a recessed toe kick platform for added support andapply Matching Toe Kick. Recommend to recess 9˝.21078Furniture Cabinets1Flat Screen Solution 2Crown Molding7Door3• 1. Replacement Doors (applied to sides)• 2. Entertainment Cabinet End Unit(with RD2152 top door;flush sides)• 3. KraftMaid Wood Top• 4. Desk Drawer Cabinet (Wide Rail Plain)• 5. Replacement Door• 6. Cove Base Board• 7. Crown Molding5DoorCoveBase Board246I36<strong>Design</strong> <strong>Ideas</strong>
Flat Screen Solution 31• 1. KraftMaid Wood Top• 2. Desk Drawer Cabinet (Wide Rail Plain)• 3. Replacement Door• 4. Cove Base Board34DoorCoveBase Board2Flat Screen Solution 4Door CabinetFrame4ClassicCrownMolding321• 1. Utility cabinets (with Wide Rail Plain;Reduced Depth to 18˝)• 2. Wall Cabinets (w/Butt doors;<strong>Inc</strong>reased Depth to 18˝)*• 3. Classic Crown Molding• 4. Furniture Shelves• 5. Solid Stock• 6. Cove Base Board• 7. Skin or panel, applied to wall, behind TV.Not intended for supporting TV.* Build a flush toe kick platform for added support172DoorCoveBase Board1356Flat Screen Solution 51• 1. Utility cabinets (with Wide Rail Plain;Reduced Depth to 18˝)• 2. Vanity Cabinets (with Wide Rail Plain)• 3. KraftMaid Wood Top (Finished Both Ends)• 4. Furniture Shelves (pull forward 3/4˝)• 5. Cove Base BoardFurniture Cabinets425DoorCoveBase Board<strong>Design</strong> <strong>Ideas</strong>I37
Flat Screen Solution 6Large CoveMoldingDoorStarterMoldingCabinetFrame1562DoorFurnitureShelf Single BeadEdge89• 1. Wall cabinets (Reduced Depth to fit TV Specs;with Furniture Plywood Ends)• 2. Wall Cabinets-CFO (installed horizontally at 12˝ deep;secure door)• 3. KraftMaid Wood Top (Finished Both Ends)• 4. Vanity Cabinets (with Wide Rail Plain;Furniture Plywood Ends)• 5. Starter Molding• 6. Large Cove Molding• 7. Cove Base Board• 8. Furniture Shelf• 9. Single Bead Edge (applied to front of shelf)DoorCoveBase Board374Furniture Component System153457• Create your own furniture component systemusing standard wall and base cabinets• 1. Furniture end panel• 2. Center furniture end panel• 3. Furniture shelf• 4. Furniture valance• 5. Standard wall cabinet• 6. Base cabinet with full-height doors• 7. Furniture panel2664Furniture CabinetsPeninsulaFurnitureShelfCabinetFrontOnlyLargeStarterMoldingLarge CoveMolding23Hearth Solution 145• 1. Utility Cabinet-CFO• 2. Peninsula Furniture Shelf• 3. Large Starter Molding• 4. Large Cove Molding• 5. Flat Panel Valance• 6. 12˝ high Furniture Drawer (with Furniture Plywood Ends)*• 7. Cove Base Board* Build a 4 1/2˝ high platform under Furniture Drawersfor support176DoorCoveBase BoardI38<strong>Design</strong> <strong>Ideas</strong>
11Hearth Solution 282710 9 Large Cove3Molding166”Single BeadEdgeWallCabinet4LargeStarterMoldingFurnitureShelf• 1. Wall cabinets (Reduced Depth to 6˝;with Furniture Plywood Ends)• 2. Wall Skin (cut skin to wall)• 3. Replacement Door• 4. KraftMaid Wood Top• 5. Wall Cabinet (with Furniture Plywood Ends)• 6. Crown Valance• 7. Large Starter Molding• 8. Large Cove Molding• 9. Furniture Shelf•10. Single Bead Edge (applied to edge of shelf)•11. Ogee Molding (above and below cabinets)5Hearth Solution 36321TraditionalWoodTopLarge FederalMoldingLargeStarterMolding• 1. Traditional Wood Top• 2. Large Federal Molding• 3. Large Starter Molding• 4. Wall cabinets (Reduced Depth to 6;Furniture Plywood Ends)*• 5. Solid Stock• 6. Cove Base Board• 7. Cove Valance4* Build a flush toe kick platform under for support5DoorCoveBase BoardMaterials by others1ClassicCrownMoldingDoor32CabinetFrameHearth Solution 4412FurnitureShelvesDoor5Small CoveCasingClassicCrownMoldingLargeStarterMolding• 1. Utility Cabinet (Wide Rail Plain;Furniture Plywood Ends)• 2. Classic Crown Molding• 3. Small Cove Casing• 4. Furniture Shelf• 5. Large Starter Molding• 6. Wall cabinets (Reduced Depth to 6;Furniture Plywood Ends)*• 7. Solid Stock• 8. Cove Base Board* Build a flush toe kick platform under for supportFurniture Cabinets86DoorCoveBase Board87<strong>Design</strong> <strong>Ideas</strong>I39
Hearth Solution 5Large CoveMolding6˝UtilityCabinetLargeStarterMoldingFurnitureShelfWallHoodMantel Matching4 5 6 7231• 1. Utility Cabinet (Wide Rail Plain;Furniture Plywood Ends; Reduced Depth to 6˝)• 2. Wall Hood Mantle Matching• 3. Cove Corbel• 4. Large Starter Molding• 5. Large Cove Molding• 6. Furniture Shelf• 7. Single Bead Edge• 8. Cove Base Board1DoorCoveBaseBoard8Hearth Solution 6WoodTopLarge CoveMoldingSolid Stock1235• 1. KraftMaid Wood Top• 2. Large Cove Molding• 3. Solid Stock• 4. Roman Spindles• 5. Small Cove Light Rail• 6. Large Cove Molding (inverted)RomanSpindleSmall CoveLight Rail46Furniture CabinetsI40<strong>Design</strong> <strong>Ideas</strong>
Diagonal Installation of Standard Furniture CabinetsDCCDOptional WallBACabinet Width “A” Cabinet Width “B” Wall Dimensions “C” Wall Dimensions “D” Cabinet Depth “B” Wall Dimensions “C” Wall Dimensions “D”Furniture Cabinets18” 12” 20 ⅜” 25 ⅜” 18” 23 ¼” 30 ¾”24” 12” 24 ⅝” 29 ⅝” 18” 27 ½” 35”30” 12” 28 ⅞” 33 ⅞” 18” 31 ¾” 39 ¼”36” 12” 33 ⅛” 38 ⅛” 18” 36” 43 ½”<strong>Design</strong> <strong>Ideas</strong>I41