Instruction Manual - Clear all - Flymo
Instruction Manual - Clear all - Flymo
Instruction Manual - Clear all - Flymo
- No tags were found...

Create successful ePaper yourself
Turn your PDF publications into a flip-book with our unique Google optimized e-Paper software.
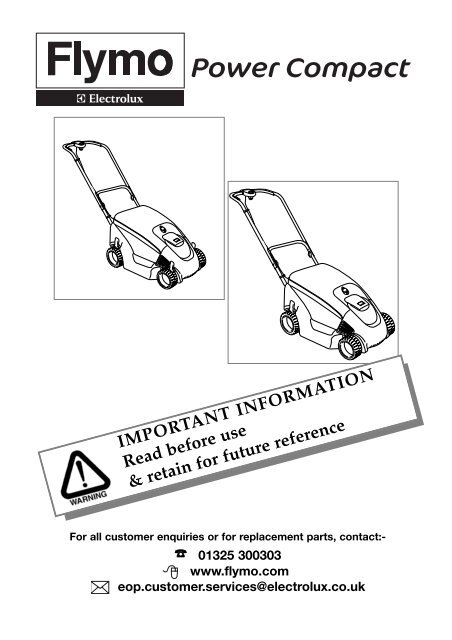
IMPORTANT INFORMATIONRead before use& retain for future referenceFor <strong>all</strong> customer enquiries or for replacement parts, contact:-☎ 01325 300303www.flymo.comeop.customer.services@electrolux.co.uk
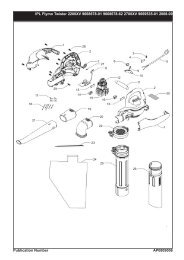
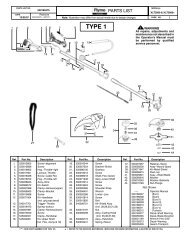
1Carton Contentsheight adjsutmentlevers(4 levers on 330)(1 lever on 400)grassbox lidwashersboltslower handlefixing pinsnuts (ifapplicable)lock-offbuttondeckcableclipsplastichandleknobinstructionmanualupper handlelower handleelectric cable withmoulded on plugIMPORTANT ! Please check the contents of the carton are correct BEFORE assembling your new <strong>Flymo</strong> product.IF ANY PARTS ARE MISSING CONTACT:-Electrolux Outdoor Products Customer Service Department directTelephone : 01325 300303, Fax : 01325 318193SafetyIf not used properly this lawnmower can be dangerous! This lawnmower can cause serious injury tothe operator and others, the warnings and safety instructions must be followed to ensure reasonablesafety and efficiency in using this lawnmower. The operator is responsible for following the warningand safety instructions in this manual and on the lawnmower. Never use the mower unless the grassboxor guards provided by the manufacturer are in the correct position.Explanation of Symbols on the Power CompactWarningSwitch off! Remove plug from mains beforeadjusting, cleaning or if cable is entangledor damaged. Keep the cable away from theblade.Read the user instructions carefully to makesure you understand <strong>all</strong> the controls andwhat they do.Always keep the lawnmower on the groundwhen mowing. Tilting or lifting the lawnmowermay cause stones to be thrown outKeep bystanders away. Do not mow whilstpeople especi<strong>all</strong>y children or pets are in themowing areaSTOPBeware of severing toes or hands.Do not put hands or feet near a rotatingblade.Blade continues to rotate after the machineis switched off.Wait until <strong>all</strong> machine components havecompletely stopped before touching them.Do not mow in the rain or leave the lawnmoweroutdoors while rainingGeneral1. Never <strong>all</strong>ow children or people unfamiliar withthese instructions to use the mower. Local regulationsmay restrict the age of the operator.2. Only use the lawnmower in the manner and for thefunctions described in these instructions.3. Never operate the lawnmower when you are tired, illor under the influence of alcohol, drugs or medicine.4. The operator or user is responsible for accidents orhazards occurring to other people or their property.Electrical1. The British Standards Institute recommend the useof a Residual Current Device (R.C.D.) with a trippingcurrent of not more than 30mA. Even with a R.C.D.inst<strong>all</strong>ed 100% safety cannot be guaranteed and safeworking practice must be followed at <strong>all</strong> times.Check your R.C.D. every time you use it.2. Before use, examine cable for damage, replace it ifthere are signs of damage or ageing.3. Do not use the lawnmower if the electric cables aredamaged or worn4. Immediately disconnect from the mains electricitysupply if the cable is cut, or the insulation is damaged.Do not touch the electric cable until theelectrical supply has been disconnected. Do notrepair a cut or damaged cable. Replace it with anew one.5. Your extension cable must be uncoiled, coiledcables can overheat and reduce the efficiency ofyour mower.6. Keep cable away from lawnmower, always workaway from the power point mowing up and down,never in circles.7. Do not pull cable around sharp objects.
8. Always switch off at the mains before disconnectingany plug, cable connector or extension cable.9. Switch off, remove plug from mains and examineelectric supply cable for damage or ageing beforewinding cable for storage. Do not repair a damagedcable, replace it with a new one. Use only<strong>Flymo</strong> replacement cable.10. Always wind cable carefully, avoiding kinking.11. Never carry the product by the cable.12. Never pull on the cable to disconnect any of theplugs.13. Use only on AC mains supply voltage shown onthe product rating label.14. Our products are double insulated to EN60335.Under no circumstance should an earth be connectedto any part of the product.Preparation1. While using your product always wear substantialfootwear and long trousers.2. Make sure the lawn is clear of sticks, stones,bones, wire and debris; they could be thrown bythe blade.3. Before using the machine and after any impact,check for signs of wear or damage and repair asnecessary.4. Replace worn or damaged blades together withtheir fixings in sets to preserve balance.Use1. Use the lawnmower only in daylight or good artifici<strong>all</strong>ight.2. Avoid operating your lawnmower in wet grass,where feasible.3. Take care in wet grass, you may lose your footing.4. On slopes, be extra careful of your footing andwear non-slip footwear.5. Mow across the face of slopes, never up anddown.6. Exercise extreme caution when changing directionon slopes. Walk never run.7. Mowing on banks and slopes can be dangerous.Do not mow on banks or steep slopes.8. Do not walk backwards when mowing, you couldtrip.CABLESIMPORTANT• Use only 1.00mm 2 size cable up to 30 metreslength maximum.Maximum rating :1.00mm 2 size cable, 10 amps 250 volts AC.• THE POWER COMPACT IS SUPPLIED WITH ANELECTRIC MAINS CABLE FITTED WITH AFEMALE CONNECTOR1. <strong>Flymo</strong> Mains Cables and Extension Cables areavailable from your local Electrolux OutdoorProducts Approved Service Centre.2. Do not wire an extension cable directly to yourproduct yourself. Please contact your localElectrolux Outdoor Products Approved ServiceCentre for further information on the connectorsand kits available.3. Only use extension cables specific<strong>all</strong>y designed foroutdoor use.CONNECTORSIMPORTANT• <strong>Flymo</strong> connectors are suitable for use with 2 corecable only. Under no circumstances should theseconnectors be used for earthed products.• All <strong>Flymo</strong> connectors and cables are of splashproofconstruction. They are not waterproof and mustnot be left outside permanently nor should they besubmerged or immersed in water. Do not let cablelay or trail through pools of water or splashed withwater from hose pipes.29. Never cut grass by pulling the mower towards you.10. Switch off before pushing the mower over surfacesother than grass.11. Never operate the lawnmower with damagedguards or without guards in place.12. Keep hands and feet away from the cutting meansat <strong>all</strong> times and especi<strong>all</strong>y when switching on themotor.13. Do not tilt lawnmower when the motor is running,except when starting and stopping. In this case,do not tilt more than absolutely necessary and liftonly the part which is away from the operator.Always ensure that both hands are in the operatingposition before returning the appliance to theground.14. Never pick up or carry a mower when it is operatingor still connected to the mains supply.15. Remove the plug from the mains :- before leaving the mower unattended for any period;- before clearing a blockage;- before checking, cleaning or working on the appliance;- if you hit an object. Do not use your lawnmoweruntil you are sure that the entire lawnmower is in asafe operating condition.;- if the lawnmower starts to vibrate abnorm<strong>all</strong>y.Check immediately. Excessive vibration can causeinjury.Maintenance and storage1. Keep <strong>all</strong> nuts, bolts and screws tight to be sure thelawnmower is in safe working condition.2. Check the grassbox/grassbag frequently for wearor deterioration.3. Replace worn or damaged parts for safety.4. Only use the replacement blade, blade bolt, spacerand impeller specified for this product.5. Be careful during adjustment of the lawnmower toprevent entrapment of the fingers between movingblades and fixed parts of the machine.MAINS PLUG REPLACEMENTIMPORTANT• If the plug supplied is cut off it should bedestroyed. There is an electric shock hazard ifa cut off plug is inserted into a 13 amp socket.1. No earth required. <strong>Flymo</strong> products are doubleinsulated to EN60335 and under no circumstancesshould an earth be connected to any part of theproduct.2. Ensure the mains voltage suits your product3. IMPORTANT!The wires in the mains lead are coloured in accordancewith the following code:BLUE - NEUTRALBROWN - LIVEThe wire which is coloured BLUE must be connectedto the Terminal which is marked with the letter'N' or coloured BLACK.The wire which is coloured BROWN must be connectedto the Terminal which is marked with the letter'L' or coloured RED.4. It is important that the outer sheath is clamped correctlyinto the 3-pin plug.5. If in doubt consult your local Service Repairer orqualified electrician before the machine is used.6. A 13 Amp fuse must be fitted to the Mains Plug.7. The normal plug fuse and household fuse only protectthe electrical equipment and are not a safeguardagainst electrocution.
565653ABCgrassboxlidAssembly <strong>Instruction</strong>sAssembly of Lower Handles to Deck1. Insert lower handle into holes in the deck andpush into place (A).2. Release the grassbox catch and lift thegrassbox lid (B).3. Rest the grassbox lid against the lower handleand remove the grassbox.4. Ensure that the holes in the lower handle arecorrectly located behind the holes in thedeck.5. Secure the lower handles to the inside of thedeck with the lower handle fixing pins (C).6. Ensure the fixing pins are securely located.7. Should a problem occur when securing lowerhandle to deck, carefully lever fixing pins outof location and repeat steps 4 to 6 above.8. Replace the grassbox and close the grassboxlid.Assembly of Upper Handles to LowerHandles.Dhandleknobnut (ifapplicable)washerlowerhandlefixingpinsbolt1. Ensure the upper handle is located correctlywith the lock-off button on the switchboxuppermost2. Ensure the upper handle and the lower handleare aligned correctly. (D)3. Insert the nut into the handle knob (if applicable)(D).4. Fit the bolts, washers and handle knobs.(D)5. Fit the cable to the handles with the clipsprovided. Make sure the cable is not trappedbetween the upper and lower handles.Adjusting the Cutting HeightEGHIGHESTHEIGHT OF CUT1 34FHFRONTPOWER COMPACT330345LOWESTHEIGHT OF CUT63 1 24Cutting Height Adjustment - Power Compact 330Rear Height Adjustment1. Select one of the 5 locations and note it asthe other lever will need to be adjusted to thesame position. (E)2. Lift the lever out of location and rotate to thedesired position. (E)3. The roller moves with the wheels when thecutting height is adjusted. (G & H)Front Height Adjustment1. Using the same height adjustment positionrepeat the procedure for the other lever (F).Cutting Height Adjustment - Power Compact 4001. Lift the lever out of location and rotate to thedesired position. (E)2. The roller moves with the wheels when thecutting height is adjusted. (G & H).Heights of cut:- 1 & 2 - low, 3 & 4 - medium, 5 & 6 - high
Removing, Emptying and Refitting the Grassbox4Grassbox Full Indicator• IMPORTANT- The machine must be switchedon for the grassbox full indicator to operate1. When the b<strong>all</strong> reaches the top of the indicatorwindow, it is time to empty the grassbox. (J)2. When the b<strong>all</strong> is NOT visible in the indicatorwindow, grass is being collected. (J)Emptying the Grassbox• Stop the lawnmower, as described in ‘To Stopyour Lawnmower’ and wait until the blade hasstopped rotating, BEFORE lifting the grassbox lid.1. Release grassbox catch and lift grassbox lid (B).See Assembly <strong>Instruction</strong>s.2. Rest grassbox lid against lower handle andremove grassbox (K).3. Empty grassbox.4. Replace grassbox and close grassbox lid.• If the b<strong>all</strong> is visible before the grassbox is full,raise the height of cut until the grassbox is full.JKgrassbox fullgrassbox emptyCut Out Device• IMPORTANT• The Power Compact is fitted with a devicewhich will prevent the lawnmower frombeing started until the grassbox is securelylocated and the grassbox lid is firmly closed.• Do not attempt to use your lawnmower withoutthe grassbox in place or with the lidopen.LGrassbox lid actuatorSwitch actuatorCut outStarting and StoppingTo Start your Lawnmower1. Connect female extension cable connector tothe back of the switchbox. (M)2. Form loop in mains cable and push the loopthrough the slot as illustrated in picture (N)3. To secure, position loop over the hook and pullthe cable back through the slot as illustrated inpicture (P).4. Connect plug to mains and switch on.5. Tilt the handle downwards to slightly raise thefront of the lawnmower and to reduce the risk oflawn damage whilst starting.The switchbox is provided with a lock-off button(Q1) to prevent accidental starting.6. Press and hold the lock-off button (Q) on theswitchbox, then squeeze one of the Start/Stoplevers towards the upper handle (R).7. Continue to squeeze the start/stop lever towardsthe upper handle and release the lock-off button.8. Lower the lawnmower to its proper operatingposition and commence mowing.• NOTE: There are two start/stop levers fitted. Eitherone can be used for starting the lawnmower.• IMPORTANT: Do not use the start/stop leversintermittentlyTo Stop your Lawnmower1. Release the pressure on the Start/Stop lever.MPRNQ1
5STUVSwitchActuatorspacerfanHow to Mow1. Start mowing the edge of the lawn nearest to thepower point so the cable is laid out on the lawn youhave already cut. (S)2. Mow twice a week during the growing season, yourlawn will suffer if more than a third of its length is cutat one time and this may also result in poor collection.Do Not Overload Your Mower: Mowing long thick grass maycause the motor speed to drop, you will hear a change in themotor sound. If the motor speed drops you may overloadyour lawnmower which may cause damage. When mowingin long thick grass a first cut with the cutting height set higherwill help reduce the load. See Adjusting the Cutting Height.Removing and Fitting the Blade and Fanpulleyblade boltbladeCaring for your LawmowerAlways handle the blade with care - sharp edgescould cause injury. USE GLOVES.Removing the Blade and Fan1. To remove the blade bolt, hold the fan firmly and,with a 13.0mm ring spanner, loosen the blade boltby turning it anti-clockwise (T).2. Remove the blade bolt, blade, spacer and fan fromthe pulley.(T)3. Inspect for damage and clean as necessary.Renew your metal blade after 50 hours mowing or 2 yearswhichever is the sooner - regardless of condition. If theblade is cracked or damaged replace it with a new one.Fitting the Blade and Fan1. Ensure the fan is located correctly.(T)2. Fit the spacer to the fan. (T)3. Fit the blade to the spacer. (T)4 . Re-assemble blade bolt through blade, spacer and fan.5. Hold the fan firmly and tighten blade bolt firmly with a13.0mm ring spanner. Do not over tighten.Cleaning (U)• USE GLOVES• IMPORTANT: It is very important that you keep yourlawnmower clean. Grass clippings left in any of theair intakes or under the deck could become a potentialfire hazard.1. Remove grass from under the deck with a piece ofwood or similar.2. Remove the blade, see Figure T, to gain access tothe fan and clean with a soft brush.3. Raise the roller to its highest position, see Adjusting theCutting Height, and clean with a soft brush.4. Remove grass clippings from: <strong>all</strong> air intakes, wheels andheight adjustment levers, grassbox, grassbox lid andboth sides of grassbox full indicator5. Clean around the switch actuator on the grassbox. (V)6. Wipe over the surface of your lawnmower with a dry cloth.• IMPORTANTNever use water for cleaning your lawnmower. Donot clean with chemicals, including petrol, or solvents- some can destroy critical plastic parts.At the End of the Mowing Season1. Replace blade, bolts, nuts or screws, if necessary.2. Clean your lawnmower thoroughly.3. Ask your local Service Centre to clean the air filterthoroughly and carry out any service or repairsrequired.4. Make sure that the electric cable is coiled properly.Storing the lawnmowerThe handles can be folded to take up the minimum of space.• Loosen the handle knobs• Fold the upper handle over the lawnmower.• Ensure the switchbox cable is not trapped.• Store in a dry place where your lawnmower is protectedfrom damage.
Fails to Operate1. Is the correct Starting procedure being followed? See‘To Start your Lawnmower’.2. Is the grassbox securely located and the grassbox lidfirmly closed? See ‘Removing, emptying and refittingthe Grassbox’.3. Is the grassbox plunger damaged or missing? See'Caring for your Lawnmower'.4. Is the Power Turned On?5. Check the fuse in the plug, if blown replace.6. Fuse continues to blow?Immediately disconnect from the mains electricitysupply and consult your local approved ElectroluxOutdoor Products Service Centre.Poor Grass Collection1. Disconnect from the mains electricity supply.2. Check that the grass chute and the underside of thedeck are free from grass.3. Raise to a higher height of cut. See Adjusting theCutting Height4. Clean Fan Blades.5. If poor collection persists.Immediately disconnect from the mains electricitysupply and consult your local approved ElectroluxOutdoor Products Service Centre.Lawnmower becomes heavy to push1. Disconnect from the mains electricity supply.2. In long grass or uneven ground, the height of cutshould be raised to a higher position. See Adjusting theCutting Height1. We strongly recommend that your product is servicedat least every twelve months, more often in a professionalapplication.2. Always use genuine <strong>Flymo</strong> Spare Parts.3. Prepacked spares are available from most ElectroluxOutdoor Products stockists.4. Your product is uniquely identified by a silver and blackproduct rating label5. If you have a problem with your machine contact yourlocal Approved Service Centre ensuring you have fulldetails of your product as described on the product ratinglabel.If any part is found to be defective due to faulty manufacturewithin the guarantee period, Electrolux Outdoor Products,through its Authorised Service Repairers will effect therepair or replacement to the customer free of charge providing:(a) The fault is reported directly to the Authorised Repairer.(b) Proof of purchase is provided.(c) The fault is not caused by misuse, neglect or faultyadjustment by the user.(d) The failure has not occurred through fair wear and tear.(e) The machine has not been serviced or repaired, takenapart or tampered with by any person not authorised byElectrolux Outdoor Products.(f) The machine has not been used for hire.(g) The machine is owned by the original purchaser.(h) The machine has not been used outside of the countryfor which it was specified.(i) The machine has not been used commerci<strong>all</strong>y.* This guarantee is additional to, and in no way diminishesthe customers statutory rights.Fault Finding HintsService RecommendationsGuarantee & Guarantee Policy63. Check that the wheels and rollers can rotate freely.4. If problem persists?Immediately disconnect from the mains electricitysupply and consult your local approved ElectroluxOutdoor Products Service Centre.Excessive Vibration1. Disconnect from the mains electricity supply.2. Check that the blade is fitted correctly?3. If the blade is damaged or worn, replace it with a newone.4. If vibration persists, turn the blade through 180 o by firstloosening the blade bolt, turning the blade and re-tighteningthe blade bolt.5. If vibration persists?Immediately disconnect from the mains electricitysupply and consult your local approved ElectroluxOutdoor Products Service Centre.Grassbox Full Indicator B<strong>all</strong> is visible when the grassboxis emptyGrassbox Full Indicator B<strong>all</strong> Fails to Operate1. Remove grass clippings from both sides of grassboxfull indicator.2. Make sure the discharge chute on the deck and thegrassbox are clean and free from debris.3. If the chute blocks persistently in longer grass - raisethe cutting height.4. If the problem persists.Immediately disconnect from the mains electricitysupply and consult your local approved ElectroluxOutdoor Products Service Centre.6. Should it be necessary for work to be carried out by yourService Centre, it is important to take your completemachine including cable and any extension cables used.A network of specialist dealers can be found in your localYellow Pages.To obtain service on your <strong>Flymo</strong> product simply telephone orvisit your local Service Centre.Should you require service under the terms of our guaranteethe Service Centre will require proof of purchase.All of the centres listed stock genuine <strong>Flymo</strong> Spare Parts.NOTE: Our Service Repairers act on their own behalf andare not empowered to commit or leg<strong>all</strong>y bind ElectroluxOutdoor Products in any manner whatsoever.Failures due to the following are not covered, therefore it isimportant that you read the instructions contained in thisOperator's <strong>Manual</strong> and understand how to operate andmaintain your machine:Failures not covered by guarantee* Replacing worn or damaged blades* Failures as a result of not reporting an initial fault.* Failures as a result of sudden impact.* Failures as a result of not using the product in accordancewith the instructions and recommendations containedin this Operator's <strong>Manual</strong>.* Machines used for hire are not covered by this guarantee.* The following items listed are considered as wearingparts and their life is dependent on regular maintenanceand are, therefore not norm<strong>all</strong>y subject to a validwarranty claim: Blades, Electric Mains cable.* Caution!Electrolux Outdoor Products does not accept liabilityunder the warranty for defects caused in whole or part,directly or indirectly by the fitting of replacement partsor additional parts that are not either manufactured orapproved by Electrolux Outdoor Products, or by themachine having been modified in any way.
Environmental InformationElectrolux Outdoor Products are manufactured under an Environmental Management System (ISO 14001) using, wherepractical, components manufactured in the most environment<strong>all</strong>y responsible manner, according to company procedures,and with the potential for recycling at the end of the products’ life.• Packaging is recyclable and plastic components have been labelled (where practical) for categorised recycling.• Awareness of the environment must be considered when disposing of ‘end-of-life’ product.• If necessary, contact your local authority for disposal information.I, the undersigned M. Bowden of ElectroluxOutdoor Products, Aycliffe Industrial Park,NEWTON AYCLIFFE, Co. Durham. DL56UP. Certify that the product:-Category........ Electric Wheeled RotaryMake.............. Electrolux OutdoorProductsConforms to the specifications of Directive2000/14/EECI, the undersigned M. Bowden of ElectroluxOutdoor Products, Aycliffe Industrial Park,NEWTON AYCLIFFE, Co. Durham. DL56UP Certify that a sample of the aboveproduct has been tested using directive81/1051/EEC as a guide. The maximum A-weighted sound pressure level recorded atoperator position under free field semi anechoicchamber conditions was :-Type of Cutting Device.... Rotary BladeIdentification of Series......See Product Rating LabelConformity Assesment Procedure....ANNEX VINotified Body.................... I.T.S., Cleeve Road, Leatherhead,Surrey. KT22 7SB EnglandOther Directives:-............. 98/37/EEC, 89/336/EEC, 73/23/EEC& applicable standards:-. EN60555-2:1987, EN60555-3:1987,EN55014:1993, EN55014:1995, EN836:1997, IEC335-1:1991, IEC335-2-77:1996EC Declaration of ConformityI, the undersigned M. Bowden of ElectroluxOutdoor Products, Aycliffe Industrial Park,NEWTON AYCLIFFE, Co. Durham. DL56UP Certify that a sample of the aboveproduct has been tested using ISO 5349 asa guide. The maximum weighted root meansquare value of vibration recorded at operator’shand position was:-Type............................................................................ AWidth of Cut................................................................ BSpeed of Rotation of Cutting Device.......................... CGuaranteed sound power level................................... DMeasured Sound Power Level.................................... ELevel............................................................................ FValue........................................................................... GWeight......................................................................... HA PC 330 A PC 400B33 cmB40 cmC4,400 RPMC4,200 RPMD96 dB (A)D95 dB (A)E95 dB (A)E94 dB (A)F81.5 dB(A)F82 dB(A)G 2.23 m/s 2G 2.59 m/s 2H11.5 kgH14 kgNewton Aycliffe, 6/12/2002M. Bowden,Research & Development DirectorElectrolux Outdoor ProductsAycliffe Industrial ParkNEWTON AYCLIFFECo.Durham DL5 6UPENGLANDTelephone - (00) 44 1325 300303 Fax - (00) 44 1325 310339Our policy of continuous improvement means that the specification of products may be altered from time to time without priornotice. Electrolux Outdoor Products manufacture products for a number of well known brands under various registeredpatents, designs and trademarks in several countries.© Electrolux Outdoor Products Ltd. Registered Office, Electrolux Works, Oakley Road, Luton LU4 9QQRegistered number 974979 EnglandThe Electrolux Group. The world’s No.1 choice.The Electrolux Group is the world’s largest producer of powered appliances for kitchen, cleaning and outdoor use. More than55 million Electrolux Group products (such as refrigerators, cookers, washing machines, vacuum cleaners, chain saws andlawn mowers) are sold each year to a value of approx. USD 14 billion in more than 150 countries around the world.5119102-03