Zip-Dee Awning Installation - Airstream
Zip-Dee Awning Installation - Airstream
Zip-Dee Awning Installation - Airstream

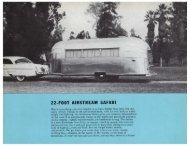
You also want an ePaper? Increase the reach of your titles
YUMPU automatically turns print PDFs into web optimized ePapers that Google loves.
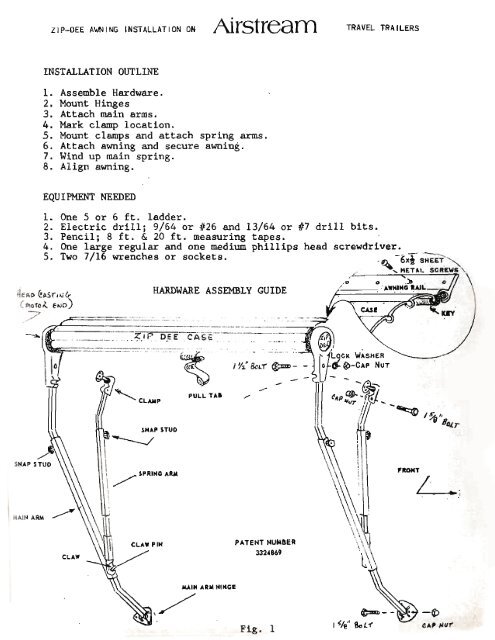
ZIP-DEE AWNING INSTALLATION ON <strong>Airstream</strong> TRAVEL TRAILERSINSTALLATION OUTLINE1. As semble Hardware.2. Mount Hinges3. Attach main arms.4. Mark clamp location.S. Mount clamps and attach spring arms.6. Attach awning and secure awning.7. Wind up main spring.8. Align awning.EQUIPMENT NEEDED1. One 5 or 6 ft. ladder.2. Electric drill; 9/64 or U26 and 13/64 or #7 drill bits.3. Pencil; 8 ft. & 20 ft. measuring tapes.4. One large regular and one medium phillips head5. Two 7/16 wrenches or sockets.-:~~~_~O'-'-C::_"'::"':':':"UEAO C!p,sru.l(,.(~\:fO.t fNl»HARDWARE_ASSEMBLY GUIDE-- ..._-_ .._-----screwdriver.,-~..'-~-6.i SHEET "". .. ..WMINO IAlL_~:"-__-"'c.:H;eE,,T,,-.L=-.:S",C","=-EW 7i "- -II!I./SNAP STUDCLA.WPATENT NUMBER332416'\~ \\ ..'\\\••~IH "'M HINGEFig. 1
Mount clamps as shownwith 3-110 x 3/4 screwsusing 9/64 or # 26 drillIIC~AmP-iJ I~G"·IfffIII,71~"II\\ ,Fig.271t'oo_J--c--_ i.-0\-,
STEP 6. ATTACH & LOCK AWNING IN RAILA.B.Attach awning assembly tomain arms as shown inFig.4-1.Remove all packing; straps,except center, from awningassembly and remove keyextrusions from case.C. Lift awning against coach,with fabric toward body.D. Attach case to awning railby inserting the Key extrusionsfrom front & rear asshown in Fig.4-Z.E. Center the case between theribs and lock key and casein place by crimping ends ofawning rail & Key as shownin Fig. 4-3.Fig.4-Z/'~(1I'"KEEP ~E"'E( -(,E I.AR.CU-.lQ ROl.LER t\l'/•Fig. 4-1INSTRUCTIONS FOR WINOING TORSION SPRINGTHE SINGLE TORSION SPRING IS WOUND BY TURNING THE HEAD CASTING CLOCKWlSE (FACING FORWARO),USING THE STEEL SUPPORT ARM BAR AS A LEVER (SEE Flo.5). INSERT THE BAR INTO THE HEAD ANDSECURE IT IN PLACE WITH 1,." BOLT, LOCKWASHER A'NO CAP NUT (SEE FIG.6). BE SURE THAT THE BARIS ALL THE WAY INTO THE HEAD SO THAT THE BOLT HOLES ALIGN.WIND THE SPRING ACCORDING TO THE AWNING SIZE, USING THE GUIDE BELOW. Aoo OR DEDUCT 2 TURNSPER FT. FOR SIZES NOT SHOWN.17 FT. AWNING19 FT. AWNING21 FT. AWNING28 TURNS31 TURNS34 TURNSAFTER WINDING, SLIDE THE MAIN ARM TUBE ONTO THE BAR WITHTHE EHO OF THE BAR FACING AWAY FROM THE COACH. THENSWING THE ASSEMBLED ARM TO THE COACH AND BOLT ONTO HINGE.,-,s",r ~Ol£S'''' 'OAR. 1'0fAte0tTf' UJA It1)FIG.5FIG. 6
STEP 8. ALIGN AWNINGTe~l the tension and adjust accordingly. Because of a naturalvariation in spring tempers, you may have to add or take off a few turns.The tension is correct when the awning does not start to roll up byitself when the spring arms are off, but pulls itself up when givena swift rolling push upward. About 12 - 24 inches of fabric may haveto wind around the roller before the spring takes over.wi/." K.'.'>I~ ~l~ ~EEDej)" "." •Fig. 8Close the awning following instructions in the Owners Manual. Be sureto release and extend the spring arms in order to place the claws onthe claw pins (as shown in Fig. 1.). This must be done every time theawning is rolled up. The scissor-like action guides the main armsupward to line up with the clamps.Also, be' sure to use the pull tab to control the speed and directionof the roller. Spiral the tab as shown'above to prevent cloth buildup. Release the tab when the roller is about 14 inches from thetrailer, allowing the awning to snap closed.When closed, there should be an even amount of exposed roller ateither end of the awning and the head should be in line with theclamps. If not, unroll and close the awning again, giving the rollera lateral push in the direction needed.Please read the Owners Manual carefully. It contains importantinformation regarding the care and treatment of <strong>Zip</strong>-<strong>Dee</strong>. For safetysake, always close the awning when the vehicle is left unattendedor when the weather threatens.<strong>Airstream</strong> -Page 4