Steam Sterilizer âFIELD-KOCHâ - Code n. 39160 - International Pbi
Steam Sterilizer âFIELD-KOCHâ - Code n. 39160 - International Pbi
Steam Sterilizer âFIELD-KOCHâ - Code n. 39160 - International Pbi

Create successful ePaper yourself
Turn your PDF publications into a flip-book with our unique Google optimized e-Paper software.
<strong>Steam</strong> <strong>Sterilizer</strong> “FIELD-KOCH” -<strong>Code</strong> n. <strong>39160</strong>INSTRUCTIONS MANUAL<strong>International</strong> PBI S.p.A. Via Novara, 89 – 20153 Milano – Italy – Tel + 39 02 48779-1 – Fax + 39 02 40090010E-mail: info@internationalpbi.it – www.internationalpbi.it<strong>International</strong> pbi S.p.A. Field-Koch Instructions manual Rev. 3 1
INSTRUCTIONS MANUALREAD CAREFULLY THIS HANDBOOKSAFETY INSTRUCTIONS• Use the device just for the indicated purposes.• The Device must be correctly installed according to manual instructions,before starting any operation.• Never disconnect the device pulling electrical cable from the socket; .• Replace immediately electrical cable when damaged ; never use a damaged or weared electrical cable.• On removing the item connected to the electrical system pay attention to the electrical connection cable• Always disconnect from electrical system on:A. Reparing or maintenance; these operations must be carried out by qualified staff;B. Keep the unit clean;C. Use original spare parts and accessories for any replacement;• Do not use this device in the presence of gaseous explosive.INSTALLATION GENERAL CAUTION.When the electrical system socket is not compatible with device socket, replace itpaying attention to codified cable colours.CAUTIONBe aware that the voltage and frequence of the electrical system are available withdevice electrical income.CAUTIONThe device must be connected to a ground wire. For any question please contact anelectrician.Before starting-up the device be sure that ventilation grids are totaly free to operate andnot covered by any barriers.CAUTION<strong>International</strong> pbi S.p.A. Field-Koch Instructions manual Rev. 3 2
SUMMARY1. Description of unit …………………………………………….……..... pg. 42. Before using for the first time ……………………………………….. pg. 53. Preliminary operations ….……………..……………………….…….. pg. 64. Operation ……………………………….…………………….……….. pg. 65. Cleaning after use ……………..……..……………………….……….. pg. 76. General maintenance ……………….…..………...………………….. pg. 87. Spare parts …………………………………………………………….. pg. 8<strong>International</strong> pbi S.p.A. Field-Koch Instructions manual Rev. 3 3
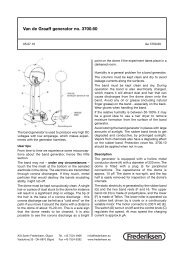
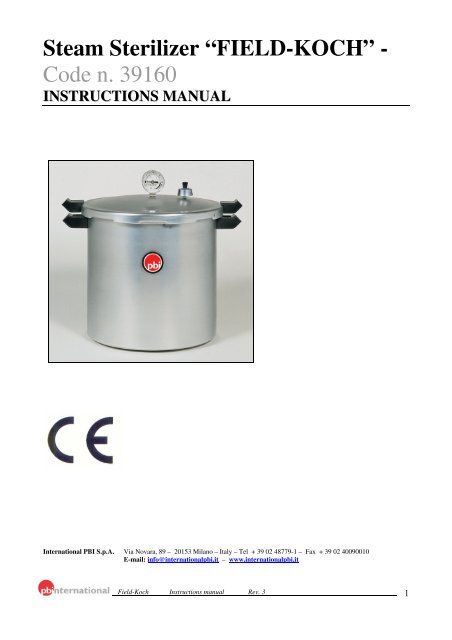
1. DESCRIPTION OF UNIT (FIG. 1)The steam sterilizer "FIELD KOCK" consists of:Pos.1 PRESSURE DIAL GAUGEThe pressure gauge registers pressure in both pounds (outer scale) and metric measure (inner scale). The pointer movesaround the dial indicating precisely the pressure within the unit.Pos.2 PRESSURE GAUGE ADAPTORThe pressure gauge adaptor connects the pressure gauge to the vessel cover.Pos.3 PRESSURE REGULATORThe pressure regulator is a solid one-piece unit. Accurate pressure readings can be controlled and maintained byadjusting heat settings.Pos.4 AIR VENT PIPEThe pressure regulator fits over the vent pipe and allows excess pressure to be released.Pos.5 AIR VENT COVER LOCKThe air vent/cover lock automatically "vents" or exhausts air from the vessel and acts as a visual indication of pressurein the unit.Pos.6 LOCKING BRACKETThe locking bracket on the inside of the vessel body engages with the air vent/cover lock to prevent the cover frombeing opened when there is pressure in the unit.Pos.7 SEALING RINGThe sealing ring fits into the vessel cover and forms a pressure-tight seal between cover and body during sterilisation.Pos.8 OVERPRESSURE PLUGThe overpressure plug is located in the vessel cover. It will automatically pop out and release steam in case the ventpipe becomes clogged and pressure cannot be released normally.FIG. 1<strong>International</strong> pbi S.p.A. Field-Koch Instructions manual Rev. 3 4
2. BEFORE USING FOR THE FIRST TIME (FIG. 2)FIG. 2coverpincupCoverSmallgasketcoverpinSmall gasketcupBody lugApply cookingoil hereApplycooking oilhereStop tabSealing ring insealing ringgroove2.1 Remove the air vent/cover lock from the vessel cover.The cup portion of the air vent/cover lock, on the inside of the cover, unscrews from the pin.2.2 Remove the sealing ring by simply pulling from the sealing ring groove.2.3 Wash the cover and body with hot, soapy water. Do not submerge the cover in water or let the gauge come incontact with any liquid. The inside mechanism of the gauge may be damaged if it is submerged or if water is allowed torun over it.Scrub the sealing ring groove to remove the manufacturing oils.Scour the inside of the canner body and cover with a nonalkali, aluminium cleaner or a steel wool pad. Rinse with warmwater and dry.2.4 Reinsert the air vent/cover lock making sure the small gasket is in place.2.5 Replace the sealing ring in the sealing ring groove.The sealing ring is prelubrificated, therefore, it is not necessary to apply oil to it. Frequent oiling may cause swellingof the sealing ring.2.6 If the cover is difficult to open or close use a pastry brush, a piece of cloth or your fingertips to apply a light coatingof oil to the underside of the lugs on the vessel body. The cover should open and close easily.Be sure the vent pipe is open before each use by holding the cover up to the light and looking through the vent pipe. Ifthe vent pipe is bloked, excess pressure cannot be released through it. Pressure will continue to build until the overpressure plug pops out of its cover opening.Pressure is indicated on the dial gauge which registers the pressure inside the unit at all times. The pointer will moveacross the dial as pressure is developed or reduced within the vessel. The one-piece regulator is designed to rock only at15 pounds pressure.Do not strike the rim of the vessel body with any utensil as this will cause nicks which may damage the rim and allowsteam to escape.Pouring water into a dry overheated vessel may crack the metal.The vessel has been designed so the cover will go on in only one position and rotate only in the directions indicated forclosing and opening. Press down on the coverhandles to compress the sealing ring and make the cover easier to close. The cover has the words CLOSE / OPENembossed on the top surface near a cover handle. Align the "V" on the cover with the mark on the body handle forproper cover and body alignment. Turn the cover in the direction indicated to close until the cover handles are centereddirectly above body handles.Do not rotate cover beyond this point.When the cover is rotated to the closed position, the air vent/cover lock passes under the locking bracket. When thehandles are aligned, one over the other, the pressure regulator is placed on the vent pipe, and heat is applied, pressurewill begin to build within the vessel.At this point, the air vent/cover lock lifts and locks the unit. The cover will remain locked as long as there is pressure inthe vessel. When pressure is completely reduced, the air vent/cover lock drops allowing the unit to be opened.<strong>International</strong> pbi S.p.A. Field-Koch Instructions manual Rev. 3 5
3. PRELIMINARY OPERATIONS3.1 This steam sterilizer must only be used for a maximum pressure of 1,08 bar (121 °C).3.2 The steam sterilizer should be positioned in an area where there is adequate means for removal of steam.4. OPERATION (FIG. 3 e 4)1. Place boiling water and rack in the vessel. To prevent waterstains add 2 tablespoons of white vinegar to the water.Always use rack.FIG. 35. Look through the vent pipe to be certain it is open beforeplacing cover on vessel. To clean the vent pipe, draw a pipecleaner or small brush through the opening.6. Place cover on vessel, aligning the "V" on the cover with themark on the body handle and lock securely by turning in thedirection indicated to close (clockwise). Cover handlesmust be centred over body handles. Do not force beyondthis position.7. Exhaust air from the vessel by adjusting heat to a relativelyhigh setting to obtain a free flow of steam from the vent pipe.Reduce heat to maintain a moderate steam flow. Allowsteam to flow for 7 to 10 minutes.8. Place pressure regulator on vent pipe. Set burner at arelatively high heat setting, on most range burners, and beatvessel until pressure dial gauge registers desired pressure.9. Processing time begins when pressure gauge registers thecorrect pressure. Adjust heat to maintain correct poundspressure on the pressure gauge to prevent excess of steamfrom escaping.10. At end of processing time, turn burner to "OFF" or removevessel from heat source. Let pressure drop of its ownaccord, do not quick-cool. Pressure is completely reducedwhen the air vent/ cover lock and overpressure plug havedropped and no steam escapes when the pressure regulator istilted. Do not use the pressure dial gauge for this purpose.Attempting to speed the cooling of the canner by laying wetcloths on the cover, placing the vessel in water or setting thevessel in a draft or on a cold surface is not recommended.11. When pressure has been completely reduced, remove pressure regulator from vent pipe and let vessel cool for 1 0minutes. Do not remove the pressure regulator until pressure is completely reduced and the air vent/cover lockhas dropped. Always remove pressure regulator before opening the cover.<strong>International</strong> pbi S.p.A. Field-Koch Instructions manual Rev. 3 6
12. To remove cover, turn counterclockwise until cover hits stop. Cover handleswill be beyond the body handles. If cover seems to stick or is hard to turn,do not force it open. Sticking may indicate that there is still pressure insidethe vessel. If in doubt about pressure being completely reduced, let thevessel stand until cool before removing the cover.FIG. 413. Lift vessel cover toward you to keep steam away from you when opening.5. CLEANING AFTER USE5.1 The outside surface may be kept bright and shiny by cleaning with a goodsilver polish or simply by washing with soap and water. Iron and various mineralsin water may darken the inside but this discoloration will in no way affectsterilisation.These stains are harmless and may be removed by using a solution of water andcream of tartar. For each quart of water, use one table-spoon cream of tartar. Pourenough solution into the vessel to cover the discoloration (do not fill over 2/3 full),then close cover securely.Place regulator on vent pipe and heat until the desired pressure is reached (max1,08). Switch off and allow the unit to stand two to three hours. Remove regulator,open and empty contents. Scour thoroughly with a soap impregnated steel woolcleaning pad; wash, rinse and dry.5.2 Each time the vessel is washed, remove the sealing ring and wash in warm,soapy water, rinse, dry and replace in cover.5.3 The air vent/cover lock may be removed for occasional cleaning or forreplacing the small gasket. Wash all parts in warm, soapy water. Use a soft clothor small nylon brush to clean the cover hole. The small gasket must be in placewhen reassembling the air vent/cover lock.5.4 The overpressure plug can be removed for cleaning by pulling it out of itsopening from the bottom part of the cover. After cleaning, reinsert the plug bypushing the round side of the plug into the opening from the bottom part of thecover. When the overpressure plug is properly installed the word (TOP) will bevisible when viewing the outside of the cover. The dented portion of theoverpressure plug is visible when the bottom part of the cover is viewed.If the overpressure plug is ever forced out of its cover opening due to excesspressure while sterilising, it is important to have the vessel properly inspectedbefore further use. Do not attempt to replace the overpressure plug and ask forservicing.5.5 Be sure the vent pipe is open before each use. Clean the vent pipe with a smallbrush or pipe cleaner.5.6 When your unit is not in use, invert the cover on the body and store in a dryplace. Storing the unit with the cover locked on may deform the sealing ring.<strong>International</strong> pbi S.p.A. Field-Koch Instructions manual Rev. 3 7
6. GENERAL MAINTENANCE6.1 CAUTION: To ensure safe operation and satisfactory performance, replace the overpressure plug every time youreplace the sealing ring or sooner if it becomes hard or deformed. In any case replace the overpressure plug every twoyears. Failure to follow these instruction could result in bodily injury or property damage.6.2 If the body or cover handles become loose, tighten with a screwdriver.6.3 If leakage of moisture or steam develops while using your unit, check the following possible causes:The formation of a small amount of moisture under the pressure regulator is normal when heating first begins.This condensation is a result of the temperature of the pressure regulator being lower than the rest of the vessel. Ifexcess condensation continues, the vent pipe may be loose and should be tightened with an adjustable wrench.Leakage between the cover and body is usually caused by shrinkage of the sealing ring after prolonged use. Replace thesealing ring, overpressure plug and pressure gauge adaptor.A slight amount of leakage around the air vent/cover lock is normal when sterilising first begins. If leakage continues,the cover handles may not be fully aligned with thebody handles and, therefore, the cover lock cannot engage. Clean the air vent/cover lock occasionally to assure that itoperates correctly.A small amount of steam or moisture may be visible around the overpressure plug as sterilisation begins.This will stop when the overpressure plug seals. If leakage continues, clean or replace the overpressure plug.6.4 If the Pressure vessel becomes difficult to open or close and the sealing ring has expanded, replace the sealing ring.6.5 IMPORTANT: In time, the sealing ring may shrink and the air vent/cover lock, small gasket, overpressure plug andpressure gauge adaptor may become hard and deformed.When this happens, replace the sealing ring, small gasket, overpressure plug and pressure gauge adaptor. The sealingring, overpressure plug and pressure gauge adaptor should be replaced at least every two years.Before inserting a new sealing ring, clean the sealing ring groove with a brush. To insure safe operation of your unit, itis recommended that the pressure gauge adaptor and overpressure plug be replaced whenever the sealing ring isreplaced.7. SPARE PARTS8169 PRESSURE DIAL GAUGE8174 SEALING RING FOR COVER8175 OVERPRESSURE PLUG<strong>International</strong> pbi S.p.A. Field-Koch Instructions manual Rev. 3 8
Company:Address:To the attention of: Technical department <strong>International</strong> pbi S.p.A.Via Novara, 89 - 20153 - Milano - Tel + 39 02/48.779.1-Fax +39 02/400.900.10AUTHORISATION RETURN NUMBER TO BE ASKED TO THE EXPORT DPTCity: Zip <strong>Code</strong> StatePhone Fax EmailName to contact:Lab/Division: returnEquipment:Model request of technical serviceSerial Number:for calibration repair other (specify)NOTE OF MALFUNCTIONING ELECTRICAL PART ELECTRONICAL PART MECHANICAL PART HYDRAULICS PARTNOTES:ATTENTION: THE INSTRUMENT MUST BE SENT TOINT.PBI C/O STATIM VIA SAN GIUSTO 85 20153 MILANO ITALYSIGNATURE NAME DATEMod. PQ09.9<strong>International</strong> pbi S.p.A. Field-Koch Instructions manual Rev. 3 9
<strong>International</strong> pbi S.p.A. Field-Koch Instructions manual Rev. 3 10
WARRANTYWARRANTY CONDITIONS<strong>International</strong> pbi warrants this product to be free of defects in materials and functionalityThe repairs will be effected by <strong>International</strong> pbi or by authorized dealers as follows:- Faulty components free replacementThe labour is always at customer's expense- The equipment will be sent at buyer's expenses and risk and the return will be ex-works- This warranty does not apply to damages resulting from tamperings,abnormal use and installation and does notcover transport damages- <strong>International</strong> pbi shall not be liable for any commercial damages, whether incidental, consequential or otherwisederived from the use of instrumentsATTENTIONTO OUR NEW CUSTOMERAs a user of our equipment you are covered for a 12 months guarantee for all spare parts as a result of mechanicalfailure of the machine during normal use. In order to provide you with first class service, it is essential for us to knowall your references and which equipment you have. We kindly ask you therefore to fill in the attached guarantee andreturn the card to us by first class mail.A NOTRE NOUVEAU CLIENTEn tant que utilisateur de notre appareil vous êtes couvert par une garantie de 12 mois pour toutes pièces de rechargeeventuelles resultant de defauts mecaniques en utilisation normale. Dans le but de vous fournir un service impeccable ilest essenciel que nous sachions qui vous êtes, ou vous êtes situes et quel equipment vous possedez. Voudriez vousremplir cette carte de garantie et nous la retourner.Le service PBI peut vous proposer un service d’entretien vous assurant un fonctionnement parfait rapide en cas depanne.Votre distributeur local peut vous fornir tous renseignements au sujet de ce contrat d’entretien et des prix appliqués.FUR UNSERE NEUEN KUNDENFür Benutzer unserer Apparate sind alle ersatzteilen die sich aus mechanischen Fehlern in normalen Gerbrauchergeben., für zen Monate garantiert.Damit wir Ihnen einem erstklassigen Service dienen konnen, ist es unbedingnotwending, dass wir wissen wo Sie sindund welches Gerat Sie haben. Darum bitten wir Sie, die beiliegende Garantiekarte auszufullen, und Sie uns per Postzuzuschicken.PBI bietet Ihnen auch einen vorbeugenden Kundendienst, um dafur zu sorgen, dass Ihre Apparate zu allen Zeiten inOrdun sind, dass Sie regelmassig kontrolliert werden, einen Express –Krisen-Service, wenn ein Apparat ausfallt.Ihr Verkaufs Agent hat alle Details des Service Kontraktes und kann Ihnen Preise offerieren.A TODOS NUESTROS NUEVOS CLIENTESEl equipo adquirido por Vd. Está garantizado por doce meses contra cualquier defecto de fabricación que pudieraproducir avería durante el uso normal. Con el fin de poderle ofrecer un servicio eficiente, es esencial que sepamos sunombre o razón social, dirección y equipo adquirido. Para ello, rogamos que por favor rellene el certificado de garantíaadjunto y nos lo envíe por correro certificado.PBI también puede ofrecer un servicio postventa de mantenimiento preventivo para mantener el perfecto estado defuncionamento de su equipo, asì como ofrecerle una atencion normal y un rapido servicio en el caso de que su equipofalle.<strong>International</strong> pbi S.p.A. Field-Koch Instructions manual Rev. 3 11
DECLARATION OF CONFORMITY<strong>International</strong> pbi S.p.A.Via Novara, 89 - 20153 Milano - ItalyHEREBY DECLARESunder its sole responsibility that the following product(s)“FIELD-KOCK” viewer code <strong>39160</strong>♦ conform(s) with the technical requirements of the following standard(s)CEI 66-5 (EN 61010-1)EC Directive 2002/95/EC of the European Parliament: “Restriction of the use ofcertain hazardous substances” (RoHS) for electric and electronic devicesThe EC RoHS Directive has been released for the restriction of the use of certain hazardous substances in electric andelectronic devices and basically says that with July 1 st 2006 new productions of electric and electronic devices may notcontain lead, mercury, cadmium, hexavalent chromium, polypromined biphenyl (PBB), respectively polybromineddiphenylether (PBDE).As a consequence of this EC Directive we have to introduce unleaded technology in our production and we have tomake adaptations concerning the use of lead, mercury, cadmium, hexavalent chromium, PBB, PBDE according to thedefined permissible values. The adaptation of our products to the RoHS conformity is confirmed.EC Directive 2002/96/EC of the European Parliament: “Disposal of old products”Our products are designed and manufactured with high quality materials and components which can be recycled andreused according to the EC Directive 2002/96/EC. The user should inform himself about the separate collection systemfor electrical and electronic products. He should act according to the local rules and do not dispose of the old productswith the normal household waste. The correct disposal of old products will help to prevent potential negativeconsequences for the environment and human health.♦ per the provisions of 97/23/CEEMilan 2007PresidentRoberto Ligugnana<strong>International</strong> pbi S.p.A. Field-Koch Instructions manual Rev. 3 12