Dye DM10 Manual.pdf - PaintballTech.org
Dye DM10 Manual.pdf - PaintballTech.org
Dye DM10 Manual.pdf - PaintballTech.org
- No tags were found...

You also want an ePaper? Increase the reach of your titles
YUMPU automatically turns print PDFs into web optimized ePapers that Google loves.
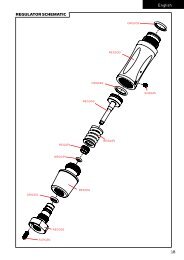
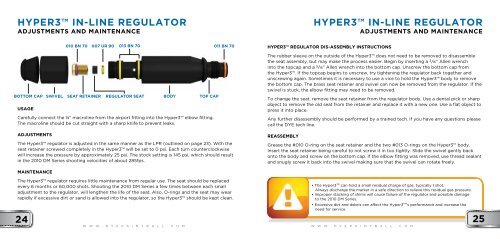
Hyper3 IN-LINE REGULATORAdjustments and MaintenanceHyper3 IN-LINE REGULATORAdjustments and MaintenanceBOTTOM CAPSwivel010 BN 70 007 UR 90 013 BN 70011 BN 70SEAT retainerRegulator seatBODYTop CapusageCarefully connect the ¼” macroline from the airport fitting into the Hyper3 elbow fitting.The macroline should be cut straight with a sharp knife to prevent leaks.ADJUSTMENTSThe Hyper3 regulator is adjusted in the same manner as the LPR (outlined on page 23). With theseat retainer screwed completely in the Hyper3 will be set to 0 psi. Each turn counterclockwisewill increase the pressure by approximately 25 psi. The stock setting is 145 psi, which should resultin the 2010 DM Series shooting velocities of about 285fps.Hyper3 REGULATOR DIS-ASSEMBLY INSTRUCTIONSThe rubber sleeve on the outside of the Hyper3 does not need to be removed to disassemblethe seat assembly, but may make the process easier. Begin by inserting a 3 ⁄16” Allen wrenchinto the topcap and a 5 ⁄16” Allen wrench into the bottom cap. Unscrew the bottom cap fromthe Hyper3. If the topcap begins to unscrew, try tightening the regulator back together andunscrewing again. Sometimes it is necessary to use a vice to hold the Hyper3 body to removethe bottom cap. The brass seat retainer and swivel can now be removed from the regulator. If theswivel is stuck, the elbow fitting may need to be removed.To change the seat, remove the seat retainer from the regulator body. Use a dental pick or sharpobject to remove the old seat from the retainer and replace it with a new one. Use a flat object topress it into place.Any further disassembly should be performed by a trained tech. If you have any questions pleasecall the DYE tech line.ReassemblyGrease the #010 O-ring on the seat retainer and the two #013 O-rings on the Hyper3 body.Insert the seat retainer being careful to not screw it in too tightly. Slide the swivel gently backonto the body and screw on the bottom cap. If the elbow fitting was removed, use thread sealantand snugly screw it back into the swivel making sure that the swivel can rotate freely.MaintenanceThe Hyper3 regulator requires little maintenance from regular use. The seat should be replacedevery 6 months or 60,000 shots. Shooting the 2010 DM Series a few times between each smalladjustment to the regulator, will lengthen the life of the seat. Also, O-rings and the seat may wearrapidly if excessive dirt or sand is allowed into the regulator, so the Hyper3 should be kept clean.24w w w . d y e p a i n t b a l l . c o m• The Hyper3 can hold a small residual charge of gas, typically 1 shot.Always discharge the marker in a safe direction to relieve this residual gas pressure.• Improper stacking of shims will cause failure of the regulator and possible damageto the 2010 DM Series.• Excessive dirt and debris can affect the Hyper3’s performance and increase theneed for service.w w w . d y e p a i n t b a l l . c o m25