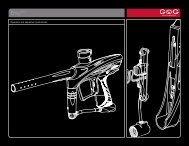
Air Gun Designs RT ULE Tac One Manual
Air Gun Designs RT ULE Tac One Manual
Air Gun Designs RT ULE Tac One Manual
- No tags were found...

Create successful ePaper yourself
Turn your PDF publications into a flip-book with our unique Google optimized e-Paper software.
<strong>Air</strong>gun <strong>Designs</strong> Inc.
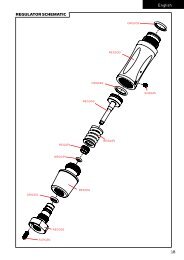
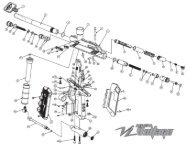
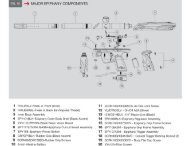
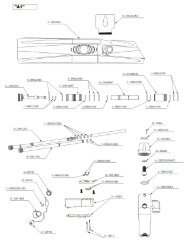
Table of ContentsSAFETY..................................................................1-2COMPRESSED AIR ONLY........................................ 2FAST STA<strong>RT</strong> ............................................................. 3LvL 10 ANTI-CHOP SYSTEM.................................... 4LOADER ....................................................................4PERFORMANCE ....................................................... 4LUBRICATION........................................................... 4VELOCITY ADJUSTMENT ........................................ 5BLOW-OFF VALVE .................................................. 5CLEANING ................................................................ 5CHRONOGRAPH PROCEDURE ..........................6-7TECHNICAL DATA .................................................... 8X-VALVE PA<strong>RT</strong>S DIAGRAM ................................... 10ACCESSORIES ....................................................... 11TECHNICAL SUPPO<strong>RT</strong> .......................................... 11
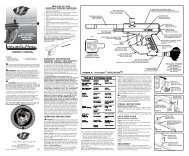
SAFETY WARNING MUST READTHIS PAINTBALL MARKER IS NOT A TOY! This paintball markershould be treated as a dangerous instrument and should always betreated with respect. Never point a paintball marker at anyone notproperly attired. This paintball marker can cause serious bodily injuryincluding, but not limited to, blindness or even death. Please read allsafety instructions and directions in this manual before using thispaintball marker. Always wear approved safety goggles or anapproved mask whenever you handle this paintball marker! Donot point or shoot this paintball marker at animals. Do not point orshoot this paintball marker at any person unless you and your targetare engaged in paintball activities and are wearing proper safety gearincluding approved paintball goggles, mask, and pads. Never shootanyone at close range! Never load this paintball marker with anythingexcept approved paintballs. Never put anything down the barrelexcept paintballs, barrel squeegees or barrel plugs. Do not attemptto repair this paintball marker by yourself. Follow all maintenanceinstructions carefully. If you are unsure about any aspect of themaintenance procedures contact your local dealer or <strong>Air</strong>gun <strong>Designs</strong>,Inc. at (847) 520-7225.This paintball marker is always armed and cocked when an air supplyis installed. Always engage the safety (located behind the trigger onthe grip) and use an approved barrel plug when an air supply isattached or installed. Disengage the safety and remove the barrelplug only when on a playing field, the game has started and allplayers are wearing proper safety gear. When the red ring of thesafety pin is showing, the safety is off and the paintball marker willfire.Always chronograph this paintball marker before using it. Nevershoot this paintball marker when the chronograph readings exceed300 fps! There is a blow-off valve incorporated into the valvemechanism that will release air pressure if pressure exceeds apredetermined amount. This blow-off valve is factory set and is notuser adjustable.-1-
Remember to wear proper approved goggles or masks whenchronographing your paintball marker. Prior to disassemblyremember to wear approved safety goggles or masks to preventaccidental injury. Never point the paintball marker at anyone oranything that could be injured or damaged if shot. Always removethe air source from the paintball marker and dry fire in a safe directionbefore disassembling. The velocity adjusting nut is on the back of theregulator body. Do not disassemble the velocity adjusting nut whilethe paintball marker is under pressure. If air is leaking out the back ofthe velocity regulator nut, the paintball marker is over-pressurizedand will shoot at a higher velocity than intended. Reduce theregulated pressure by backing off the velocity regulator nut and rechronographthe paintball marker. If problems persist, call yourdealer or <strong>Air</strong>gun <strong>Designs</strong>, Inc.Do not put your fingers into the breech area, down the ball feed tubeor into the barrel while firing the paintball marker; serious injury couldresult.The pressure regulator allows gas under pressure to push the triggerforward after shooting. An excessively hard trigger pull indicates overpressure in the system. Do NOT fire a paintball marker that hasexcessive trigger pull; call your local dealer or <strong>Air</strong>gun <strong>Designs</strong>immediately.COMPRESSED AIR ONLYYour <strong>RT</strong>-<strong>ULE</strong> is designed to run on compressed air only! It will notfunction at all on CO2 no matter what hoses, expansion chambers,etc., you use. We recommend that you purchase a high quality 3000psi compressed air tank and regulator for your <strong>RT</strong>-<strong>ULE</strong>. Themaximum input pressure to the paintball marker should be above 700psi and less than 1000 psi for best performance. Pressures over1000 psi will damage the regulator and reduce performance.-2-
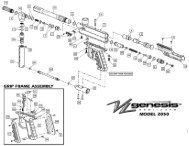
FAST STA<strong>RT</strong>This is a quick overview of how to use the <strong>RT</strong>-<strong>ULE</strong> for theexperienced player. Introducing air pressure to the paintball markerwill charge and cock the system. The system is a blow forward fromopen bolt, similar in concept to a cork in a champagne bottle.The velocity adjustment nut is on the back of the valve body andrequires only one turn to adjust from 200 to 300 fps. <strong>Air</strong> venting outof the back of the regulator indicates that the internal blow-off valve isresponding to over pressure in the system, and the velocity should beturned down. Field stripping is accomplished by unscrewing theknurled bolt underneath the frame while the bottle is off. THETRIGGER MUST BE PULLED TO SLIDE THE VALVE BODY OUT.There is a locking pin for alignment in the regulator body which allowsthe valve body to only come out part way before you must twist thevalve body clockwise to continue sliding out the back. Reinstall in thesame manner. Once removed, the entire valve and bolt assembly isavailable for cleaning.Maintenance on most active o-rings can be accomplished withouttools; however, a small dental type pick may be required. Whenadjusting the velocity regulator, dry fire the paintball marker severaltimes before chronographing to allow the regulator piston and springto seat properly. Always start below your intended velocity and workyour way up. Always use fresh, high-quality paintballs.The bolt may stick forward causing the trigger to lock due to whendegassing the paintball marker, caused by turning off the tank andshooting those last few blooping shots. When the bolt sticks forwardthe trigger will not come forward. Remove the barrel and push thebolt back until the trigger clicks forward.The paintball marker will give very little indication that it is running outof gas; by the time you see the velocity drop you are 20-30 shotsaway from total shutdown. Additionally, if you use a compressed airtank with an on/off valve, make sure you open it all the way.-3-
LEVEL 10 ANTI-CHOP SYSTEMYour <strong>RT</strong>-<strong>ULE</strong> utilizes a mechanical state of the art anti-chop systemdeveloped after extensive research by the AGD Engineering team.The details are beyond the scope of this manual but have beenincluded on a Micro-CD in your packaging. Please refer to the LvL 10Micro-CD for comprehensive information.LOADEROften paintballs will not feed because the recoilless design does notjiggle the loader. You must remain aware enough to keep the ballsfeeding. We recommend that you use an agitator and/or force-feedtype loader to keep the balls feeding, such as a Viewloader coupledwith a Warp Feed.PERFORMANCETake-up is the movement of the trigger before it comes in contactwith the sear. After sear contact, continuing to pull through fires thepaintball marker. The trigger in the <strong>RT</strong>-<strong>ULE</strong> has been designed tohave a “snap” action with no take-up to give the shortest possiblestroke and, therefore, the highest possible firing rate. The averageperson can fire 4-5 shots per second but, when charged withadrenaline, this can climb to 6 per second.If your marker came equipped with a <strong>ULE</strong> Trigger Pull Kit then your3 lb. “snap” action trigger pull weight has been reduced to a mere 15ounces.LUBRICATIONWe find that customers who properly lubricate their paintball markersonce a week have the fewest problems. To lubricate your <strong>RT</strong>-<strong>ULE</strong>,drip 6 drops of AUTOLUBE into the back bottle adapter. Then gas upand dry fire the paintball marker several dozen times with the barrelremoved to prevent oil build-up in the barrel.-4-
VELOCITY ADJUSTMENTThe velocity of your <strong>RT</strong>-<strong>ULE</strong> is adjusted by increasing or decreasingthe regulated pressure. This is accomplished by turning the regulatoradjusting nut located on the back of the regulator body. Only aminimal amount of rotation is necessary to adjust the velocity. Werecommend that you always start at a low velocity setting andcontinue to screw the adjustment clockwise up to your desiredsetting.Always shoot several shots to seat the regulator piston and spring.High velocities will cause the blow-off valve built into your system tovent air out the back of the regulator body. If you ever hear airventing, stop and re-chronograph the paintball marker immediately.We found the best performance to be in the 270-280 fps range.Occasionally grease the threads of the velocity adjusting nut andregulator coils of the regulator.BLOW-OFF VALVEThe blow-off valve is self contained in the regulator piston and is notuser adjustable. It is a safety device for venting air from the paintballmarker should abnormally high pressure occur in the regulator or airchamber. Always check your velocity any time the blow-off valve hasvented.CLEANINGAlways remember to wear approved safety goggles or mask whencleaning your paintball marker. After every hard use, a paintballmarker should be taken down and all the exposed parts cleaned andinspected for wear or problems. Lightly lubricate all surfaces andreassemble according to instructions.-5-
PLEASE READ THIS CHRONOGRAPH PROCEDURECAREFULLY BEFORE USING YOUR <strong>RT</strong>-<strong>ULE</strong>The <strong>RT</strong>-<strong>ULE</strong> has the fastest recharging regulator found on any paintballmarker. There are certain characteristics that you should understandabout this regulator before you chronograph your <strong>RT</strong>-<strong>ULE</strong>.The X-Valve recharges so quickly (up to five times faster than the 68AUTOMAG valve) that friction heats up the compressed air moleculesfilling the air chamber. The temperature in the air chamber can get ashigh as 180 degrees and can make the front of the gun warm after astring of shots. It is important to understand that when the air chamber isfilled with hot air under pressure, it cools off rapidly over severalseconds. This cooling will reduce both the chamber pressure and thevelocity.If you fire the <strong>RT</strong>-<strong>ULE</strong> while the air chamber is hot (high pressure), yourvelocity will be higher. If you wait, the air chamber will cool and velocitywill drop noticeably. The faster you fire your <strong>RT</strong>-<strong>ULE</strong>, the moreconsistent your velocity will be.QUICK SETUP AND CHRONOGRAPH PROCEDURE FOR YOURAUTOMAG <strong>RT</strong>1. Set the pressure going into the <strong>RT</strong>-<strong>ULE</strong> to 800 psi.2. To record your highest rapid fire velocity: Fire a paintball and holdthe trigger back. Then release the trigger completely and fire thenext paintball as quickly as possible, once again holding the triggerback. Repeat as necessary. This procedure will simulate rapid fire,thus recording your highest possible rapid fire velocity.PLEASE NOTE: The <strong>RT</strong>-<strong>ULE</strong> is sensitive to differences in triggerrelease, so always attempt to be consistent with your trigger finger!-6-
FU<strong>RT</strong>HER DETAILS ABOUT SETUP AND CHRONOGRAPHPROCEDUREThe <strong>RT</strong>-<strong>ULE</strong>, like any manufactured product, will vary a bit from oneexample to the next. Our testing shows that the best input pressure foreach <strong>RT</strong>-<strong>ULE</strong> will be somewhere between 750 and 850 psi. This is whywe recommend 800 psi as a starting input pressure.Higher input pressures will make the trigger more reactive, but thevelocity will drop off more when fired slowly.Lower input pressures will reduce the reactive trigger and may causeslight shoot down on rapid fire, but the <strong>RT</strong> will be more consistent overthe chronograph when fired slowly.As you can see, the <strong>RT</strong>-<strong>ULE</strong> can be adjusted to suit your preferencesand style of play. We hope this information provides you with someinsight on the best methods for setting up your <strong>RT</strong> and giving your gamethe performance edge.<strong>Air</strong>gun <strong>Designs</strong> is committed to bringing you the highest performanceproducts possible. The <strong>RT</strong>-<strong>ULE</strong> was designed to be (and is) the world’sfastest shooting paintball marker! The <strong>RT</strong>-<strong>ULE</strong> performs best when firedrapidly, much like a high performance racing engine that runs best athigh RPMs but doesn’t idle well. After thousands of computer gun testruns and dozens of regulator variations, we feel that the <strong>RT</strong>-<strong>ULE</strong> X-Valverepresents the best balance between outstanding rapid fire performanceand stability over the chronograph.Sincerely,Tom KayePresident, <strong>Air</strong>gun <strong>Designs</strong>-7-
TECHNICAL DATA FOR EXPERIENCED AIRSMITHSThe velocity fluctuations in the <strong>RT</strong>-<strong>ULE</strong> are caused by the temperaturechanges of the compressed gas in the air chamber. Temperaturerelatedpressure profiles will have different characteristics dependingupon input pressure. The graphs on the next page show how chamberpressure changes over time. This page contains more technical data tohelp you understand what is going on inside the <strong>RT</strong>-<strong>ULE</strong> and to help youmake the <strong>RT</strong>-<strong>ULE</strong> perform to your style of play.Refer to the high input pressure graph. Notice that the graph peakshigher, goes into a dip, and then levels off. When the gas cools, theregulator opens up and maintains a steady pressure. After .5 secondsthe pressure has stabilized. When firing at a rate of 2 shots per secondor slower, the <strong>RT</strong>-<strong>ULE</strong> will maintain consistent velocities. When shootingat a rate of 3 shots per second or faster, the velocity will be closer to yourmaximum rapid fire velocity, as set with the quick shot test. Higher inputpressure also gives a stronger Reactive Trigger. When chronographingat high input pressures, a rapid fire shot (as described earlier) will behigher than a shot fired after a ten second wait.Refer to the medium input pressure graph. You will notice a peakfollowed by a dip and then a gradual climb back to your rapid firepressure. The peak is where the temperature of the gas is at its highest.This is where your rapid fire pressures (velocities) will be seen. Whenshooting at your maximum rate, you will be shooting the same velocity aswhen you wait 10 seconds or more and take another shot. If you areshooting at a rate lower than your maximum, you will notice lowervelocities. This is where the graph is falling to its lowest point (labeled“dip” on the graph). Here the gas is cooling, and the regulator has notopened back up. After this point, the regulator opens back up and thechamber pressure begins to climb back to your rapid fire pressure. Thisinput pressure range is for the player who combines rapid firing with anoccasional sniper shot. This will also give a positive Reactive Triggerfeel. When chronographing at medium input pressures, a rapid fire shot(as described earlier) and a shot after a ten second wait will be similar.Refer to the low input pressure graph. Notice that the peak and dippressures in the first second are lower than the pressures after 1 second.This means that all shots spaced less than 1 second apart will be atlower velocity than shots spaced longer than 1 second apart. At lowerinput pressures, all benefits of the fast recharge regulator diminish andthe regulator acts like the regulator on a 68 AUTOMAG. The mainadvantage is that this setup is more consistent over the chronographwhere shots are at least one second apart and may benefit a sniper withconsistent slow shots. Lower input pressure also weakens the ReactiveTrigger. When chronographing at low input pressures, a rapid fire shot(as described earlier) will be lower than a shot fired after a ten secondwait.-8-
450400350300250200150100500HIGH INPUT PRESSURE0.0010.1950.3890.5830.7770.9711.1652.9111.3591.5531.7471.9412.1352.3292.5232.7173.1053.2993.4933.6873.881450400350300250200150100500PEAKDIPLOW INPUT PRESSURETIME (SEC.)CHAMBER PRESSURE (PS0.0010.1950.3890.5830.7770.9711.1652.9111.3591.5531.7471.9412.1352.3292.5232.7173.1053.2993.4933.6873.881450400350300250200150100500PEAKDIPTIME (SEC.)MEDIUM INPUT PRESSURECHAMBER PRESSURE (PS0.0010.1950.3890.5830.7770.9711.1652.9111.3591.5531.7471.9412.1352.3292.5232.7173.1053.2993.4933.6873.881PEA KDIPTIME (SEC.)-9-CHAMBER PRESSURE (PS
ACCESSORIES-10-<strong>Air</strong>gun <strong>Designs</strong> has a wide variety of add-on products and accessoriesfor your paintball marker like the powered force-fed feeder“Warp Feed,” all available directy to you at our online store athttp://store.airgun.com/TECHNICAL SUPPO<strong>RT</strong>Please refer to this manual for basic information about your <strong>RT</strong>-<strong>ULE</strong>.If you have questions about your <strong>RT</strong>-<strong>ULE</strong>, please call our TechnicalSupport staff at (847) 520-7225 or visit http://www.automags.org.Our technical support staff is available Monday through Fridaybetween the hours of 9:00 a.m.-11:30 a.m. and 1:00 p.m.-5:00p.m. (Central Time). Call us first if you need to send your paintballmarker to us for repair! Our Technical Support staff might be able tosolve your problem over the telephone. If your paintball markerneeds to be returned to us for repair, we need to verify that we haveyour current address, telephone number and email address on file,and that you are aware of our warranty repair policies and our usualturnaround time. At this point you will be given a return authorizationnumber.Important! Packages received without this RA number on them willbe returned unopened.This procedure can also be accomplished easily online and it is highlyrecommended that you visit http://www.airgun.com/Techinfo.shtml#and select “ Request Repair Authorization”. A Tech will then evaluateyour problem and determain if you require an RA number or if yourproblem can be solved with simply an e-mail or phone call.AIRGUN DESIGNS, INC.804 Seton CourtWheeling, Illinois 60090Telephone: 847-520-7507Tech Phone: 847-520-7225Fax: 847-520-7848Copyright 1996-2004 <strong>Air</strong>gun <strong>Designs</strong>, Inc.
-11-AIRGUN DESIGNS, INC.804 Seton CourtWheeling, Illinois 60090Telephone: 847-520-7507Tech Phone: 847-520-7225Fax: 847-520-7848
Copyright 1996-2004 <strong>Air</strong>gun <strong>Designs</strong>, Inc.Notes for printers:Inside front cover blankInside back cover blankBack cover is page above these notes.