
You also want an ePaper? Increase the reach of your titles
YUMPU automatically turns print PDFs into web optimized ePapers that Google loves.
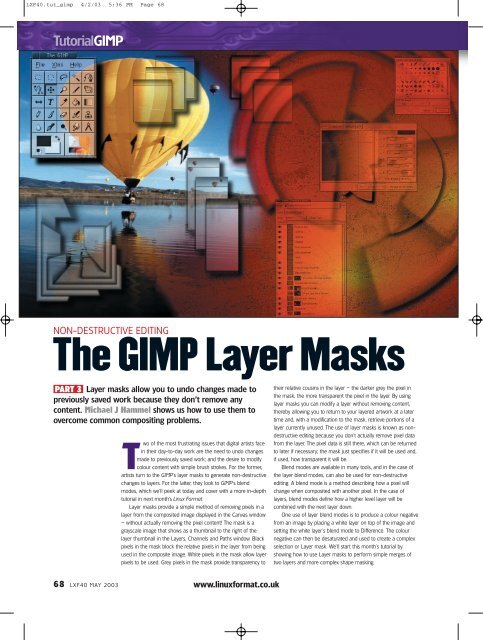
LXF40.tut_gimp 4/2/03 5:36 PM Page 68Tutorial<strong>GIMP</strong>NON-DESTRUCTIVE EDITING<strong>The</strong> <strong>GIMP</strong> <strong>Layer</strong> <strong>Masks</strong>PART 3 <strong>Layer</strong> masks allow you to undo changes made topreviously saved work because they don’t remove anycontent. Michael J Hammel shows us how to use them toovercome common compositing problems.wo of the most frustrating issues that digital artists facein their day-to-day work are the need to undo changesmade to previously saved work; and the desire to modifycolour content with simple brush strokes. For the former,artists turn to the <strong>GIMP</strong>'s layer masks to generate non-destructivechanges to layers. For the latter, they look to <strong>GIMP</strong>'s blendmodes, which we'll peek at today and cover with a more in-depthtutorial in next month’s <strong>Linux</strong> Format.<strong>Layer</strong> masks provide a simple method of removing pixels in alayer from the composited image displayed in the Canvas window– without actually removing the pixel content! <strong>The</strong> mask is agrayscale image that shows as a thumbnail to the right of thelayer thumbnail in the <strong>Layer</strong>s, Channels and Paths window. Blackpixels in the mask block the relative pixels in the layer from beingused in the composite image. White pixels in the mask allow layerpixels to be used. Grey pixels in the mask provide transparency totheir relative cousins in the layer – the darker grey the pixel inthe mask, the more transparent the pixel in the layer. By usinglayer masks you can modify a layer without removing content,thereby allowing you to return to your layered artwork at a latertime and, with a modification to the mask, retrieve portions of alayer currently unused. <strong>The</strong> use of layer masks is known as nondestructiveediting because you don't actually remove pixel datafrom the layer. <strong>The</strong> pixel data is still there, which can be returnedto later if necessary; the mask just specifies if it will be used and,if used, how transparent it will be.Blend modes are available in many tools, and in the case ofthe layer blend modes, can also be used for non-destructiveediting. A blend mode is a method describing how a pixel willchange when composited with another pixel. In the case oflayers, blend modes define how a higher level layer will becombined with the next layer down.One use of layer blend modes is to produce a colour negativefrom an image by placing a white layer on top of the image andsetting the white layer's blend mode to Difference. <strong>The</strong> colournegative can then be desaturated and used to create a complexselection or <strong>Layer</strong> mask. We'll start this month's tutorial byshowing how to use <strong>Layer</strong> masks to perform simple merges oftwo layers and more complex shape masking.68 LXF40 MAY 2003www.linuxformat.co.uk
LXF40.tut_gimp 4/2/03 5:36 PM Page 69Tutorial<strong>GIMP</strong>MERGING TWO LAYERSA common use for layer masks is to seamlessly merge two layers. <strong>The</strong> effect allows you to apply part of the top layer as areplacement for a portion of the bottom. In this example, we’ll be adding a cloud filled sky to a skyless mountain range.1 Our two images forthis example: <strong>The</strong>first is a photo of abeautiful Coloradomountain range witha clear blue sky; butthat sky is a littleboring. Our otherimage shows aninteresting cloudpattern over a dull,nearly dark earth.We’ll take the cloudsfrom the latter andplace them over theempty sky in theformer. Use CTRL-A toselect the entire cloudimage, then CTRL-Cto make a copy of it.Move to the mountainimage and use CTRL-Vto paste the cloudimage into it.2 Move the opacity slider to the left so we can seethe tops of the mountain range better. <strong>The</strong> cloudsare a little low compared to the top of themountain ranges so we’ve moved them up a littleusing the Move tool. We’ve made a freehandselection around the cloud, selecting everythingabove the clouds and just a little below them. Notethat you can click and drag within the image and,with the mouse button still held down, dragoutside of the window, around the top and backinto the window on the other side. When yourelease the mouse button, a straight line is drawnto connect the start and end points of theselection. Add a layer mask to the cloud layer thatis completely white. Make sure the mask is activeby clicking on it (its thumbnail in the <strong>Layer</strong>s dialogshould be enclosed in a white border). <strong>The</strong>selection is then inverted, heavily feathered, andfilled with black. Finally, the opacity slider isreturned to its rightmost position.3 <strong>The</strong> layer mask has allowed us to easilymerge the two images without modifyingeither layer directly. <strong>The</strong> mask isn’t perfect,however. We still need to touch up the maskon the bottom side of the clouds to removethe dark edges. We can do this by zooming inand using a soft edged brush and thePaintbrush or Airbrush tools. Also, the cloudlayer may need to be colour adjusted so itlooks like it came from the same lighting asthe mountain range. In our example, we’veremoved much of the red, magenta andyellow from the image using theImage>Colors>Colour Balance tool. <strong>The</strong> twosmall lower clouds in the mountain imagewere selected using the Elliptical Selection,feathered lightly and blurred with a GaussianBlur so the appeared more distant and at thesame focal depth as the new clouds. Finally, adesaturated version of the mountains, with amask of the background mountains only, wasused to add some shadows where the cloudswere added.>>www.linuxformat.co.uk LXF40 MAY 2003 69
LXF40.tut_gimp 4/2/03 5:36 PM Page 70Tutorial<strong>GIMP</strong>Colors>Levels and select Auto to make surewe get a full range from absolute white to absolute black. But we stillhave some non-white pixels (though we probably can’t visually seethem) in the area surrounding the flower. We’ll use Image>Colors>Brightness Contrast to get rid of most of these by increasing thecontrast a bit. Too much contrast change will cause us to start losingdetails in the flower, however.3 To rid any non-white artifacts from the area around the flower, we’lluse Select by Colour (Select>By Colour...) with a 1 pixel Fuzzinessthreshold and clicking on the white are of the image. This shows us smallregions of non-white pixels, including the area on the right that camefrom another flower in our scan. We invert the selection and paint overthose areas with white. Deselect the image and repeat the Select ByColor/paint process until we’re satisfied.4 Invert the image (Image>Colors>Invert). Add a white layer to thecoloured image. Create a white mask for the white layer. Copy the flowerimage and paste it into the mask of the white layer. If the flower doesn’tfill that layer, all that you need to do is scale up the floating selectionuntil it does. <strong>The</strong> complex shape is now a white image over yourcoloured background. We can fill the white layer with any colour tochange the colour of the flower.70 LXF40 MAY 2003www.linuxformat.co.uk
LXF40.tut_gimp 4/2/03 5:36 PM Page 71Tutorial<strong>GIMP</strong>CREATING A BORDER FROM CLIPARTIn this third tutorial we’ll be painting inside our masks to meld two complexpatterns together to create a border around an 8.5 x 11 inch page.<strong>The</strong> process is simple but requires some close up work using soft and hardedged brushes to make the merging appear seamless. We start with a whiteimage sized to fit a standard 8.5 x 11 page (the actual size doesn’t matter –make it any standard size used for printing at home). <strong>The</strong> white background isused because our source clipart has a white background as well. If the clipartbackground is not exactly white, this doesn’t present too much of a problem..Simply use the steps in the previous Isolating Complex Shapes tutorial to adjustthe image colours.1 With the clipart sized appropriately to work as a border on the page,copy the clipart (CTRL-C) into image (CTRL-V). Convert the floatingselection to a new layer. Duplicate the layer and rotate the duplicate 90degrees. Use <strong>Layer</strong>s>Align Visible <strong>Layer</strong>s to align both copies of theclipart to the upper left corner. Set the Horizontal Style to Collect, theHorizontal base to Left Edge, the Vertical Style to Collect and the VerticalBase to Left Edge. Disable the Ignore Bottom <strong>Layer</strong> button (the buttonshould appear raised).Enable the Use Bottom <strong>Layer</strong> button (it should appear depressed). <strong>The</strong>setting for Grid size is irrelevant for this example. Finally, zoom in on theupper left corner.2 Turn off the background layer visibility. Add a white layer mask to thetop layer. Select a brush that has a hard edge to it, make sure theforeground colour is black and start to paint in the layer mask. Whatyou’re looking for is a form that merges the two layers cleanly. Click onthe layer mask while holding the ALT key (Shift-Alt may be necessarydepending on your desktop configuration) to view just the layer mask. Usethe Opacity slider to see through the top layer to what you might want toshow through the mask. Turn the top layer visibility on and off quickly toview what is showing and what could be showing from the other layer. Allthe while, paint in black in the layer mask to remove parts of the toplayer, and paint in white to bring parts back. <strong>The</strong>re is no special trick hereexcept patience and various brush sizes to merge the two pieces together.When you’ve got the mask set so the two layers composite nicely, mergethe visible layers to make a corner piece for your border.3 Duplicate the corner piecethree times, aligning each copyto one of the other corners ofthe image, rotating the copy asneeded. With the backgroundlayer active, copy and paste theclipart again. <strong>The</strong> floating layershould be centered in thebackground. Make it a new layerand align it with the top of thebackground only (set theHorizontal Style to None in theAlign <strong>Layer</strong>s dialog). Create amask on this new layer andpaint it like you did in theprevious step to merge it withthe corner pieces.Note that if the clipart is notlong enough to fill the spacebetween the corner pieces youmight need to scale the clipartbefore you start all this.Alternatively you can paste andalign multiple cliparts betweenthe corners and merge themusing layer masks. Repeat theprocess for the other threesides of the image. LXFNEXTMONTHBlend modes can lightendark areas, add colour tolifeless images, or produceunusual affects, all withoutactually modifying theimage. Well-lit images canbe enhanced with Multiplyand Divide, but what if youhave an underexposed orpoorly lit image? We’llshow you what to do.Next month we’ll alsocover Screen, Overlay,Behind, Darken, Lighten,Value, Colour, Hue andSaturationwww.linuxformat.co.uk LXF40 MAY 2003 71