Composting and Worm Farming - Northland Regional Council
Composting and Worm Farming - Northland Regional Council
Composting and Worm Farming - Northland Regional Council
- No tags were found...

Create successful ePaper yourself
Turn your PDF publications into a flip-book with our unique Google optimized e-Paper software.
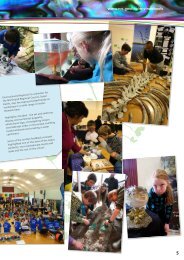
A home for your wormsMaking a worm binYou can recycle or make a suitablecontainer from wood, plastic or metal.Old tyres or baths make great worm binstoo. The container should ideally be 20-40cm deep with a relatively large surfacearea (about 40 x 40-60cm) becauseworms like to work near the surface.<strong>Worm</strong>s need air to live, so put a fewholes in the bottom of the container foraeration <strong>and</strong> drainage. If the contentsget too wet, then drill some more holes.Bins should be raised up on bricks orblocks to aid air circulation <strong>and</strong>drainage.You can place a tray under the bin tocapture excess liquid. This makes anexcellent plant fertiliser. Use diluted at arate of one part liquid to 10 parts water.Setting up your wormeryOld carpet <strong>and</strong> canvas are ideal forcovering a ground-based worm farm.Place moist bedding (shredded paperor similar) in the worm bin, plus oneor two h<strong>and</strong>fuls of coarse s<strong>and</strong> ortopsoil.Add tiger worms (1000 or so). Youcan buy these locally or via mailorder. Alternatively, you can sourcethem yourself as worms livewherever a good supply of organicmaterial is available. Check yourfriends’ compost bins for worms or afarmer with a mature manure heap<strong>and</strong> collect the worms. Kids willlove this!Bury kitchen scraps just below thesurface of the bedding.Cover with sacking or a loose fittinglid that will keep the material fromdrying out <strong>and</strong> provide a darkenvironment for the worms.Additional fresh bedding should beadded at least every two months.Harvesting your compostHarvest the compost (worm castings)after three to four months <strong>and</strong> feed toyour plants.The easiest method is to use a h<strong>and</strong> forkto remove the top 150mm layer <strong>and</strong> setit aside for starting the next bin. Theremaining contents can then be removedfor either immediate use or stored untilrequired. Put the top layer back into thebin with some fresh bedding to start theprocess again.Alternatively, tip the entire contents ofthe bin onto a tarpaulin or plastic sheet.Spread the compost to form a layerapproximately 100mm thick. The wormsdislike light <strong>and</strong> burrow deeper. Over aperiod of about an hour, you can removethe compost in layers as they movedeeper <strong>and</strong> you will be left with a massof worms which can be added back intothe worm bin with new bedding.You may prefer to simply move thefinished compost over to one side of thebin, place fresh bedding into the spacecreated <strong>and</strong> add food waste to the newbedding only. The worms will graduallymove over <strong>and</strong> the compost can beremoved.Top up the bin with fresh bedding toreplace the compost removed. Theworms require bedding in which to live<strong>and</strong> lay their eggs.