REVIEW: New Haven 36’ Wood Boxcar MSRP: $84.952008 O <strong>Scale</strong> National Convention, c/o Tom McCarthy, POBox 162, Ware, MA 01082www.2008oscalenational.orgreviewed by Brian ScaceThe good folk putting on the 2008 National are offering aresin kit of the New Haven 36’ single sheath boxcar as one ofthe Convention cars. The 36’ box really hasn’t seen the representationit should, especially for the pre-war era modeler.To give you an idea, I ran the number series given by CDS(their lettering is supplied in the kit) through a couple ORER’son hand, and learned that there were over 6000 New Haventhirty-six footers in interchange service in 1940. Half of themsurvived the war to be rostered in 1945. The postwar era sawan immense surge in steel boxcar procurement nationwide,and these tired old cars were pared down to a mere five ininterchange by 1950. This story applies, not only to the NewHaven, but also to most 36’ boxcar fleets in the US.My kit arrived with a completely assembled basic body,painted in gray primer. Included are separate wire grabs,resin roofwalks, plastic brake-gear (both underbody andend), the afore-mentioned CDS dry transfer lettering, andseveral instructional sheets. Like most resin kits, you supplythe trucks and couplers of choice. I built the car straight offthe instruction sheet, which worked out just fine. With a littlecare, it’s a very pleasant three-evening build using the citeddrill sizes, a couple good pinvises, a new single-edge razorblade, some CA, hemostats, and all the other accoutrementswe’ve come to know and love.Since the acquisition of skills, working with resin kits,opens up a lot of options for finely detailed and moreunusual prototypes, hereare a couple tricks of thetrade. First, rememberthat most resins are a bitbrittle, so exercise a littlecare when handling someof the finer cross-sectiondetails. Next, I find thatrunning the train-line(that’s the main air pipebetween the brake hosesalong the underframe)can be somewhat tediousworking with a preassembledbody. First,it’s a little problematicdrilling through the crossmemberswhen they’realready assembled orcast in place. My trick isto use a six-inch piece ofpiano wire chucked up inone of those little hand-drills (the manual crank-it type).Gently done, it makes a perfectly fine long drill bit forresin, and keeps the holes lined up with each other. The nextissue is how to thread and bend brass wire through the routewhen the crossmembers are already fixed in place (rememberthat the line has to cross over to the opposite side of thecar somehow, usually through the main frame-memberson wood-body cars). A good solution is to go to a sportinggoods store and get some appropriate diameter mono-filamentfishing leader. Thread it through the holes, secure oneend with CA, pull it tight, and glue it at each hole with moreCA. When it’s taut, secure, and painted, it looks just as goodas wire.One thing about the manufacturing process that can hauntyou a bit is the fact that each piece comes out of the moldwith a coating of a mold release agent on it. If it wasn’t coated,it would just stick to the mold, so it’s a fact of life. Solventbased paints and CA won’t adhere to this stuff, so you haveto be pretty careful to clean it all off. Indeed, my kit had placeson the roof where the primer was loose. No big deal, I justshaved it all off with an Xacto chisel-blade, re-cleaned thesurface, and shot it with color when I painted the car. You’llsee this often with resin kits. Bob Jones, who actually handlesthe distribution of these kits for the 2008 SONC folks, recommends”Shout” stain remover to clean resin castings (I haveto try that one.) I use Floquil Diosol and an old toothbrushwith excellent results. Chooch, a major manufacturer of resincars, says in their instructions that the new acrylic paints aremuch more forgiving of mold release agent than solvent-typepaint. There’s lots of options.Anyway, this car is a pleasant build and the results can bejudged by the photo. It is a very nice model of a more commoncar than many of us realize, a car type that really shouldbe more heavily represented on our steam-era rosters thanthey are.52 • O <strong>Scale</strong> <strong>Trains</strong> - Nov/Dec ’07
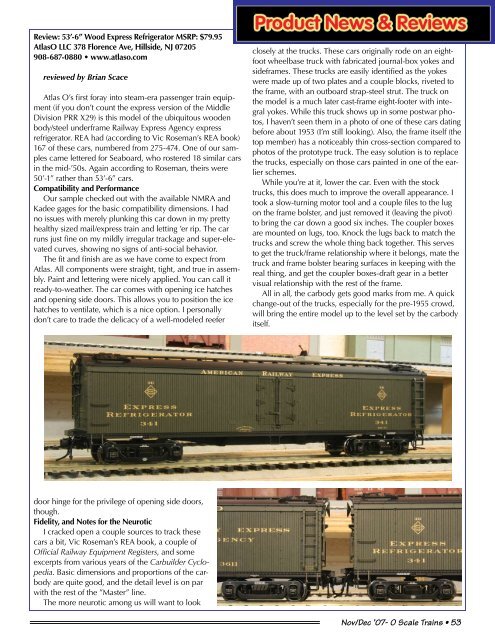
Review: 53’-6” Wood Express Refrigerator MSRP: $79.95AtlasO LLC 378 Florence Ave, Hillside, NJ 07205908-687-0880 • www.atlaso.comreviewed by Brian ScaceAtlas O’s first foray into steam-era passenger train equipment(if you don’t count the express version of the MiddleDivision PRR X29) is this model of the ubiquitous woodenbody/steel underframe Railway Express Agency expressrefrigerator. REA had (according to Vic Roseman’s REA book)167 of these cars, numbered from 275-474. One of our samplescame lettered for Seaboard, who rostered 18 similar carsin the mid-’50s. Again according to Roseman, theirs were50’-1” rather than 53’-6” cars.Compatibility and PerformanceOur sample checked out with the available NMRA andKadee gages for the basic compatibility dimensions. I hadno issues with merely plunking this car down in my prettyhealthy sized mail/express train and letting ’er rip. The carruns just fine on my mildly irregular trackage and super-elevatedcurves, showing no signs of anti-social behavior.The fit and finish are as we have come to expect fromAtlas. All components were straight, tight, and true in assembly.Paint and lettering were nicely applied. You can call itready-to-weather. The car comes with opening ice hatchesand opening side doors. This allows you to position the icehatches to ventilate, which is a nice option. I personallydon’t care to trade the delicacy of a well-modeled reeferclosely at the trucks. These cars originally rode on an eightfootwheelbase truck with fabricated journal-box yokes andsideframes. These trucks are easily identified as the yokeswere made up of two plates and a couple blocks, riveted tothe frame, with an outboard strap-steel strut. The truck onthe model is a much later cast-frame eight-footer with integralyokes. While this truck shows up in some postwar photos,I haven’t seen them in a photo of one of these cars datingbefore about 1953 (I’m still looking). Also, the frame itself (thetop member) has a noticeably thin cross-section compared tophotos of the prototype truck. The easy solution is to replacethe trucks, especially on those cars painted in one of the earlierschemes.While you’re at it, lower the car. Even with the stocktrucks, this does much to improve the overall appearance. Itook a slow-turning motor tool and a couple files to the lugon the frame bolster, and just removed it (leaving the pivot)to bring the car down a good six inches. The coupler boxesare mounted on lugs, too. Knock the lugs back to match thetrucks and screw the whole thing back together. This servesto get the truck/frame relationship where it belongs, mate thetruck and frame bolster bearing surfaces in keeping with thereal thing, and get the coupler boxes-draft gear in a bettervisual relationship with the rest of the frame.All in all, the carbody gets good marks from me. A quickchange-out of the trucks, especially for the pre-1955 crowd,will bring the entire model up to the level set by the carbodyitself.door hinge for the privilege of opening side doors,though.Fidelity, and Notes for the NeuroticI cracked open a couple sources to track thesecars a bit, Vic Roseman’s REA book, a couple ofOfficial Railway Equipment Registers, and someexcerpts from various years of the Carbuilder Cyclopedia.Basic dimensions and proportions of the carbodyare quite good, and the detail level is on parwith the rest of the ”Master” line.The more neurotic among us will want to lookNov/Dec ’07- O <strong>Scale</strong> <strong>Trains</strong> • 53