EL DIABLO 60 Owners Manual - Genz Benz
EL DIABLO 60 Owners Manual - Genz Benz
EL DIABLO 60 Owners Manual - Genz Benz

You also want an ePaper? Increase the reach of your titles
YUMPU automatically turns print PDFs into web optimized ePapers that Google loves.
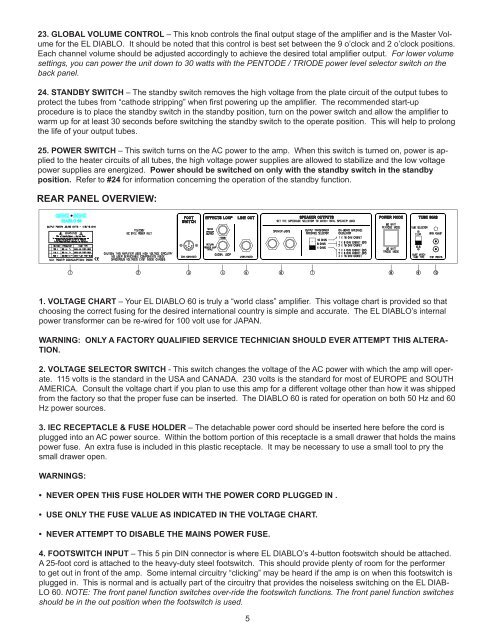
23. GLOBAL VOLUME CONTROL – This knob controls the final output stage of the amplifier and is the Master Volumefor the <strong>EL</strong> <strong>DIABLO</strong>. It should be noted that this control is best set between the 9 o’clock and 2 o’clock positions.Each channel volume should be adjusted accordingly to achieve the desired total amplifier output. For lower volumesettings, you can power the unit down to 30 watts with the PENTODE / TRIODE power level selector switch on theback panel.24. STANDBY SWITCH – The standby switch removes the high voltage from the plate circuit of the output tubes toprotect the tubes from “cathode stripping” when first powering up the amplifier. The recommended start-upprocedure is to place the standby switch in the standby position, turn on the power switch and allow the amplifier towarm up for at least 30 seconds before switching the standby switch to the operate position. This will help to prolongthe life of your output tubes.25. POWER SWITCH – This switch turns on the AC power to the amp. When this switch is turned on, power is appliedto the heater circuits of all tubes, the high voltage power supplies are allowed to stabilize and the low voltagepower supplies are energized. Power should be switched on only with the standby switch in the standbyposition. Refer to #24 for information concerning the operation of the standby function.REAR PAN<strong>EL</strong> OVERVIEW:1. VOLTAGE CHART – Your <strong>EL</strong> <strong>DIABLO</strong> <strong>60</strong> is truly a “world class” amplifier. This voltage chart is provided so thatchoosing the correct fusing for the desired international country is simple and accurate. The <strong>EL</strong> <strong>DIABLO</strong>’s internalpower transformer can be re-wired for 100 volt use for JAPAN.WARNING: ONLY A FACTORY QUALIFIED SERVICE TECHNICIAN SHOULD EVER ATTEMPT THIS ALTERA-TION.2. VOLTAGE S<strong>EL</strong>ECTOR SWITCH - This switch changes the voltage of the AC power with which the amp will operate.115 volts is the standard in the USA and CANADA. 230 volts is the standard for most of EUROPE and SOUTHAMERICA. Consult the voltage chart if you plan to use this amp for a different voltage other than how it was shippedfrom the factory so that the proper fuse can be inserted. The <strong>DIABLO</strong> <strong>60</strong> is rated for operation on both 50 Hz and <strong>60</strong>Hz power sources.3. IEC RECEPTACLE & FUSE HOLDER – The detachable power cord should be inserted here before the cord isplugged into an AC power source. Within the bottom portion of this receptacle is a small drawer that holds the mainspower fuse. An extra fuse is included in this plastic receptacle. It may be necessary to use a small tool to pry thesmall drawer open.WARNINGS:• NEVER OPEN THIS FUSE HOLDER WITH THE POWER CORD PLUGGED IN .• USE ONLY THE FUSE VALUE AS INDICATED IN THE VOLTAGE CHART.• NEVER ATTEMPT TO DISABLE THE MAINS POWER FUSE.4. FOOTSWITCH INPUT – This 5 pin DIN connector is where <strong>EL</strong> <strong>DIABLO</strong>’s 4-button footswitch should be attached.A 25-foot cord is attached to the heavy-duty steel footswitch. This should provide plenty of room for the performerto get out in front of the amp. Some internal circuitry “clicking” may be heard if the amp is on when this footswitch isplugged in. This is normal and is actually part of the circuitry that provides the noiseless switching on the <strong>EL</strong> DIAB-LO <strong>60</strong>. NOTE: The front panel function switches over-ride the footswitch functions. The front panel function switchesshould be in the out position when the footswitch is used.