
Create successful ePaper yourself
Turn your PDF publications into a flip-book with our unique Google optimized e-Paper software.
Table of ContentsWelcome ………………………………………………………………...…….. P.4Features ……………………………………………………………………….. P.4Minimum System Requirement ………………………………………………P.5Important notes before you begin ……………………………………….…...P.5Product Illustration ………………………………………………….………....P.6Quick Start ……………………………………………………………............. P.7Using the Media Conversion Program ………………………………………P.71. Function ………………………………………………………………….P.82. Step …………………………………………………….…………..…….P.9To Play Video …………………………………………………………………..P.10To Play Audio ………………………………………….……………..………...P.10To use DV …………………………………………………………………..…..P.11To use camera ………………………………………………………………… P.11To Display Pictures ………………………………………….…………………P.12Recording …………………………………………………….…..…………….P.13AV in(video & audio) ……………………………………………………… P.13Mic only(audio) ……………………………………………………………. P.14Line in(audio only) …………………………………………………….…...P.14Scheduled Recording ………………………………………………………… P.15Ebook …………………………………………………..………...……………..P.16Setup …………………………………………………………………………… P.16Time ………………………………………………………………………... P.16Scheduled Recording …………………………………………………….. P.16Alarm Clock …………………………………………………….…………..P.16Key Tones …………………………………………………………………..P.16Storage ……………………………………………………..……………… P.16Format …………………………………………………….…………..…… P.17Auto Off ……………………………………………………………………..P.17P.
Language ……………………………………………………..…………….P.17Default …………………………………………………….…………..…….P.17TV Out ……………………………………………………..………………..P.17Accessory ……………………………………………………………...............P.18Memory ……………………………………………………..………………P.18Calendar …………………………………………………….…………..….P.18Supported Media Format …………………………………………………….. P.18Video ……………………………………………………..………………… P.18Audio …………………………………………………….…………..……...P.18Picture ……………………………………………………..………………..P.19Note …………………………………………………….…………..……….P.19Troubleshoot …………………………………………………………….......... P.20Technical Support …………………………………………………………….. P.21Disclaimer ………………………………………………………………………P.21P.
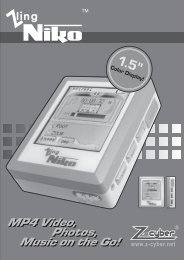
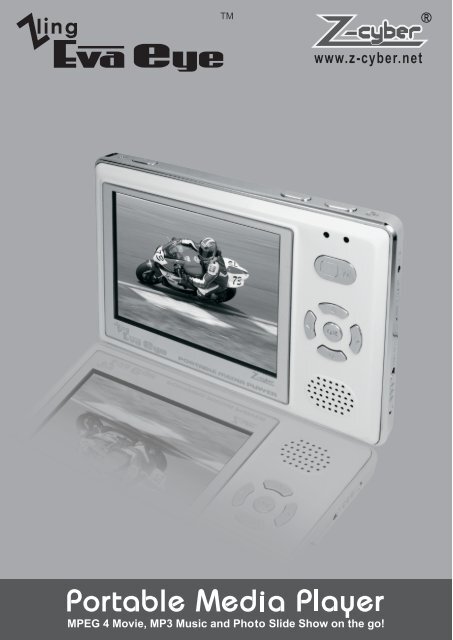
WelcomeThank you for purchasing ling Zling Eva Eye. This Users Users User's Manual providesdetailed instructions and illustrations to help you enjoy this multi-functionalportable media player. Please read the manual carefully before you start tooperate it.FeaturesDigital Camera : 2.0 Max Mega Pixel (1600x1200)Video Display : LTPS 2.5’ LCDVideo Playback: ASF Format(320x240) at 30fpsVideo Formats : ASF, AVI, VOB, DAT, WMV, MPEG, MOV,RMVB RMVB RMVB **Video Recording : 320x240(ASF format)Voice Recording: ES YES ES ESAudio Playback : MP3(32kbps 320kbps)WMA(48kbps 128kbps)Equalier qualizer: Flat/Rock/Pop/Jazz/Classic/Dance/Heavy/Disco/FlatRockPopaClassicDanceeavyDiscoFlatRockPopaClassicDanceeavyDiscoFlatRockPopaClassicDanceeavyDiscoFlatRockPopaClassicDanceeavyDiscoSoft/Live/HallID3 Tag: ID3v1Photo Display: PG JPG PG formatVideo Out: NTSC / PALSpeaker: Built-inMemory Support: Built-in memory External SD / MMC CardsBattery: Li-Polymer rechargeableOutput Power: 5mW5mW 5mW5mW 5mW5mW at 32 ohmFrequency Response : 20-20k20Hz-20kHz20-20kSignal to Noise Ratio : 85dB >85dB 85dBUSB Interface: USB 2.0 Full SpeedSupported OS: Windows ME / 2000 / P XP P (no driver required)Windows 98SE (driver required)Physical Sie: 91mm(L) x 61mm() 61mm() 61mm(H) x 15mm(D)Weight: 85g** Transcoder software is included for converting different file extensionsinto ASF format.All specifications are subject to change without notice.P.
Minimum System Requirement• Windows 98SE, Windows ME, Windows 2000 and Windows XP• One available USB Port• CD ROM drive required for driver installation (Windows 98SEonly)• Windows Media Player 9 and Direct X 9.0c or above is requiredfor video conversion softwareImportant notes before you begin1. Do not operate the device under extreme temperature condition.The best working temperature is 0C 40C.2. Avoid placing the device to direct sun light.3. Insert the SD/MMC card ONLY when the device is turned off.Failure to so may result in data loss or damage to the circuit.4. Always back up your important files. The manufacturer is notliable for any loss of data.5. Do not connect the USB port while the device is playing mediafiles.P.
Product Illustration12 13 14111098576MP4 Portable Media Player1. MenuBack /Back Button2. Microphone3. Reset Switch4. Play/OK PlayOK PlayOK Button5. old Hold Switch6. Speaker7. SD / MMC Slot8. DC In9. USB Port10. AV In Port11. 1. AVEarphone AVEarphone AVEarphone /Earphone Out12. Power Button13. A Button14. B Button15. Camera sensor15P.
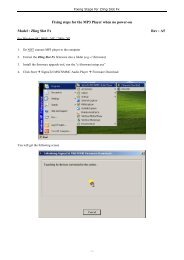
Quick Start!1. Charge the player by using the bundled AC adapter. The defaultcharging time is 2-3 hrs. The LED will be turned on in Red whilecharging. It will be off when the battery is fully charged.2. Use the bundled Media Conversion program to prepare your video,music and picture files for the player. See below sing “sing Using edia Media ediaConversion Program section for details.3. Press and hold POWER button to turn on the device. To turn off thedevice, press and hold the POWER button for 2 seconds.4. Connect the device to computer by via the bundled USB cable. The“MSDC” screen will appear on the device. Any button on the devicewill be disabled in this mode. The computer will now detect the deviceand 2 removable drives will appear. One is the internal memory of thedevice and the other is the external memory respectively.5. Now you can drag and drop the video files or audio files to theappropriate folders in the device. For optimal result, please use MediaConversion Program to convert the files before copying to the player.6. To select between earphones out or speaker out, press “B” buttonwhile on the main menu screen.Using the Media Conersion Conversion Conersion ProgramYour PMP Player has come with a very useful media converter that allowsyou to convert Video, Music and Picture files to be played with the player.Insert CD ROM driver and run “Setup.exe” from “Transcoder” folder. Followthe screen instruction and proceed.P.
1. FunctionThe PMP Transcoding Tool can convert a video file to .asf, CD Tracks to.mp3 or an image file to .jpgConvert a video file to asf Convert a CD track to MP3 Convert an image file to jpgTo clear all the files in the following listTo add the file you want to convertThe location you want to save the output fileClick here to set up the quality of output fileClick here to convertP.
2. Step(1) Select the conversion mode(2) Browse and select the input file (include the full file path)(3) Browse and select the output file (you may write it by yourself butinclude the full file path) and designate it to the correct folder of the player.For example,Video files --- D:\VideoPicture files --- D:\DCIM\100MEDIAMP3 files --- D:\MP3** Assumed C: is your only HDD then D: will be assigned for the device’sinternal memory. And E: will be assigned to external memory card if it is inused.(4) Click “settings” to set up the quality, video size, frame rate and so on;(5) Click “Convert” to begin converting;(6) Stop conversion when converting (if you want)(7) Play the output file when conversion ended (if you want)(8) End program (if you want to exit)Now you have successfully converted the media files into the player.P.
To Play Video1. In the main menu screen, select VIDEO and click O” “OK” O” to confirm andenter.2. In the video selection screen, select the video file that you wish to playand press “OK” to start playing. To pause the video, simply press “OK”button again.3. To display the video file information, select the video file and press B” Bbutton in the video selection screen.4. Press “P” UP” and Down” Down” Down” Down” Down” Down button to control the volume updown. updown. updown. updown. updown. updown. updown. updown. updown. /down.5. To exit the current section, press the “MENU” button.Video Bookmark During the video playback, you can always press“EN” MENU to exist and turn off the device. The device will playback the videotrack where it was last saved. However, if you switch to the other movieclips by pressing “Forward and “Backward buttons while watching thecurrent one, no video bookmark will be saved into the current clip.To Play Audio1. In the main menu screen, select AUDIO and click O” “OK” O” to confirm andenter.2. In the audio selection screen, press B” B” B” B button to cycle through normal,fast browsing, repeat once, repeat all and random play settings.3. Select the audio file that you wish to play and press “OK” O” to startplaying.P. 10
4. During audio playback, press B” B button to cycle through various E EQsettings.5. Press A” A” A button to set A/B AB AB AB AB repeat.6. To exit the current section, press the “MENU” button.To Use DV1. In the main menu screen, select AV and click O” “OK” O” to confirm andenter.2. The image captured by the sensor will display in screen;3. Press “B” button to begin DV recording, press “B” button again to stop;4. Press “>”button to reduce the value of EV(Exposure valuecompensation), the lowest value is “ -1.5EV”;press “”button to reduce the value of EV, the lowest value is “ -1.5EV”;press “
6. Press “B” button to setup “Preview mode” ,the function is listed asfollows:Menu Sub menu FunctionCaptureSingleNormal shootingSelf snapSelf Timer shooting after 10 sec2.0M 1600x1200 pixelsImage Size 1.3M 1280x1024 pixelsVGA640x480 480 pixelsImageFineFine qualityQuality StandardStandard qualityAutoAuto settingDaylightSuitable for light source from sunWhiteCloudySuitable for environment under cloudybalanceTungstenSuitable for light source from bulbFluorescent Suitable for light source from fluorescent lampSephiaClassic modeEffectBWBlack and white modeNegativeNegative modeNormalNormal shooting modeNormalAdjusts the sharpness of images to normalSharpnessData stampSoftSharpOnOffAdjusts the sharpness of images to softAdjusts the sharpness of images to sharpTurn on the date stamp displayingTurn off the date stamp displayingTo Display Pictures1. In the main menu screen, select PHOTO and click O” “OK” O” to confirm andenter.2. In the Picture selection screen, select the picture file that you wish todisplay and press “OK” to start.P. 12
3. The player supports Picture Picture Bridge” Bridge function. function.** function. In the full screenpicture display, press B” B” B to bring up the Printing menu. Select either3R, 4R or print default and click O” O” OK to execute.4. During the full screen picture display, press “A” button to set the pictureas boot up screen.5. Press “P” P” UP” and DOWN” DOWN” DOWN” DOWN” DOWN” DOWN” DOWN buttons to oom oom zoom inout inout inout inout inout inout inout inout in/out of the picture. Andpress O” to enable navigation mode. You ou ou can then press , P UP Pand DOWN to navigate the picture.6. To slide all pictures automatically, press button B for 2 seconds onpicture display screen.7. To exit the current section, press the “MENU” button.** Your printer needs to support Picture Bridge function.To delete a file - Under Video, Audio or Photo main selection screen, simplypress “B” button. The delete menu will appear with options of:-> of:- Cancel ->-Delete Current - -> Delete All.RecordingThe device is capable of recording your favorite TV program into MPEG 4format. It can also record voice via its microphone and record audio signalonly via AV in.AV in(video & audio) In the main menu screen, select RECORDING andpress O” “OK” to confirm and enter.1. Select “Av in” and press “OK”.2. Plug in the bundled AV cable to the device and connect the RCAP. 13
connectors to your video device (For example TV).3. Press “OK” to start recording. The yellow icon on the upperleft corner will start blinking to red to indicate the recording is inprogress.4. Press “EN” MENU to stop a recording.Notes:To record TV program via your PMP, you should connect the bundled AVcable to the “AV out” of TV set / DVD player as the picture shows below, theother side of the cable should be plugged into “AV in” port of your PMP.AV OutMic only(audio)1. Select “Mic Only” and press “OK”.2. Press “OK” to start recording. The time meter will appear toindicate the recording is in progress.3. Press “EN” MENU to stop a recording.Line in(audio only).1. Select “Audio Only” and press “OK”.2. Press “OK” to start recording. The time meter will appear toindicate the recording is in progress.3. Press “EN” MENU to stop a recording.P. 14
Press “Menu” button to exist the current section.Note:• It is recommended that the volume of the audio source to beadjusted to its louder level to achieve the optimal recording result.Scheduled RecordingThe device is able to perform scheduled recording function by setting theinternal recording timer.1. Go to Setup menu and press O”. O”. OK. .2. Select OnTimeRec” OnTimeRec” and press O”. O”. O”. O”. O”. O”. OK. .3. Switch to ON” ON” by pressing p” p” p” p” p” “p” Up button.4. Set Hour” Hour” and in” in” in” “in” in” in” Min for which you wish the player to startrecording automatically.5. In the “ength” ength” Length section, set how many minutes you wish theplayer to record. And click O” O” O” to confirm.6. Press “enu” enu” Menu button to exist. The player’s players players timer is now on andwill start recording automatically based on your scheduled setting.Note: It is highly recommended that the player is connected to AC power inorder to avoid battery runs out. The PMP will start recording automaticallywhen system time meets the preset time.P. 15
EbookSupports text file of ANSI coding, please copy such type of file to X:\Ebook(where X is the drive letter of the PMP player; and in the main menuscreen ,select Ebook menu and press “OK” to enter, then select the text fileyou want to read to press “OK” button to read;SetupTimeScheduledRecordingAlarm Clock Key Tones StorageFormat Auto Off Language Default TV_OutTime Set the ear, Year, Month, Day and Time for the internal real time clock.Scheduled Recording Schedule the time to start a recording and the videolength to record.Alarm Clock Set the time to sound. The alarm clock will sound even if theplayer is turned off.Key Tones To turn the key tones on or off.Storage – Set to use either Nandflash or external memory card.P. 16
Format Set to format the memory. Important Important Important All data will be lost afterformatting.Auto Off Set the time to automatically power off or LCD off after certainperiod of idle.Language – Available in English, Traditional Chinese, Simplified Chinese,Spanish, Portuguese, Italian, German and France.Default Set everything back to factory default settings.TV Out Set the video output signal to TV PAL, TV NTSC or the device’sLCD.Note: To output program to TV set, you should plug in the AV cable to the“AV in” of TV set / DVD player as the picture shows below, the other side ofthe cable should be plugged into “AV out” port of your PMP.P. 17
AccessoryThe player has come with a calendar, 3 games and memory indicator.Memory If an external memory is in used, it will display its remainingcapacity in priority. If you want to display the internal memory, you will needto set it in the SETUP screen.Calendar To show the Year, Month and Day you have set .Supported Media FormatVideoAudioFile extension Supported by deviceSupported by PCconversion.mpg No Yes 2 *2.avi Yes *1 Yes 2 *2.asf Yes *1 Yes 2 *2.vob No Yes 2 *2.wmv No Yes 2 *2.dat No Yes 2 *2.rmvb No Yes *3File extension Supported by deviceSupported by PCconversion *2.wma Yes *1 Yes.mp3 Yes YesP. 18
PictureFile extension Supported by deviceSupported by PCconversion *2.jpg Yes *1 Yes.bmp No Yes.tiff No Yes.gif No YesNote:*1 – Only applies to some specific encode format.*2 Must comply with the decode/encode requirement of the conversionprogram.*3 The storm codec (http://www.softpedia.com/get/Multimedia/Video/Codec-Packs-Video-Codecs/Storm-Codec.shtmlshould be installed for .rmvb conversion. In the selection of .rmvb file,please select the files of type All All files”P. 19
Trouble shootSymptoms Possible Reasons Actions1 Can not startup2 No SoundfromEarphones34567Can not playvideo filesSystemhangsInvalidcharacter onLCD screenFail todownloador upload offilesCan notbrowsepicturesCheck whether the batteryis too lowCheck if the HOLD button isset to ON.Check whether the batteryis too lowCheck if the earphoneis set to off.Check if the jack is detachedfrom the unitCheck if the VOLUMN is setto “0”.Check whether the plug iscontaminated / oxidized.Check if the HOLD button isset to ON.Check whether the batteryis too lowCheck if the files aredownloaded in right folder.Check if the files format issupported by the PMPCheck whether you have dosome invalid operation.The character isn’t supportedby the language you setCheck whether the batteryis too lowCheck the connection ofUSB cable.Damaged USB cable.Memory is full.Check whether the picturesare located in right folder.Check whether the format ofthe picture is supportedP. 20Recharge the batterySet the HOLD button to OFF.Recharge the batterySet the “A” button to set it onin the main menu.Re-install the earphonesagain.Increase the volume.Clean the jack.Set the HOLD button to OFF.Recharge the batteryMove the files to the rightfolder.Transfer the video files tosupported format with PMPTranscoding ToolPress “reset” button to turnoff the PMP and then turn iton again.Change the language settingRecharge the batteryRe-plug the cable at bothends.Replace a new USB cable.Delete some files to releasememory space.Move pictures to the rightfolder.Transfer the picture tosupported format with PMPTranscoding Tool
Technical SupportAccess latest driver update and software enhancement via our web site:www.z-cyber.net/support.This manual only provides information that may help you operate the playermore efficiently. If you are not able to find answers from the troubleshootingabove, you can contact us via email at support@zoltrix.com.DisclaimerOur company bears no responsibility for any damage arising from improperoperation, software, product maintenance, battery change, incidental lossof personal data, or any claim made by any third party. We also reservethe right to make any modification in this manual at any time without priornotice.P. 21