How to Make a Lucet Fork and Cord - AlonaTwoTrees.com
How to Make a Lucet Fork and Cord - AlonaTwoTrees.com
How to Make a Lucet Fork and Cord - AlonaTwoTrees.com

You also want an ePaper? Increase the reach of your titles
YUMPU automatically turns print PDFs into web optimized ePapers that Google loves.
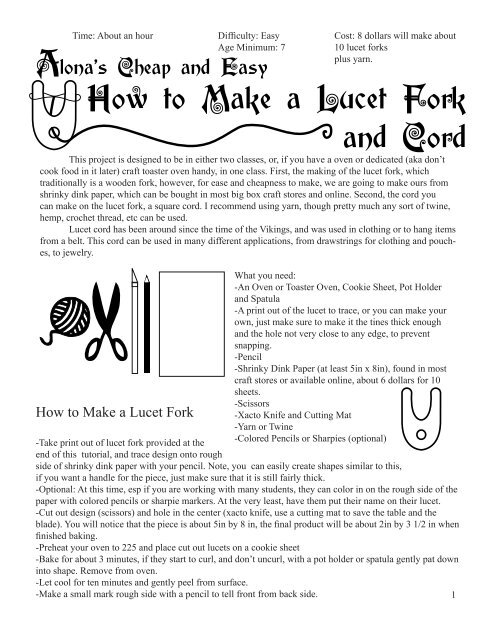
Time: About an hour Difficulty: Easy Cost: 8 dollars will make aboutAge Minimum: 710 lucet forksplus yarn.Alona’s Cheap <strong>and</strong> Easy<strong>How</strong> <strong>to</strong> <strong>Make</strong> a <strong>Lucet</strong> <strong>Fork</strong><strong>and</strong> <strong>Cord</strong>This project is designed <strong>to</strong> be in either two classes, or, if you have a oven or dedicated (aka don’tcook food in it later) craft <strong>to</strong>aster oven h<strong>and</strong>y, in one class. First, the making of the lucet fork, whichtraditionally is a wooden fork, however, for ease <strong>and</strong> cheapness <strong>to</strong> make, we are going <strong>to</strong> make ours fromshrinky dink paper, which can be bought in most big box craft s<strong>to</strong>res <strong>and</strong> online. Second, the cord youcan make on the lucet fork, a square cord. I re<strong>com</strong>mend using yarn, though pretty much any sort of twine,hemp, crochet thread, etc can be used.<strong>Lucet</strong> cord has been around since the time of the Vikings, <strong>and</strong> was used in clothing or <strong>to</strong> hang itemsfrom a belt. This cord can be used in many different applications, from drawstrings for clothing <strong>and</strong> pouches,<strong>to</strong> jewelry.What you need:-An Oven or Toaster Oven, Cookie Sheet, Pot Holder<strong>and</strong> Spatula-A print out of the lucet <strong>to</strong> trace, or you can make yourown, just make sure <strong>to</strong> make it the tines thick enough<strong>and</strong> the hole not very close <strong>to</strong> any edge, <strong>to</strong> preventsnapping.-Pencil-Shrinky Dink Paper (at least 5in x 8in), found in mostcraft s<strong>to</strong>res or available online, about 6 dollars for 10sheets.-Scissors<strong>How</strong> <strong>to</strong> <strong>Make</strong> a <strong>Lucet</strong> <strong>Fork</strong> -Xac<strong>to</strong> Knife <strong>and</strong> Cutting Mat-Yarn or Twine-Take print out of lucet fork provided at the-Colored Pencils or Sharpies (optional)end of this tu<strong>to</strong>rial, <strong>and</strong> trace design on<strong>to</strong> roughside of shrinky dink paper with your pencil. Note, you can easily create shapes similar <strong>to</strong> this,if you want a h<strong>and</strong>le for the piece, just make sure that it is still fairly thick.-Optional: At this time, esp if you are working with many students, they can color in on the rough side of thepaper with colored pencils or sharpie markers. At the very least, have them put their name on their lucet.-Cut out design (scissors) <strong>and</strong> hole in the center (xac<strong>to</strong> knife, use a cutting mat <strong>to</strong> save the table <strong>and</strong> theblade). You will notice that the piece is about 5in by 8 in, the final product will be about 2in by 3 1/2 in whenfinished baking.-Preheat your oven <strong>to</strong> 225 <strong>and</strong> place cut out lucets on a cookie sheet-Bake for about 3 minutes, if they start <strong>to</strong> curl, <strong>and</strong> don’t uncurl, with a pot holder or spatula gently pat downin<strong>to</strong> shape. Remove from oven.-Let cool for ten minutes <strong>and</strong> gently peel from surface.-<strong>Make</strong> a small mark rough side with a pencil <strong>to</strong> tell front from back side. 1
<strong>How</strong> <strong>to</strong> Use the <strong>Lucet</strong> <strong>Fork</strong> <strong>to</strong> <strong>Make</strong> <strong>Cord</strong>Some things <strong>to</strong> think about, for what kind of project you are making:-<strong>Lucet</strong> cord uses up a LOT of yarn, I <strong>to</strong>ok a yard of medium weight yarn <strong>and</strong> ended up with 5 inchesof cording, with about 5 inches of yarn <strong>and</strong> the begining <strong>and</strong> the end of the cord. You can use a line from aball of yarn, if you prefer.-The cord is fairly thick, the medium weight yarn I used created a 1/8 inch thick cord.Step One:-Pull end of yarn through the center hole,so the yarn is on the back.Step Four:-Wrap yarn over right tine as before.XXStep Two:-Pull yarn so that it is crossing over the right tine.Step Five:-Now you want <strong>to</strong> flip the lucet, so the right tine isnow the left tine. For this tu<strong>to</strong>rial, the back side willbe in gray.XStep Three:-Wrap yarn around the back of the right tine, <strong>and</strong>over the left tine. You will be forming a figure 8 onthe tines.Step Six:-Pinch the borrom loop around the now left tine, <strong>and</strong>pull up over the <strong>to</strong>p loop, <strong>and</strong> over the left tine.X2
Step Seven:-Now pull a bit on the bot<strong>to</strong>m bit of yarn <strong>and</strong> holdon<strong>to</strong> the <strong>to</strong>p part of the yarn, pulling the knot <strong>to</strong> thecenter of the fork.Step Ten:-Tug on the yarn looped around the right tine <strong>to</strong>tighten the knot. Tug on the ends <strong>to</strong> tighten as well.XStep Eight:-Wrap the long end under the right tine <strong>and</strong> flipagain.Step Eleven:Wrap end over <strong>and</strong> around right tine <strong>and</strong> flip again.XStep Twelve:-Pull bot<strong>to</strong>m loop on left tine over the <strong>to</strong>p loop <strong>and</strong>over the left tine. Tug once again <strong>to</strong> make knot tighter.Step Nine:-Pull the bot<strong>to</strong>m loop on the left tine up over the <strong>to</strong>ploop <strong>and</strong> over the tine.XContinue making figure 8s around tines <strong>and</strong> pullingbot<strong>to</strong>m loop over the <strong>to</strong>p loop <strong>and</strong> over the left tine.Then tug <strong>to</strong> tighten, then flip. Repeat till you have aamount of cord you want, <strong>and</strong> knot off end, otherwisecord will unravel.Once you master this, you can make cord almost without thinking, <strong>and</strong> churn it out. The following page canbe printed out <strong>and</strong> used <strong>to</strong> trace <strong>to</strong> make a lucet that is about 2 inches by 3 1/5 inches. Questions? EmailAlona at neweuropa@hotmail.<strong>com</strong>3