
Create successful ePaper yourself
Turn your PDF publications into a flip-book with our unique Google optimized e-Paper software.
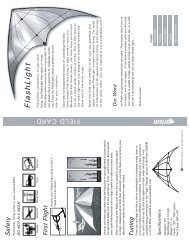
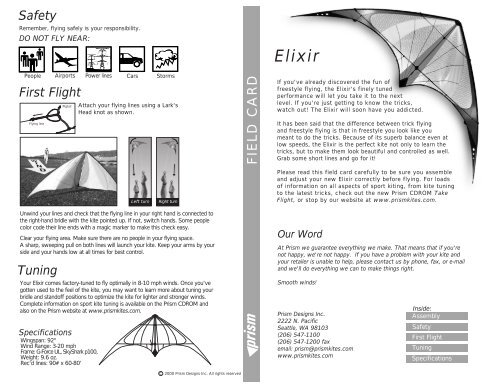
SafetyRemember, flying safely is your responsibility.DO NOT FLY NEAR:People Airports Power lines Cars StormsFirst FlightFlying linePigtailAttach your flying lines using a Lark'sHead knot as shown.FIELD CARD<strong>Elixir</strong>If you've already discovered the fun offreestyle flying, the <strong>Elixir</strong>'s finely tunedperformance will let you take it to the nextlevel. If you're just getting to know the tricks,watch out! The <strong>Elixir</strong> will soon have you addicted.It has been said that the difference between trick flyingand freestyle flying is that in freestyle you look like youmeant to do the tricks. Because of its superb balance even atlow speeds, the <strong>Elixir</strong> is the perfect kite not only to learn thetricks, but to make them look beautiful and controlled as well.Grab some short lines and go for it!Left turnRight turnPlease read this field card carefully to be sure you assembleand adjust your new <strong>Elixir</strong> correctly before flying. For loadsof information on all aspects of sport kiting, from kite tuningto the latest tricks, check out the new <strong>Prism</strong> CDROM TakeFlight, or stop by our website at www.prismkites.com.Unwind your lines and check that the flying line in your right hand is connected tothe right-hand bridle with the kite pointed up. If not, switch hands. Some peoplecolor code their line ends with a magic marker to make this check easy.Clear your flying area. Make sure there are no people in your flying space.A sharp, sweeping pull on both lines will launch your kite. Keep your arms by yourside and your hands low at all times for best control.TuningYour <strong>Elixir</strong> comes factory-tuned to fly optimally in 8-10 mph winds. Once you'vegotten used to the feel of the kite, you may want to learn more about tuning yourbridle and standoff positions to optimize the kite for lighter and stronger winds.Complete information on sport kite tuning is available on the <strong>Prism</strong> CDROM andalso on the <strong>Prism</strong> website at www.prismkites.com.SpecificationsWingspan: 92"Wind Range: 3-20 mphFrame: G-Force UL, SkyShark p100,Weight: 9.6 oz.Rec'd lines: 90# x 60-80'Our WordAt <strong>Prism</strong> we guarantee everything we make. That means that if you'renot happy, we're not happy. If you have a problem with your kite andyour retailer is unable to help, please contact us by phone, fax, or e-mailand we'll do everything we can to make things right.Smooth winds!<strong>Prism</strong> Designs Inc.2222 N. PacificSeattle, WA 98103(206) 547-1100(206) 547-1200 faxemail: prism@prismkites.comwww.prismkites.comInside:AssemblySafetyFirst FlightTuningSpecificationsC 2000 <strong>Prism</strong> Designs Inc. All rights reserved
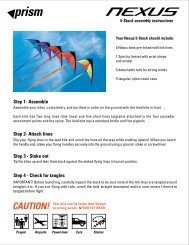
ASSEMBLY1Unroll your sail and lay it out asshown. In addition to the sail,you should have:2Two long lower spreaders, onemale and one femaleOne short upper spreaderTwo long standoffsFour short standoffsConnect the leading edge rodsfor each wing at the ferrules.StrongerwindsFactoryLightest winds6Start with the long inner standoffsat the factory setting. Later youcan move them to other holes tosee how they affect the lift andspeed of the kite in different winds.See the <strong>Prism</strong> CDROM to learnmore about standoff adjustment.7Insert the upper and lowerspreaders all the way into theleading edge fittings. Checkthat the bridles are clear ofthe fittings, and hold thespreader rods close to the endas shown so you don't slipand puncture the sail.3Using your upper spreader as atool, tension the elastic at eachwingtip as shown.8Insert the ends of the lowerspreaders into the center "T"fitting.Tension the sail by inserting thestandoffs into the spreaderfittings. Hang the kite from thebridles to check that they aren'ttangled.4With your wingtips tensioned,check that the sail is smoothand wrinkle-free along theleading edge. The tighter yourtip tension, the better.5Clip the standoff rods into theholes in the back edge of thesail. Clip two short rods into theholes nearer the wingtips. Cliptwo short rods into the holesclosest to the spine.