VERITAS Volume Manager™ 3.5 - Storage Foundation DocCentral
VERITAS Volume Manager™ 3.5 - Storage Foundation DocCentral
VERITAS Volume Manager™ 3.5 - Storage Foundation DocCentral

You also want an ePaper? Increase the reach of your titles
YUMPU automatically turns print PDFs into web optimized ePapers that Google loves.
<strong>VERITAS</strong> <strong>Volume</strong> Manager <strong>3.5</strong>Administrator’s GuideHP-UXAugust 2002N08929G
DisclaimerThe information contained in this publication is subject to change without notice.<strong>VERITAS</strong> Software Corporation makes no warranty of any kind with regard to thismanual, including, but not limited to, the implied warranties of merchantability andfitness for a particular purpose. <strong>VERITAS</strong> Software Corporation shall not be liable forerrors contained herein or for incidental or consequential damages in connection with thefurnishing, performance, or use of this manual.CopyrightCopyright © 2000-2002 <strong>VERITAS</strong> Software Corporation. All rights reserved. <strong>VERITAS</strong>,<strong>VERITAS</strong> SOFTWARE, the <strong>VERITAS</strong> logo, and all other <strong>VERITAS</strong> product names andslogans are trademarks or registered trademarks of <strong>VERITAS</strong> Software Corporation in theUSA and/or other countries. Other product names and/or slogans mentioned herein maybe trademarks or registered trademarks of their respective companies.<strong>VERITAS</strong> Software Corporation350 Ellis StreetMountain View, CA 94043Phone 650–527–8000Fax 650-527-2908www.veritas.com
ContentsPreface . . . . . . . . . . . . . . . . . . . . . . . . . . . . . . . . . . . . . . . . . . . . . . . . . . . . . . . . . . . . . .xvIntroduction . . . . . . . . . . . . . . . . . . . . . . . . . . . . . . . . . . . . . . . . . . . . . . . . . . . . . . . . . . . . . .xvAudience . . . . . . . . . . . . . . . . . . . . . . . . . . . . . . . . . . . . . . . . . . . . . . . . . . . . . . . . . . . . . . . . .xvScope . . . . . . . . . . . . . . . . . . . . . . . . . . . . . . . . . . . . . . . . . . . . . . . . . . . . . . . . . . . . . . . . . . . .xvOrganization . . . . . . . . . . . . . . . . . . . . . . . . . . . . . . . . . . . . . . . . . . . . . . . . . . . . . . . . . . . . . xviUsing This Guide . . . . . . . . . . . . . . . . . . . . . . . . . . . . . . . . . . . . . . . . . . . . . . . . . . . . . . . . . xviRelated Documents . . . . . . . . . . . . . . . . . . . . . . . . . . . . . . . . . . . . . . . . . . . . . . . . . . . . . . xviiConventions . . . . . . . . . . . . . . . . . . . . . . . . . . . . . . . . . . . . . . . . . . . . . . . . . . . . . . . . . . . . xviiiGetting Help . . . . . . . . . . . . . . . . . . . . . . . . . . . . . . . . . . . . . . . . . . . . . . . . . . . . . . . . . . . . . xixUsing VRTSexplorer . . . . . . . . . . . . . . . . . . . . . . . . . . . . . . . . . . . . . . . . . . . . . . . . . . . xixChapter 1. Understanding <strong>VERITAS</strong> <strong>Volume</strong> Manager . . . . . . . . . . . . . . . . . . . . . . . .1Introduction . . . . . . . . . . . . . . . . . . . . . . . . . . . . . . . . . . . . . . . . . . . . . . . . . . . . . . . . . . . . . . . 1VxVM and the Operating System . . . . . . . . . . . . . . . . . . . . . . . . . . . . . . . . . . . . . . . . . . . . . 2How Data is Stored . . . . . . . . . . . . . . . . . . . . . . . . . . . . . . . . . . . . . . . . . . . . . . . . . . . . . . . . . 2How VxVM Handles <strong>Storage</strong> Management . . . . . . . . . . . . . . . . . . . . . . . . . . . . . . . . . . . . . 3Physical Objects—Physical Disks . . . . . . . . . . . . . . . . . . . . . . . . . . . . . . . . . . . . . . . . . . 3Device Discovery . . . . . . . . . . . . . . . . . . . . . . . . . . . . . . . . . . . . . . . . . . . . . . . . . . . . . . . . . . . 5Virtual Objects . . . . . . . . . . . . . . . . . . . . . . . . . . . . . . . . . . . . . . . . . . . . . . . . . . . . . . . . . . 7Combining Virtual Objects in VxVM . . . . . . . . . . . . . . . . . . . . . . . . . . . . . . . . . . . . . . 12<strong>Volume</strong> Layouts in VxVM . . . . . . . . . . . . . . . . . . . . . . . . . . . . . . . . . . . . . . . . . . . . . . . . . . 13Implementation of Non-Layered <strong>Volume</strong>s . . . . . . . . . . . . . . . . . . . . . . . . . . . . . . . . . 13Implementation of Layered <strong>Volume</strong>s . . . . . . . . . . . . . . . . . . . . . . . . . . . . . . . . . . . . . . 14Layout Methods . . . . . . . . . . . . . . . . . . . . . . . . . . . . . . . . . . . . . . . . . . . . . . . . . . . . . . . . 14iii
Hot-Relocation . . . . . . . . . . . . . . . . . . . . . . . . . . . . . . . . . . . . . . . . . . . . . . . . . . . . . . . . . . . . 51Chapter 2. Administering Disks . . . . . . . . . . . . . . . . . . . . . . . . . . . . . . . . . . . . . . . . . .53Introduction . . . . . . . . . . . . . . . . . . . . . . . . . . . . . . . . . . . . . . . . . . . . . . . . . . . . . . . . . . . . . . 53Disk Devices . . . . . . . . . . . . . . . . . . . . . . . . . . . . . . . . . . . . . . . . . . . . . . . . . . . . . . . . . . . . . . 53Disk Device Naming in VxVM . . . . . . . . . . . . . . . . . . . . . . . . . . . . . . . . . . . . . . . . . . . . 54Private and Public Disk Regions . . . . . . . . . . . . . . . . . . . . . . . . . . . . . . . . . . . . . . . . . . 55Metadevices . . . . . . . . . . . . . . . . . . . . . . . . . . . . . . . . . . . . . . . . . . . . . . . . . . . . . . . . . . . . 56Configuring Newly Added Disk Devices . . . . . . . . . . . . . . . . . . . . . . . . . . . . . . . . . . . . . 56Discovering Disks and Dynamically Adding Disk Arrays . . . . . . . . . . . . . . . . . . . . 57Administering the Device Discovery Layer . . . . . . . . . . . . . . . . . . . . . . . . . . . . . . . . . 58Placing Disks Under VxVM Control . . . . . . . . . . . . . . . . . . . . . . . . . . . . . . . . . . . . . . . . . . 60Changing the Disk-Naming Scheme . . . . . . . . . . . . . . . . . . . . . . . . . . . . . . . . . . . . . . . . . . 61Using vxprint with Enclosure-Based Disk Names . . . . . . . . . . . . . . . . . . . . . . . . . . . 62Issues Regarding Persistent Simple/Nopriv Disks with Enclosure-Based Naming .62Installing and Formatting Disks . . . . . . . . . . . . . . . . . . . . . . . . . . . . . . . . . . . . . . . . . . . 64Adding a Disk to VxVM . . . . . . . . . . . . . . . . . . . . . . . . . . . . . . . . . . . . . . . . . . . . . . . . . . . . 65Reinitializing a Disk . . . . . . . . . . . . . . . . . . . . . . . . . . . . . . . . . . . . . . . . . . . . . . . . . . . . . 68Using vxdiskadd to Place a Disk Under Control of VxVM . . . . . . . . . . . . . . . . . . . . 68Rootability . . . . . . . . . . . . . . . . . . . . . . . . . . . . . . . . . . . . . . . . . . . . . . . . . . . . . . . . . . . . . . . . 69VxVM Root Disk <strong>Volume</strong> Restrictions . . . . . . . . . . . . . . . . . . . . . . . . . . . . . . . . . . . . . 70Root Disk Mirrors . . . . . . . . . . . . . . . . . . . . . . . . . . . . . . . . . . . . . . . . . . . . . . . . . . . . . . . 70Booting Root <strong>Volume</strong>s . . . . . . . . . . . . . . . . . . . . . . . . . . . . . . . . . . . . . . . . . . . . . . . . . . . 70Setting up a VxVM Root Disk and Mirror . . . . . . . . . . . . . . . . . . . . . . . . . . . . . . . . . . 71Creating an LVM Root Disk from a VxVM Root Disk . . . . . . . . . . . . . . . . . . . . . . . . 73Adding Swap Disks to a VxVM Rootable System . . . . . . . . . . . . . . . . . . . . . . . . . . . . 73Removing Disks . . . . . . . . . . . . . . . . . . . . . . . . . . . . . . . . . . . . . . . . . . . . . . . . . . . . . . . . . . . 74Removing a Disk with Subdisks . . . . . . . . . . . . . . . . . . . . . . . . . . . . . . . . . . . . . . . . . . 75Removing a Disk with No Subdisks . . . . . . . . . . . . . . . . . . . . . . . . . . . . . . . . . . . . . . . 76Removing and Replacing Disks . . . . . . . . . . . . . . . . . . . . . . . . . . . . . . . . . . . . . . . . . . . . . . 76Contentsv
Replacing a Failed or Removed Disk . . . . . . . . . . . . . . . . . . . . . . . . . . . . . . . . . . . . . . 78Enabling a Physical Disk . . . . . . . . . . . . . . . . . . . . . . . . . . . . . . . . . . . . . . . . . . . . . . . . . . . 80Taking a Disk Offline . . . . . . . . . . . . . . . . . . . . . . . . . . . . . . . . . . . . . . . . . . . . . . . . . . . . . .81Renaming a Disk . . . . . . . . . . . . . . . . . . . . . . . . . . . . . . . . . . . . . . . . . . . . . . . . . . . . . . . . . . 81Reserving Disks . . . . . . . . . . . . . . . . . . . . . . . . . . . . . . . . . . . . . . . . . . . . . . . . . . . . . . . . . . . 82Displaying Disk Information . . . . . . . . . . . . . . . . . . . . . . . . . . . . . . . . . . . . . . . . . . . . . . . . 83Displaying Disk Information with vxdiskadm . . . . . . . . . . . . . . . . . . . . . . . . . . . . . . 84Chapter 3. Administering Dynamic Multipathing (DMP) . . . . . . . . . . . . . . . . . . . . . . 85Introduction . . . . . . . . . . . . . . . . . . . . . . . . . . . . . . . . . . . . . . . . . . . . . . . . . . . . . . . . . . . . . . 85Path Failover Mechanism . . . . . . . . . . . . . . . . . . . . . . . . . . . . . . . . . . . . . . . . . . . . . . . . 87Load Balancing . . . . . . . . . . . . . . . . . . . . . . . . . . . . . . . . . . . . . . . . . . . . . . . . . . . . . . . . 88Disabling and Enabling Multipathing for Specific Devices . . . . . . . . . . . . . . . . . . . . . . 88Disabling Multipathing and Making Devices Invisible to VxVM . . . . . . . . . . . . . . 88Enabling Multipathing and Making Devices Visible to VxVM . . . . . . . . . . . . . . . . 93Enabling and Disabling Input/Output (I/O) Controllers . . . . . . . . . . . . . . . . . . . . . . . 98Displaying DMP Database Information . . . . . . . . . . . . . . . . . . . . . . . . . . . . . . . . . . . . . . 99Displaying Multipaths to a VM Disk . . . . . . . . . . . . . . . . . . . . . . . . . . . . . . . . . . . . . . . . . 99Administering DMP Using vxdmpadm . . . . . . . . . . . . . . . . . . . . . . . . . . . . . . . . . . . . . 101Retrieving Information About a DMP Node . . . . . . . . . . . . . . . . . . . . . . . . . . . . . . . 101Displaying All Paths Controlled by a DMP Node . . . . . . . . . . . . . . . . . . . . . . . . . . 101Listing Information About Host I/O Controllers . . . . . . . . . . . . . . . . . . . . . . . . . . . 102Disabling a Controller . . . . . . . . . . . . . . . . . . . . . . . . . . . . . . . . . . . . . . . . . . . . . . . . . . 102Enabling a Controller . . . . . . . . . . . . . . . . . . . . . . . . . . . . . . . . . . . . . . . . . . . . . . . . . . 102Listing Information About Enclosures . . . . . . . . . . . . . . . . . . . . . . . . . . . . . . . . . . . . 102Renaming an Enclosure . . . . . . . . . . . . . . . . . . . . . . . . . . . . . . . . . . . . . . . . . . . . . . . . 103Starting the DMP Restore Daemon . . . . . . . . . . . . . . . . . . . . . . . . . . . . . . . . . . . . . . . 103Stopping the DMP Restore Daemon . . . . . . . . . . . . . . . . . . . . . . . . . . . . . . . . . . . . . . 104Displaying the Status of the DMP Restore Daemon . . . . . . . . . . . . . . . . . . . . . . . . 104Displaying Information About the DMP Error Daemons . . . . . . . . . . . . . . . . . . . . 105vi<strong>VERITAS</strong> <strong>Volume</strong> Manager Administrator’s Guide
DMP in a Clustered Environment . . . . . . . . . . . . . . . . . . . . . . . . . . . . . . . . . . . . . . . . . . . 105Enabling/Disabling Controllers with Shared Disk Groups . . . . . . . . . . . . . . . . . . . 105Operation of the DMP Restore Daemon with Shared Disk Groups . . . . . . . . . . . . 106Chapter 4. Creating and Administering Disk Groups . . . . . . . . . . . . . . . . . . . . . . . .107Introduction . . . . . . . . . . . . . . . . . . . . . . . . . . . . . . . . . . . . . . . . . . . . . . . . . . . . . . . . . . . . . 107Specifying a Disk Group to Commands . . . . . . . . . . . . . . . . . . . . . . . . . . . . . . . . . . . . . . 108Displaying Disk Group Information . . . . . . . . . . . . . . . . . . . . . . . . . . . . . . . . . . . . . . . . . 109Displaying Free Space in a Disk Group . . . . . . . . . . . . . . . . . . . . . . . . . . . . . . . . . . . 110Creating a Disk Group . . . . . . . . . . . . . . . . . . . . . . . . . . . . . . . . . . . . . . . . . . . . . . . . . . . . 110Adding a Disk to a Disk Group . . . . . . . . . . . . . . . . . . . . . . . . . . . . . . . . . . . . . . . . . . . . . 111Removing a Disk from a Disk Group . . . . . . . . . . . . . . . . . . . . . . . . . . . . . . . . . . . . . . . . 111Deporting a Disk Group . . . . . . . . . . . . . . . . . . . . . . . . . . . . . . . . . . . . . . . . . . . . . . . . . . . 113Importing a Disk Group . . . . . . . . . . . . . . . . . . . . . . . . . . . . . . . . . . . . . . . . . . . . . . . . . . . 114Renaming a Disk Group . . . . . . . . . . . . . . . . . . . . . . . . . . . . . . . . . . . . . . . . . . . . . . . . . . . 115Moving Disks between Disk Groups . . . . . . . . . . . . . . . . . . . . . . . . . . . . . . . . . . . . . . . . 117Moving Disk Groups Between Systems . . . . . . . . . . . . . . . . . . . . . . . . . . . . . . . . . . . . . . 117Reserving Minor Numbers for Disk Groups . . . . . . . . . . . . . . . . . . . . . . . . . . . . . . . 119Reorganizing the Contents of Disk Groups . . . . . . . . . . . . . . . . . . . . . . . . . . . . . . . . . . . 120Listing Objects Potentially Affected by a Move . . . . . . . . . . . . . . . . . . . . . . . . . . . . . 125Moving Objects Between Disk Groups . . . . . . . . . . . . . . . . . . . . . . . . . . . . . . . . . . . . 127Splitting Disk Groups . . . . . . . . . . . . . . . . . . . . . . . . . . . . . . . . . . . . . . . . . . . . . . . . . . 129Joining Disk Groups . . . . . . . . . . . . . . . . . . . . . . . . . . . . . . . . . . . . . . . . . . . . . . . . . . . . 130Disabling a Disk Group . . . . . . . . . . . . . . . . . . . . . . . . . . . . . . . . . . . . . . . . . . . . . . . . . . . . 132Destroying a Disk Group . . . . . . . . . . . . . . . . . . . . . . . . . . . . . . . . . . . . . . . . . . . . . . . . . . 132Upgrading a Disk Group . . . . . . . . . . . . . . . . . . . . . . . . . . . . . . . . . . . . . . . . . . . . . . . . . . 132Managing the Configuration Daemon in VxVM . . . . . . . . . . . . . . . . . . . . . . . . . . . . . . . 135Chapter 5. Creating and Administering Subdisks . . . . . . . . . . . . . . . . . . . . . . . . . .137Introduction . . . . . . . . . . . . . . . . . . . . . . . . . . . . . . . . . . . . . . . . . . . . . . . . . . . . . . . . . . . . . 137Creating Subdisks . . . . . . . . . . . . . . . . . . . . . . . . . . . . . . . . . . . . . . . . . . . . . . . . . . . . . . . . 137Contentsvii
Displaying Subdisk Information . . . . . . . . . . . . . . . . . . . . . . . . . . . . . . . . . . . . . . . . . . . . 138Moving Subdisks . . . . . . . . . . . . . . . . . . . . . . . . . . . . . . . . . . . . . . . . . . . . . . . . . . . . . . . . . 138Splitting Subdisks . . . . . . . . . . . . . . . . . . . . . . . . . . . . . . . . . . . . . . . . . . . . . . . . . . . . . . . . 139Joining Subdisks . . . . . . . . . . . . . . . . . . . . . . . . . . . . . . . . . . . . . . . . . . . . . . . . . . . . . . . . . 139Associating Subdisks with Plexes . . . . . . . . . . . . . . . . . . . . . . . . . . . . . . . . . . . . . . . . . . . 140Associating Log Subdisks . . . . . . . . . . . . . . . . . . . . . . . . . . . . . . . . . . . . . . . . . . . . . . . . . 141Dissociating Subdisks from Plexes . . . . . . . . . . . . . . . . . . . . . . . . . . . . . . . . . . . . . . . . . . 142Removing Subdisks . . . . . . . . . . . . . . . . . . . . . . . . . . . . . . . . . . . . . . . . . . . . . . . . . . . . . . . 142Changing Subdisk Attributes . . . . . . . . . . . . . . . . . . . . . . . . . . . . . . . . . . . . . . . . . . . . . . 143Chapter 6. Creating and Administering Plexes . . . . . . . . . . . . . . . . . . . . . . . . . . . . 145Introduction . . . . . . . . . . . . . . . . . . . . . . . . . . . . . . . . . . . . . . . . . . . . . . . . . . . . . . . . . . . . . 145Creating Plexes . . . . . . . . . . . . . . . . . . . . . . . . . . . . . . . . . . . . . . . . . . . . . . . . . . . . . . . . . . 145Creating a Striped Plex . . . . . . . . . . . . . . . . . . . . . . . . . . . . . . . . . . . . . . . . . . . . . . . . . . . . 146Displaying Plex Information . . . . . . . . . . . . . . . . . . . . . . . . . . . . . . . . . . . . . . . . . . . . . . . 146Plex States . . . . . . . . . . . . . . . . . . . . . . . . . . . . . . . . . . . . . . . . . . . . . . . . . . . . . . . . . . . . 146Plex Condition Flags . . . . . . . . . . . . . . . . . . . . . . . . . . . . . . . . . . . . . . . . . . . . . . . . . . . 150Plex Kernel States . . . . . . . . . . . . . . . . . . . . . . . . . . . . . . . . . . . . . . . . . . . . . . . . . . . . . 151Attaching and Associating Plexes . . . . . . . . . . . . . . . . . . . . . . . . . . . . . . . . . . . . . . . . . . . 151Taking Plexes Offline . . . . . . . . . . . . . . . . . . . . . . . . . . . . . . . . . . . . . . . . . . . . . . . . . . . . . 152Detaching Plexes . . . . . . . . . . . . . . . . . . . . . . . . . . . . . . . . . . . . . . . . . . . . . . . . . . . . . . . . . 152Reattaching Plexes . . . . . . . . . . . . . . . . . . . . . . . . . . . . . . . . . . . . . . . . . . . . . . . . . . . . . . . . 153Moving Plexes . . . . . . . . . . . . . . . . . . . . . . . . . . . . . . . . . . . . . . . . . . . . . . . . . . . . . . . . . . . 154Copying Plexes . . . . . . . . . . . . . . . . . . . . . . . . . . . . . . . . . . . . . . . . . . . . . . . . . . . . . . . . . . 154Dissociating and Removing Plexes . . . . . . . . . . . . . . . . . . . . . . . . . . . . . . . . . . . . . . . . . . 155Changing Plex Attributes . . . . . . . . . . . . . . . . . . . . . . . . . . . . . . . . . . . . . . . . . . . . . . . . . . 156Chapter 7. Creating <strong>Volume</strong>s . . . . . . . . . . . . . . . . . . . . . . . . . . . . . . . . . . . . . . . . . . 157Introduction . . . . . . . . . . . . . . . . . . . . . . . . . . . . . . . . . . . . . . . . . . . . . . . . . . . . . . . . . . . . . 157Types of <strong>Volume</strong> Layouts . . . . . . . . . . . . . . . . . . . . . . . . . . . . . . . . . . . . . . . . . . . . . . . . . 157Creating a <strong>Volume</strong> . . . . . . . . . . . . . . . . . . . . . . . . . . . . . . . . . . . . . . . . . . . . . . . . . . . . . . . 159viii<strong>VERITAS</strong> <strong>Volume</strong> Manager Administrator’s Guide
Advanced Approach . . . . . . . . . . . . . . . . . . . . . . . . . . . . . . . . . . . . . . . . . . . . . . . . . . . 159Assisted Approach . . . . . . . . . . . . . . . . . . . . . . . . . . . . . . . . . . . . . . . . . . . . . . . . . . . . . 159Using vxassist . . . . . . . . . . . . . . . . . . . . . . . . . . . . . . . . . . . . . . . . . . . . . . . . . . . . . . . . . . . . 160Setting Default Values for vxassist . . . . . . . . . . . . . . . . . . . . . . . . . . . . . . . . . . . . . . . 161Discovering the Maximum Size of a <strong>Volume</strong> . . . . . . . . . . . . . . . . . . . . . . . . . . . . . . . . . 163Creating a <strong>Volume</strong> on Any Disk . . . . . . . . . . . . . . . . . . . . . . . . . . . . . . . . . . . . . . . . . . . . 163Creating a <strong>Volume</strong> on Specific Disks . . . . . . . . . . . . . . . . . . . . . . . . . . . . . . . . . . . . . . . . 164Specifying Ordered Allocation of <strong>Storage</strong> to <strong>Volume</strong>s . . . . . . . . . . . . . . . . . . . . . . . 165Creating a Mirrored <strong>Volume</strong> . . . . . . . . . . . . . . . . . . . . . . . . . . . . . . . . . . . . . . . . . . . . . . . 168Creating a Mirrored-Concatenated <strong>Volume</strong> . . . . . . . . . . . . . . . . . . . . . . . . . . . . . . . 168Creating a Concatenated-Mirror <strong>Volume</strong> . . . . . . . . . . . . . . . . . . . . . . . . . . . . . . . . . . 169Creating a <strong>Volume</strong> with a DCO and DCO <strong>Volume</strong> . . . . . . . . . . . . . . . . . . . . . . . . . 169Creating a Mirrored <strong>Volume</strong> with DRL Logging Enabled . . . . . . . . . . . . . . . . . . . 170Creating a Striped <strong>Volume</strong> . . . . . . . . . . . . . . . . . . . . . . . . . . . . . . . . . . . . . . . . . . . . . . . . . 171Creating a Mirrored-Stripe <strong>Volume</strong> . . . . . . . . . . . . . . . . . . . . . . . . . . . . . . . . . . . . . . 172Creating a Striped-Mirror <strong>Volume</strong> . . . . . . . . . . . . . . . . . . . . . . . . . . . . . . . . . . . . . . . 173Mirroring across Targets, Controllers or Enclosures . . . . . . . . . . . . . . . . . . . . . . . . . . . 173Creating a RAID-5 <strong>Volume</strong> . . . . . . . . . . . . . . . . . . . . . . . . . . . . . . . . . . . . . . . . . . . . . . . . . 174Creating a <strong>Volume</strong> Using vxmake . . . . . . . . . . . . . . . . . . . . . . . . . . . . . . . . . . . . . . . . . . . 176Creating a <strong>Volume</strong> Using a vxmake Description File . . . . . . . . . . . . . . . . . . . . . . . . 178Initializing and Starting a <strong>Volume</strong> . . . . . . . . . . . . . . . . . . . . . . . . . . . . . . . . . . . . . . . . . . 179Accessing a <strong>Volume</strong> . . . . . . . . . . . . . . . . . . . . . . . . . . . . . . . . . . . . . . . . . . . . . . . . . . . . . . . 180Chapter 8. Administering <strong>Volume</strong>s . . . . . . . . . . . . . . . . . . . . . . . . . . . . . . . . . . . . . .181Introduction . . . . . . . . . . . . . . . . . . . . . . . . . . . . . . . . . . . . . . . . . . . . . . . . . . . . . . . . . . . . . 181Displaying <strong>Volume</strong> Information . . . . . . . . . . . . . . . . . . . . . . . . . . . . . . . . . . . . . . . . . . . . 181<strong>Volume</strong> States . . . . . . . . . . . . . . . . . . . . . . . . . . . . . . . . . . . . . . . . . . . . . . . . . . . . . . . . . 182<strong>Volume</strong> Kernel States . . . . . . . . . . . . . . . . . . . . . . . . . . . . . . . . . . . . . . . . . . . . . . . . . . . 184Monitoring and Controlling Tasks . . . . . . . . . . . . . . . . . . . . . . . . . . . . . . . . . . . . . . . . . . 185Specifying Task Tags . . . . . . . . . . . . . . . . . . . . . . . . . . . . . . . . . . . . . . . . . . . . . . . . . . . 185Contentsix
Managing Tasks with vxtask . . . . . . . . . . . . . . . . . . . . . . . . . . . . . . . . . . . . . . . . . . . . 185Stopping a <strong>Volume</strong> . . . . . . . . . . . . . . . . . . . . . . . . . . . . . . . . . . . . . . . . . . . . . . . . . . . . . . . 187Putting a <strong>Volume</strong> in Maintenance Mode . . . . . . . . . . . . . . . . . . . . . . . . . . . . . . . . . . 188Starting a <strong>Volume</strong> . . . . . . . . . . . . . . . . . . . . . . . . . . . . . . . . . . . . . . . . . . . . . . . . . . . . . . . . 188Adding a Mirror to a <strong>Volume</strong> . . . . . . . . . . . . . . . . . . . . . . . . . . . . . . . . . . . . . . . . . . . . . . 189Mirroring All <strong>Volume</strong>s . . . . . . . . . . . . . . . . . . . . . . . . . . . . . . . . . . . . . . . . . . . . . . . . . 189Mirroring <strong>Volume</strong>s on a VM Disk . . . . . . . . . . . . . . . . . . . . . . . . . . . . . . . . . . . . . . . 189Removing a Mirror . . . . . . . . . . . . . . . . . . . . . . . . . . . . . . . . . . . . . . . . . . . . . . . . . . . . . . . 191Adding a DCO and DCO <strong>Volume</strong> . . . . . . . . . . . . . . . . . . . . . . . . . . . . . . . . . . . . . . . . . . 191Attaching a DCO and DCO volume to a RAID-5 <strong>Volume</strong> . . . . . . . . . . . . . . . . . . . 193Specifying <strong>Storage</strong> for DCO Plexes . . . . . . . . . . . . . . . . . . . . . . . . . . . . . . . . . . . . . . . 194Removing a DCO and DCO <strong>Volume</strong> . . . . . . . . . . . . . . . . . . . . . . . . . . . . . . . . . . . . . . . . 194Reattaching a DCO and DCO <strong>Volume</strong> . . . . . . . . . . . . . . . . . . . . . . . . . . . . . . . . . . . . . . . 195Adding DRL Logging to a Mirrored <strong>Volume</strong> . . . . . . . . . . . . . . . . . . . . . . . . . . . . . . . . . 195Removing a DRL Log . . . . . . . . . . . . . . . . . . . . . . . . . . . . . . . . . . . . . . . . . . . . . . . . . . . . . 196Adding a RAID-5 Log . . . . . . . . . . . . . . . . . . . . . . . . . . . . . . . . . . . . . . . . . . . . . . . . . . . . . 196Adding a RAID-5 Log using vxplex . . . . . . . . . . . . . . . . . . . . . . . . . . . . . . . . . . . . . . 197Removing a RAID-5 Log . . . . . . . . . . . . . . . . . . . . . . . . . . . . . . . . . . . . . . . . . . . . . . . . . . 197Resizing a <strong>Volume</strong> . . . . . . . . . . . . . . . . . . . . . . . . . . . . . . . . . . . . . . . . . . . . . . . . . . . . . . . 198Resizing <strong>Volume</strong>s using vxresize . . . . . . . . . . . . . . . . . . . . . . . . . . . . . . . . . . . . . . . . 199Resizing <strong>Volume</strong>s using vxassist . . . . . . . . . . . . . . . . . . . . . . . . . . . . . . . . . . . . . . . . 200Resizing <strong>Volume</strong>s using vxvol . . . . . . . . . . . . . . . . . . . . . . . . . . . . . . . . . . . . . . . . . . 201Changing the Read Policy for Mirrored <strong>Volume</strong>s . . . . . . . . . . . . . . . . . . . . . . . . . . . . . 202Removing a <strong>Volume</strong> . . . . . . . . . . . . . . . . . . . . . . . . . . . . . . . . . . . . . . . . . . . . . . . . . . . . . . 203Moving <strong>Volume</strong>s from a VM Disk . . . . . . . . . . . . . . . . . . . . . . . . . . . . . . . . . . . . . . . . . . 204Enabling FastResync on a <strong>Volume</strong> . . . . . . . . . . . . . . . . . . . . . . . . . . . . . . . . . . . . . . . . . . 205Checking Whether FastResync is Enabled on a <strong>Volume</strong> . . . . . . . . . . . . . . . . . . . . . 206Disabling FastResync . . . . . . . . . . . . . . . . . . . . . . . . . . . . . . . . . . . . . . . . . . . . . . . . . . . . . 207Enabling Persistent FastResync on Existing <strong>Volume</strong>s with Associated Snapshots . . 207Backing up <strong>Volume</strong>s Online . . . . . . . . . . . . . . . . . . . . . . . . . . . . . . . . . . . . . . . . . . . . . . . 210x<strong>VERITAS</strong> <strong>Volume</strong> Manager Administrator’s Guide
Backing Up <strong>Volume</strong>s Online Using Mirrors . . . . . . . . . . . . . . . . . . . . . . . . . . . . . . . 210Backing Up <strong>Volume</strong>s Online Using Snapshots . . . . . . . . . . . . . . . . . . . . . . . . . . . . . 212Converting a Plex into a Snapshot Plex . . . . . . . . . . . . . . . . . . . . . . . . . . . . . . . . . . . 215Backing Up Multiple <strong>Volume</strong>s Using Snapshots . . . . . . . . . . . . . . . . . . . . . . . . . . . 216Merging a Snapshot <strong>Volume</strong> (snapback) . . . . . . . . . . . . . . . . . . . . . . . . . . . . . . . . . . 216Dissociating a Snapshot <strong>Volume</strong> (snapclear) . . . . . . . . . . . . . . . . . . . . . . . . . . . . . . . 217Displaying Snapshot Information (snapprint) . . . . . . . . . . . . . . . . . . . . . . . . . . . . . . 218Performing Online Relayout . . . . . . . . . . . . . . . . . . . . . . . . . . . . . . . . . . . . . . . . . . . . . . . 219Specifying a Non-Default Layout . . . . . . . . . . . . . . . . . . . . . . . . . . . . . . . . . . . . . . . . 219Specifying a Plex for Relayout . . . . . . . . . . . . . . . . . . . . . . . . . . . . . . . . . . . . . . . . . . . 220Tagging a Relayout Operation . . . . . . . . . . . . . . . . . . . . . . . . . . . . . . . . . . . . . . . . . . . 220Viewing the Status of a Relayout . . . . . . . . . . . . . . . . . . . . . . . . . . . . . . . . . . . . . . . . . 221Controlling the Progress of a Relayout . . . . . . . . . . . . . . . . . . . . . . . . . . . . . . . . . . . . 221Converting Between Layered and Non-Layered <strong>Volume</strong>s . . . . . . . . . . . . . . . . . . . . . . 222Chapter 9. Administering Hot-Relocation . . . . . . . . . . . . . . . . . . . . . . . . . . . . . . . . .225Introduction . . . . . . . . . . . . . . . . . . . . . . . . . . . . . . . . . . . . . . . . . . . . . . . . . . . . . . . . . . . . . 225How Hot-Relocation works . . . . . . . . . . . . . . . . . . . . . . . . . . . . . . . . . . . . . . . . . . . . . . . . 226Partial Disk Failure Mail Messages . . . . . . . . . . . . . . . . . . . . . . . . . . . . . . . . . . . . . . . 229Complete Disk Failure Mail Messages . . . . . . . . . . . . . . . . . . . . . . . . . . . . . . . . . . . . 230How Space is Chosen for Relocation . . . . . . . . . . . . . . . . . . . . . . . . . . . . . . . . . . . . . . 230Configuring a System for Hot-Relocation . . . . . . . . . . . . . . . . . . . . . . . . . . . . . . . . . . . . 231Displaying Spare Disk Information . . . . . . . . . . . . . . . . . . . . . . . . . . . . . . . . . . . . . . . . . . 232Marking a Disk as a Hot-Relocation Spare . . . . . . . . . . . . . . . . . . . . . . . . . . . . . . . . . . . . 232Removing a Disk from Use as a Hot-Relocation Spare . . . . . . . . . . . . . . . . . . . . . . . . . 233Excluding a Disk from Hot-Relocation Use . . . . . . . . . . . . . . . . . . . . . . . . . . . . . . . . . . . 234Making a Disk Available for Hot-Relocation Use . . . . . . . . . . . . . . . . . . . . . . . . . . . . . . 235Configuring Hot-Relocation to Use Only Spare Disks . . . . . . . . . . . . . . . . . . . . . . . . . . 236Moving and Unrelocating Subdisks . . . . . . . . . . . . . . . . . . . . . . . . . . . . . . . . . . . . . . . . . 236Moving and Unrelocating Subdisks using vxdiskadm . . . . . . . . . . . . . . . . . . . . . . 237Contentsxi
Moving and Unrelocating subdisks using vxassist . . . . . . . . . . . . . . . . . . . . . . . . . 238Moving and Unrelocating Subdisks using vxunreloc . . . . . . . . . . . . . . . . . . . . . . . 238Restarting vxunreloc After Errors . . . . . . . . . . . . . . . . . . . . . . . . . . . . . . . . . . . . . . . . 240Modifying the Behavior of Hot-Relocation . . . . . . . . . . . . . . . . . . . . . . . . . . . . . . . . . . . 241Chapter 10. Administering Cluster Functionality . . . . . . . . . . . . . . . . . . . . . . . . . . 243Introduction . . . . . . . . . . . . . . . . . . . . . . . . . . . . . . . . . . . . . . . . . . . . . . . . . . . . . . . . . . . . . 243Overview of Cluster <strong>Volume</strong> Management . . . . . . . . . . . . . . . . . . . . . . . . . . . . . . . . . . 244Private and Shared Disk Groups . . . . . . . . . . . . . . . . . . . . . . . . . . . . . . . . . . . . . . . . . 246Activation Modes of Shared Disk Groups . . . . . . . . . . . . . . . . . . . . . . . . . . . . . . . . . 247Connectivity Policy of Shared Disk Groups . . . . . . . . . . . . . . . . . . . . . . . . . . . . . . . 249Limitations of Shared Disk Groups . . . . . . . . . . . . . . . . . . . . . . . . . . . . . . . . . . . . . . 249Cluster Initialization and Configuration . . . . . . . . . . . . . . . . . . . . . . . . . . . . . . . . . . . . . 250Cluster Reconfiguration . . . . . . . . . . . . . . . . . . . . . . . . . . . . . . . . . . . . . . . . . . . . . . . . 250<strong>Volume</strong> Reconfiguration . . . . . . . . . . . . . . . . . . . . . . . . . . . . . . . . . . . . . . . . . . . . . . . 252Node Shutdown . . . . . . . . . . . . . . . . . . . . . . . . . . . . . . . . . . . . . . . . . . . . . . . . . . . . . . . 254Node Abort . . . . . . . . . . . . . . . . . . . . . . . . . . . . . . . . . . . . . . . . . . . . . . . . . . . . . . . . . . . 255Cluster Shutdown . . . . . . . . . . . . . . . . . . . . . . . . . . . . . . . . . . . . . . . . . . . . . . . . . . . . . 256Upgrading Cluster Functionality . . . . . . . . . . . . . . . . . . . . . . . . . . . . . . . . . . . . . . . . . . . 256Dirty Region Logging (DRL) in Cluster Environments . . . . . . . . . . . . . . . . . . . . . . . . . 257Header Compatibility . . . . . . . . . . . . . . . . . . . . . . . . . . . . . . . . . . . . . . . . . . . . . . . . . . 257Dirty Region Log Format and Size Requirements . . . . . . . . . . . . . . . . . . . . . . . . . . 257How DRL Works in a Cluster Environment . . . . . . . . . . . . . . . . . . . . . . . . . . . . . . . 258Administering VxVM in Cluster Environments . . . . . . . . . . . . . . . . . . . . . . . . . . . . . . . 258Requesting the Status of a Cluster Node . . . . . . . . . . . . . . . . . . . . . . . . . . . . . . . . . . 259Determining if a Disk is Shareable . . . . . . . . . . . . . . . . . . . . . . . . . . . . . . . . . . . . . . . 259Listing Shared Disk Groups . . . . . . . . . . . . . . . . . . . . . . . . . . . . . . . . . . . . . . . . . . . . . 260Creating a Shared Disk Group . . . . . . . . . . . . . . . . . . . . . . . . . . . . . . . . . . . . . . . . . . 261Forcibly Adding a Disk to a Disk Group . . . . . . . . . . . . . . . . . . . . . . . . . . . . . . . . . . 261Importing Disk Groups as Shared . . . . . . . . . . . . . . . . . . . . . . . . . . . . . . . . . . . . . . . 262xii<strong>VERITAS</strong> <strong>Volume</strong> Manager Administrator’s Guide
Converting a Disk Group from Shared to Private . . . . . . . . . . . . . . . . . . . . . . . . . . . 262Moving Objects Between Disk Groups . . . . . . . . . . . . . . . . . . . . . . . . . . . . . . . . . . . . 263Splitting Disk Groups . . . . . . . . . . . . . . . . . . . . . . . . . . . . . . . . . . . . . . . . . . . . . . . . . . 263Joining Disk Groups . . . . . . . . . . . . . . . . . . . . . . . . . . . . . . . . . . . . . . . . . . . . . . . . . . . . 263Changing the Activation Mode on a Shared Disk Group . . . . . . . . . . . . . . . . . . . . 264Setting the Connectivity Policy on a Shared Disk Group . . . . . . . . . . . . . . . . . . . . 264Creating <strong>Volume</strong>s with Exclusive Open Access by a Node . . . . . . . . . . . . . . . . . . . 264Setting Exclusive Open Access to a <strong>Volume</strong> by a Node . . . . . . . . . . . . . . . . . . . . . . 265Displaying the Cluster Protocol Version . . . . . . . . . . . . . . . . . . . . . . . . . . . . . . . . . . 265Displaying the Supported Cluster Protocol Version Range . . . . . . . . . . . . . . . . . . 266Upgrading the Cluster Protocol Version . . . . . . . . . . . . . . . . . . . . . . . . . . . . . . . . . . 266Recovering <strong>Volume</strong>s in Shared Disk Groups . . . . . . . . . . . . . . . . . . . . . . . . . . . . . . . 267Obtaining Cluster Performance Statistics . . . . . . . . . . . . . . . . . . . . . . . . . . . . . . . . . . 267Chapter 11. Configuring Off-Host Processing . . . . . . . . . . . . . . . . . . . . . . . . . . . . .269Introduction . . . . . . . . . . . . . . . . . . . . . . . . . . . . . . . . . . . . . . . . . . . . . . . . . . . . . . . . . . . . . 269FastResync of <strong>Volume</strong> Snapshots . . . . . . . . . . . . . . . . . . . . . . . . . . . . . . . . . . . . . . . . 270Disk Group Split and Join . . . . . . . . . . . . . . . . . . . . . . . . . . . . . . . . . . . . . . . . . . . . . . . 271Implementing Off-Host Processing Solutions . . . . . . . . . . . . . . . . . . . . . . . . . . . . . . . . . 271Implementing Online Backup . . . . . . . . . . . . . . . . . . . . . . . . . . . . . . . . . . . . . . . . . . . 272Implementing Decision Support . . . . . . . . . . . . . . . . . . . . . . . . . . . . . . . . . . . . . . . . . 275Chapter 12. Performance Monitoring and Tuning . . . . . . . . . . . . . . . . . . . . . . . . . .279Introduction . . . . . . . . . . . . . . . . . . . . . . . . . . . . . . . . . . . . . . . . . . . . . . . . . . . . . . . . . . . . . 279Performance Guidelines . . . . . . . . . . . . . . . . . . . . . . . . . . . . . . . . . . . . . . . . . . . . . . . . . . . 279Data Assignment . . . . . . . . . . . . . . . . . . . . . . . . . . . . . . . . . . . . . . . . . . . . . . . . . . . . . . 279Striping . . . . . . . . . . . . . . . . . . . . . . . . . . . . . . . . . . . . . . . . . . . . . . . . . . . . . . . . . . . . . . . 280Mirroring . . . . . . . . . . . . . . . . . . . . . . . . . . . . . . . . . . . . . . . . . . . . . . . . . . . . . . . . . . . . . 280Combining Mirroring and Striping . . . . . . . . . . . . . . . . . . . . . . . . . . . . . . . . . . . . . . . 281RAID-5 . . . . . . . . . . . . . . . . . . . . . . . . . . . . . . . . . . . . . . . . . . . . . . . . . . . . . . . . . . . . . . . 281<strong>Volume</strong> Read Policies . . . . . . . . . . . . . . . . . . . . . . . . . . . . . . . . . . . . . . . . . . . . . . . . . . 282Contentsxiii
Performance Monitoring . . . . . . . . . . . . . . . . . . . . . . . . . . . . . . . . . . . . . . . . . . . . . . . . . . 283Setting Performance Priorities . . . . . . . . . . . . . . . . . . . . . . . . . . . . . . . . . . . . . . . . . . . 283Obtaining Performance Data . . . . . . . . . . . . . . . . . . . . . . . . . . . . . . . . . . . . . . . . . . . . 283Using Performance Data . . . . . . . . . . . . . . . . . . . . . . . . . . . . . . . . . . . . . . . . . . . . . . . 285Tuning VxVM . . . . . . . . . . . . . . . . . . . . . . . . . . . . . . . . . . . . . . . . . . . . . . . . . . . . . . . . . . . 289General Tuning Guidelines . . . . . . . . . . . . . . . . . . . . . . . . . . . . . . . . . . . . . . . . . . . . . 289Tuning Guidelines for Large Systems . . . . . . . . . . . . . . . . . . . . . . . . . . . . . . . . . . . . 289Changing Values of Tunables . . . . . . . . . . . . . . . . . . . . . . . . . . . . . . . . . . . . . . . . . . . 290Tunable Parameters . . . . . . . . . . . . . . . . . . . . . . . . . . . . . . . . . . . . . . . . . . . . . . . . . . . . 291Appendix A. Commands Summary . . . . . . . . . . . . . . . . . . . . . . . . . . . . . . . . . . . . . 299Glossary . . . . . . . . . . . . . . . . . . . . . . . . . . . . . . . . . . . . . . . . . . . . . . . . . . . . . . . . . . . 309Index . . . . . . . . . . . . . . . . . . . . . . . . . . . . . . . . . . . . . . . . . . . . . . . . . . . . . . . . . . . . . . 323xiv<strong>VERITAS</strong> <strong>Volume</strong> Manager Administrator’s Guide
PrefaceIntroductionThe <strong>VERITAS</strong> <strong>Volume</strong> Manager TM Administrator’s Guide provides information on how to use<strong>VERITAS</strong> <strong>Volume</strong> Manager (VxVM) and all of its features.AudienceThis guide is intended for system administrators responsible for installing, configuring,and maintaining systems under the control of VxVM.This guide assumes that the user has a:◆ working knowledge of the UNIX operating system◆ basic understanding of UNIX system administration◆ basic understanding of volume managementScopeThe purpose of this guide is to provide the system administrator with a thoroughknowledge of the procedures and concepts involved with volume management andsystem administration using VxVM. This guide includes guidelines on how to takeadvantage of various advanced VxVM features, and instructions on how to use VxVMcommands to create and manipulate objects in VxVM.xv
Related DocumentsRelated DocumentsThe following documents provide information related to VxVM:◆ <strong>VERITAS</strong> <strong>Volume</strong> Manager Installation Guide◆ <strong>VERITAS</strong> <strong>Volume</strong> Manager Release Notes◆ <strong>VERITAS</strong> <strong>Volume</strong> Manager Hardware Notes◆ <strong>VERITAS</strong> <strong>Volume</strong> Manager Troubleshooting Guide◆ <strong>VERITAS</strong> <strong>Volume</strong> Manager (UNIX) User’s Guide — VEA◆ <strong>VERITAS</strong> <strong>Volume</strong> Manager manual pagesPrefacexvii
ConventionsConventionsThe following table describes the typographic conventions used in this guide.Typeface Usage Examplesmonospaceitalicmonospace(bold)monospace(bold and italic)Computer output, file contents,files, directories, softwareelements such as commandoptions, function names, andparametersNew terms, book titles,emphasis, variables to bereplaced by a name or valueUser input; the “#” symbolindicates a command promptVariables to be replaced by aname or value in user inputRead tunables from the/etc/vx/tunefstab file.See the ls(1) manual page for moreinformation.See the User’s Guide for details.The variable ncsize determines thevalue of...# mount -F vxfs /h/filesys# mount -F fstype mount_pointSymbol Usage Examples% C shell prompt$ Bourne/Korn/Bash shellprompt# Superuser prompt (all shells)\ Continued input on thefollowing line[] In a command synopsis, bracketsindicates an optional argument| In a command synopsis, avertical bar separates mutuallyexclusive arguments# mount -F vxfs \/h/filesysls [ -a ]mount [suid | nosuid ]xviii<strong>VERITAS</strong> <strong>Volume</strong> Manager Administrator’s Guide
Getting HelpGetting HelpIf you have any comments or problems with <strong>VERITAS</strong> products, contact <strong>VERITAS</strong>Technical Support:◆ U.S. and Canadian Customers: 1-800-342-0652◆ International Customers: +1 (650) 527-8555◆ Email: support@veritas.comFor license information (U.S. and Canadian Customers):◆ Phone: 1-925-931-2464◆ Email: license@veritas.com◆ Fax: 1-925-931-2487For software updates:◆ Email: swupdate@veritas.comFor information on purchasing <strong>VERITAS</strong> products:◆ Phone: 1-800-258-UNIX (1-800-258-8649) or 1-650-527-8000◆ Email: vx-sales@veritas.comFor additional technical support information, such as TechNotes, product alerts, andhardware compatibility lists, visit the <strong>VERITAS</strong> Technical Support Web site at:◆ http://support.veritas.comFor additional information about <strong>VERITAS</strong> and <strong>VERITAS</strong> products, visit the Web site at:◆ http://www.veritas.comUsing VRTSexplorerThe VRTSexplorer program can help <strong>VERITAS</strong> Technical Support engineers diagnosethe cause of technical problems associated with <strong>VERITAS</strong> products. You can downloadthis program from the <strong>VERITAS</strong> FTP site or install it from the <strong>VERITAS</strong> Installation CD.For more information, consult the <strong>VERITAS</strong> <strong>Volume</strong> Manager Release Notes and theREADME file in the support directory on the <strong>VERITAS</strong> Installation CD.Prefacexix
Getting Helpxx<strong>VERITAS</strong> <strong>Volume</strong> Manager Administrator’s Guide
Understanding <strong>VERITAS</strong> <strong>Volume</strong> Manager 1Introduction<strong>VERITAS</strong> <strong>Volume</strong> Manager (VxVM) is a storage management subsystem that allows youto manage physical disks as logical devices called volumes. A volume is a logical devicethat appears to data management systems as a physical disk.VxVM provides easy-to-use online disk storage management for computingenvironments and <strong>Storage</strong> Area Network (SAN) environments. Through support ofRedundant Array of Independent Disks (RAID), VxVM protects against disk andhardware failure. Additionally, VxVM provides features that enable fault tolerance andfast recovery from disk failure.VxVM overcomes physical restrictions imposed by hardware disk devices by providing alogical volume management layer. This allows volumes to span multiple disks.VxVM provides the tools to improve performance and ensure data availability andintegrity. VxVM also dynamically configures disk storage while the system is active.The following sections of this chapter explain fundamental concepts of VxVM:◆ How VxVM Handles <strong>Storage</strong> Management◆ Physical Objects—Physical Disks◆ Virtual Objects◆ <strong>Volume</strong> Layouts in VxVMThe following sections introduce you to advanced features of VxVM:◆ Online Relayout◆ <strong>Volume</strong> Resynchronization◆ Dirty Region Logging (DRL)◆ <strong>Volume</strong> Snapshots◆ FastResync◆ SmartSync Recovery Accelerator◆ Hot-Relocation1
VxVM and the Operating SystemVxVM and the Operating SystemVxVM operates as a subsystem between your operating system and your datamanagement systems, such as file systems and database management systems. VxVM istightly coupled with the operating system. Before a disk can be brought under VxVMcontrol, the disk must be accessible through the operating system device interface. VxVMis layered on top of the operating system interface services, and is dependent upon howthe operating system accesses physical disks.VxVM is dependent upon the operating system for the following functionality:◆ operating system (disk) devices◆ device handles◆ VxVM dynamic multipathing (DMP) metadeviceThis guide introduces you to the VxVM commands which are used to carry out the tasksassociated with VxVM objects. These commands are described on the relevant manualpages and in the chapters of this guide when VxVM tasks are described.VxVM relies on the following constantly running daemons for its operation:◆ vxconfigd—The VxVM configuration daemon maintains disk and groupconfigurations and communicates configuration changes to the kernel, and modifiesconfiguration information stored on disks.◆◆vxiod—The VxVM I/O daemon provides extended I/O operations without blockingcalling processes. Several vxiod daemons are usually started at boot time, andcontinue to run at all times.vxrelocd—The hot-relocation daemon monitors VxVM for events that affectredundancy, and performs hot-relocation to restore redundancy.How Data is StoredThere are several methods used to store data on physical disks. These methods organizedata on the disk so the data can be stored and retrieved efficiently. The basic method ofdisk organization is called formatting. Formatting prepares the hard disk so that files canbe written to and retrieved from the disk by using a prearranged storage pattern.Hard disks are formatted, and information stored, using two methods: physical-storagelayout and logical-storage layout. VxVM uses the logical-storage layout method. The typesof storage layout supported by VxVM are introduced in this chapter.2 <strong>VERITAS</strong> <strong>Volume</strong> Manager Administrator’s Guide
How VxVM Handles <strong>Storage</strong> ManagementHow VxVM Handles <strong>Storage</strong> ManagementVxVM uses two types of objects to handle storage management: physical objects and virtualobjects.◆◆Physical objects—Physical disks or other hardware with block and raw operatingsystem device interfaces that are used to store data.Virtual objects—When one or more physical disks are brought under the control ofVxVM, it creates virtual objects called volumes on those physical disks. Each volumerecords and retrieves data from one or more physical disks. <strong>Volume</strong>s are accessed byfile systems, databases, or other applications in the same way that physical disks areaccessed. <strong>Volume</strong>s are also composed of other virtual objects (plexes and subdisks)that are used in changing the volume configuration. <strong>Volume</strong>s and their virtualcomponents are called virtual objects or VxVM objects.Physical Objects—Physical DisksA physical disk is the basic storage device (media) where the data is ultimately stored. Youcan access the data on a physical disk by using a device name to locate the disk. Thephysical disk device name varies with the computer system you use. Not all parametersare used on all systems. Typical device names are of the form c#t#d#, where:◆◆c# specifies the controllert# specifies the target ID◆ d# specifies the diskThe figure, “Physical Disk Example”, shows how a physical disk and device name(devname) are illustrated in this document. For example, device name c0t0d0 is the entirehard disk connected to controller number 0 in the system, with a target ID of 0, andphysical disk number 0.Physical Disk ExampledevnameVxVM writes identification information on physical disks under VxVM control (VMdisks). VxVM disks can be identified even after physical disk disconnection or systemoutages. VxVM can then re-form disk groups and logical objects to provide failuredetection and to speed system recovery.For HP-UX 11.x, all the disks are treated and accessed by VxVM as entire physical disksusing a device name such as c#t#d#.Chapter 1, Understanding <strong>VERITAS</strong> <strong>Volume</strong> Manager3
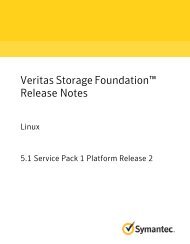
How VxVM Handles <strong>Storage</strong> ManagementDisk ArraysPerforming I/O to disks is a relatively slow process because disks are physical devicesthat require time to move the heads to the correct position on the disk before reading orwriting. If all of the read or write operations are done to individual disks, one at a time,the read-write time can become unmanageable. Performing these operations on multipledisks can help to reduce this problem.A disk array is a collection of physical disks that VxVM can represent to the operatingsystem as one or more virtual disks or volumes. The volumes created by VxVM look andact to the operating system like physical disks. Applications that interact with volumesshould work in the same way as with physical disks.“How VxVM Presents the Disks in a Disk Array as <strong>Volume</strong>s to the Operating System”illustrates how VxVM represents the disks in a disk array as several volumes to theoperating system.Data can be spread across several disks within an array to distribute or balance I/Ooperations across the disks. Using parallel I/O across multiple disks in this way improvesI/O performance by increasing data transfer speed and overall throughput for the array.How VxVM Presents the Disks in a Disk Array as <strong>Volume</strong>s to the Operating SystemOperating System<strong>VERITAS</strong> <strong>Volume</strong> Manager<strong>Volume</strong>sPhysical DisksDisk 1Disk 2Disk 3Disk 44 <strong>VERITAS</strong> <strong>Volume</strong> Manager Administrator’s Guide
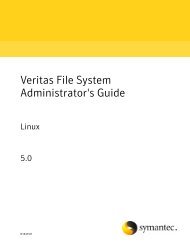
Device DiscoveryMultipathed Disk ArraysSome disk arrays provide multiple ports to access their disk devices. These ports, coupledwith the host bus adaptor (HBA) controller and any data bus or I/O processor local to thearray, make up multiple hardware paths to access the disk devices. Such disk arrays arecalled multipathed disk arrays. This type of disk array can be connected to host systems inmany different configurations, (such as multiple ports connected to different controllerson a single host, chaining of the ports through a single controller on a host, or portsconnected to different hosts simultaneously). For more detailed information, see“Administering Dynamic Multipathing (DMP)” on page 85.Device DiscoveryDevice Discovery is the term used to describe the process of discovering the disks that areattached to a host. This feature is important for DMP because it needs to support agrowing number of disk arrays from a number of vendors. In conjunction with the abilityto discover the devices attached to a host, the Device Discovery services enables you toadd support dynamically for new disk arrays. This operation, which uses a facility calledthe Device Discovery Layer (DDL), is achieved without the need for a reboot.This means that you can dynamically add a new disk array to a host, and run a commandwhich scans the operating system’s device tree for all the attached disk devices, andreconfigures DMP with the new device database. For more information, see“Administering the Device Discovery Layer” on page 58.Enclosure-Based NamingEnclosure-based naming provides an alternative to the disk device naming described in“Physical Objects—Physical Disks” on page 3. This allows disk devices to be named forenclosures rather than for the controllers through which they are accessed. In a <strong>Storage</strong>Area Network (SAN) that uses Fibre Channel hubs or fabric switches, information aboutdisk location provided by the operating system may not correctly indicate the physicallocation of the disks. For example, c#t#d# naming assigns controller-based device namesto disks in separate enclosures that are connected to the same host controller.Enclosure-based naming allows VxVM to access enclosures as separate physical entities.By configuring redundant copies of your data on separate enclosures, you can safeguardagainst failure of one or more enclosures.In a typical SAN environment, host controllers are connected to multiple enclosures in adaisy chain or through a Fibre Channel hub or fabric switch as illustrated in“ExampleConfiguration for Disk Enclosures Connected via a Fibre Channel Hub/Switch.”Chapter 1, Understanding <strong>VERITAS</strong> <strong>Volume</strong> Manager5
Device DiscoveryExample Configuration for Disk Enclosures Connected via a Fibre Channel Hub/Switchc1HostFibre ChannelHub/SwitchDisk Enclosuresenc0 enc1 enc2In such a configuration, enclosure-based naming can be used to refer to each disk withinan enclosure. For example, the device names for the disks in enclosure enc0 are namedenc0_0, enc0_1, and so on. The main benefit of this scheme is that it allows you toquickly determine where a disk is physically located in a large SAN configuration.Note In many advanced disk arrays, you can use hardware-based storage management torepresent several physical disks as one logical disk device to the operating system.In such cases, VxVM also sees a single logical disk device rather than its componentdisks. For this reason, when reference is made to a disk within an enclosure, this diskmay be either a physical or a logical device.Another important benefit of enclosure-based naming is that it enables VxVM to avoidplacing redundant copies of data in the same enclosure. This is a good thing to avoid aseach enclosure can be considered to be a separate fault domain. For example, if a mirroredvolume were configured only on the disks in enclosure enc1, the failure of the cablebetween the hub and the enclosure would make the entire volume unavailable.If required, you can replace the default name that VxVM assigns to an enclosure with onethat is more meaningful to your configuration. See “Renaming an Enclosure” on page 103for details.In High Availability (HA) configurations, redundant-loop access to storage can beimplemented by connecting independent controllers on the host to separate hubs withindependent paths to the enclosures as shown in “Example HA Configuration UsingMultiple Hubs/Switches to Provide Redundant-Loop Access.” Such a configurationprotects against the failure of one of the host controllers (c1 and c2), or of the cablebetween the host and one of the hubs. In this example, each disk is known by the same6 <strong>VERITAS</strong> <strong>Volume</strong> Manager Administrator’s Guide
Device Discoveryname to VxVM for all of the paths over which it can be accessed. For example, the diskdevice enc0_0 represents a single disk for which two different paths are known to theoperating system, such as c1t99d0 and c2t99d0.To take account of fault domains when configuring data redundancy, you can control howmirrored volumes are laid out across enclosures as described in “Mirroring across Targets,Controllers or Enclosures” on page 173.Example HA Configuration Using Multiple Hubs/Switches to Provide Redundant-Loop Accessc1c2HostFibre ChannelHubs/SwitchesDisk Enclosuresenc0 enc1 enc2See “Disk Device Naming in VxVM” on page 54 and “Changing the Disk-NamingScheme” on page 61 for details of the standard and the enclosure-based naming schemes,and how to switch between them.Virtual ObjectsVirtual objects in VxVM include the following:◆◆◆◆VM DisksDisk GroupsSubdisksPlexes◆ <strong>Volume</strong>sThe connection between physical objects and VxVM objects is made when you place aphysical disk under VxVM control.Chapter 1, Understanding <strong>VERITAS</strong> <strong>Volume</strong> Manager7
Device DiscoveryAfter installing VxVM on a host system, you must bring the contents of physical disksunder VxVM control by collecting the VM disks into disk groups and allocating the diskgroup space to create logical volumes.Note To bring the physical disk under VxVM control, the disk must not be under LVMcontrol. For more information on how LVM and VM disks co-exist or how toconvert LVM disks to VM disks, see the <strong>VERITAS</strong> <strong>Volume</strong> Manager Migration GuideBringing the contents of physical disks under VxVM control is accomplished only ifVxVM takes control of the physical disks and the disk is not under control of anotherstorage manager such as LVM.VxVM creates virtual objects and makes logical connections between the objects. Thevirtual objects are then used by VxVM to do storage management tasks.Note The vxprint command displays detailed information on existing VxVM objects.For additional information on the vxprint command, see “Displaying <strong>Volume</strong>Information” on page 181 and the vxprint(1M) manual page.VM DisksWhen you place a physical disk under VxVM control, a VM disk is assigned to thephysical disk. A VM disk is under VxVM control and is usually in a disk group. Each VMdisk corresponds to one physical disk. VxVM allocates storage from a contiguous area ofVxVM disk space.A VM disk typically includes a public region (allocated storage) and a private region whereVxVM internal configuration information is stored.Each VM disk has a unique disk media name (a virtual disk name). You can either define adisk name of up to 31 characters, or allow VxVM to assign a default name that typicallytakes the form disk##. “VM Disk Example” shows a VM disk with a media name ofdisk01 that is assigned to the physical disk devname.VM Disk ExamplePhysical DiskVM Diskdevnamedisk018 <strong>VERITAS</strong> <strong>Volume</strong> Manager Administrator’s Guide
Device DiscoveryDisk GroupsA disk group is a collection of VM disks that share a common configuration. A disk groupconfiguration is a set of records with detailed information about related VxVM objects,their attributes, and their connections. The default disk group is rootdg (or root diskgroup). A disk group name can be up to 31 characters long.Note Even though rootdg is the default disk group, it does not necessarily contain theroot disk. In the current release, the root disk may be under VxVM or LVM control.You can create additional disk groups as necessary. Disk groups allow you to group disksinto logical collections. A disk group and its components can be moved as a unit from onehost machine to another. The ability to move whole volumes and disks between diskgroups, to split whole volumes and disks between disk groups, and to join disk groups isdescribed in “Reorganizing the Contents of Disk Groups” on page 120.<strong>Volume</strong>s are created within a disk group. A given volume must be configured from disksin the same disk group.SubdisksA subdisk is a set of contiguous disk blocks. A block is a unit of space on the disk. VxVMallocates disk space using subdisks. A VM disk can be divided into one or more subdisks.Each subdisk represents a specific portion of a VM disk, which is mapped to a specificregion of a physical disk.The default name for a VM disk is disk## (such as disk01) and the default name for asubdisk is disk##-##. In the figure, “Subdisk Example”, disk01-01 is the name ofthe first subdisk on the VM disk named disk01.Subdisk ExampleVM Disk with One SubdiskSubdiskdisk01-01disk01disk01-01A VM disk can contain multiple subdisks, but subdisks cannot overlap or share the sameportions of a VM disk. “Example of Three Subdisks Assigned to One VM Disk” shows aVM disk with three subdisks. The VM disk is assigned to one physical disk.Chapter 1, Understanding <strong>VERITAS</strong> <strong>Volume</strong> Manager9
Device DiscoveryExample of Three Subdisks Assigned to One VM DiskPhysical DiskVM DiskSubdisksdevnamedisk01-01disk01-02disk01-03disk01disk01-01disk01-02disk01-03Any VM disk space that is not part of a subdisk is free space. You can use free space tocreate new subdisks.VxVM release 3.0 or higher supports the concept of layered volumes in which subdiskscan contain volumes. For more information, see “Layered <strong>Volume</strong>s” on page 30.PlexesVxVM uses subdisks to build virtual objects called plexes. A plex consists of one or moresubdisks located on one or more physical disks. For example, see the plex vol01-01shown in “Example of a Plex with Two Subdisks”Example of a Plex with Two SubdisksPlexdisk01-01disk01-02disk01disk01-01disk01-02vol01-01SubdisksYou can organize data on subdisks to form a plex by using the following methods:◆◆◆concatenationstriping (RAID-0)mirroring (RAID-1)◆ striping with parity (RAID-5)Concatenation, striping (RAID-0), mirroring (RAID-1) and RAID-5 are described in“<strong>Volume</strong> Layouts in VxVM” on page 13.10 <strong>VERITAS</strong> <strong>Volume</strong> Manager Administrator’s Guide
Device Discovery<strong>Volume</strong>sA volume is a virtual disk device that appears to applications, databases, and file systemslike a physical disk device, but does not have the physical limitations of a physical diskdevice. A volume consists of one or more plexes, each holding a copy of the selected datain the volume. Due to its virtual nature, a volume is not restricted to a particular disk or aspecific area of a disk. The configuration of a volume can be changed by using VxVM userinterfaces. Configuration changes can be accomplished without causing disruption toapplications or file systems that are using the volume. For example, a volume can bemirrored on separate disks or moved to use different disk storage.Note VxVM uses the default naming conventions of vol## for volumes and vol##-##for plexes in a volume. For ease of administration, you can choose to select moremeaningful names for the volumes that you create.A volume may be created under the following constraints:◆ Its name can contain up to 31 characters.◆ It can consist of up to 32 plexes, each of which contains one or more subdisks.◆ It must have at least one associated plex that has a complete copy of the data in thevolume with at least one associated subdisk.◆ All subdisks within a volume must belong to the same disk group.See “Example of a <strong>Volume</strong> with One Plex”.Example of a <strong>Volume</strong> with One Plex<strong>Volume</strong>Plexdisk01-01vol01-01vol01Subdisk<strong>Volume</strong> vol01 has the following characteristics:◆◆It contains one plex named vol01-01.The plex contains one subdisk named disk01-01.◆ The subdisk disk01-01 is allocated from VM disk disk01.A volume with two or more data plexes is “mirrored” and contains mirror images of thedata. See “Example of a <strong>Volume</strong> with Two Plexes”Chapter 1, Understanding <strong>VERITAS</strong> <strong>Volume</strong> Manager11
Device DiscoveryExample of a <strong>Volume</strong> with Two Plexes<strong>Volume</strong>disk01-01vol06-01vol06disk02-01vol06-02Each plex contains an identical copy of the volume data. For more information, see“Mirroring (RAID-1)” on page 21.<strong>Volume</strong> vol06 has the following characteristics:◆◆◆It contains two plexes named vol06-01 and vol06-02Each plex contains one subdiskEach subdisk is allocated from a different VM disk (disk01 and disk02)Combining Virtual Objects in VxVMVxVM virtual objects are combined to build volumes. The virtual objects contained involumes are VM disks, disk groups, subdisks, and plexes. <strong>VERITAS</strong> <strong>Volume</strong> Managerobjects are organized as follows:◆◆VM disks are grouped into disk groupsSubdisks (each representing a specific region of a disk) are combined to form plexes◆ <strong>Volume</strong>s are composed of one or more plexesThe figure, “Connection Between Objects in VxVM”, shows the connections between<strong>VERITAS</strong> <strong>Volume</strong> Manager virtual objects and how they relate to physical disks. The diskgroup consists of two VM disks: disk01 has a volume with one plex and two subdisks,and disk02 has a volume with one plex and a single subdisk12 <strong>VERITAS</strong> <strong>Volume</strong> Manager Administrator’s Guide
<strong>Volume</strong> Layouts in VxVMConnection Between Objects in VxVMPhysical DiskVM Disk<strong>Volume</strong>Plexdevname1disk01-01disk01-02disk01disk01-01disk01-02vol01-01vol01SubdisksPhysical DiskVM Disk<strong>Volume</strong>Plexdevname2disk02-01disk02disk02-01vol02-01vol02SubdiskDisk Group<strong>Volume</strong> Layouts in VxVMA VxVM virtual device is defined by a volume. A volume has a layout defined by theassociation of a volume to one or more plexes, each of which map to subdisks. Thevolume presents a virtual device interface that is exposed to other applications for dataaccess. These logical building blocks re-map the volume address space through which I/Ois re-directed at run-time.Different volume layouts each provide different levels of storage service. A volume layoutcan be configured and reconfigured to match particular levels of desired storage service.Implementation of Non-Layered <strong>Volume</strong>sIn a non-layered volume, a subdisk is restricted to mapping directly to a VM disk. Thisallows the subdisk to define a contiguous extent of storage space backed by the publicregion of a VM disk. When active, the VM disk is directly associated with an underlyingphysical disk. The combination of a volume layout and the physical disks thereforedetermines the storage service available from a given virtual device.Chapter 1, Understanding <strong>VERITAS</strong> <strong>Volume</strong> Manager13
<strong>Volume</strong> Layouts in VxVMImplementation of Layered <strong>Volume</strong>sA layered volume is constructed by mapping its subdisks to underlying volumes. Thesubdisks in the underlying volumes must map to VM disks, and hence to attachedphysical storage.Layered volumes allow for more combinations of logical compositions, some of whichmay be desirable for configuring a virtual device. Because permitting free use of layeredvolumes throughout the command level would have resulted in unwieldy administration,some ready-made layered volume configurations are designed into VxVM. See “Layered<strong>Volume</strong>s” on page 30 for more information.These ready-made configurations operate with built-in rules to automatically matchdesired levels of service within specified constraints. The automatic configuration is doneon a “best-effort” basis for the current command invocation working against the currentconfiguration.To achieve the desired storage service from a set of virtual devices, it may be necessary toinclude an appropriate set of VM disks into a disk group, and to execute multipleconfiguration commands.To the extent that it can, VxVM handles initial configuration and on-line re-configurationwith its set of layouts and administration interface to make this job easier and moredeterministic.Layout MethodsData in virtual objects is organized to create volumes by using the following layoutmethods:◆◆◆◆◆Concatenation and SpanningStriping (RAID-0)Mirroring (RAID-1)Striping Plus Mirroring (Mirrored-Stripe or RAID-0+1)Mirroring Plus Striping (Striped-Mirror, RAID-1+0 or RAID-10)◆ RAID-5 (Striping with Parity)The following sections describe each layout method.14 <strong>VERITAS</strong> <strong>Volume</strong> Manager Administrator’s Guide
<strong>Volume</strong> Layouts in VxVMConcatenation and SpanningConcatenation maps data in a linear manner onto one or more subdisks in a plex. To accessall of the data in a concatenated plex sequentially, data is first accessed in the first subdiskfrom beginning to end. Data is then accessed in the remaining subdisks sequentially frombeginning to end, until the end of the last subdisk.The subdisks in a concatenated plex do not have to be physically contiguous and canbelong to more than one VM disk. Concatenation using subdisks that reside on more thanone VM disk is called spanning.The figure, “Example of Concatenation”, shows concatenation with one subdisk.Example of ConcatenationVM DiskPhysical Disk Plex B = Block of dataB1B2devnamedisk01-01disk01disk01-01B3B4You can use concatenation with multiple subdisks when there is insufficient contiguousspace for the plex on any one disk. This form of concatenation can be used for loadbalancing between disks, and for head movement optimization on a particular disk. Seethe figure, “Example of a <strong>Volume</strong> in a Concatenated Configuration.”Example of a <strong>Volume</strong> in a Concatenated ConfigurationPhysical Disk VM Disk SubdisksConcatenatedPlex<strong>Volume</strong>devnamedisk01-01disk01-02disk01-03disk01disk01-01disk01-02disk01-03disk01-01disk01-02disk01-03vol01-01disk01-01disk01-02disk01-03vol01-01vol01Chapter 1, Understanding <strong>VERITAS</strong> <strong>Volume</strong> Manager15
<strong>Volume</strong> Layouts in VxVMThe figure, “Example of Spanning” on page 16 shows data spread over two subdisks in aspanned plex. In the figure, “Example of Spanning,” the first six blocks of data (B1through B6) use most of the space on the disk to which VM disk disk01 is assigned. Thisrequires space only on subdisk disk01-01 on disk01. However, the last two blocks ofdata, B7 and B8, use only a portion of the space on the disk to which VM disk disk02 isassigned.The remaining free space on VM disk disk02 can be put to other uses. In this example,subdisks disk02-02 and disk02-03 are available for other disk management tasks.Example of SpanningPhysical disksVM DisksPlexB = Block of DataB1devname1disk01-01disk01disk01-01disk02-01B2B3Data indisk01-01B4B5devname2disk02-01disk02-02disk02-03disk02disk02-02disk02-03B6B7B8Data indisk02-01CautionSpanning a plex across multiple disks increases the chance that a disk failureresults in failure of the assigned volume. Use mirroring or RAID-5 (bothdescribed later) to reduce the risk that a single disk failure results in a volumefailure.See “Creating a <strong>Volume</strong> on Any Disk” on page 163 for information on how to create aconcatenated volume that may span several disks.16 <strong>VERITAS</strong> <strong>Volume</strong> Manager Administrator’s Guide
<strong>Volume</strong> Layouts in VxVMStriping (RAID-0)Note You may need an additional license to use this feature.Striping (RAID-0) is useful if you need large amounts of data written to or read fromphysical disks, and performance is important. Striping is also helpful in balancing the I/Oload from multi-user applications across multiple disks. By using parallel data transfer toand from multiple disks, striping significantly improves data-access performance.Striping maps data so that the data is interleaved among two or more physical disks. Astriped plex contains two or more subdisks, spread out over two or more physical disks.Data is allocated alternately and evenly to the subdisks of a striped plex.The subdisks are grouped into “columns,” with each physical disk limited to one column.Each column contains one or more subdisks and can be derived from one or morephysical disks. The number and sizes of subdisks per column can vary. Additionalsubdisks can be added to columns, as necessary.CautionStriping a volume, or splitting a volume across multiple disks, increases thechance that a disk failure will result in failure of that volume.If five volumes are striped across the same five disks, then failure of any one of the fivedisks will require that all five volumes be restored from a backup. If each volume is on aseparate disk, only one volume has to be restored. (As an alternative to striping, usemirroring or RAID-5 to substantially reduce the chance that a single disk failure results infailure of a large number of volumes.)Data is allocated in equal-sized units (stripe units) that are interleaved between thecolumns. Each stripe unit is a set of contiguous blocks on a disk. The default stripe unitsize (or width) is 64 kilobytes.For example, if there are three columns in a striped plex and six stripe units, data isstriped over the three columns, as illustrated in “Striping Across Three Columns.”Chapter 1, Understanding <strong>VERITAS</strong> <strong>Volume</strong> Manager17
<strong>Volume</strong> Layouts in VxVMStriping Across Three ColumnsColumn Column Column1 2 3SU = Stripe UnitStripe 1su1su2su3Stripe 2su4 su5 su6Subdisk Subdisk Subdisk1 2 3PlexA stripe consists of the set of stripe units at the same positions across all columns. In thefigure, stripe units 1, 2, and 3 constitute a single stripe.Viewed in sequence, the first stripe consists of:◆ stripe unit 1 in column 1◆ stripe unit 2 in column 2◆ stripe unit 3 in column 3The second stripe consists of:◆ stripe unit 4 in column 1◆ stripe unit 5 in column 2◆ stripe unit 6 in column 3Striping continues for the length of the columns (if all columns are the same length), oruntil the end of the shortest column is reached. Any space remaining at the end ofsubdisks in longer columns becomes unused space.18 <strong>VERITAS</strong> <strong>Volume</strong> Manager Administrator’s Guide
<strong>Volume</strong> Layouts in VxVM“Example of a Striped Plex with One Subdisk per Column” shows a striped plex withthree equal sized, single-subdisk columns. There is one column per physical disk. Thisexample shows three subdisks that occupy all of the space on the VM disks. It is alsopossible for each subdisk in a striped plex to occupy only a portion of the VM disk, whichleaves free space for other disk management tasks.Example of a Striped Plex with One Subdisk per ColumnPhysical DisksVM DisksStriped PlexSU = Stripe Unitdevname1su1 su4...disk01-01disk01disk01-01Column 1su1su2devname2su2 su5...disk02-01disk02disk02-01Column 2su3su4su5devname3su3 su6...disk03-01disk03disk03-01Column 3su6...Chapter 1, Understanding <strong>VERITAS</strong> <strong>Volume</strong> Manager19
<strong>Volume</strong> Layouts in VxVM“Example of a Striped Plex with Concatenated Subdisks per Column” illustrates a stripedplex with three columns containing subdisks of different sizes. Each column contains adifferent number of subdisks. There is one column per physical disk. Striped plexes can becreated by using a single subdisk from each of the VM disks being striped across. It is alsopossible to allocate space from different regions of the same disk or from another disk (forexample, if the size of the plex is increased). Columns can also contain subdisks fromdifferent VM disks.Example of a Striped Plex with Concatenated Subdisks per ColumnPhysical Disksdevname1su1 su4su2 su5...devname2...VM Disksdisk01-01disk01-02disk01-03disk01disk02-01disk02-02Striped Plexdisk01-01disk01-02disk01-03Column 1disk02-01disk02-02SU = Stripe Unitsu1su2su3su4devname3su3 su6...disk02disk03-01disk03Column 2disk03-01Column 3su5su6...See “Creating a Striped <strong>Volume</strong>” on page 171 for information on how to create a stripedvolume.20 <strong>VERITAS</strong> <strong>Volume</strong> Manager Administrator’s Guide
<strong>Volume</strong> Layouts in VxVMMirroring (RAID-1)Mirroring uses multiple mirrors (plexes) to duplicate the information contained in avolume. In the event of a physical disk failure, the plex on the failed disk becomesunavailable, but the system continues to operate using the unaffected mirrors.Note Although a volume can have a single plex, at least two plexes are required toprovide redundancy of data. Each of these plexes must contain disk space fromdifferent disks to achieve redundancy.When striping or spanning across a large number of disks, failure of any one of thosedisks can make the entire plex unusable. Because the likelihood of one out of several disksfailing is reasonably high, you should consider mirroring to improve the reliability (andavailability) of a striped or spanned volume.See “Creating a Mirrored <strong>Volume</strong>” on page 168 for information on how to create amirrored volume.Striping Plus Mirroring (Mirrored-Stripe or RAID-0+1)Note You may need an additional license to use this feature.VxVM supports the combination of mirroring above striping. The combined layout iscalled a mirrored-stripe layout. A mirrored-stripe layout offers the dual benefits of stripingto spread data across multiple disks, while mirroring provides redundancy of data.For mirroring above striping to be effective, the striped plex and its mirrors must beallocated from separate disks.The figure, “Mirrored-Stripe <strong>Volume</strong> Laid out on Six Disks” shows an example where twoplexes, each striped across three disks, are attached as mirrors to the same volume tocreate a mirrored-stripe volume.Chapter 1, Understanding <strong>VERITAS</strong> <strong>Volume</strong> Manager21
<strong>Volume</strong> Layouts in VxVMMirrored-Stripe <strong>Volume</strong> Laid out on Six DisksColumn 1 Column 2 Column 3Striped PlexMirrorColumn 1 Column 2 Column 3Striped PlexMirrored-Stripe<strong>Volume</strong>See “Creating a Mirrored-Stripe <strong>Volume</strong>” on page 172 for information on how to create amirrored-stripe volume.The layout type of the data plexes in a mirror can be concatenated or striped. Even if onlyone is striped, the volume is still termed a mirrored-stripe volume. If they are allconcatenated, the volume is termed a mirrored-concatenated volume.Mirroring Plus Striping (Striped-Mirror, RAID-1+0 or RAID-10)Note You may need an additional license to use this feature.VxVM supports the combination of striping above mirroring. This combined layout iscalled a striped-mirror layout. Putting mirroring below striping mirrors each column of thestripe. If there are multiple subdisks per column, each subdisk can be mirroredindividually instead of each column.Note A striped-mirror volume is an example of a layered volume. See “Layered<strong>Volume</strong>s” on page 30 for more information.As for a mirrored-stripe volume, a striped-mirror volume offers the dual benefits ofstriping to spread data across multiple disks, while mirroring provides redundancy ofdata. In addition, it enhances redundancy, and reduces recovery time after disk failure.“Striped-Mirror <strong>Volume</strong> Laid out on Six Disks” shows an example where a striped-mirrorvolume is created by using each of three existing 2-disk mirrored volumes to form aseparate column within a striped plex.22 <strong>VERITAS</strong> <strong>Volume</strong> Manager Administrator’s Guide
<strong>Volume</strong> Layouts in VxVMStriped-Mirror <strong>Volume</strong> Laid out on Six DisksUnderlying Mirrored <strong>Volume</strong>sColumn 1 Column 2 Column 3MirrorColumn 1 Column 2 Column 3Striped PlexStriped-Mirror<strong>Volume</strong>See “Creating a Striped-Mirror <strong>Volume</strong>” on page 173 for information on how to create astriped-mirrored volume.As shown in the figure, “How the Failure of a Single Disk Affects Mirrored-Stripe andStriped-Mirror <strong>Volume</strong>s,” the failure of a disk in a mirrored- stripe layout detaches anentire data plex, thereby losing redundancy on the entire volume. When the disk isreplaced, the entire plex must be brought up to date. Recovering the entire plex can take asubstantial amount of time. If a disk fails in a striped-mirror layout, only the failingsubdisk must be detached, and only that portion of the volume loses redundancy. Whenthe disk is replaced, only a portion of the volume needs to be recovered. Additionally, amirrored-stripe volume is more vulnerable to being put out of use altogether should asecond disk fail before the first failed disk has been replaced, either manually or byhot-relocation.Chapter 1, Understanding <strong>VERITAS</strong> <strong>Volume</strong> Manager23
<strong>Volume</strong> Layouts in VxVMHow the Failure of a Single Disk Affects Mirrored-Stripe and Striped-Mirror <strong>Volume</strong>sStriped PlexXFailure of DiskDetaches PlexDetachedStriped PlexMirrored-Stripe<strong>Volume</strong> withno RedundancyXFailure of Disk RemovesRedundancy from a MirrorStriped PlexStriped-Mirror<strong>Volume</strong> withPartialRedundancyCompared to mirrored-stripe volumes, striped-mirror volumes are more tolerant of diskfailure, and recovery time is shorter.If the layered volume concatenates instead of striping the underlying mirrored volumes,the volume is termed a concatenated-mirror volume.Note The <strong>VERITAS</strong> Enterprise Administrator (VEA) terms a striped-mirror asStriped-Pro, and a concatenated-mirror as Concatenated-Pro.24 <strong>VERITAS</strong> <strong>Volume</strong> Manager Administrator’s Guide
<strong>Volume</strong> Layouts in VxVMRAID-5 (Striping with Parity)Note VxVM supports RAID-5 for private disk groups, but not for shareable disk groupsin a cluster environment.Note You may need an additional license to use this feature.Although both mirroring (RAID-1) and RAID-5 provide redundancy of data, they usedifferent methods. Mirroring provides data redundancy by maintaining multiplecomplete copies of the data in a volume. Data being written to a mirrored volume isreflected in all copies. If a portion of a mirrored volume fails, the system continues to usethe other copies of the data.RAID-5 provides data redundancy by using parity. Parity is a calculated value used toreconstruct data after a failure. While data is being written to a RAID-5 volume, parity iscalculated by doing an exclusive OR (XOR) procedure on the data. The resulting parity isthen written to the volume. The data and calculated parity are contained in a plex that is“striped” across multiple disks. If a portion of a RAID-5 volume fails, the data that was onthat portion of the failed volume can be recreated from the remaining data and parityinformation. It is also possible to mix concatenation and striping in the layout.The figure, “Parity Locations in a RAID-5 Model”, shows parity locations in a RAID-5array configuration. Every stripe has a column containing a parity stripe unit andcolumns containing data. The parity is spread over all of the disks in the array, reducingthe write time for large independent writes because the writes do not have to wait until asingle parity disk can accept the data.Parity Locations in a RAID-5 ModelStripe 1Stripe 2Stripe 3Stripe 4DataDataParityDataDataParityDataDataParityDataDataParityRAID-5 and how it is implemented by the VxVM is described in “<strong>VERITAS</strong> <strong>Volume</strong>Manager RAID-5 Arrays” on page 26.RAID-5 volumes can additionally perform logging to minimize recovery time. RAID-5volumes use RAID-5 logs to keep a copy of the data and parity currently being written.RAID-5 logging is optional and can be created along with RAID-5 volumes or added later.Chapter 1, Understanding <strong>VERITAS</strong> <strong>Volume</strong> Manager25
<strong>Volume</strong> Layouts in VxVMTraditional RAID-5 ArraysA traditional RAID-5 array is several disks organized in rows and columns. A column is anumber of disks located in the same ordinal position in the array. A row is the minimalnumber of disks necessary to support the full width of a parity stripe. The figure,“Traditional RAID-5 Array”, shows the row and column arrangement of a traditionalRAID-5 array.Traditional RAID-5 ArrayRow 0Stripe 1Stripe 3Row 1Stripe 2Column 0 Column 1 Column 2 Column 3This traditional array structure supports growth by adding more rows per column.Striping is accomplished by applying the first stripe across the disks in Row 0, then thesecond stripe across the disks in Row 1, then the third stripe across the Row 0 disks, andso on. This type of array requires all disks columns, and rows to be of equal size.<strong>VERITAS</strong> <strong>Volume</strong> Manager RAID-5 ArraysThe RAID-5 array structure in <strong>VERITAS</strong> <strong>Volume</strong> Manager differs from the traditionalstructure. Due to the virtual nature of its disks and other objects, VxVM does not userows. Instead, VxVM uses columns consisting of variable length subdisks (as shown in“<strong>VERITAS</strong> <strong>Volume</strong> ManagerRAID-5 Array” on page 27). Each subdisk represents aspecific area of a disk.VxVM allows each column of a RAID-5 plex to consist of a different number of subdisks.The subdisks in a given column can be derived from different physical disks. Additionalsubdisks can be added to the columns as necessary. Striping is implemented by applyingthe first stripe across each subdisk at the top of each column, then applying another stripebelow that, and so on for the length of the columns. Equal-sized stripe units are used foreach column. For RAID-5, the default stripe unit size is 16 kilobytes. See “Striping(RAID-0)” on page 17 for further information about stripe units.26 <strong>VERITAS</strong> <strong>Volume</strong> Manager Administrator’s Guide
<strong>Volume</strong> Layouts in VxVM<strong>VERITAS</strong> <strong>Volume</strong> ManagerRAID-5 ArrayStripe 1Stripe 2SDSDSDSDSDSDSDSDColumn 0 Column 1 Column 2 Column 3SD = SubdiskNote Mirroring of RAID-5 volumes is not currently supported.See “Creating a RAID-5 <strong>Volume</strong>” on page 174 for information on how to create a RAID-5volume.Left-Symmetric LayoutThere are several layouts for data and parity that can be used in the setup of a RAID-5array. The implementation of RAID-5 in VxVM uses a left-symmetric layout. Thisprovides optimal performance for both random I/O operations and large sequential I/Ooperations. However, the layout selection is not as critical for performance as are thenumber of columns and the stripe unit size.Left-symmetric layout stripes both data and parity across columns, placing the parity in adifferent column for every stripe of data. The first parity stripe unit is located in therightmost column of the first stripe. Each successive parity stripe unit is located in thenext stripe, shifted left one column from the previous parity stripe unit location. If thereare more stripes than columns, the parity stripe unit placement begins in the rightmostcolumn again.Chapter 1, Understanding <strong>VERITAS</strong> <strong>Volume</strong> Manager27
<strong>Volume</strong> Layouts in VxVMThe figure, “Left-Symmetric Layout,” shows a left-symmetric parity layout with fivedisks (one per column).Left-Symmetric LayoutColumnParity Stripe Unit01 2 3 P0Stripe56 7 P1 41011 P2 8 915P4P3 12 13 1416 17 18 19(Data)Stripe UnitFor each stripe, data is organized starting to the right of the parity stripe unit. In thefigure, data organization for the first stripe begins at P0 and continues to stripe units 0-3.Data organization for the second stripe begins at P1, then continues to stripe unit 4, andon to stripe units 5-7. Data organization proceeds in this manner for the remaining stripes.Each parity stripe unit contains the result of an exclusive OR (XOR) operation performedon the data in the data stripe units within the same stripe. If one column’s data isinaccessible due to hardware or software failure, the data for each stripe can be restoredby XORing the contents of the remaining columns data stripe units against theirrespective parity stripe units.For example, if a disk corresponding to the whole or part of the far left column fails, thevolume is placed in a degraded mode. While in degraded mode, the data from the failedcolumn can be recreated by XORing stripe units 1-3 against parity stripe unit P0 torecreate stripe unit 0, then XORing stripe units 4, 6, and 7 against parity stripe unit P1 torecreate stripe unit 5, and so on.Note Failure of more than one column in a RAID-5 plex detaches the volume. The volumeis no longer allowed to satisfy read or write requests. Once the failed columns havebeen recovered, it may be necessary to recover user data from backups.28 <strong>VERITAS</strong> <strong>Volume</strong> Manager Administrator’s Guide
<strong>Volume</strong> Layouts in VxVMRAID-5 LoggingLogging is used to prevent corruption of data during recovery by immediately recordingchanges to data and parity to a log area on a persistent device such as a volume on disk orin non-volatile RAM. The new data and parity are then written to the disks.Without logging, it is possible for data not involved in any active writes to be lost orsilently corrupted if both a disk in a RAID-5 volume and the system fail. If thisdouble-failure occurs, there is no way of knowing if the data being written to the dataportions of the disks or the parity being written to the parity portions have actually beenwritten. Therefore, the recovery of the corrupted disk may be corrupted itself.The figure, “Incomplete Write,” illustrates a RAID-5 volume configured across three disks(A, B and C). In this volume, recovery of disk B’s corrupted data depends on disk A’s dataand disk C’s parity both being complete. However, only the data write to disk A iscomplete. The parity write to disk C is incomplete, which would cause the data on disk Bto be reconstructed incorrectly.Incomplete WriteCompleted Corrupted Data IncompleteData WriteParity WriteDisk A Disk B Disk CThis failure can be avoided by logging all data and parity writes before committing themto the array. In this way, the log can be replayed, causing the data and parity updates to becompleted before the reconstruction of the failed drive takes place.Logs are associated with a RAID-5 volume by being attached as log plexes. More than onelog plex can exist for each RAID-5 volume, in which case the log areas are mirrored.See “Adding a RAID-5 Log” on page 196 for information on how to add a RAID-5 log to aRAID-5 volume.Chapter 1, Understanding <strong>VERITAS</strong> <strong>Volume</strong> Manager29
<strong>Volume</strong> Layouts in VxVMLayered <strong>Volume</strong>sA layered volume is a virtual <strong>VERITAS</strong> <strong>Volume</strong> Manager object that is built on top of othervolumes. The layered volume structure tolerates failure better and has greaterredundancy than the standard volume structure. For example, in a striped-mirror layeredvolume, each mirror (plex) covers a smaller area of storage space, so recovery is quickerthan with a standard mirrored volume.The figure, “Example of a Striped-Mirror Layered <strong>Volume</strong>,” illustrates the structure of atypical layered volume. It shows subdisks with two columns, built on underlyingvolumes with each volume internally mirrored. The volume and striped plex in the“Managed by User” area allow you to perform normal tasks in VxVM. User tasks can beperformed only on the top-level volume of a layered volume.Underlying volumes in the “Managed by VxVM” area are used exclusively by VxVM andare not designed for user manipulation. You cannot detach a layered volume or performany other operation on the underlying volumes by manipulating the internal structure.You can perform all necessary operations in the “Managed by User” area that includes thetop-level volume and striped plex (for example, resizing the volume, changing thecolumn width, or adding a column).Example of a Striped-Mirror Layered <strong>Volume</strong>Subdisks onVM Disksdisk04-01ConcatenatedPlexesdisk04-01UnderlyingMirroredSubdisks Striped Plex <strong>Volume</strong><strong>Volume</strong>sdisk05-01disk06-01disk07-01disk05-01disk06-01disk07-01vop01vop02Column 0Column 1vol01-01vop01vop02vol01-01vol01Managed by VxVMManaged by User30 <strong>VERITAS</strong> <strong>Volume</strong> Manager Administrator’s Guide
Online RelayoutSystem administrators can manipulate the layered volume structure for troubleshootingor other operations (for example, to place data on specific disks). Layered volumes areused by VxVM to perform the following tasks and operations:◆◆◆◆◆Creating striped-mirrors. (See “Creating a Striped-Mirror <strong>Volume</strong>” on page 173, andthe vxassist(1M) manual page.)Creating concatenated-mirrors. (See “Creating a Concatenated-Mirror <strong>Volume</strong>” onpage 169, and the vxassist(1M) manual page.)Online Relayout. (See “Online Relayout” on page 31, and the vxrelayout(1M) andvxassist(1M) manual pages.)RAID-5 subdisk moves. (See the vxsd(1M) manual page.)Snapshots. (See “Backing Up <strong>Volume</strong>s Online Using Snapshots” on page 212, and thevxassist(1M) manual page.)Note The <strong>VERITAS</strong> Enterprise Administrator (VEA) terms a striped-mirror asStriped-Pro, and a concatenated-mirror as Concatenated-Pro.Online RelayoutNote You may need an additional license to use this feature.Online relayout allows you to convert between storage layouts in VxVM, withuninterrupted data access. Typically, you would do this to change the redundancy orperformance characteristics of a volume. VxVM adds redundancy to storage either byduplicating the data (mirroring) or by adding parity (RAID-5). Performancecharacteristics of storage in VxVM can be changed by changing the striping parameters,which are the number of columns and the stripe width.See “Performing Online Relayout” on page 219 for details of how to perform onlinerelayout of volumes in VxVM. Also see “Converting Between Layered and Non-Layered<strong>Volume</strong>s” on page 222 for information about the additional volume conversion operationsthat are possible.How Online Relayout WorksOnline relayout allows you to change the storage layouts that you have already created inplace without disturbing data access. You can change the performance characteristics of aparticular layout to suit your changed requirements. You can transform one layout toanother by invoking a single command.Chapter 1, Understanding <strong>VERITAS</strong> <strong>Volume</strong> Manager31
Online RelayoutFor example, if a striped layout with a 128KB stripe unit size is not providing optimalperformance, you can use relayout to change the stripe unit size.File systems mounted on the volumes do not need to be unmounted to achieve thistransformation provided that the file system (such as <strong>VERITAS</strong> File System TM ) supportsonline shrink and grow operations.Online relayout reuses the existing storage space and has space allocation policies toaddress the needs of the new layout. The layout transformation process converts a givenvolume to the destination layout by using minimal temporary space that is available inthe disk group.The transformation is done by moving one portion of data at a time in the source layout tothe destination layout. Data is copied from the source volume to the temporary area, anddata is removed from the source volume storage area in portions. The source volumestorage area is then transformed to the new layout, and the data saved in the temporaryarea is written back to the new layout. This operation is repeated until all the storage anddata in the source volume has been transformed to the new layout.The default size of the temporary area used during the relayout depends on the size of thevolume and the type of relayout. For volumes larger than 50MB, the amount of temporaryspace that is required is usually 10% of the size of the volume, from a minimum of 50MBup to a maximum of 1GB. For volumes smaller than 50MB, the temporary space requiredis the same as the size of the volume.The following error message displays the number of blocks required if there is insufficientfree space available in the disk group for the temporary area:tmpsize too small to perform this relayout (nblks minimum required)You can override the default size used for the temporary area by using the tmpsizeattribute to vxassist. See the vxassist(1M) manual page for more information.Additional permanent disk space may be required for the destination volumes,depending on the type of relayout that you are performing. This may happen, forexample, if you change the number of columns in a striped volume. The figure, “Exampleof Decreasing the Number of Columns in a <strong>Volume</strong>,” shows how decreasing the numberof columns can require disks to be added to a volume. The size of the volume remains thesame but an extra disk is needed to extend one of the columns.32 <strong>VERITAS</strong> <strong>Volume</strong> Manager Administrator’s Guide
Online RelayoutExample of Decreasing the Number of Columns in a <strong>Volume</strong>Five ColumnsThree ColumnsThe following are examples of operations that you can perform using online relayout:◆Change a RAID-5 volume to a concatenated, striped, or layered volume (removeparity). See “Example of Relayout of a RAID-5 <strong>Volume</strong> to a Striped <strong>Volume</strong>” below.Note that removing parity (shown by the shaded area) decreases the overall storagespace that the volume requires.Example of Relayout of a RAID-5 <strong>Volume</strong> to a Striped <strong>Volume</strong>RAID-5 <strong>Volume</strong>Striped <strong>Volume</strong>◆Change a volume to a RAID-5 volume (add parity). See “Example of Relayout of aConcatenated <strong>Volume</strong> to a RAID-5 <strong>Volume</strong>” below. Note that adding parity (shownby the shaded area) increases the overall storage space that the volume requires.Example of Relayout of a Concatenated <strong>Volume</strong> to a RAID-5 <strong>Volume</strong>Concatenated<strong>Volume</strong>RAID-5 <strong>Volume</strong>◆Change the number of columns in a volume. See “Example of Increasing the Numberof Columns in a <strong>Volume</strong>” below. Note that the length of the columns is reduced toconserve the size of the volume.Example of Increasing the Number of Columns in a <strong>Volume</strong>Two ColumnsThree ColumnsChapter 1, Understanding <strong>VERITAS</strong> <strong>Volume</strong> Manager33
Online Relayout◆Change the column stripe width in a volume. See “Example of Increasing the StripeWidth for the Columns in a <strong>Volume</strong>” below.Example of Increasing the Stripe Width for the Columns in a <strong>Volume</strong>For details of how to perform online relayout operations, see “Performing OnlineRelayout” on page 219.34 <strong>VERITAS</strong> <strong>Volume</strong> Manager Administrator’s Guide
Online RelayoutPermitted Relayout TransformationsThe tables below give details of the relayout operations that are possible for each type ofsource storage layout.Supported Relayout Transformations for Unmirrored Concatenated <strong>Volume</strong>sRelayout toconcatconcat-mirrormirror-concatmirror-striperaid5stripestripe-mirrorFrom concatNo.No. Add a mirror, and then use vxassist convert instead.No. Add a mirror instead.No. Use vxassist convert after relayout to striped-mirror volume instead.Yes. The stripe width and number of columns may be defined.Yes. The stripe width and number of columns may be defined.Yes. The stripe width and number of columns may be defined.Supported Relayout Transformations for Layered Concatenated-Mirror <strong>Volume</strong>sRelayout toconcatconcat-mirrormirror-concatmirror-striperaid5stripestriped-mirrorFrom concat-mirrorNo. Use vxassist convert, and then remove unwanted mirrors from theresulting mirrored-concatenated volume instead.No.No. Use vxassist convert instead.No. Use vxassist convert after relayout to striped-mirror volume instead.Yes.Yes. This removes a mirror and adds striping. The stripe width and number ofcolumns may be defined.Yes. The stripe width and number of columns may be defined.Chapter 1, Understanding <strong>VERITAS</strong> <strong>Volume</strong> Manager35
Online RelayoutSupported Relayout Transformations for RAID-5 <strong>Volume</strong>sRelayout toconcatconcat-mirrormirror-concatmirror-striperaid5stripestripe-mirrorFrom raid5Yes.Yes.No. Use vxassist convert after relayout to concatenated-mirror volumeinstead.No. Use vxassist convert after relayout to striped-mirror volume instead.Yes. The stripe width and number of columns may be changed.Yes. The stripe width and number of columns may also be changed.Yes. The stripe width and number of columns may also be changed.Supported Relayout Transformations for Mirrored-Concatenated <strong>Volume</strong>sRelayout toconcatconcat-mirrormirror-concatmirror-striperaid5stripestripe-mirrorFrom mirror-concatNo. Remove unwanted mirrors instead.No. Use vxassist convert instead.No.No. Use vxassist convert after relayout to striped-mirror volume instead.Yes. The stripe width and number of columns may be defined. Choose a plex inthe existing mirrored volume on which to perform the relayout. The otherplexes are removed at the end of the relayout operation.Yes.Yes.Supported Relayout Transformations for Mirrored-Stripe <strong>Volume</strong>sRelayout toconcatconcat-mirrormirror-concatmirror-striperaid5stripestripe-mirrorFrom mirror-stripeYes.Yes.No. Use vxassist convert after relayout to concatenated-mirror volumeinstead.No. Use vxassist convert after relayout to striped-mirror volume instead.Yes. The stripe width and number of columns may be changed.Yes. The stripe width or number of columns must be changed.Yes. The stripe width or number of columns must be changed. Otherwise, usevxassist convert.36 <strong>VERITAS</strong> <strong>Volume</strong> Manager Administrator’s Guide
Online RelayoutSupported Relayout Transformations for Unmirrored Stripe, and Layered Striped-Mirror <strong>Volume</strong>sRelayout toconcatconcat-mirrormirror-concatmirror-striperaid5stripestripe-mirrorFrom stripe, or stripe-mirrorYes.Yes.No. Use vxassist convert after relayout to concatenated-mirror volumeinstead.No. Use vxassist convert after relayout to striped-mirror volume instead.Yes. The stripe width and number of columns may be changed.Yes. The stripe width or number of columns must be changed.Yes. The stripe width or number of columns must be changed.Transformations are not supported for the following objects:◆Log plexes.◆ <strong>Volume</strong> snapshot when there is an online relayout operation running on the volume.Also note the following limitations:◆ Online relayout cannot create a non-layered mirrored volume in a single step. Italways creates a layered mirrored volume even if you specify a non-layered mirroredlayout, such as mirror-stripe or mirror-concat. Use the vxassist convertcommand to turn the layered mirrored volume that results from a relayout into anon-layered volume. See “Converting Between Layered and Non-Layered <strong>Volume</strong>s”on page 222 for more information.◆◆◆◆Online relayout can be used only with volumes that have been created using thevxassist command or the <strong>VERITAS</strong> Enterprise Administrator (VEA).The usual restrictions apply for the minimum number of physical disks that arerequired to create the destination layout. For example, mirrored volumes require atleast as many disks as mirrors, striped and RAID-5 volumes require at least as manydisks as columns, and striped-mirror volumes require at least as many disks ascolumns multiplied by mirrors.To be eligible for layout transformation, the plexes in a mirrored volume must haveidentical stripe widths and numbers of columns.Online relayout involving RAID-5 volumes is not supported for shareable diskgroups in a cluster environment.◆ Online relayout cannot transform sparse plexes, nor can it make any plex sparse. (Asparse plex is not the same size as the volume, or has regions that are not mapped toany subdisk.)Chapter 1, Understanding <strong>VERITAS</strong> <strong>Volume</strong> Manager37
<strong>Volume</strong> ResynchronizationTransformation CharacteristicsTransformation of data from one layout to another involves rearrangement of data in theexisting layout to the new layout. During the transformation, online relayout retains dataredundancy by mirroring any temporary space used. Read and write access to data is notinterrupted during the transformation.Data is not corrupted if the system fails during a transformation. The transformationcontinues after the system is restored and both read and write access are maintained.You can reverse the layout transformation process at any time, but the data may not bereturned to the exact previous storage location. Any existing transformation in thevolume must be stopped before doing a reversal.You can determine the transformation direction by using the vxrelayout statusvolume command.These transformations are protected against I/O failures if there is sufficient redundancyand space to move the data.Transformations and <strong>Volume</strong> LengthSome layout transformations can cause the volume length to increase or decrease. If eitherof these conditions occurs, online relayout uses the vxresize(1M) command to shrinkor grow a file system as described in “Resizing a <strong>Volume</strong>” on page 198.<strong>Volume</strong> ResynchronizationWhen storing data redundantly and using mirrored or RAID-5 volumes, VxVM ensuresthat all copies of the data match exactly. However, under certain conditions (usually dueto complete system failures), some redundant data on a volume can become inconsistentor unsynchronized. The mirrored data is not exactly the same as the original data. Exceptfor normal configuration changes (such as detaching and reattaching a plex), this can onlyoccur when a system crashes while data is being written to a volume.Data is written to the mirrors of a volume in parallel, as is the data and parity in a RAID-5volume. If a system crash occurs before all the individual writes complete, it is possible forsome writes to complete while others do not. This can result in the data becomingunsynchronized. For mirrored volumes, it can cause two reads from the same region ofthe volume to return different results, if different mirrors are used to satisfy the readrequest. In the case of RAID-5 volumes, it can lead to parity corruption and incorrect datareconstruction.38 <strong>VERITAS</strong> <strong>Volume</strong> Manager Administrator’s Guide
<strong>Volume</strong> ResynchronizationVxVM needs to ensure that all mirrors contain exactly the same data and that the data andparity in RAID-5 volumes agree. This process is called volume resynchronization. Forvolumes that are part of disk groups that are automatically imported at boot time (such asrootdg), the resynchronization process takes place when the system reboots.Not all volumes require resynchronization after a system failure. <strong>Volume</strong>s that were neverwritten or that were quiescent (that is, had no active I/O) when the system failureoccurred could not have had outstanding writes and do not require resynchronization.Dirty FlagsVxVM records when a volume is first written to and marks it as dirty. When a volume isclosed by all processes or stopped cleanly by the administrator, and all writes have beencompleted, VxVM removes the dirty flag for the volume. Only volumes that are markeddirty when the system reboots require resynchronization.Resynchronization ProcessThe process of resynchronization depends on the type of volume. RAID-5 volumes thatcontain RAID-5 logs can “replay” those logs. If no logs are available, the volume is placedin reconstruct-recovery mode and all parity is regenerated. For mirrored volumes,resynchronization is done by placing the volume in recovery mode (also calledread-writeback recovery mode). Resynchronization of data in the volume is done in thebackground. This allows the volume to be available for use while recovery is taking place.The process of resynchronization can impact system performance. The recovery processreduces some of this impact by spreading the recoveries to avoid stressing a specific diskor controller.For large volumes or for a large number of volumes, the resynchronization process cantake time. These effects can be addressed by using dirty region logging (DRL) andFastResync (fast mirror resynchronization) for mirrored volumes, or by ensuring thatRAID-5 volumes have valid RAID-5 logs. See the following sections, “Dirty RegionLogging (DRL)” and “FastResync,” for more information.For raw volumes used by database applications, the SmartSync Recovery Acceleratorcan be used (see “SmartSync Recovery Accelerator” on page 49).Chapter 1, Understanding <strong>VERITAS</strong> <strong>Volume</strong> Manager39
Dirty Region Logging (DRL)Dirty Region Logging (DRL)Note You may need an additional license to use this feature.Dirty region logging (DRL), if enabled, speeds recovery of mirrored volumes after asystem crash. DRL keeps track of the regions that have changed due to I/O writes to amirrored volume. DRL uses this information to recover only those portions of the volumethat need to be recovered.If DRL is not used and a system failure occurs, all mirrors of the volumes must be restoredto a consistent state. Restoration is done by copying the full contents of the volumebetween its mirrors. This process can be lengthy and I/O intensive. It may also benecessary to recover the areas of volumes that are already consistent.Dirty Region LogsDRL logically divides a volume into a set of consecutive regions, and maintains a dirtyregion log on disk where each region is represented by one status bit. Before any data iswritten to any region, DRL synchronously marks the corresponding bit in the log as dirtyif it was previously clean. The log is only used to represent regions of the volume onwhich writes are pending. Once a write has been completed, the dirty bit for a region isnot cleared immediately. If another write to the same region occurs, this means it is notnecessary to write the log to the disk before the write operation can occur. The bit remainsmarked as dirty until the corresponding volume region becomes the least recentlyaccessed for writing.On restarting a system after a crash, VxVM recovers only those regions of the volume thatare marked as dirty in the dirty region log.Log subdisksLog subdisks are used to store the dirty region log of a mirrored volume that has DRLenabled. A volume with DRL has at least one log subdisk; multiple log subdisks can beused to mirror the dirty region log. Each log subdisk is associated with one plex of thevolume. Only one log subdisk can exist per plex. If the plex contains only a log subdiskand no data subdisks, that plex is referred to as a log plex.The log subdisk can also be associated with a regular plex that contains data subdisks. Inthat case, the log subdisk risks becoming unavailable if the plex must be detached due tothe failure of one of its data subdisks.40 <strong>VERITAS</strong> <strong>Volume</strong> Manager Administrator’s Guide
Dirty Region Logging (DRL)If the vxassist command is used to create a dirty region log, it creates a log plexcontaining a single log subdisk by default. A dirty region log can also be set up manuallyby creating a log subdisk and associating it with a plex. The plex then contains both a logand data subdisks.Sequential DRLSome volumes, such as those that are used for database replay logs, are writtensequentially and do not benefit from delayed cleaning of the DRL bits. For these volumes,sequential DRL can be used to limit the number of dirty regions. This allows for fasterrecovery should a crash occur. However, if applied to volumes that are written torandomly, sequential DRL can be a performance bottleneck as it limits the number ofparallel writes that can be carried out.The maximum number of dirty regions allowed for sequential DRL is controlled by thetunable voldrl_max_seq_dirty as described in the description of“voldrl_max_seq_dirty” on page 295.Note DRL adds a small I/O overhead for most write access patterns.For details of how to configure DRL and sequential DRL, see “Adding DRL Logging to aMirrored <strong>Volume</strong>” on page 195.Chapter 1, Understanding <strong>VERITAS</strong> <strong>Volume</strong> Manager41
<strong>Volume</strong> Snapshots<strong>Volume</strong> SnapshotsThe volume snapshot model is shown in “Snapshot Creation and the Backup Cycle.” Thisfigure also shows the transitions that are supported by the snapback and snapclearcommands to vxassist.Snapshot Creation and the Backup CycleSTARTsnapstartOriginalvolumeRefresh onsnapbackOriginalvolumeSnapshotmirrorsnapshotBackupCycleSnapshotvolumesnapbackBack up to disk,tape or othermedium, or useto create replicadatabase or filesystem.IndependentvolumesnapclearThe vxassist snapstart command creates a mirror to be used for the snapshot, andattaches it to the volume as a snapshot mirror. (The vxassist snapabort command canbe used to cancel this operation and remove the snapshot mirror.)When the attachment is complete, the vxassist snapshot command is used to create anew snapshot volume by taking one or more snapshot mirrors to use as its data plexes.The snapshot volume contains a copy of the original volume’s data at the time that youtook the snapshot. If more than one snapshot mirror is used, the snapshot volume is itselfmirrored.The command, vxassist snapback, can be used to return snapshot plexes to theoriginal volume from which they were snapped, and to resynchronize the data in thesnapshot mirrors from the data in the original volume. This enables you to refresh thedata in a snapshot after each time that you use it to make a backup. As described in“FastResync” on page 43, you can use the FastResync feature of VxVM to minimize thetime needed to resynchronize the data in the snapshot mirror. If FastResync is notenabled, a full resynchronization of the data is required.42 <strong>VERITAS</strong> <strong>Volume</strong> Manager Administrator’s Guide
FastResyncAlternatively, you can use the vxassist snapclear command to break the associationbetween the original volume and the snapshot volume. The snapshot volume then has anexistence that is independent of the original volume. This is useful for applications that donot require the snapshot to be resynchronized with the original volume.For more information about taking snapshots of a volume, see “Backing Up <strong>Volume</strong>sOnline Using Snapshots” on page 212, and the vxassist(1M) manual page.FastResyncNote You may need an additional license to use this feature.The FastResync feature (previously called fast mirror resynchronization or FMR)performs quick and efficient resynchronization of stale mirrors (a mirror that is notsynchronized). This increases the efficiency of the VxVM snapshot mechanism, andimproves the performance of operations such as backup and decision supportapplications. Typically, these operations require that the volume is quiescent, and thatthey are not impeded by updates to the volume by other activities on the system. Toachieve these goals, the snapshot mechanism in VxVM creates an exact copy of a primaryvolume at an instant in time. After a snapshot is taken, it can be accessed independently ofthe volume from which it was taken. In a clustered VxVM environment with sharedaccess to storage, it is possible to eliminate the resource contention and performanceoverhead of using a snapshot simply by accessing it from a different node.For details of how to enable FastResync on a per-volume basis, see “Enabling FastResyncon a <strong>Volume</strong>” on page 205.FastResync EnhancementsFastResync provides two fundamental enhancements to VxVM:◆FastResync optimizes mirror resynchronization by keeping track of updates to storeddata that have been missed by a mirror. (A mirror may be unavailable because it hasbeen detached from its volume, either automatically by VxVM as the result of an error,or directly by an administrator using a utility such as vxplex or vxassist. Areturning mirror is a mirror that was previously detached and is in the process of beingre-attached to its original volume as the result of the vxrecover or vxplex attoperation.) When a mirror returns to service, only the updates that it has missed needto be re-applied to resynchronize it. This requires much less effort than the traditionalmethod of copying all the stored data to the returning mirror.Once FastResync has been enabled on a volume, it does not alter how you administermirrors. The only visible effect is that repair operations conclude more quickly.Chapter 1, Understanding <strong>VERITAS</strong> <strong>Volume</strong> Manager43
FastResync◆FastResync allows you to refresh and re-use snapshots rather than discard them. Youcan quickly re-associate (snapback) snapshot plexes with their original volumes. Thisreduces the system overhead required to perform cyclical operations such as backupsthat rely on the snapshot functionality of VxVM.Non-Persistent FastResyncNon-Persistent FastResync, introduced in VxVM 3.1, allocates its change maps inmemory. If Non-Persistent FastResync is enabled, a separate FastResync map is kept forthe original volume and for each snapshot volume. Unlike a dirty region log (DRL), theydo not reside on disk nor in persistent store. This has the advantage that updates to theFastResync map have little impact on I/O performance, as no disk updates needed to beperformed. However, if a system is rebooted, the information in the map is lost, so a fullresynchronization is required on snapback. This limitation can be overcome for volumesin cluster-shareable disk groups, provided that at least one of the nodes in the clusterremained running to preserve the FastResync map in its memory. However, a node crashin a High Availability (HA) environment requires the full resynchronization of a mirrorwhen it is reattached to its parent volume.Persistent FastResyncIn VxVM 3.2, Non-Persistent FastResync was augmented by the introduction of PersistentFastResync. Unlike Non-Persistent FastResync, Persistent FastResync keeps theFastResync maps on disk so that they can survive both system reboots, system crashesand cluster crashes. If Persistent FastResync is enabled on a volume or on a snapshotvolume, a data change object (DCO) and a DCO volume are associated with the volume.The DCO object manages information about the FastResync maps. These maps trackwrites to the original volume and to each of up to 32 snapshot volumes since the lastsnapshot operation. The DCO volume on disk holds the 33 maps, each of which is 4blocks in size by default.Persistent FastResync can also track the association between volumes and their snapshotvolumes after they are moved into different disk groups. When the disk groups arerejoined, this allows the snapshot plexes to be quickly resynchronized. This ability is notsupported by Non-Persistent FastResync. See “Reorganizing the Contents of DiskGroups” on page 120 for details.44 <strong>VERITAS</strong> <strong>Volume</strong> Manager Administrator’s Guide
FastResyncHow Non-Persistent FastResync Works with SnapshotsThe snapshot feature of VxVM takes advantage of FastResync change tracking to recordupdates to the original volume after a shapshot plex is created. After a snapshot is taken,the snapback option is used to reattach the snapshot plex. Provided that FastResync isenabled on a volume before the snapshot is taken, and that it is not disabled at any timebefore the snapshot is reattached, the changes that FastResync records are used toresynchronize the volume during the snapback. This considerably reduces the timeneeded to resynchronize the volume.Non-Persistent FastResync uses a map in memory to implement change tracking. Each bitin the map represents a contiguous number of blocks in a volume’s address space. Thedefault size of the map is 4 blocks. The kernel tunable vol_fmr_logsz can be used tolimit the maximum size in blocks of the map as described on page 292.How Persistent FastResync Works with SnapshotsPersistent FastResync uses a map in a DCO volume on disk to implement changetracking. As for Non-Persistent FastResync, each bit in the map represents a contiguousnumber of blocks in a volume’s address space. The default size of the maps can beincreased by specifying the dcolen attribute to the vxassist command when thevolume is created. The default value of dcolen is 132 1024-byte blocks (the plex contains33 maps, each of length 4 blocks). To use a larger map size, multiply the desired map sizeby 33 to calculate the value of dcolen that you should specify. For example, to use an8-block map, you would specify dcolen=264. The maximum possible map size is 64blocks, which corresponds to a dcolen value of 2112 blocks.“Mirrored <strong>Volume</strong> with Persistent FastResync Enabled” shows an example of a mirroredvolume with two plexes on which Persistent FastResync is enabled. Associated with thevolume are a DCO object and a DCO volume with two plexes.Mirrored <strong>Volume</strong> with Persistent FastResync EnabledMirrored <strong>Volume</strong>Data PlexData PlexData Change ObjectDCOPlexDCOPlexDCO <strong>Volume</strong>Chapter 1, Understanding <strong>VERITAS</strong> <strong>Volume</strong> Manager45
FastResyncWhen the snapstart operation is performed on the volume, this sets up a snapshot plexin the volume and associates a disabled DCO plex with it, as shown in “Mirrored <strong>Volume</strong>After Completion of a snapstart Operation.”Mirrored <strong>Volume</strong> After Completion of a snapstart OperationMirrored <strong>Volume</strong>Data PlexData PlexSnapshotPlexData Change ObjectDisabledDCOPlexDCOPlexDCOPlexMultiple snapshot plexes and associated DCO plexes may be created in the volume byre-running the snapstart operation. You can create up to a total of 32 plexes (data andlog) in a volume.A snapshot volume can now be created from a snapshot plex by running the snapshotoperation on the volume. As illustrated in “Mirrored <strong>Volume</strong> and Snapshot <strong>Volume</strong> AfterCompletion of a snapshot Operation” on page 47, this also sets up a DCO object and aDCO volume for the snapshot volume. The new DCO volume contains the single DCOplex that was associated with the snapshot plex. If two snapshot plexes were taken toform the snapshot volume, the DCO volume would contain two plexes.Associated with both the original volume and the snapshot volume are snap objects. Thesnap object for the original volume points to the snapshot volume, and the snap object forthe snapshot volume points to the original volume. This allows VxVM to track therelationship between volumes and their snapshots even if they are moved into differentdisk groups.The snap objects in the original volume and snapshot volume are automatically deleted ineither of the following circumstances:◆◆DCO <strong>Volume</strong>The snapback operation is run to return all of the plexes of the snapshot volume tothe original volume.The snapclear operation is run on a volume to break the association between theoriginal volume and the snapshot volume. If the volumes are in different disk groups,snapclear must be run separately on each volume.46 <strong>VERITAS</strong> <strong>Volume</strong> Manager Administrator’s Guide
FastResyncSee “Merging a Snapshot <strong>Volume</strong> (snapback)” on page 216, “Dissociating a Snapshot<strong>Volume</strong> (snapclear)” on page 217, and the vxassist(1M) manual page for moreinformation.Mirrored <strong>Volume</strong> and Snapshot <strong>Volume</strong> After Completion of a snapshot OperationMirrored <strong>Volume</strong>Data PlexData PlexData Change ObjectSnap ObjectDCOLog PlexDCOLog PlexDCO <strong>Volume</strong>Snapshot <strong>Volume</strong>Data PlexData Change ObjectSnap ObjectDCOLog PlexDCO <strong>Volume</strong>Additional Snapshot FeaturesTo make it easier to create snapshots of several volumes at the same time, the snapshotoption accepts more than one volume name as its argument. By default, each replicavolume is named SNAPnumber-volume, where number is a unique serial number, andvolume is the name of the volume being snapshotted. This default can be overridden byusing the option -o name=pattern, as described on the vxassist(1M) manual page.Chapter 1, Understanding <strong>VERITAS</strong> <strong>Volume</strong> Manager47
FastResyncTo snapshot all the volumes in a single disk group, specify the option -o allvols tovxassist. However, this fails if any of the volumes in the disk group do not have acomplete snapshot plex.It is also possible to take several snapshots of the same volume. A new FastResync changemap is produced for each snapshot taken to minimize the resynchronization time for eachsnapshot.By default, the snapshot plex is resynchronized from the data in the original volumeduring a snapback operation. Alternatively, you can choose the snapshot plex as thepreferred copy of the data when performing a snapback as illustrated in“Resynchronizing the Original <strong>Volume</strong> from the Snapshot.” Specifying the option -oresyncfromreplica to vxassist resynchronizes the original volume from the data inthe snapshot.Resynchronizing the Original <strong>Volume</strong> from the SnapshotRefresh onsnapbackOriginalvolumesnapshotSnapshotmirrorSnapshotvolume-o resyncfromreplica snapbackNote The original volume must not be in use during a snapback operation that specifiesthe option -o resyncfromreplica to resynchronize the volume from a snapshot.Stop any application, such as a database, and unmount any file systems that areconfigured to use the volume.It is possible to grow the replica volume, or the original volume, and still use FastResync.Growing the volume extends the map that FastResync uses to track changes to theoriginal volume. This can change either the size of the map, or the size of the regionrepresented by each bit in the map. In either case, the part of the map that corresponds tothe grown area of the volume is marked as “dirty” so that this area is resynchronized. Thesnapback operation fails if it attempts to create an incomplete snapshot plex. In suchcases, you must grow the replica volume, or the original volume, before invokingsnapback. Growing the two volumes separately can lead to a snapshot that sharesphysical disks with another mirror in the volume. To prevent this, grow the volume afterthe snapback command is complete.48 <strong>VERITAS</strong> <strong>Volume</strong> Manager Administrator’s Guide
SmartSync Recovery AcceleratorFastResync LimitationsThe following limitations apply to FastResync:◆◆◆◆◆◆Persistent FastResync is supported for RAID-5 volumes, but this prevents the use ofthe relayout or resize operations on the volume while a DCO is associated with it.Neither Non-Persistent nor Persistent FastResync can be used to resynchronizemirrors after a system crash. Dirty region logging (DRL), which can coexist withFastResync, should be used for this purpose.When a subdisk is relocated, the entire plex is marked “dirty” and a fullresynchronization becomes necessary.If a snapshot volume is split off into another disk group, Non-Persistent FastResynccannot be used to resynchronize the snapshot plexes with the original volume whenthe disk group is rejoined with the original volume’s disk group. PersistentFastResync must be used for this purpose.If you move or split an original volume (on which Persistent FastResync is enabled)into another disk group, and then move or join it to a snapshot volume’s disk group,you cannot use vxassist snapback to resynchronize snapshot plexes with theoriginal volume. This restriction arises because a snapshot volume references theoriginal volume by its record ID at the time that the snapshot volume was created.Moving the original volume to a different disk group changes the volume’s record ID,and so breaks the association. However, in such a case, you can use the vxplexsnapback command with the -f (force) option to perform the snapback.Any operation that changes the layout of a replica volume can mark the FastResyncchange map for that snapshot “dirty” and require a full resynchronization duringsnapback. Operations that cause this include subdisk split, subdisk move, and onlinerelayout of the replica. It is safe to perform these operations after the snapshot iscompleted. For more information, see the vxvol (1M), vxassist (1M), and vxplex(1M) manual pages.SmartSync Recovery AcceleratorThe SmartSync feature of <strong>VERITAS</strong> <strong>Volume</strong> Manager increases the availability of mirroredvolumes by only resynchronizing changed data. (The process of resynchronizing mirroreddatabases is also sometimes referred to as resilvering.) SmartSync reduces the timerequired to restore consistency, freeing more I/O bandwidth for business-criticalapplications. The SmartSync feature uses an extended interface between VxVM volumesand the database software to avoid unnecessary work during mirror resynchronization.For example, Oracle ® automatically takes advantage of SmartSync to perform databaseresynchronization when it is available.Chapter 1, Understanding <strong>VERITAS</strong> <strong>Volume</strong> Manager49
SmartSync Recovery AcceleratorNote SmartSync is only applicable to databases that are configured on raw volumes. Youcannot use SmartSync with volumes that contain file systems. Use an alternativesolution such as DRL with such volumes.You must configure volumes correctly to use SmartSync. For VxVM, there are two types ofvolumes used by the database, as follows:◆Redo log volumes contain redo logs of the database.◆ Data volumes are all other volumes used by the database (control files and tablespacefiles).SmartSync works with these two types of volumes differently, and they must beconfigured correctly to take full advantage of the extended interfaces. The only differencebetween the two types of volumes is that redo log volumes have dirty region logs, whiledata volumes do not.To enable the use of SmartSync with database volumes in shared disk groups, set thevalue of the volcvm_smartsync tunable to 1 as described in “Tuning VxVM” onpage 289. See “volcvm_smartsync” on page 294 for more information about this tunable.Data <strong>Volume</strong> ConfigurationThe recovery takes place when the database software is started, not at system startup. Thisreduces the overall impact of recovery when the system reboots. Because the recovery iscontrolled by the database, the recovery time for the volume is the resilvering time for thedatabase (that is, the time required to replay the redo logs).Because the database keeps its own logs, it is not necessary for VxVM to do logging. Datavolumes should be configured as mirrored volumes without dirty region logs. In additionto improving recovery time, this avoids any run-time I/O overhead due to DRL whichimproves normal database write access.Redo Log <strong>Volume</strong> ConfigurationA redo log is a log of changes to the database data. Because the database does not maintainchanges to the redo logs, it cannot provide information about which sections requireresilvering. Redo logs are also written sequentially, and since traditional dirty region logsare most useful with randomly-written data, they are of minimal use for reducingrecovery time for redo logs. However, VxVM can reduce the number of dirty regions bymodifying the behavior of its Dirty Region Logging feature to take advantage ofsequential access patterns. Sequential DRL decreases the amount of data needing recoveryand reduces recovery time impact on the system.50 <strong>VERITAS</strong> <strong>Volume</strong> Manager Administrator’s Guide
Hot-RelocationThe enhanced interfaces for redo logs allow the database software to inform VxVM whena volume is to be used as a redo log. This allows VxVM to modify the DRL behavior of thevolume to take advantage of the access patterns. Since the improved recovery timedepends on dirty region logs, redo log volumes should be configured as mirroredvolumes with sequential DRL.For details of how to configure sequential DRL, see “Adding DRL Logging to a Mirrored<strong>Volume</strong>” on page 195.Hot-RelocationNote You may need an additional license to use this feature.Hot-relocation is a feature that allows a system to react automatically to I/O failures onredundant objects (mirrored or RAID-5 volumes) in VxVM and restore redundancy andaccess to those objects. VxVM detects I/O failures on objects and relocates the affectedsubdisks. The subdisks are relocated to disks designated as spare disks and/or free spacewithin the disk group. VxVM then reconstructs the objects that existed before the failureand makes them accessible again.When a partial disk failure occurs (that is, a failure affecting only some subdisks on adisk), redundant data on the failed portion of the disk is relocated. Existing volumes onthe unaffected portions of the disk remain accessible. For further details, see“Administering Hot-Relocation” on page 225.Chapter 1, Understanding <strong>VERITAS</strong> <strong>Volume</strong> Manager51
Hot-Relocation52 <strong>VERITAS</strong> <strong>Volume</strong> Manager Administrator’s Guide
Administering Disks 2IntroductionThis chapter describes the operations for managing disks used by the <strong>VERITAS</strong> <strong>Volume</strong>Manager (VxVM). This includes placing disks under VxVM control, initializing disks,mirroring the root disk, and removing and replacing disks.Note Most VxVM commands require superuser or equivalent privileges.Note Rootability, which puts the root disk under VxVM control and allows it to bemirrored, is supported for this release of VxVM for HP-UX. See “Rootability” onpage 69 for more information.Note Disks that are controlled by the LVM subsystem cannot be used directly as VxVMdisks, but they can be converted so that their volume groups and logical volumesbecome VxVM disk groups and volumes. For more information on conversion, seethe <strong>VERITAS</strong> <strong>Volume</strong> Manager Migration Guide.For information about configuring and administering the Dynamic Multipathing (DMP)feature of VxVM that is used with multiported disk arrays, see “Administering DynamicMultipathing (DMP)” on page 85.Disk DevicesWhen performing disk administration, it is important to understand the differencebetween a disk name and a device name.When a disk is placed under VxVM control, a VM disk is assigned to it. You can define asymbolic disk name (also known as a disk media name) to refer to a VM disk for the purposesof administration. A disk name can be up to 31 characters long. If you do not assign a diskname, it defaults to disk## if the disk is being added to rootdg (where ## is a sequencenumber). Otherwise, the default disk name is groupname##, where groupname is thename of the disk group to which the disk is added. Your system may use a device namethat differs from the examples.53
Disk DevicesThe device name (sometimes referred to as devname or disk access name) defines where thedisk is located in a system.Note The full pathname of a device is /dev/vx/[r]dsk/devicename. In this document,only the device name is listed and /dev/vx/[r]dsk is assumed.Disk Device Naming in VxVMPrior to VxVM 3.2, all disks were named according to the c#t#d# format. Fabric modedisks were not supported by VxVM. From VxVM 3.2 onward, there are two differentmethods of naming disk devices:◆◆c#t#d# Based Naming SchemeEnclosure Based Naming Schemec#t#d# Based Naming SchemeIn this naming scheme, all disk devices except fabric mode disks are named using thec#t#d# format.The syntax of a device name is c#t#d#, where c# represents a controller on a host busadapter, t# is the target controller ID, and d# identifies a disk on the target controller.Fabric mode disk devices are named as follows:◆ Disk in supported disk arrays are named using the enclosure name_# format. Forexample, disks in the supported disk array name FirstFloor are namedFirstFloor_0, FirstFloor_1, FirstFloor_2 and so on. (You can use thevxdmpadm command to administer enclosure names.)◆◆Disks in the DISKS category (formerly know as JBOD disks) are named using theDisk_# format.Disks in the OTHER_DISKS category are named using the fabric_# formatEnclosure Based Naming SchemeThe enclosure-based naming scheme operates as follows:◆All fabric or non-fabric disks in supported disk arrays are named using theenclosure_name_# format. For example, disks in the supported disk array,enggdept are named enggdept_0, enggdept_1, enggdept_2 and so on. (You canuse the vxdmpadm command to administer enclosure names. See “AdministeringDMP Using vxdmpadm” on page 101 and the vxdmpadm(1M) manual page for moreinformation.)54 <strong>VERITAS</strong> <strong>Volume</strong> Manager Administrator’s Guide
Disk Devices◆Disks in the DISKS category (formerly known as JBOD disks) are named using theDisk_# format.◆ Disks in the OTHER_DISKS category are named as follows:- Non-fabric disks are named using the c#t#d# format.- Fabric disks are named using the fabric_# format.See “Changing the Disk-Naming Scheme” on page 61 for details of how to switchbetween the two naming schemes.To display the native OS device names of a VM disk (such as disk01), use the followingcommand:# vxdisk list disknameFor information on how to rename an enclosure, see “Renaming an Enclosure” onpage 103.Private and Public Disk RegionsA VM disk usually has two regions:◆private region—a small area where configuration information is stored. A disk headerlabel, configuration records for VxVM objects (such as volumes, plexes and subdisks),and an intent log for the configuration database are stored here. The default privateregion size is 2048 blocks (2048 kilobytes), which is large enough to record the detailsof about 4000 VxVM objects in a disk group.Under most circumstances, the default private region size should be sufficient. Foradministrative purposes, it is usually much simpler to create more disk groups thatcontain fewer volumes, or to split large disk groups into several smaller ones (asdescribed in “Splitting Disk Groups” on page 129). If required, the value for theprivate region size may be overridden at installation time by choosing the CustomInstallation path, or when you add or replace a disk using the vxdiskadm command.Note Each disk that has a private region holds an entire copy of the configurationdatabase for the disk group. The size of the configuration database for a disk groupis limited by the size of the smallest copy of the configuration database on any of itsmember disks.◆ public region—an area that covers the remainder of the disk and is used to storesubdisks (and allocate storage space).The following basic disk types are used by VxVM:Chapter 2, Administering Disks55
Configuring Newly Added Disk Devices◆simple—the public and private regions are on the same disk area (with the public areafollowing the private area). Typically, most or all disks on your system are configuredas this disk type.◆ nopriv—there is no private region (only a public region for allocating subdisks).This is the simplest disk type consisting only of space for allocating subdisks. Noprivdisks are most useful for defining special devices (such as RAM disks, if supported)on which private region data would not persist between reboots. They can also beused to encapsulate disks where there is insufficient room for a private region. Suchdisks cannot store configuration and log copies, and they do not support the use ofthe vxdisk addregion command to define reserved regions. VxVM cannot track themovement of nopriv disks on a SCSI chain or between controllers.On some systems, VxVM asks the operating system for a list of known disk deviceaddresses. These device addresses are auto-configured into the rootdg disk group whenvxconfigd is started. Auto-configured disks are always of type simple, with defaultattributes.For more information about disk types and their configuration, see the vxdisk(1M)manual page.MetadevicesTwo classes of disk device files can be used with VxVM: standard devices, and specialdevices known as metadevices. Metadevices are only used with operating systems thatsupport dynamic multipathing (DMP). Such devices represent the physical disks that asystem can access via more than one physical path. The available access paths depend onwhether the disk is a single disk, or part of a multiported disk array that is connected to asystem.You can use the vxdisk utility to display the paths subsumed by a metadevice, and todisplay the status of each path (for example, whether it is enabled or disabled). For moreinformation, see “Administering Dynamic Multipathing (DMP)” on page 85.Configuring Newly Added Disk DevicesWhen you physically connect new disks to a host or when you zone new fibre channeldevices to a host, you can use the vxdctl command to rebuild the volume device nodedirectories and to update the DMP internal database to reflect the new state of the system.To reconfigure the DMP database, first run ioscan followed by insf to make theoperating system recognize the new disks, and then invoke the vxdctl enablecommand. See the vxdctl(1M) manual page for more information.56 <strong>VERITAS</strong> <strong>Volume</strong> Manager Administrator’s Guide
Configuring Newly Added Disk DevicesYou can also use the vxdisk scandisks command to scan devices in the operatingsystem device tree and to initiate dynamic reconfiguration of multipathed disks. See thevxdisk(1M) manual page for more information.Discovering Disks and Dynamically Adding Disk ArraysYou can dynamically add support for a new type of disk array which has been developedby a third-party vendor. The support comes in the form of vendor supplied libraries, andis added to an HP-UX system by using the swinstall command.Adding Support for a New Disk ArrayThe following example illustrates how to add support for a new disk array namedvrtsda to an HP-UX system using a vendor-supplied package on a mounted CD-ROM:# swinstall -s /cdrom vrtsdaThe new disk array does not need to be already connected to the system when thepackage is installed. If any of the disks in the new disk array are subsequently connected,and if vxconfigd is running, vxconfigd immediately invokes the Device Discoveryfunction and includes the new disks in the VxVM device list.Device Discovery FunctionTo have VxVM discover a new disk array, use the following command:# vxdctl enableThis command scans all of the disk devices and their attributes, updates the VxVM devicelist, and reconfigures DMP with the new device database. There is no need to reboot thehost.Removing Support for a Disk ArrayTo remove support for the vrtsda disk array, use the following command:# swremove vrtsdaIf the arrays remain physically connected to the host after support has been removed, theyare listed in the OTHER_DISKS category, and the volumes remain available.Chapter 2, Administering Disks57
Configuring Newly Added Disk DevicesAdministering the Device Discovery LayerDynamic addition of disk arrays is possible because of the existence of the DeviceDiscovery Layer (DDL) which is a facility for discovering disks and their attributes thatare required for VXVM and DMP operations.Administering the DDL is the role of the vxddladm utility which is an administrativeinterface to the DDL. You can use vxddladm to perform the following tasks:◆◆◆◆◆◆List the types of arrays that are supported.Add support for an array to DDL.Remove support for an array from DDL.List information about excluded disk arrays.List the supported JBODs.Add JBOD support for disks from different vendors.◆ Remove support for a JBOD.The following sections explain these tasks in more detail. For further information, see thevxddladm(1M) manual page.Listing Details of Supported Disk ArraysTo list all currently supported disk arrays, use the following command# vxddladm listsupportNote Use this command to obtain values for the vid and pid attributes that are usedwith other forms of the vxddladm command.Excluding Support for a Disk ArrayTo exclude a particular array library from participating in device discovery, use thefollowing command:# vxddladm excludearray libname=libvxenc.slThis example excludes support for a disk array that depends on the librarylibvxenc.sl. You can also exclude support for a disk array from a particular vendor, asshown in this example:# vxddladm excludearray vid=ACME pid=X1This array is also excluded from device discovery.58 <strong>VERITAS</strong> <strong>Volume</strong> Manager Administrator’s Guide
Configuring Newly Added Disk DevicesFor more information about excluding disk array support, see the vxddladm (1M)manual page.Re-including Support for an Excluded Disk ArrayIf you have excluded support for a particular disk array, you can use the includearraykeyword to remove the entry from the exclude list, as shown in the following example:# vxddladm includearray libname=libvxenc.slThis command adds the array library to the database so that the library can once again beused in device discovery. If vxconfigd is running, you can use the vxdisk scandiskscommand to discover the array and add its details to the database.Listing Excluded Disk ArraysTo list all disk arrays that are currently excluded from use by VxVM, use the followingcommand:# vxddladm listexcludeListing Supported Disks in the JBOD CategoryTo list supported disks in the JBOD category, use the following command:# vxddladm listjbodAdding Support for Disks in the JBOD CategoryTo add support for disks that are in the JBOD category, use the vxddladm command withthe addjbod keyword. The following example illustrates the command for adding disksfrom the vendor, Seagate:# vxddladm addjbod vid=SEAGATETo add support for X1 disks from ACME, use the following command:# vxddladm addjbod vid=ACME pid=X1Removing Support for Disks in the JBOD CategoryTo remove support for disks that are in the JBOD category, use the vxddladm commandwith the rmjbod keyword. The following example illustrates the command for removingdisks supplied by the vendor, Seagate:# vxddladm rmjbod vid=SEAGATEChapter 2, Administering Disks59
Placing Disks Under VxVM ControlTo remove support for X1 disks from ACME, use the following command:# vxddladm rmjbod vid=ACME pid=X1Placing Disks Under VxVM ControlWhen you add a disk to a system that is running VxVM, you need to put the disk underVxVM control so that VxVM can control the space allocation on the disk. Unless anotherdisk group is specified, VxVM places new disks in the default disk group, rootdg.The method by which you place a disk under VxVM control depends on thecircumstances:◆If the disk is new, it must be initialized and placed under VxVM control. You can usethe menu-based vxdiskadm utility to do this.CautionInitialization destroys existing data on disks.◆◆◆◆◆◆◆If the disk is not needed immediately, it can be initialized (but not added to a diskgroup) and reserved for future use. To do this, enter none when asked to name a diskgroup. Do not confuse this type of “spare disk” with a hot-relocation spare disk.If the disk was previously initialized for future use by VxVM, it can be reinitializedand placed under VxVM control.If the disk was previously used for a file system,VxVM prompts you to confirm thatyou really want to destroy the file system.If the disk was previously in use by the LVM subsystem, you can preserve existingdata while still letting VxVM take control of the disk. This is accomplished usingconversion. With conversion, the virtual layout of the data is fully converted to VxVMcontrol (see the <strong>VERITAS</strong> <strong>Volume</strong> Manager Migration Guide).If the disk was previously in use by the LVM subsystem, but you do not want topreserve the data on it, use the LVM command, pvremove, before attempting toinitialize the disk for VxVM.Multiple disks on one or more controllers can be placed under VxVM controlsimultaneously. Depending on the circumstances, all of the disks may not beprocessed the same way.When initializing multiple disks at once, it is possible to exclude certain disks orcontrollers.To exclude disks, list the names of the disks to be excluded in the file/etc/vx/disks.exclude before the initialization. The following is an example ofthe contents of a disks.exclude file:c0t1d060 <strong>VERITAS</strong> <strong>Volume</strong> Manager Administrator’s Guide
Changing the Disk-Naming SchemeYou can exclude all disks on specific controllers from initialization by listing thosecontrollers in the file /etc/vx/cntrls.exclude. The following is an example of anentry in a cntrls.exclude file:c0You can exclude all disks in specific enclosures from initialization by listing thoseenclosures in the file /etc/vx/enclr.exclude. The following is an example of anentry in a enclr.exclude file:enc1Note Only the vxinstall and vxdiskadm commands use the contents of the/etc/vx/disks.exclude, /etc/vx/cntrls.exclude and/etc/vx/enclr.exclude files. You may need to create these files if they do notalready exist on the system.Changing the Disk-Naming SchemeYou can either use enclosure-based naming for disks or the traditional naming scheme(such as c#t#d#). Select menu item 20 from the vxdiskadm main menu to change thedisk-naming scheme that you want VxVM to use. Selecting this option displays thefollowing screen:Change the disk naming schemeMenu: <strong>Volume</strong>Manager/Disk/NamingSchemeUse this screen to change the disk naming scheme (from the c#t#d#format to the enclosure based format and vice versa).NOTE: This operation will result in vxconfigd being stopped andrestarted.<strong>Volume</strong> Manager is currently using the enclosure based format toname disks on the system.Do you want to change the naming scheme ? [y,n,q,?] (default: n)Enter y to change the naming scheme. This restarts the vxconfig daemon to bring thenew disk naming scheme into effect.Chapter 2, Administering Disks61
Changing the Disk-Naming SchemeUsing vxprint with Enclosure-Based Disk NamesIf you enable enclosure-based naming, and use the vxprint command to display thestructure of a volume, it shows enclosure-based disk device names (disk access names)rather than c#t#d names. To discover the c#t#d names that are associated with a givenenclosure-based disk name, use either of the following commands:# vxdisk list enclosure-based_name# vxdmpadm getsubpaths dmpnodename=enlcosure-based_nameFor example, to find the physical device that is associated with disk ENC0_21, theappropriate commands would be:# vxdisk list ENC0_21# vxdmpadm getsubpaths dmpnodename=ENC0_21To obtain the full pathname for the block and character disk device from these commands,append the displayed device name to /dev/dsk or /dev/rdsk.Issues Regarding Persistent Simple/Nopriv Disks withEnclosure-Based NamingIf you change from the c#t#d# based naming scheme to the enclosure-based namingscheme, persistent simple or nopriv disks may be put in the “error” state and causeVxVM objects on those disks to fail. If this happens, use the following procedures tocorrect the problem:◆Persistent Simple/Nopriv Disks in the Root Disk Group◆ Persistent Simple/Nopriv Disks in Non-Root Disk GroupsThese procedures use the vxdarestore utility to handle errors in persistent simple andnopriv disks that arise from changing to the enclosure-based naming scheme. You do notneed to perform either procedure if the devices on which any simple or nopriv disks arepresent are not automatically configured by VxVM (for example, non-standard diskdevices such as ramdisks).Note The disk access records for simple disks are either persistent or non-persistent. Thedisk access record for a persistent simple disk is stored in the disk’s private region.The disk access record for a non-persistent simple disk is automatically configuredin memory at VxVM startup. A simple disk has a non-persistent disk access recordif autoconfig is included in the flags field that is displayed by the vxdisklist disk_access_name command. If the autoconfig flag is not present, the diskaccess record is persistent. Nopriv disks are always persistent.62 <strong>VERITAS</strong> <strong>Volume</strong> Manager Administrator’s Guide
Changing the Disk-Naming SchemeNote You cannot run vxdarestore if the c#t#d# naming scheme is in use. Additionally,vxdarestore does not handle failures on persistent simple/nopriv disks that arecaused by renaming enclosures, by hardware reconfiguration that changes devicenames. or by removing support from the JBOD category for disks that belong to aparticular vendor when enclosure-based naming is in use.For more information about the vxdarestore command, see the vxdarestore(1M)manual page.Persistent Simple/Nopriv Disks in the Root Disk GroupIf all persistent simple and nopriv disks in rootdg go into the error state and thevxconfigd daemon is disabled after the naming scheme change, perform the followingsteps:1. Use vxdiskadm to change back to the c#t#d# naming scheme.2. Either shut down and reboot the system, or enter the following command to restartthe VxVM configuration daemon:# vxconfigd -kr reset3. If you want to use the enclosure-based naming scheme, use vxdiskadm to add anon-persistent simple disk to the rootdg disk group, change back to theenclosure-based naming scheme, and then run the following command:# /usr/bin/vxvm/bin/vxdarestoreNote If not all the disks in rootdg go into the error state, you need only runvxdarestore to restore the disks that are in the error state and the objects thatthey contain.Persistent Simple/Nopriv Disks in Non-Root Disk GroupsIf an imported disk group other than rootdg, consisting only of persistent simple and/ornopriv disks, is put in the “online dgdisabled” state after the change to theenclosure-based naming scheme, perform the following steps:1. Deport the disk group using the following command:# vxdg deport diskgroup2. Use the vxdarestore command to restore the failed disks, and to recover the objectson those disks:Chapter 2, Administering Disks63
Changing the Disk-Naming Scheme# /usr/bin/vxvm/bin/vxdarestore3. Re-import the disk group using the following command:# vxdg import diskgroupInstalling and Formatting DisksDepending on the hardware capabilities of your disks and of your system, you may eitherneed to shut down and power off your system before installing the disks, or you may beable to hot-insert the disks into the live system. Many operating systems can detect thepresence of the new disks on being rebooted. If the disks are inserted while the system islive, you may need to enter an operating system-specific command to notify the system.If the disks require low- or intermediate-level formatting before use, use the operatingsystem-specific formatting command to do this.Note SCSI disks are usually preformatted. Reformatting is needed only if the existingformatting has become damaged.The following sections provide detailed examples of how to use the vxdiskadm utility toplace disks under VxVM control in various ways and circumstances.64 <strong>VERITAS</strong> <strong>Volume</strong> Manager Administrator’s Guide
Adding a Disk to VxVMAdding a Disk to VxVMFormatted disks being placed under VxVM control may be new or previously usedoutside VxVM. The set of disks can consist of all disks on the system, all disks on acontroller, selected disks, or a combination of these.Depending on the circumstances, all of the disks may not be processed in the same way.CautionInitialization does not preserve data on disks.When initializing multiple disks at one time, it is possible to exclude certain disks orcertain controllers. To exclude disks, list the names of the disks to be excluded in the file/etc/vx/disks.exclude before the initialization. You can exclude all disks on specificcontrollers from initialization by listing those controllers in the file/etc/vx/cntrls.exclude.Initialize disks for VxVM use as follows:1. Select menu item 1 (Add or initialize one or more disks) from thevxdiskadm main menu.2. At the following prompt, enter the disk device name of the disk to be added to VxVMcontrol (or enter list for a list of disks):Add or initialize disksMenu: <strong>Volume</strong>Manager/Disk/AddDisksUse this operation to add one or more disks to a disk group.You can add the selected disks to an existing disk group or toa new disk group that will be created as a part of theoperation. The selected disks may also be added to a diskgroup as spares. Or they may be added as nohotuses to be excludedfrom hot-relocation use. The selected disks may also be initializedwithout adding them to a disk group leaving the disksavailable for use as replacement disks.More than one disk or pattern may be entered at the prompt.Here are some disk selection examples:all:c3 c4t2:c3t4d2:xyz_0 :xyz_ :all disksall disks on both controller 3 and controller4,target 2a single disk (in the c#t#d# naming scheme)a single disk (in the enclosure based naming scheme)all disks on the enclosure whose name is xyzSelect disk devices to add:[,all,list,q,?]Chapter 2, Administering Disks65
Adding a Disk to VxVM can be a single disk, or a series of disks and/or controllers (withoptional targets). If consists of multiple items, separate them usingwhite space, for example:c3t0d0 c3t1d0 c3t2d0 c3t3d0specifies fours disks at separate target IDs on controller 3.If you enter list at the prompt, the vxdiskadm program displays a list of the disksavailable to the system:DEVICE DISK GROUP STATUSc2t4d0 - - LVMc2t5d0 - - LVMc2t6d0 - - LVMc3t0d0 disk01 rootdg onlinec3t1d0 disk03 rootdg onlinec3t2d0 disk04 rootdg onlinec3t3d0 disk05 rootdg onlinec3t8d0 disk06 rootdg onlinec3t9d0 disk07 rootdg onlinec3t10d0 disk02 rootdg onlinec4t1d0 disk08 rootdg onlinec4t2d0 TCd1-18238 TCg1-18238 onlinec4t13d0 - - online invalidc4t14d0 - - online...Select disk devices to add:[,all,list,q,?]The phrase online invalid in the STATUS line indicates that a disk has yet to beadded or initialized for VxVM control. Disks that are listed as online with a diskname and disk group are already under VxVM control.Enter the device name or pattern of the disks that you want to initialize at the promptand press Return.3. To continue with the operation, enter y (or press Return) at the following prompt:Here are the disks selected. Output format: [Device]list of device namesContinue operation? [y,n,q,?] (default: y) y66 <strong>VERITAS</strong> <strong>Volume</strong> Manager Administrator’s Guide
Adding a Disk to VxVM4. At the following prompt, specify the disk group to which the disk should be added,none to reserve the disks for future use, or press Return to accept rootdg:You can choose to add these disks to an existing disk group, a newdisk group, or you can leave these disks available for use byfuture add or replacement operations. To create a new disk group,select a disk group name that does not yet exist. To leave thedisks available for future use, specify a disk group name of“none”.Which disk group [,none,list,q,?] (default: rootdg)5. If you specified the name of a disk group that does not already exist, vxdiskadmprompts for confirmation that you really want to create this new disk group:There is no active disk group named disk group name.Create a new group named disk group name? [y,n,q,?] (default: y) y6. At the following prompt, either press Return to accept the default disk name or entern to allow you to define your own disk names:Use default disk names for the disks? [y,n,q,?] (default: y)7. When prompted whether the disks should become hot-relocation spares, enter n (orpress Return):Add disks as spare disks for disk group name? [y,n,q,?] (default: n) n8. When prompted whether to exclude the disks from hot-relocation use, enter n (orpress Return).Exclude disk from hot-relocation use? [y,n,q,?} (default: n) n9. To continue with the operation, enter y (or press Return) at the following prompt:The selected disks will be added to the disk group disk group namewith default disk names.list of device namesContinue with operation? [y,n,q,?] (default: y) y10. If one or more disks already contains a file system, vxdiskadm asks if you are surethat want to destroy it. Enter y to confirm this:The following disk device appears to contain a currently unmountedfile system.list of device namesAre you sure you want to destroy these file systems[y,n,q,?] (default: n) yChapter 2, Administering Disks67
Adding a Disk to VxVMvxdiskadm asks you to confirm that the devices are to be reinitialized beforeproceeding:Reinitialize these devices? [y,n,q,?] (default: n) yInitializing device device name.Adding disk device device name to disk group disk group name withdisk name disk name....Note To bring LVM disks under VxVM control, use the Migration Utilities. See the<strong>VERITAS</strong> <strong>Volume</strong> Manager Migration Guide for details.11. At the following prompt, indicate whether you want to continue to initialize moredisks (y) or return to the vxdiskadm main menu (n):Add or initialize other disks? [y,n,q,?] (default: n)Reinitializing a DiskYou can reinitialize a disk that has previously been initialized for use by VxVM by puttingit under VxVM control as you would a new disk. See “Adding a Disk to VxVM” onpage 65 for details.CautionReinitialization does not preserve data on the disk. If you want to reinitializethe disk, make sure that it does not contain data that should be preserved.If the disk you want to add has previously been under LVM control, you can preserve thedata it contains on a VxVM disk by the process of conversion (see the <strong>VERITAS</strong> <strong>Volume</strong>Manager Migration Guide for more details).Using vxdiskadd to Place a Disk Under Control of VxVMAs an alternative to vxdiskadm, you can use the vxdiskadd command to put a diskunder VxVM control. For example, to initialize the second disk on the first controller, usethe following command:# vxdiskadd c0t1d0The vxdiskadd command examines your disk to determine whether it has beeninitialized and also checks for disks that have been added to VxVM, and for otherconditions.68 <strong>VERITAS</strong> <strong>Volume</strong> Manager Administrator’s Guide
RootabilityNote If you are adding an uninitialized disk, warning and error messages are displayedon the console during the vxdiskadd command. Ignore these messages. Thesemessages should not appear after the disk has been fully initialized; thevxdiskadd command displays a success message when the initializationcompletes.The interactive dialog for adding a disk using vxdiskadd is similar to that for vxdiskadm,described in “Adding a Disk to VxVM” on page 65.RootabilityRootability indicates that the volumes containing the root file system and the systemswap area are under VxVM control. Without rootability, VxVM is usually started after theoperating system kernel has passed control to the initial user mode process at boot time.However, if the volume containing the root file system is under VxVM control, thekernel starts portions of VxVM before starting the first user mode process.Under HP-UX, a bootable root disk contains a Logical Interchange Format (LIF) area. TheLIF LABEL record in the LIF area contains information about the starting block number,and the length of the volumes that contain the stand and root file systems and thesystem swap area. When a VxVM root disk is made bootable, the LIF LABEL record isinitialized with volume extent information for the stand, root, swap, and dump (ifpresent) volumes.See “Setting up a VxVM Root Disk and Mirror” on page 71 for details of how to configurea bootable VxVM root disk from an existing LVM root disk.Note In the AR0902 release of HP-UX 11i, you can choose to configure either a VxVM rootdisk or an LVM root disk at install time. See the HP-UX Installation and ConfigurationGuide for more information.See the chapter “Recovery from Boot Disk Failure” in the <strong>VERITAS</strong> <strong>Volume</strong> ManagerTroubleshooting Guide, for information on how to replace a failed boot disk.Chapter 2, Administering Disks69
RootabilityVxVM Root Disk <strong>Volume</strong> Restrictions<strong>Volume</strong>s on a bootable VxVM-root disk have the following configuration restrictions:◆◆◆◆All volumes on the root disk must be in the rootdg disk group.The names of the volumes with entries in the LIF LABEL record must be standvol,rootvol, swapvol, and dumpvol (if present). The names of the volumes for otherfile systems on the root disk are generated by appending vol to the name of theirmount point under /.Any volume with an entry in the LIF LABEL record must be contiguous. It can haveonly one subdisk, and it cannot span to another disk.The rootvol and swapvol volumes must have the special volume usage types rootand swap respectively.Root Disk MirrorsAll the volumes on a VxVM root disk may be mirrored. The simplest way to achieve this isto mirror the VxVM root disk onto an identically sized or larger physical disk. If a mirrorof the root disk must also be bootable, the restrictions listed in “Booting Root <strong>Volume</strong>s”also apply to the mirror disk.Note If you mirror only selected volumes on the root disk and use spanning or striping toenhance performance, these mirrors are not bootable.See “Setting up a VxVM Root Disk and Mirror” for details of how to create a mirror of aVxVM root disk.Booting Root <strong>Volume</strong>sNote At boot time, the system firmware provides you with a short time period duringwhich you can manually override the automatic boot process and select an alternateboot device. For information on how to boot your system from a device other thanthe primary or alternate boot devices, and how to change the primary and alternateboot devices, see the HP-UX documentation and the boot(1M), pdc(1M) andisl(1M) manual pages.Before the kernel mounts the root file system, it determines if the boot disk is a rootableVxVM disk. If it is such a disk, the kernel passes control to its VxVM rootability code. Thiscode extracts the starting block number and length of the root and swap volumes fromthe LIF LABEL record, builds temporary volume and disk configuration objects for these70 <strong>VERITAS</strong> <strong>Volume</strong> Manager Administrator’s Guide
Rootabilityvolumes, and then loads this configuration into the VxVM kernel driver. At this point,I/O can take place for these temporary root and swap volumes by referencing the devicenumber set up by the rootability code.When the kernel has passed control to the initial user procedure, the VxVM configurationdaemon (vxconfigd) is started. vxconfigd reads the configuration of the volumes inthe rootdg disk group and loads them into the kernel. The temporary root and swapvolumes are then discarded. Further I/O for these volumes is performed using the VxVMconfiguration objects that were loaded into the kernel.Setting up a VxVM Root Disk and MirrorNote These procedures should be carried out at init level 1.To set up a VxVM root disk and a bootable mirror of this disk, use the vxcp_lvmrootutility. This command initializes a specified physical disk as a VxVM root disk namedrootdisk## (where ## is the first number starting at 01 that creates a unique diskname), copies the contents of the volumes on the LVM root disk to the new VxVM rootdisk, optionally creates a mirror of the VxVM root disk on another specified physical disk,and make the VxVM root disk and its mirror (if any) bootable by HP-UX.The following example shows how to set up a VxVM root disk on the physical diskc0t4d0:# /etc/vx/bin/vxcp_lvmroot -b c0t4d0Note The -b option to vxcp_lvmroot uses the setboot command to define c0t4d0 asthe primary boot device. If this option is not specified, the primary boot device is notchanged.If the destination VxVM root disk is not big enough to accommodate the contents of theLVM root disk, you can use the -R option to specify a percentage by which to reduce thesize of the file systems on the target disk. (This takes advantage of the fact that most ofthese file systems are usually nowhere near 100% full.) For example, to specify a sizereduction of 30%, the following command would be used:# /etc/vx/bin/vxcp_lvmroot -R 30 -v -b c0t4d0The verbose option, -v, is specified to give an indication of the progress of the operation.CautionOnly create a VxVM root disk if you also intend to mirror it. There is no benefitin having a non-mirrored VxVM root disk for its own sake.Chapter 2, Administering Disks71
RootabilityThe next example uses the same command and additionally specifies the -m option to setup a root mirror on disk c1t1d0:# /etc/vx/bin/vxcp_lvmroot -m c1t1d0 -R 30 -v -b c0t4d0In this example, the -b option to vxcp_lvmroot sets c0t4d0 as the primary boot deviceand c1t1d0 as the alternate boot device.This command is equivalent to using vxcp_lvmroot to create the VxVM-rootable disk,and then using the vxrootmir command to create the mirror:# /etc/vx/bin/vxcp_lvmroot -R 30 -v -b c0t4d0# /etc/vx/bin/vxrootmir -v -b c1t1d0The disk name assigned to the VxVM root disk mirror also uses the format rootdisk##with ## set to the next available number.Note The target disk for a mirror that is added using the vxrootmir command must belarge enough to accommodate the volumes from the VxVM root disk.Once you have successfully rebooted the system from a VxVM root disk to init level 1,you can use the vxdestroy_lvmroot command to completely remove the original LVMroot disk (and its associated LVM volume group), and re-use this disk as a mirror of theVxVM root disk, as shown in this example:# /etc/vx/bin/vxdestroy_lvmroot -v c0t0d0# /etc/vx/bin/vxrootmir -v -b c0t0d0Note You may want to keep the LVM root disk in case you ever need a boot disk that doesnot depend on VxVM being present on the system. However, this may require thatyou update the contents of the LVM root disk in parallel with changes that youmake to the VxVM root disk. See “Creating an LVM Root Disk from a VxVM RootDisk” for a description of how to create a bootable LVM root disk from the VxVMroot disk.For more information, see the vxcp_lvmroot(1M), vxrootmir(1M),vxdestroy_lvmroot(1M) and vxres_lvmroot (1M) manual pages.72 <strong>VERITAS</strong> <strong>Volume</strong> Manager Administrator’s Guide
RootabilityCreating an LVM Root Disk from a VxVM Root DiskNote These procedures should be carried out at init level 1.In some circumstances, it may be necessary to boot the system from an LVM root disk. Ifan LVM root disk is no longer available or an existing LVM root disk is out-of-date, youcan use the vxres_lvmroot command to create an LVM root disk on a spare physicaldisk that is not currently under LVM or VxVM control. The contents of the volumes on theexisting VxVM root disk are copied to the new LVM root disk, and the LVM disk is thenmade bootable. This operation does not remove the VxVM root disk or any mirrors of thisdisk, nor does it affect their bootability.Note The target disk must be large enough to accommodate the volumes from the VxVMroot disk.This example shows how to create an LVM root disk on physical disk c0t1d0 afterremoving the existing LVM root disk configuration from that disk.# /etc/vx/bin/vxdestroy_lvmroot -v c0t1d0# /etc/vx/bin/vxres_lvmroot -v -b c0t1d0The -b option to vxres_lvmroot sets c0t1d0 as the primary boot device.As these operations can take some time, the verbose option, -v, is specified to indicatehow far the operation has progressed.For more information, see the vxres_lvmroot (1M) manual page.Adding Swap Disks to a VxVM Rootable SystemOn occasion, you may need to increase the amount of swap space for an HP-UX system. Ifyour system has a VxVM root disk, use the procedure described below.1. Create a new volume that is to be used for the swap area. The following exampleshows how to set up a non-mirrored 1GB simple volume:# vxassist -g rootdg make swapvol2 1g2. Add the new volume as a swap device to the /etc/fstab file as shown in thissample entry:/dev/vx/dsk/rootdg/swapvol2 / swap pri=1 0 03. Use the System Administration Manager (SAM) to increase the value of themaxswapchunks tunable as required by the swapon command. For example, if youdouble the amount of swap space, double the value of maxswapchunks.Chapter 2, Administering Disks73
Removing Disks4. Build a new kernel and reboot the system:# mk_kernel -v -o /stand/vmunix# kmupdate# reboot -rRemoving DisksYou can remove a disk from a system and move it to another system if the disk is failing orhas failed. Before removing the disk from the current system, you must:1. Stop all activity by applications to volumes that are configured on the disk that is to beremoved. Unmount file systems and shut down databases that are configured on thevolumes.2. Use the following command to stop the volumes:# vxvol stop volume1 volume2 ...3. Move the volumes to other disks or back up the volumes. To move a volume, usevxdiskadm to mirror the volume on one or more disks, then remove the originalcopy of the volume. If the volumes are no longer needed, they can be removed insteadof moved.Before removing a disk, make sure any data on that disk has either been moved to otherdisks or is no longer needed. Then remove the disk using the vxdiskadm utility, asfollows:1. Select menu item 2 (Remove a disk) from the vxdiskadm main menu.Note You must disable the disk group before you can remove the last disk in that group.2. At the following prompt, enter the disk name of the disk to be removed:Remove a diskMenu: <strong>Volume</strong>Manager/Disk/RemoveDiskUse this operation to remove a disk from a disk group. Thisoperation takes a disk name as input. This is the same namethat you gave to the disk when you added the disk to the diskgroup.Enter disk name [,list,q,?] disk0174 <strong>VERITAS</strong> <strong>Volume</strong> Manager Administrator’s Guide
Removing Disks3. If there are any volumes on the disk, VxVM asks you whether they should beevacuated from the disk. If you wish to keep the volumes, answer y. Otherwise,answer n.4. At the following verification prompt, press Return to continue:Requested operation is to remove disk disk01 from group rootdg.Continue with operation? [y,n,q,?] (default: y)The vxdiskadm utility removes the disk from the disk group and displays thefollowing success message:Removal of disk disk01 is complete.You can now remove the disk or leave it on your system as a replacement.5. At the following prompt, indicate whether you want to remove other disks (y) orreturn to the vxdiskadm main menu (n):Remove another disk? [y,n,q,?] (default: n)Removing a Disk with SubdisksYou can remove a disk on which some subdisks are defined. For example, you canconsolidate all the volumes onto one disk. If you use the vxdiskadm program to removea disk, you can choose to move volumes off that disk. To do this, run the vxdiskadmprogram and select item 2 (Remove a disk) from the main menu.If the disk is used by some subdisks, the following message is displayed:The following volumes currently use part of disk disk02:home usrvolSubdisks must be moved from disk02 before it can be removed.Move subdisks to other disks? [y,n,q,?] (default: n)If you choose y, then all subdisks are moved off the disk, if possible. Some subdisks arenot movable. A subdisk may not be movable for one of the following reasons:◆◆There is not enough space on the remaining disks in the subdisk’s disk group.Plexes or striped subdisks cannot be allocated on different disks from existing plexesor striped subdisks in the volume.If the vxdiskadm program cannot move some subdisks, remove some plexes from somedisks to free more space before proceeding with the disk removal operation. See“Removing a <strong>Volume</strong>” on page 203 and “Taking Plexes Offline” on page 152 forinformation on how to remove volumes and plexes.Chapter 2, Administering Disks75
Removing and Replacing DisksRemoving a Disk with No SubdisksTo remove a disk that contains no subdisks from its disk group, run the vxdiskadmprogram and select item 2 (Remove a disk) from the main menu, and respond to theprompts as shown in this example to remove disk02:Enter disk name [,list,q,?] disk02Requested operation is to remove disk disk02 from group rootdg.Continue with operation? [y,n,q,?] (default: y) yRemoval of disk disk02 is complete.Clobber disk headers? [y,n,q,?] (default: n) yEnter y to remove the disk completely from VxVM control. If you do not want to removethe disk completely from VxVM control, press Return or enter n.Removing and Replacing DisksIf failures are starting to occur on a disk, but the disk has not yet failed completely, youcan replace the disk. This involves detaching the failed or failing disk from its disk group,followed by replacing the failed or failing disk with a new one. Replacing the disk can bepostponed until a later date if necessary.To replace a disk, use the following procedure:1. Select menu item 3 (Remove a disk for replacement) from the vxdiskadmmain menu.2. At the following prompt, enter the name of the disk to be replaced (or enter list fora list of disks):Remove a disk for replacementMenu: <strong>Volume</strong>Manager/Disk/RemoveForReplaceUse this menu operation to remove a physical disk from a diskgroup, while retaining the disk name. This changes the statefor the disk name to a removed disk. If there are anyinitialized disks that are not part of a disk group, you will begiven the option of using one of these disks as a replacement.Enter disk name [,list,q,?] disk0276 <strong>VERITAS</strong> <strong>Volume</strong> Manager Administrator’s Guide
Removing and Replacing Disks3. When you select a disk to remove for replacement, all volumes that are affected by theoperation are displayed, for example:The following volumes will lose mirrors as a result of thisoperation:home srcNo data on these volumes will be lost.The following volumes are in use, and will be disabled as a resultof this operation:mktingAny applications using these volumes will fail future accesses.These volumes will require restoration from backup.Are you sure you want do this? [y,n,q,?] (default: n)To remove the disk, causing the named volumes to be disabled and data to be lostwhen the disk is replaced, enter y or press Return.To abandon removal of the disk, and back up or move the data associated with thevolumes that would otherwise be disabled, enter n or q and press Return.For example, to move the volume mkting to a disk other than disk02, use thiscommand:# vxassist move mkting !disk02After backing up or moving the data in the volumes, start again from step 1 above.4. At the following prompt, either select the device name of the replacement disk (fromthe list provided), press Return to choose the default disk, or enter none to deferreplacing the disk until a later date:The following devices are available as replacements:c0t1d0You can choose one of these disks now, to replace disk02.Select “none” if you do not wish to select a replacement disk.Choose a device, or select “none”[,none,q,?] (default: c0t1d0)Note Do not choose the old disk drive as a replacement even though it appears in theselection list. If necessary, you can choose to initialize a new disk.If you choose to defer replacing the failed disk, see the following section, “Replacing aFailed or Removed Disk.”Chapter 2, Administering Disks77
Removing and Replacing Disks5. If you chose to replace the disk in step 4, press Return at the following prompt toconfirm this:Requested operation is to remove disk02 from group rootdg.The removed disk will be replaced with disk device c0t1d0.Continue with operation? [y,n,q,?] (default: y)6. vxdiskadm displays the following success messages:Replacement of disk disk02 in group rootdg with disk devicec0t1d0 completed successfully.At the following prompt, indicate whether you want to remove another disk (y) orreturn to the vxdiskadm main menu (n):Remove another disk? [y,n,q,?] (default: n)Note If removing a disk causes one or more volumes to be disabled, see the section,“Restarting a Disabled <strong>Volume</strong>” in the chapter “Recovery from Hardware Failure”in the <strong>VERITAS</strong> <strong>Volume</strong> Manager Troubleshooting Guide, for information on how torestart a disabled volume so that you can restore its data from a backup.If you wish to move hot-relocate subdisks back to a replacement disk, see “ConfiguringHot-Relocation to Use Only Spare Disks” on page 236.Replacing a Failed or Removed DiskUse the following procedure to replace a failed or removed disk with a new disk:1. Select menu item 4 (Replace a failed or removed disk) from thevxdiskadm main menu.2. At the following prompt, enter the name of the disk to be replaced (or enter list fora list of disks):Replace a failed or removed diskMenu: <strong>Volume</strong>Manager/Disk/ReplaceDiskUse this menu operation to specify a replacement disk for a diskthat you removed with the “Remove a disk for replacement” menuoperation, or that failed during use. You will be prompted fora disk name to replace and a disk device to use as a replacement.You can choose an uninitialized disk, in which case the diskwill be initialized, or you can choose a disk that you havealready initialized using the Add or initialize a disk menuoperation.Select a removed or failed disk [,list,q,?] disk0278 <strong>VERITAS</strong> <strong>Volume</strong> Manager Administrator’s Guide
Removing and Replacing Disks3. The vxdiskadm program displays the device names of the disk devices available foruse as replacement disks. Your system may use a device name that differs from theexamples. Enter the device name of the disk or press Return to select the defaultdevice:The following devices are available as replacements:c0t1d0 c1t1d0You can choose one of these disks to replace disk02.Choose "none" to initialize another disk to replace disk02.Choose a device, or select "none"[,none,q,?] (default: c0t1d0)4. If the disk has not previously been initialized, press Return at the following prompt toreplace the disk:The requested operation is to initialize disk devicec0t1d0 and to then use that device to replace the removed or faileddisk disk02 in disk group rootdg.Continue with operation? [y,n,q,?] (default: y)If the disk has already been initialized, press Return at the following prompt toreplace the disk:The requested operation is to use the initialized devicec0t1d0 to replace the removed or failed disk disk02 in disk grouprootdg.Continue with operation? [y,n,q,?] (default: y)5. The vxdiskadm program then proceeds to replace the disk, and returns the followingmessage on success:Replacement of disk disk02 in group rootdg with disk devicec0t1d0 completed successfully.At the following prompt, indicate whether you want to replace another disk (y) orreturn to the vxdiskadm main menu (n):Replace another disk? [y,n,q,?] (default: n)Chapter 2, Administering Disks79
Enabling a Physical DiskEnabling a Physical DiskIf you move a disk from one system to another during normal system operation, VxVMdoes not recognize the disk automatically. The enable disk task enables VxVM to identifythe disk and to determine if this disk is part of a disk group. Also, this task re-enablesaccess to a disk that was disabled by either the disk group deport task or the disk devicedisable (offline) task.To enable a disk, use the following procedure:1. Select menu item 9 (Enable (online) a disk device) from the vxdiskadmmain menu.2. At the following prompt, enter the device name of the disk to be enabled (or enterlist for a list of devices):Enable (online) a disk deviceMenu: <strong>Volume</strong>Manager/Disk/OnlineDiskUse this operation to enable access to a disk that was disabledwith the “Disable (offline) a disk device” operation.You can also use this operation to re-scan a disk that may havebeen changed outside of the <strong>Volume</strong> Manager. For example, if adisk is shared between two systems, the <strong>Volume</strong> Manager runningon the other system may have changed the disk. If so, you canuse this operation to re-scan the disk.NOTE: Many vxdiskadm operations re-scan disks without userintervention. This will eliminate the need to online adisk directly, except when the disk is directly offlined.Select a disk device to enable [,list,q,?] c0t2d0vxdiskadm enables the specified device.3. At the following prompt, indicate whether you want to enable another device (y) orreturn to the vxdiskadm main menu (n):Enable another device? [y,n,q,?] (default: n)80 <strong>VERITAS</strong> <strong>Volume</strong> Manager Administrator’s Guide
Taking a Disk OfflineTaking a Disk OfflineThere are instances when you must take a disk offline. If a disk is corrupted, you mustdisable the disk before removing it. You must also disable a disk before moving thephysical disk device to another location to be connected to another system.Note Taking a disk offline is only useful on systems that support hot-swap removal andinsertion of disks without needing to shut down and reboot the system.To take a disk offline, use the vxdiskadm command:1. Select menu item 10 (Disable (offline) a disk device) from thevxdiskadm main menu.2. At the following prompt, enter the address of the disk you want to disable:Disable (offline) a disk deviceMenu: <strong>Volume</strong>Manager/Disk/OfflineDiskUse this menu operation to disable all access to a disk deviceby the <strong>Volume</strong> Manager. This operation can be applied only todisks that are not currently in a disk group. Use this operationif you intend to remove a disk from a system without rebooting.NOTE: Many systems do not support disks that can be removed froma system during normal operation. On such systems, theoffline operation is seldom useful.Select a disk device to disable [,list,q,?] c0t2d0The vxdiskadm program disables the specified disk.3. At the following prompt, indicate whether you want to disable another device (y) orreturn to the vxdiskadm main menu (n):Disable another device? [y,n,q,?] (default: n)Renaming a DiskIf you do not specify a VM disk name, VxVM gives the disk a default name when you addthe disk to VxVM control. The VM disk name is used by VxVM to identify the location ofthe disk or the disk type. To change the disk name to reflect a change of use or ownership,use the following command:# vxedit rename old_diskname new_disknameTo rename disk01 to disk03, use the following command:# vxedit rename disk01 disk03Chapter 2, Administering Disks81
Reserving DisksTo confirm that the name change took place, use the following command:# vxdisk listVxVM returns the following display:DEVICE TYPE DISK GROUP STATUSc0t0d0 simple disk04 rootdg onlinec1t0d0 simple disk03 rootdg onlinec1t1d0 simple - - onlineNote By default, VxVM names subdisk objects after the VM disk on which they arelocated. Renaming a VM disk does not automatically rename the subdisks on thatdisk.Reserving DisksBy default, the vxassist command allocates space from any disk that has free space. Youcan reserve a set of disks for special purposes, such as to avoid general use of aparticularly slow or a particularly fast disk.To reserve a disk for special purposes, use the following command:# vxedit set reserve=on disknameAfter you enter this command, the vxassist program does not allocate space from theselected disk unless that disk is specifically mentioned on the vxassist command line.For example, if disk03 is reserved, use the following command:# vxassist make vol03 20m disk03The vxassist command overrides the reservation and creates a 20 megabyte volume ondisk03. However, the command:# vxassist make vol04 20mdoes not use disk03, even if there is no free space on any other disk.To turn off reservation of a disk, use the following command:# vxedit set reserve=off disknameSee Special Attribute Values for Disk Media in vxedit(1M) for more information.82 <strong>VERITAS</strong> <strong>Volume</strong> Manager Administrator’s Guide
Displaying Disk InformationDisplaying Disk InformationBefore you use a disk, you need to know if it has been initialized and placed under VxVMcontrol. You also need to know if the disk is part of a disk group because you cannot createvolumes on a disk that is not part of a disk group. The vxdisk list command displaysdevice names for all recognized disks, the disk names, the disk group names associatedwith each disk, and the status of each disk.To display information on all disks that are known to VxVM, use the following command:# vxdisk listVxVM returns a display similar to the following:DEVICE TYPE DISK GROUP STATUSc0t0d0 sliced disk04 rootdg onlinec1t0d0 sliced disk03 rootdg onlinec1t1d0 sliced - - online invalidenc0_2 sliced disk02 rootdg onlineenc0_3 sliced disk05 rootdg onlineenc0_0 sliced - - onlineenc0_1 sliced - - onlineNote The phrase online invalid in the STATUS line indicates that a disk has not yetbeen added to VxVM control. These disks may or may not have been initialized byVxVM previously. Disks that are listed as online are already under VxVM control.To display details on a particular disk defined to VxVM, use the following command:# vxdisk list disknameChapter 2, Administering Disks83
Displaying Disk InformationDisplaying Disk Information with vxdiskadmDisplaying disk information shows you which disks are initialized, to which disk groupsthey belong, and the disk status. The list command displays device names for allrecognized disks, the disk names, the disk group names associated with each disk, and thestatus of each disk.To display disk information, use the following procedure:1. Start the vxdiskadm program, and select list (List disk information) fromthe main menu.2. At the following display, enter the address of the disk you want to see, or enter allfor a list of all disks:List disk informationMenu: <strong>Volume</strong>Manager/Disk/ListDiskUse this menu operation to display a list of disks. You canalso choose to list detailed information about the disk ata specific disk device address.Enter disk device or "all" [,all,q,?] (default: all)- If you enter all, VxVM displays the device name, disk name, group, and status.- If you enter the address of the device for which you want information, completedisk information (including the device name, the type of disk, and informationabout the public and private areas of the disk) is displayed.Once you have examined this information, press Return to return to the main menu.84 <strong>VERITAS</strong> <strong>Volume</strong> Manager Administrator’s Guide
Administering Dynamic Multipathing (DMP) 3IntroductionNote You may need an additional license to use this feature.The Dynamic Multipathing (DMP) feature of <strong>VERITAS</strong> <strong>Volume</strong> Manager (VxVM)provides greater reliability and performance by using path failover and load balancing.This feature is available for multiported disk arrays from various vendors. See the<strong>VERITAS</strong> <strong>Volume</strong> Manager Hardware Notes for information about supported disk arrays.Multiported disk arrays can be connected to host systems through multiple paths. Todetect the various paths to a disk, DMP uses a mechanism that is specific to eachsupported array type. DMP can also differentiate between different enclosures of asupported array type that are connected to the same host system.The multipathing policy used by DMP depends on the characteristics of the disk array:◆ Active/active disk arrays (A/A arrays) permit several paths to be used concurrently forI/O. Such arrays enable DMP to provide greater I/O throughput by balancing theI/O load uniformly across the multiple paths to the disk devices. In the event of a lossof one connection to an array, DMP automatically routes I/O over the other availableconnections to the array.◆◆◆Active/passive arrays in auto-trespass mode (A/P arrays) allow I/O on the primary(active) path, and the secondary (passive) path is used if the primary path fails.Failover occurs when I/O is received or sent on the secondary path.Active/passive arrays in explicit failover mode (A/PF arrays) require a specialcommand to be issued to the array for failover to occur.Active/passive arrays with LUN group failover (A/PG arrays) treat a group of LUNsthat are connected through a controller as a single failover entity. Failover occurs atthe controller level, and not at the LUN level (as would be the case for an A/P array inauto-trespass mode). The primary and secondary controller are each connected to aseparate group of LUNs. If a single LUN in the primary controller’s LUN group fails,all LUNs in that group fail over to the secondary controller’s passive LUN group.85
IntroductionVxVM uses DMP metanodes to access disk devices connected to the system. For each diskin a supported array, DMP maps one metanode to the set of paths that are connected tothe disk. Additionally, DMP associates the appropriate multipathing policy for the diskarray with the metanode. For disks in an unsupported array, DMP maps a separatemetanode to each path that is connected to a disk.See the figure “How DMP Represents Multiple Physical Paths to a Disk as one Metanode”on page 86 for an illustration of how DMP sets up a metanode for a disk in a supporteddisk array.How DMP Represents Multiple Physical Paths to a Disk as one Metanodec1c2MultiplePathsHostMapped by DMPVxVMDMPSingle DMPMetanodeMultiplePathsDiskAs described in “Enclosure-Based Naming” on page 5, VxVM implements a disk devicenaming scheme that allows you to easily recognize to which array a disk belongs. Thefigure, “Example of Multipathing for a Disk Enclosure in a SAN Environment” onpage 87, shows that two paths, c1t99d0 and c2t99d0, exist to a single disk in theenclosure, but VxVM uses the single DMP metanode, enc0_0, to access it.86 <strong>VERITAS</strong> <strong>Volume</strong> Manager Administrator’s Guide
IntroductionExample of Multipathing for a Disk Enclosure in a SAN Environmentc1c2HostVxVMenc0_0Mapped by DMPFibre ChannelHubs/SwitchesDisk Enclosure enc0Disk is c1t99d0 or c2t99d0depending on the pathc1t99d0DMPc2t99d0See “Changing the Disk-Naming Scheme” on page 61 for details of how to change thenaming scheme that VxVM uses for disk devices.Note The operation of DMP relies on the vxdmp device driver. Unlike prior releases, fromVxVM 3.1.1 onwards, the vxdmp driver must always be present on the system.See “Configuring Newly Added Disk Devices” on page 56 for a description of how tomake newly added disk hardware known to a host system.Path Failover MechanismThe DMP feature of VxVM enhances system reliability when used with multiported diskarrays. In the event of the loss of one connection to the disk array, DMP automaticallyselects the next available I/O path for I/O requests dynamically without action from theadministrator.DMP is also informed when you repair or restore a connection, and when you add orremove devices after the system has been fully booted (provided that the operatingsystem recognizes the devices correctly).Chapter 3, Administering Dynamic Multipathing (DMP)87
Disabling and Enabling Multipathing for Specific DevicesLoad BalancingDMP uses the balanced path mechanism to provide load balancing across paths foractive/active disk arrays. Load balancing maximizes I/O throughput by using the totalbandwidth of all available paths. Sequential I/O starting within a certain range is sentdown the same path in order to benefit from disk track caching. Large sequential I/O thatdoes not fall within the range is distributed across the available paths to reduce theoverhead on any one path.For active/passive disk arrays, I/O is sent down the primary path. If the primary pathfails, I/O is switched over to the other available primary paths or secondary paths. As thecontinuous transfer of ownership of LUNs from one controller to another results in severeI/O slowdown, load balancing across paths is not performed for active/passive diskarrays.Note Both paths of an active/passive array are not considered to be on differentcontrollers when mirroring across controllers (for example, when creating a volumeusing vxassist make specified with the mirror=ctlr attribute).Disabling and Enabling Multipathing for Specific DevicesYou can use vxdiskadm menu options 17 and 18 to disable or enable multipathing. Thesemenu options also allow you to exclude devices from or include devices in the view ofVxVM. For more information, see “Disabling Multipathing and Making Devices Invisibleto VxVM,” and “Enabling Multipathing and Making Devices Visible to VxVM” onpage 93.Disabling Multipathing and Making Devices Invisible to VxVMNote Some of the operations described in this section require a reboot of the system.Select menu task 17 (Prevent multipathing/Suppress devices from VxVM’sview) from the vxdiskadm main menu to prevent a device from being multipathed bythe VxVM DMP driver (vxdmp), or to exclude a device from the view of VxVM:1. At the following prompt, confirm that you want to continue:Exclude DevicesMenu: <strong>Volume</strong>Manager/Disk/ExcludeDevicesThis operation might lead to some devices being suppressed fromVxVM’s view or prevent them from being multipathed by vxdmp (Thisoperation can be reversed using the vxdiskadm command).88 <strong>VERITAS</strong> <strong>Volume</strong> Manager Administrator’s Guide
Disabling and Enabling Multipathing for Specific DevicesDo you want to continue ? [y,n,q,?] (default: y)2. Select the operation you want to perform from the displayed list:Exclude DevicesMenu: <strong>Volume</strong>Manager/Disk/ExcludeDevices1 Suppress all paths through a controller from VxVM’s view2 Suppress a path from VxVM’s view3 Suppress disks from VxVM’s view by specifying a VID:PIDcombination4 Suppress all but one paths to a disk5 Prevent multipathing of all disks on a controller by VxVM6 Prevent multipathing of a disk by VxVM7 Prevent multipathing of disks by specifying a VID:PIDcombination8 List currently suppressed/non-multipathed devices? Display help about menu?? Display help about the menuing systemq Exit from menusSelect an operation to perform:❖Select option 1 to exclude all paths through the specified controller from the view ofVxVM. These paths remain in the disabled state until the next reboot, or until thepaths are re-included.Exclude controllers from VxVMMenu: <strong>Volume</strong>Manager/Disk/ExcludeDevices/CTLR-VXVMUse this operation to exclude all paths through a controller fromVxVM.This operation can be reversed using the vxdiskadm command.You can specify a controller name at the prompt. A controller nameis of the form c#, example c3, c11 etc. Enter ’all’ to exclude allpaths on all the controllers on the host. To see the list ofcontrollers on the system, type ’list’.Enter a controller name:[ctlr_name,all,list,list-exclude,q,?]❖Select option 2 to exclude specified paths from the view of VxVM.Exclude paths from VxVMMenu: <strong>Volume</strong>Manager/Disk/ExcludeDevices/PATH-VXVMUse this operation to exclude one or more paths from VxVM.Chapter 3, Administering Dynamic Multipathing (DMP)89
Disabling and Enabling Multipathing for Specific DevicesAs a result of this operation, the specified paths will be excludedfrom the view of VxVM. This operation can be reversed using thevxdiskadm command.You can specify a pathname or a pattern at the prompt. Here aresome path selection examples:all:c3t4d2:list:all pathsa single pathlist all paths on the systemEnter a pathname or pattern:[,all,list,list-exclude,q?]❖Select option 3 to exclude disks from the view of VxVM that match a specified VendorID and Product ID.Note This option requires a reboot of the system.Exclude VID:PID from VxVMMenu: <strong>Volume</strong>Manager/Disk/ExcludeDevices/VIDPID-VXVMUse this operation to exclude disks returning a specifiedVendorID:ProductID combination from VxVM.As a result of this operation, all disks that returnVendorID:ProductID matching the specified combination will beexcluded from the view of VxVM. This operation can be reversedusing the vxdiskadm command.You can specify a VendorID:ProductID pattern at the prompt. Thespecification can be as follows:VID:PID where VID stands for Vendor IDPID stands for Product ID(The command vxdmpinq in /etc/vx/diag.d can be used to obtain theVendor ID and Product ID)Both VID and PID can have an optional ’*’ (asterisk) followingthem.If a ’*’ follows VID, it will result in the exclusion of all disksreturning Vendor ID starting with the specified VID. The same istrue for Product ID as well. Both VID and PID should be non NULL.The maximum allowed lengths for VendorID and ProductID are 8 and 16characters respectively.Some examples of VID:PID specification are:90 <strong>VERITAS</strong> <strong>Volume</strong> Manager Administrator’s Guide
Disabling and Enabling Multipathing for Specific Devicesall - Exclude all disksaaa:123 - Exclude all disks having VID ‘aaa’ and PID ‘123’aaa*:123 - Exclude all disks having VID starting with ‘aaa’and PID ‘123’aaa:123* - Exclude all disks having VID ‘aaa’ and PID startingwith ‘123’aaa:* - Exclude all disks having VID ‘aaa’ and any PIDEnter a VID:PID combination:[,all,list-exclude,q,?]❖ Select option 4 to define a pathgroup for disks that are not multipathed by VxVM. (Apathgroup explicitly defines alternate paths to the same disk.) Only one path is madevisible to VxVM.Exclude all but one paths to a diskMenu: <strong>Volume</strong>Manager/Disk/ExcludeDevices/PATHGROUP-VXVMUse this operation to exclude all but one paths to a disk. In caseof disks which are not multipathed by vxdmp, VxVM will see eachpath as a disk. In such cases, creating a pathgroup of all paths tothe disk will ensure that only one of the paths from the group ismade visible to VxVM. The pathgroup can be removed using thevxdiskadm command.Example: If c1t30d0 and c2t30d0 are paths to the same disk and bothare seen by VxVM as separate disks, c1t30d0 and c2t30d0 can be putin a pathgroup so that only one of these paths is visible to VxVM.The pathgroup can be specified as a list of blank separated paths,for example, c1t30d0 c2t30d0.Enter pathgroup: [,list,list-exclude,q,?]❖Select option 5 to disable multipathing for all disks on a specified controller.Exclude controllers from DMPMenu: <strong>Volume</strong>Manager/Disk/ExcludeDevices/CTLR-DMPUse this operation to exclude all disks on a controller from beingmultipathed by vxdmp.As a result of this operation, all disks having a path through thespecified controller will be claimed in the OTHER_DISKS categoryand hence, not multipathed by vxdmp. This operation can be reversedusing the vxdiskadm command.Chapter 3, Administering Dynamic Multipathing (DMP)91
Disabling and Enabling Multipathing for Specific DevicesYou can specify a controller name at the prompt. A controller nameis of the form c#, example c3, c11 etc. Enter ’all’ to exclude allpaths on all the controllers on the host. To see the list ofcontrollers on the system, type ’list’.Enter a controller name:[,all,list,list-exclude,q,?]❖Select option 6 to disable multipathing for specified paths.Exclude paths from DMPMenu: <strong>Volume</strong>Manager/Disk/ExcludeDevices/PATH-DMPUse this operation to exclude one or more disks from DMP.As a result of this operation, the disks corresponding to thespecified paths will not be multipathed by DMP. This operation canbe reversed using the vxdiskadm command.You can specify a pathname or a pattern at the prompt. Here aresome path selection examples:all:c3t4d2:list:all pathsa single pathlist all paths on the systemEnter a pathname or pattern :[,all,list,list-exclude,q,?]If a path is specified, the corresponding disk are claimed in the OTHER_DISKScategory and hence not multipathed.❖Select option 7 to disable multipathing for disks that match a specified Vendor ID andProduct ID.Note This option requires a reboot of the system.Exclude VID:PID from DMPMenu: <strong>Volume</strong>Manager/Disk/ExcludeDevices/VIDPID-DMPUse this operation to prevent vxdmp from multipathing disksreturning a specific VID:PID combination.As a result of this operation, all disks that returnVendorID:ProductID matching the specified combination will beclaimed in the OTHER DISKS category(i.e. they will not bemultipathed by vxdmp). This operation can be reversed using thevxdiskadm command.92 <strong>VERITAS</strong> <strong>Volume</strong> Manager Administrator’s Guide
Disabling and Enabling Multipathing for Specific DevicesYou can specify a VendorID:ProductID combination at the prompt. Thespecification can be as follows:VID:PID where VID stands for Vendor IDPID stands for Product ID(The command vxdmpinq in /etc/vx/diag.d can be used to obtain theVendor ID and Product ID)Both VID and PID can have an optional ’*’ (asterisk) followingthem.If a ’*’ follows VID, it will result in the exclusion of all disksreturning Vendor ID starting with the specified VID. The same istrue for Product ID as well. Both VID and PID should be non NULL.The maximum allowed lengths for Vendor ID and Product ID are 8 and16 characters respectively.Some examples of VID:PID specification are:all - Exclude all disksaaa:123 - Exclude all disks having VID ‘aaa’ and PID ‘123’aaa*:123 - Exclude all disks having VID starting with ‘aaa’and PID ‘123’aaa:123* - Exclude all disks having VID ‘aaa’ and PID startingwith ‘123’aaa:* - Exclude all disks having VID ‘aaa’ and any PIDEnter a VID:PID combination:[,all,list,list-exclude,q,?]All disks returning the specified Vendor ID and Product ID combination are claimedin OTHER_DISKS category and so are not multipathed.Enabling Multipathing and Making Devices Visible to VxVMNote Some of the operations described in this section require a reboot of the system.Select menu item 18 (Allow multipathing/Unsuppress devices from VxVM’sview)fromthevxdiskadm main menu to re-enable multipathing for a device, or to makea device visible to VxVM again.1. At the following prompt, confirm that you want to continue:Include DevicesMenu: <strong>Volume</strong>Manager/Disk/IncludeDevicesChapter 3, Administering Dynamic Multipathing (DMP)93
Disabling and Enabling Multipathing for Specific DevicesThe devices selected in this operation will become visible to VxVMand/or will be multipathed by vxdmp again. Only those devices whichwere previously excluded can be included again.Do you want to continue ? [y,n,q,?] (default: y)2. Select the operation you want to perform from the displayed list:<strong>Volume</strong> Manager Device OperationsMenu: <strong>Volume</strong>Manager/Disk/IncludeDevices1 Unsuppress all paths through a controller from VxVM’s view2 Unsuppress a path from VxVM’s view3 Unsuppress disks from VxVM’s view by specifying a VID:PIDcombination4 Remove a pathgroup definition5 Allow multipathing of all disks on a controller by VxVM6 Allow multipathing of a disk by VxVM7 Allow multipathing of disks by specifying a VID:PID combination8 List currently suppressed/non-multipathed devices? Display help about menu?? Display help about the menuing systemq Exit from menusSelect an operation to perform:❖Select option 1 to make all paths through a specified controller visible to VxVM.Re-include controllers in VxVMMenu: <strong>Volume</strong>Manager/Disk/IncludeDevices/CTLR-VXVMUse this operation to make all paths through a controller visibleto VxVM again.As a result of this operation, all paths through the specifiedcontroller will be made visible to VxVM again.You can specify a controller name at the prompt. A controller nameis of the form c#, example c3, c11 etc. Enter ’all’ to exclude allpaths on all the controllers on the host. To see the list ofcontrollers on the system, type ’list’.Enter a controller name:[,all,list,list-exclude,q,?]94 <strong>VERITAS</strong> <strong>Volume</strong> Manager Administrator’s Guide
Disabling and Enabling Multipathing for Specific Devices❖Select option 2 to make specified paths visible to VxVM.Re-include paths in VxVMMenu: <strong>Volume</strong>Manager/Disk/IncludeDevices/PATH-VXVMUse this operation to make one or more paths visible to VxVM again.As a result of this operation,the specified paths will becomevisible to VxVM again.You can specify a pathname or a pattern at the prompt. Here aresome path selection examples:all:c3t4d2:list:all pathsa single pathlist all paths on the systemEnter a pathname or pattern :[,all,list,list-exclude,q,?]❖Select option 3 to make disks visible to VxVM that match a specified Vendor ID andProduct ID.Make VID:PID visible to VxVMMenu: <strong>Volume</strong>Manager/Disk/IncludeDevices/VIDPID-VXVMUse this operation to make all disks returning a specifiedVendorID:ProductID combination visible to VxVM again.As a result of this operation, disks that return VendorID:ProductIDmatching the specified combination will be made visible to VxVMagain.You can specify a VID:PID combination at the prompt. Thespecification can be as follows:VID:PID where VID stands for Vendor IDPID stands for Product ID(The command vxdmpinq in /etc/vx/diag.d can be used to obtain theVendor ID and Product ID)Both VID and PID can have an optional ’*’ (asterisk) followingthem.If a ’*’ follows VID, it will result in the inclusion of all disksreturning Vendor ID starting with VID. The same is true for ProductID as well. Both VID and PID should be non NULL. The maximumallowed lengths for Vendor ID and Product ID are 8 and 16characters respectively.Chapter 3, Administering Dynamic Multipathing (DMP)95
Disabling and Enabling Multipathing for Specific DevicesSome examples of VID:PID specification are:all - Include all disksaaa:123 - Include all disks having VID ‘aaa’ and PID ‘123’aaa*:123 - Include all disks having VID starting with ‘aaa’and PID ‘123’aaa:123* - Include all disks having VID ‘aaa’ and PID startingwith ‘123’aaa:* - Include all disks having VID ‘aaa’ and any PIDEnter a VID:PID combination:[,all,list,list-exclude,q,?]All disks returning the specified Vendor ID and Product ID combination are madevisible to VxVM.❖Select option 4 to remove a pathgroup definition. (A pathgroup explicitly definesalternate paths to the same disk.) Once a pathgroup has been removed, all paths thatwere defined in that pathgroup become visible again.Remove a pathgroup definitionMenu: <strong>Volume</strong>Manager/Disk/IncludeDevices/PATHGROUP-VXVMUse this operation to remove the definition of pathgroup. Specifythe serial numbers of the pathgroups at the prompt. This can beobtained by typing list-exclude at the prompt.Enter pathgroup number(s):[,list-exclude,q,?]❖Select option 5 to enable multipathing for all disks that have paths through thespecified controller.Note This option requires a reboot of the system.Re-include controllers in DMPMenu: <strong>Volume</strong>Manager/Disk/IncludeDevices/CTLR-DMPUse this operation to make vxdmp multipath all disks on acontroller again.As a result of this operation, all disks having a path through thespecified controller will be multipathed by vxdmp again.You can specify a controller name at the prompt. A controller nameis of the form c#, example c3, c11 etc. Enter ’all’ to exclude allpaths on all the controllers on the host. To see the list ofcontrollers on the system, type ’list’.Enter a controller name:[,all,list,list-exclude,q,?]96 <strong>VERITAS</strong> <strong>Volume</strong> Manager Administrator’s Guide
Disabling and Enabling Multipathing for Specific Devices❖Select option 6 to enable multipathing for specified paths.Note This option requires a reboot of the system.Re-include paths in DMPMenu: <strong>Volume</strong>Manager/Disk/IncludeDevices/PATH-DMPUse this operation to make vxdmp multipath one or more disks again.As a result of this operation, all disks corresponding to thespecified paths will be multipathed by vxdmp again.You can specify a pathname or a pattern at the prompt. Here aresome path selection examples:all:c3t4d2:list:all pathsa single pathlist all paths on the systemEnter a pathname or pattern :[,all,list,list-exclude,q,?]❖Select option 7 to enable multipathing for disks that match a specified Vendor ID andProduct ID.Note This option requires a reboot of the system.Make VID:PID visible to DMPMenu: <strong>Volume</strong>Manager/Disk/IncludeDevices/VIDPID-DMPUse this operation to make vxdmp multipath disks returning aspecified VendorID:ProductID combination again.As a result of this operation, all disks that return VID:PIDmatching the specified combination will be multipathed by vxdmpagain.You can specify a VID:PID combination at the prompt. Thespecification can be as follows:VID:PID where VID stands for Vendor IDPID stands for Product ID(The command vxdmpinq in /etc/vx/diag.d can be used to obtain theVendor ID and Product ID)Both VID and PID can have an optional ’*’ (asterisk) followingthem.Chapter 3, Administering Dynamic Multipathing (DMP)97
Enabling and Disabling Input/Output (I/O) ControllersIf a ’*’ follows VID, it will result in the inclusion of all disksreturning Vendor ID starting with the specified VID. The same istrue for Product ID as well. Both VID and PID should be non NULL.The maximum allowed lengths for Vendor ID and Product ID are 8 and16 characters respectively.Some examples of VID:PID specification are:all - Exclude all disksaaa:123 - Exclude all disks having VID ‘aaa’ and PID ‘123’aaa*:123 - Exclude all disks having VID starting with ‘aaa’and PID ‘123’aaa:123* - Exclude all disks having VID ‘aaa’ and PID startingwith ‘123’aaa:* - Exclude all disks having VID ‘aaa’ and any PIDEnter a VID:PID combination:[,all,list-exclude,q,?]Enabling and Disabling Input/Output (I/O) ControllersDMP allows you to turn off I/O to a host I/O controller so that you can performadministrative operations. This feature can be used for maintenance of controllersattached to the host or of disk arrays supported by VxVM. I/O operations to the host I/Ocontroller can be turned back on after the maintenance task is completed. You canaccomplish these operations using the vxdmpadm command provided with VxVM.In active/active type disk arrays, VxVM uses a balanced path mechanism to schedule I/Oto multipathed disks. As a result, I/O may go through any available path at any givenpoint in time. For example, if a system has an active/active storage array and you need tochange an interface board that is connected to this disk array (if supported by thehardware), you can use the vxdmpadm command to list the host I/O controllers that areconnected to the interface board. Disable the host I/O controllers to stop further I/O tothe disks that are accessed through the interface board. You can then replace the boardwithout causing disruption to any ongoing I/O to disks in the disk array.98 <strong>VERITAS</strong> <strong>Volume</strong> Manager Administrator’s Guide
Displaying DMP Database InformationIn active/passive type disk arrays, VxVM schedules I/O to use the primary path until afailure is encountered. To change an interface card on the disk array or a card on the host(if supported by the hardware) that is connected to the disk array, disable I/O operationsto the host I/O controllers. This shifts all I/O over to an active secondary path or to anactive primary path on another I/O controller so that you can change the hardware.After the operation is over, you can use vxdmpadm to re-enable the paths through thecontrollers.Displaying DMP Database InformationYou can use the vxdmpadm command to list DMP database information and performother administrative tasks. This command allows you to list all controllers that areconnected to disks, and other related information that is stored in the DMP database. Youcan use this information to locate system hardware, and to help you decide whichcontrollers need to be enabled or disabled.The vxdmpadm command also provides useful information such as disk array serialnumbers, which DMP devices (disks) are connected to the disk array, and which paths areconnected to a particular controller.For more information, see “Administering DMP Using vxdmpadm” on page 101.Displaying Multipaths to a VM DiskThe vxdisk command is used to display the multipathing information for a particularmetadevice. The metadevice is a device representation of a particular physical disk havingmultiple physical paths from the I/O controller of the system. In VxVM, all the physicaldisks in the system are represented as metadevices with one or more physical paths.To view multipathing information for a particular metadevice, use the followingcommand:# vxdisk list devicenameFor example, to view multipathing information for c1t0d3, use the following command:# vxdisk list c1t0d3Typical output is as follows:Device: c1t0d3devicetag: c1t0d3type: simplehostid: zortdisk: name=disk04 id=962923652.362193.zorttimeout: 30Chapter 3, Administering Dynamic Multipathing (DMP)99
Displaying Multipaths to a VM Diskgroup: name=rootdg id=962212937.1025.zortinfo: privoffset=128flags: online ready private autoconfig autoimport importedpubpaths: block=/dev/vx/dmp/c1t0d3 char=/dev/vx/rdmp/c1t0d3version: 2.1iosize: min=1024 (bytes) max=64 (blocks)public: slice=0 offset=1152 len=4101723private: slice=0 offset=128 len=1024update: time=962923719 seqno=0.7headers: 0 248configs: count=1 len=727logs: count=1 len=110Defined regions:config priv 000017-000247[000231]:copy=01 offset=000000 disabledconfig priv 000249-000744[000496]:copy=01 offset=000231 disabledlog priv 000745-000854[000110]:copy=01 offset=000000 disabledlockrgn priv 000855-000919[000065]: part=00 offset=000000Multipathing information:numpaths: 2c1t0d3 state=enabled type=secondaryc4t1d3 state=disabled type=primaryIn the Multipathing information section of this output, the numpaths line showsthat there are 2 paths to the device, and the following two lines show that the path toc1t0d3 is active (state=enabled) and that the other path c4t1d3 has failed(state=disabled).The type field is shown for disks on active/passive type disk arrays such as Nike, DGClariion, and Hitachi DF350. This field indicates the primary and secondary paths to thedisk.The type field is not displayed for disks on active/active type disk arrays. Such arrayshave no concept of primary and secondary paths.100 <strong>VERITAS</strong> <strong>Volume</strong> Manager Administrator’s Guide
Administering DMP Using vxdmpadmAdministering DMP Using vxdmpadmThe vxdmpadm utility is a command line administrative interface to the DMP feature ofVxVM.You can use the vxdmpadm utility to perform the following tasks.◆◆◆◆◆◆Retrieve the name of the DMP device corresponding to a particular pathList all paths under a DMP device.List all controllers connected to disks attached to the host.List all the paths connected to a particular controller.Enable or disable a host controller on the system.Rename an enclosure.◆ Control the operation of the DMP restore daemon.The following sections cover these tasks in detail along with sample output. For moreinformation, see the vxdmpadm(1M) manual page.Retrieving Information About a DMP NodeThe following command displays the DMP node that controls a particular physical path:# vxdmpadm getdmpnode nodename=c3t2d1The physical path can be specified as the nodename attribute, which must be a valid pathlisted in the /dev/rdsk directory.Use the enclosure attribute with getdmpnode to obtain a list of all DMP nodes for thespecified enclosure.# vxdmpadm getdmpnode enclosure=enc0Displaying All Paths Controlled by a DMP NodeThe following command displays the paths controlled by the specified DMP node:# vxdmpadm getsubpaths dmpnodename=c2t1d0s2The specified DMP node must be a valid node in the /dev/vx/rdmp directory.You can also use getsubpaths to obtain all paths through a particular host diskcontroller:# vxdmpadm getsubpaths ctlr=c2Chapter 3, Administering Dynamic Multipathing (DMP)101
Administering DMP Using vxdmpadmListing Information About Host I/O ControllersThe following command lists attributes of all host I/O controllers on the system:# vxdmpadm listctlr allThis form of the command lists controllers belonging to a specified enclosure andenclosure type:# vxdmpadm listctlr enclosure=enc0 type=X1Disabling a ControllerDisabling I/O to a host disk controller prevents DMP from issuing I/O through thespecified controller. The command blocks until all pending I/O issued through thespecified disk controller are completed.To disable a controller, use the following command:# vxdmpadm disable ctlr=ctlrEnabling a ControllerEnabling a controller allows a previously disabled host disk controller to accept I/O. Thisoperation succeeds only if the controller is accessible to the host and I/O can beperformed on it. When connecting active/passive disk arrays in a non-clusteredenvironment, the enable operation results in failback of I/O to the primary path. Theenable operation can also be used to allow I/O to the controllers on a system board thatwas previously detached.To enable a controller, use the following command:# vxdmpadm enable ctlr=ctlrListing Information About EnclosuresTo display the attributes of a specified enclosure, use the following command:# vxdmpadm listenclosure enc0The following command lists attributes for all enclosures in a system:# vxdmpadm listenclosure all102 <strong>VERITAS</strong> <strong>Volume</strong> Manager Administrator’s Guide
Administering DMP Using vxdmpadmRenaming an EnclosureThe vxdmpadm setattr command can be used to assign a meaningful name to anexisting enclosure, for example:# vxdmpadm setattr enclosure enc0 name=GRP1This example changes the name of an enclosure from enc0 to GRP1.Note The maximum length of the enclosure name prefix is 25 characters. The name mustnot contain an underbar character (_).Starting the DMP Restore DaemonThe DMP restore daemon re-examines the condition of paths at a specified interval. Thetype of analysis it performs on the paths depends on the specified checking policy.Note The DMP restore daemon does not change the disabled state of the path through acontroller that you have disabled using vxdmpadm disable.Use the start restore command to start the restore daemon and specify one of thefollowing policies:◆◆◆check_allThe restore daemon analyzes all paths in the system and revives the paths that areback online, as well as disabling the paths that are inaccessible. The command to startthe restore daemon with this policy is:# vxdmpadm start restore policy=check_all [interval=seconds]check_alternateThe restore daemon checks that at least one alternate path is healthy. It generates anotification if this condition is not met. This policy avoids inquiry commands on allhealthy paths, and is less costly than check_all in cases where a large number ofpaths are available. This policy is the same as check_all if there are only two pathsper DMP node. The command to start the restore daemon with this policy is:# vxdmpadm start restore policy=check_alternate [interval=seconds]check_disabledThis is the default policy. The restore daemon checks the condition of paths that werepreviously disabled due to hardware failures, and revives them if they are backonline. The command to start the restore daemon with this policy is:# vxdmpadm start restore policy=check_disabled [interval=seconds]Chapter 3, Administering Dynamic Multipathing (DMP)103
Administering DMP Using vxdmpadm◆check_periodicThe restore daemon performs check_all once in a given number of cycles, andcheck_disabled in the remainder of the cycles. This policy may lead to periodicslowing down (due to check_all) if there are a large number of paths available. Thecommand to start the restore daemon with this policy is:# vxdmpadm start restore policy=check_periodic interval=seconds \[period=number]The interval attribute must be specified for this policy. The default number ofcycles between running the check_all policy is 10.The interval attribute specifies how often the restore daemon examines the paths. Forexample, after stopping the restore daemon, the polling interval can be set to 400 secondsusing the following command:# vxdmpadm start restore interval=400The default interval is 300 seconds. Decreasing this interval can adversely affect systemperformance.Note To change the interval or policy, you must first stop the restore daemon, and thenrestart it with new attributes.See the vxdmpadm(1M) manual page for more information about DMP restore policies.Stopping the DMP Restore DaemonUse the following command to stop the DMP restore daemon:# vxdmpadm stop restoreNote Automatic path failback stops if the restore daemon is stopped.Displaying the Status of the DMP Restore DaemonUse the following command to display the status of the automatic path restorationdaemon, its polling interval, and the policy that it uses to check the condition of paths:# vxdmpadm stat restoredThis produces output such as the following:The number of daemons running : 1The interval of daemon: 300The policy of daemon: check_disabled104 <strong>VERITAS</strong> <strong>Volume</strong> Manager Administrator’s Guide
DMP in a Clustered EnvironmentDisplaying Information About the DMP Error DaemonsTo display the number of error daemons that are running, use the following command:# vxdmpadm stat errordDMP in a Clustered EnvironmentNote You may need an additional license to use this feature.In a clustered environment where active/passive type disk arrays are shared by multiplehosts, all hosts in the cluster should access the disk via the same physical path. If a diskfrom an active/passive type shared disk array is accessed via multiple pathssimultaneously, it could lead to severe degradation of I/O performance. This requirespath failover on a host to be a cluster coordinated activity for an active/passive type diskarray.For active/active type disk arrays, any disk can be simultaneously accessed through allavailable physical paths to it. Therefore, in a clustered environment all hosts do not needto access a disk, via the same physical path.Note If the vxdctl enable command is run, and DMP identifies a disabled primarypath of a shared disk in an active/passive type disk array as physically accessible, itmarks this path as enabled. However, I/O continues to use the current path and isnot routed through the path that has been marked enabled. This behavior onclusters deviates from that on a single-host where I/O automatically fails back tothe primary path.Enabling/Disabling Controllers with Shared Disk GroupsVxVM does not allow enabling or disabling of controllers connected to a disk that is partof a shared <strong>VERITAS</strong> <strong>Volume</strong> Manager disk group.For example, consider a disk array that is connected through controller c0 to a host. Thiscontroller has a disk that is part of a shared disk group. In such a situation, the followingoperations fail on that host:# vxdmpadm disable ctlr=c0# vxdmpadm enable ctlr=c0The following error message is displayed:vxvm: vxdmpadm: ERROR: operation not supported for shared diskarrays.Chapter 3, Administering Dynamic Multipathing (DMP)105
DMP in a Clustered EnvironmentOperation of the DMP Restore Daemon with Shared DiskGroupsThe DMP restore daemon does not automatically failback I/O requests for a disk in anactive/passive disk array if that disk is a part of a shared disk group.When a restore daemon revives a DISABLED primary path to a shared disk in anactive/passive disk array, DMP does not route the I/O requests automatically through theprimary path, but continues routing them through the secondary path. This behaviordeviates from that in a single host environment.In a clustered environment, failback of I/O requests to the primary path happens onlywhen the secondary path becomes physically inaccessible to the host.106 <strong>VERITAS</strong> <strong>Volume</strong> Manager Administrator’s Guide
Creating and Administering Disk Groups 4IntroductionThis chapter describes how to create and manage disk groups. Disk groups are namedcollections of disks that share a common configuration. <strong>Volume</strong>s are created within a diskgroup and are restricted to using disks within that disk group.A system with <strong>VERITAS</strong> <strong>Volume</strong> Manager (VxVM) installed has a default disk groupconfigured, rootdg. By default, operations are directed to the rootdg disk group. Assystem administrator, you can create additional disk groups to arrange your system’sdisks for different purposes. Many systems do not use more than one disk group, unlessthey have a large number of disks. Disks are not added to disk groups until the disks areneeded to create VxVM objects. Disks can be initialized, reserved, and added to diskgroups later. However, at least one disk must be added to rootdg when you initiallyconfigure VxVM after installation.Note Even though rootdg is the default disk group, it does not contain the root disk. Inthe current release the root volume group is always under LVM control.When a disk is added to a disk group, it is given a name (for example, disk02). Thisname identifies a disk for volume operations: volume creation or mirroring. This namerelates directly to the physical disk. If a physical disk is moved to a different targetaddress or to a different controller, the name disk02 continues to refer to it. Disks can bereplaced by first associating a different physical disk with the name of the disk to bereplaced and then recovering any volume data that was stored on the original disk (frommirrors or backup copies).Having large disk groups can cause the private region to fill. In the case of larger diskgroups, disks should be set up with larger private areas. A major portion of a privateregion provides space for a disk group configuration database that contains records foreach VxVM object in that disk group. Because each configuration record takes up 256bytes (or one quarter of a block), the number of records that can be created in a disk groupcan be estimated from the configuration database copy size. The copy size in blocks can beobtained from the output of the command vxdg list diskgroup as the value of thepermlen parameter on the line starting with the string “config:”. This value is thesmallest of the len values for all copies of the configuration database in the disk group.The amount of remaining free space in the configuration database is shown as the value of107
Specifying a Disk Group to Commandsthe free parameter. An example is shown in “Displaying Disk Group Information” onpage 109. One way to overcome the problem of running out of free space is to split theaffected disk group into two separate disk groups. See “Reorganizing the Contents of DiskGroups” on page 120 for details.CautionBefore making any changes to disk groups, use the commands vxprint -hrmand vxdisk list to record the current configuration.Specifying a Disk Group to CommandsMany VxVM commands allow you to specify a disk group using the –g option. Forexample, to create a volume in disk group mktdg, use the following command:# vxassist -g mktdg make mktvol 50mThe block special device for this volume is:/dev/vx/dsk/mktdg/mktvolThe disk group does not have to be specified if the object names are unique. Most VxVMcommands use object names specified on the command line to determine the disk groupfor the operation. For example, to create a volume on disk mktdg01 without specifyingthe disk group name, use the following command:# vxassist make mktvol 50m mktdg01Many commands work this way as long as two disk groups do not have objects with thesame names. For example, VxVM allows you to create volumes named mktvol in bothrootdg and in mktdg. If you do this, you must add –g mktdg to any command whereyou want to manipulate the volume in the mktdg disk group.Note Most VxVM commands require superuser or equivalent privileges.108 <strong>VERITAS</strong> <strong>Volume</strong> Manager Administrator’s Guide
Displaying Disk Group InformationDisplaying Disk Group InformationTo display information on existing disk groups, enter the following command:# vxdg listVxVM returns the following listing of current disk groups:NAME STATE IDrootdg enabled 730344554.1025.tweetynewdg enabled 731118794.1213.tweetyTo display more detailed information on a specific disk group (such as rootdg), use thefollowing command:# vxdg list rootdgThe output from this command is similar to the following:Group: rootdgdgid: 962910960.1025.bassimport-id: 0.1flags:version: 90local-activation: read-writedetach-policy: localcopies: nconfig=default nlog=defaultconfig: seqno=0.1183 permlen=727 free=722 templen=2 loglen=110config disk c0t10d0 copy 1 len=727 state=clean onlineconfig disk c0t11d0 copy 1 len=727 state=clean onlinelog disk c0t10d0 copy 1 len=110log disk c0t11d0 copy 1 len=110To verify the disk group ID and name associated with a specific disk (for example, toimport the disk group), use the following command:# vxdisk -s list devicenameThis command provides output that includes the following information for the specifieddisk. For example, output for disk c0t12d0 as follows:Disk: c0t12d0type: simpleflags: online ready private autoconfig autoimport importeddiskid: 963504891.1070.bassdgname: newdgdgid: 963504895.1075.basshostid: bassinfo: privoffset=128Chapter 4, Creating and Administering Disk Groups109
Creating a Disk GroupDisplaying Free Space in a Disk GroupBefore you add volumes and file systems to your system, make sure you have enough freedisk space to meet your needs.To display free space in the system, use the following command:# vxdg freeThe following is example output:GROUP DISK DEVICE TAG OFFSET LENGTH FLAGSrootdg disk01 c0t10d0 c0t10d0 0 4444228 -rootdg disk02 c0t11d0 c0t11d0 0 4443310 -newdg newdg01 c0t12d0 c0t12d0 0 4443310 -newdg newdg02 c0t13d0 c0t13d0 0 4443310 -oradg oradg01 c0t14d0 c0t14d0 0 4443310 -To display free space for a disk group, use the following command:# vxdg -g diskgroup freewhere -g diskgroup optionally specifies a disk group.For example, to display the free space in the default disk group, rootdg, use thefollowing command:# vxdg -g rootdg freeThe following example output shows the amount of free space in sectors:DISK DEVICE TAG OFFSET LENGTH FLAGSdisk01 c0t10d0 c0t10d0 0 4444228 -disk02 c0t11d0 c0t11d0 0 4443310 -Creating a Disk GroupData related to a particular set of applications or a particular group of users may need tobe made accessible on another system. Examples of this are:◆A system has failed and its data needs to be moved to other systems.◆ The work load must be balanced across a number of systems.It is important that you locate data related to particular applications or users on anidentifiable set of disks. When you need to move these disks, this allows you to move onlythe application or user data that should be moved.Disks must be placed in disk groups before VxVM can use the disks for volumes. VxVMalways requires the rootdg disk group to be defined, but you can add more disk groupsas required.110 <strong>VERITAS</strong> <strong>Volume</strong> Manager Administrator’s Guide
Adding a Disk to a Disk GroupNote VxVM commands create all volumes in the default disk group, rootdg, if noalternative disk group is specified using the -g option (see “Specifying a DiskGroup to Commands” on page 108). All commands default to the rootdg diskgroup unless the disk group can be deduced from other information such as a diskname.A disk group must have at least one disk associated with it. A new disk group can becreated when you use menu item 1 (Add or initialize one or more disks) ofthe vxdiskadm command to add disks to VxVM control, as described in “Adding a Diskto VxVM” on page 65. Disks to be added to a disk group must not already belong to anexisting disk group.You can also use the vxdiskadd command to create a new disk group, for example:# vxdiskadd c1t1d0where c1t1d0 is the device name of a disk that is not currently assigned to a disk group.Disk groups can also be created by using the command vxdg init:# vxdg init diskgroup diskname=devicenameFor example, to create a disk group named mktdg on device c1t0d0:# vxdg init mktdg mktdg01=c1t0d0The disk specified by the device name, c1t0d0, must have been previously initializedwith vxdiskadd or vxdiskadm, and must not currently belong to a disk group.Adding a Disk to a Disk GroupTo add a disk to an existing disk group, use menu item 1 (Add or initialize oneor more disks) of the vxdiskadm command, as described in “Adding a Disk toVxVM” on page 65.You can also use the vxdiskadd command to add a disk to a disk group, for example:# vxdiskadd c1t2d0where c1t2d0 is the device name of a disk that is not currently assigned to a disk group.Removing a Disk from a Disk GroupA disk that contains no subdisks can be removed from its disk group with this command:# vxdg [-g groupname] rmdisk disknameChapter 4, Creating and Administering Disk Groups111
Removing a Disk from a Disk Groupwhere the disk group name is only specified for a disk group other than the default,rootdg.For example, to remove disk02 from rootdg, use this command:# vxdg rmdisk disk02If the disk has subdisks on it when you try to remove it, the following error message isdisplayed:vxdg:Disk diskname is used by one or more subdisksUse the -k option to vxdg to remove device assignment. Using the -k option allows youto remove the disk even if subdisks are present. For more information, see the vxdg(1M)manual page.CautionUse of the -k option to vxdg can result in data loss.Once the disk has been removed from its disk group, you can (optionally) remove it fromVxVM control completely, as follows:# vxdisk rm devicenameFor example, to remove c1t0d0 from VxVM control, use these commands:# vxdisk rm c1t0d0You can remove a disk on which some subdisks are defined. For example, you canconsolidate all the volumes onto one disk. If you use vxdiskadm to remove a disk, youcan choose to move volumes off that disk. To do this, run vxdiskadm and select item 2(Remove a disk) from the main menu.If the disk is used by some subdisks, this message is displayed:The following subdisks currently use part of disk disk02:home usrvolSubdisks must be moved from disk02 before it can be removed.Move subdisks to other disks? [y,n,q,?] (default: n)If you choose y, then all subdisks are moved off the disk, if possible. Some subdisks maynot be movable. The most common reasons why a subdisk may not be movable are asfollows:◆◆There is not enough space on the remaining disks.Plexes or striped subdisks cannot be allocated on different disks from existing plexesor striped subdisks in the volume.If vxdiskadm cannot move some subdisks, you may need to remove some plexes fromsome disks to free more space before proceeding with the disk removal operation.112 <strong>VERITAS</strong> <strong>Volume</strong> Manager Administrator’s Guide
Deporting a Disk GroupDeporting a Disk GroupDeporting a disk group disables access to a disk group that is currently enabled(imported) by the system. Deport a disk group if you intend to move the disks in a diskgroup to another system. Also, deport a disk group if you want to use all of the disksremaining in a disk group for a new purpose.To deport a disk group, use the following procedure:1. Stop all activity by applications to volumes that are configured in the disk group thatis to be deported. Unmount file systems and shut down databases that are configuredon the volumes.2. Use the following command to stop the volumes in the disk group:# vxvol -g diskgroup stopall3. Select menu item 8 (Remove access to (deport) a disk group) from thevxdiskadm main menu.4. At the following prompt, enter the name of the disk group to be deported (in thisexample, newdg):Remove access to (deport) a disk groupMenu: <strong>Volume</strong>Manager/Disk/DeportDiskGroupUse this menu operation to remove access to a disk group that iscurrently enabled (imported) by this system. Deport a diskgroup if you intend to move the disks in a disk group to anothersystem. Also, deport a disk group if you want to use all of thedisks remaining in a disk group for some new purpose.You will be prompted for the name of a disk group. You will alsobe asked if the disks should be disabled (offlined). Forremovable disk devices on some systems, it is important todisable all access to the disk before removing the disk.Enter name of disk group [,list,q,?] (default: list)newdg5. At the following prompt, enter y if you intend to remove the disks in this disk group:The requested operation is to disable access to the removabledisk group named newdg. This disk group is stored on thefollowing disks:newdg01 on device c1t1d0You can choose to disable access to (also known as “offline”)Chapter 4, Creating and Administering Disk Groups113
Importing a Disk Groupthese disks. This may be necessary to prevent errors ifyou actually remove any of the disks from the system.Disable (offline) the indicated disks? [y,n,q,?] (default: n) y6. At the following prompt, press Return to continue with the operation:Continue with operation? [y,n,q,?] (default: y)Once the disk group is deported, the vxdiskadm utility displays the followingmessage:Removal of disk group newdg was successful.7. At the following prompt, indicate whether you want to disable another disk group (y)or return to the vxdiskadm main menu (n):Disable another disk group? [y,n,q,?] (default: n)Alternatively, you can use the vxdg command to deport a disk group:# vxdg deport diskgroupImporting a Disk GroupImporting a disk group enables access by the system to a disk group. To move a diskgroup from one system to another, first disable (deport) the disk group on the originalsystem, and then move the disk between systems and enable (import) the disk group.To import a disk group, use the following procedure:1. Use the following command to ensure that the disks in the deported disk group areonline:# vxdisk -s list2. Select menu item 7 (Enable access to (import) a disk group) from thevxdiskadm main menu.3. At the following prompt, enter the name of the disk group to import (in this example,newdg):Enable access to (import) a disk groupMenu: <strong>Volume</strong>Manager/Disk/EnableDiskGroupUse this operation to enable access to a disk group. This can beused as the final part of moving a disk group from one system to114 <strong>VERITAS</strong> <strong>Volume</strong> Manager Administrator’s Guide
Renaming a Disk Groupanother. The first part of moving a disk group is to use the“Remove access to (deport) a disk group” operation on theoriginal host.A disk group can be imported from another host that failedwithout first deporting the disk group. Be sure that all disksin the disk group are moved between hosts.If two hosts share a SCSI bus, be very careful to ensure thatthe other host really has failed or has deported the disk group.If two active hosts import a disk group at the same time, thedisk group will be corrupted and will become unusable.Select disk group to import [,list,q,?] (default: list)newdgOnce the import is complete, the vxdiskadm utility displays the following successmessage:The import of newdg was successful.4. At the following prompt, indicate whether you want to import another disk group (y)or return to the vxdiskadm main menu (n):Select another disk group? [y,n,q,?] (default: n)Alternatively, you can use the vxdg command to import a disk group:# vxdg import diskgroupRenaming a Disk GroupOnly one disk group of a given name can exist per system. It is not possible to import ordeport a disk group when the target system already has a disk group of the same name. Toavoid this problem, VxVM allows you to rename a disk group during import or deport.For example, because every system running VxVM must have a single rootdg defaultdisk group, importing or deporting rootdg across systems is a problem. There cannot betwo rootdg disk groups on the same system. This problem can be avoided by renamingthe rootdg disk group during the import or deport.To rename a disk group during import, use the following command:# vxdg [-t] -n newdg import diskgroupChapter 4, Creating and Administering Disk Groups115
Renaming a Disk GroupIf the -t option is included, the import is temporary and does not persist across reboots.In this case, the stored name of the disk group remains unchanged on its original host, butthe disk group is known as newdg to the importing host. If the -t option is not used, thename change is permanent.To rename a disk group during deport, use the following command:# vxdg [-h hostname] -n newdg deport diskgroupWhen renaming on deport, you can specify the -h hostname option to assign a lock to analternate host. This ensures that the disk group is automatically imported when thealternate host reboots.To temporarily move the rootdg disk group from one host to another (for repair work onthe root volume, for example) and then move it back, use the following procedure:1. On the original host, identify the disk group ID of the rootdg disk group to beimported with the following command:# vxdisk -s listThis command results in output such as the following:dgname: rootdgdgid: 774226267.1025.tweety2. On the importing host, import and rename the rootdg disk group with thiscommand:# vxdg -tC -n newdg import diskgroupThe -t option indicates a temporary import name, and the -C option clears importlocks. The -n option specifies an alternate name for the rootdg being imported sothat it does not conflict with the existing rootdg. diskgroup is the disk group ID ofthe disk group being imported (for example, 774226267.1025.tweety).If a reboot or crash occurs at this point, the temporarily imported disk group becomesunimported and requires a reimport.3. After the necessary work has been done on the imported rootdg, deport it back to itsoriginal host with this command:# vxdg -h hostname deport diskgroupwhere hostname is the name of the system whose rootdg is being returned (thesystem name can be confirmed with the command uname -n).116 <strong>VERITAS</strong> <strong>Volume</strong> Manager Administrator’s Guide
Moving Disks between Disk GroupsThis command removes the imported rootdg from the importing host and returnslocks to its original host. The original host then automatically imports its rootdg onthe next reboot.Moving Disks between Disk GroupsTo move a disk between disk groups, remove the disk from one disk group and add it tothe other. For example, to move the physical disk c0t3d0 (attached with the disk namedisk04) from disk group rootdg and add it to disk group mktdg, use the followingcommands:# vxdg rmdisk disk04# vxdg -g mktdg adddisk mktdg02=c0t3d0CautionThis procedure does not save the configurations nor data on the disks.You can also move a disk by using the vxdiskadm command. Select item 3 (Remove adisk) from the main menu, and then select item 1 (Add or initialize a disk).See “Moving Objects Between Disk Groups” on page 127 for an alternative and preferredmethod of moving disks between disk groups. This method preserves VxVM objects, suchas volumes, that are configured on the disks.Moving Disk Groups Between SystemsAn important feature of disk groups is that they can be moved between systems. If alldisks in a disk group are moved from one system to another, then the disk group can beused by the second system. You do not have to re-specify the configuration.To move a disk group between systems, use the following procedure:1. On the first system, stop all volumes in the disk group, then deport (disable localaccess to) the disk group with the following command:# vxdg deport diskgroup2. Move all the disks to the second system and perform the steps necessary(system-dependent) for the second system and VxVM to recognize the new disks.This can require a reboot, in which case the vxconfigd daemon is restarted andrecognizes the new disks. If you do not reboot, use the command vxdctl enable torestart the vxconfigd program so VxVM also recognizes the disks.3. Import (enable local access to) the disk group on the second system with thiscommand:Chapter 4, Creating and Administering Disk Groups117
Moving Disk Groups Between Systems# vxdg import diskgroupCautionAll disks in the disk group must be moved to the other system. If they are notmoved, the import fails.4. After the disk group is imported, start all volumes in the disk group with thiscommand:# vxrecover -g diskgroup -sbYou can also move disks from a system that has crashed. In this case, you cannot deportthe disk group from the first system. When a disk group is created or imported on asystem, that system writes a lock on all disks in the disk group.CautionThe purpose of the lock is to ensure that dual-ported disks (disks that can beaccessed simultaneously by two systems) are not used by both systems at thesame time. If two systems try to manage the same disks at the same time,configuration information stored on the disk is corrupted. The disk and its databecome unusable.When you move disks from a system that has crashed or failed to detect the group beforethe disk is moved, the locks stored on the disks remain and must be cleared. The systemreturns the following error message:vxdg:disk group groupname: import failed: Disk is in use byanother hostTo clear locks on a specific set of devices, use the following command:# vxdisk clearimport devicename ...To clear the locks during import, use the following command:# vxdg -C import diskgroupCautionBe careful when using the vxdisk clearimport or vxdg -C importcommand on systems that have dual-ported disks. Clearing the locks allowsthose disks to be accessed at the same time from multiple hosts and can result incorrupted data.You may want to import a disk group when some disks are not available. The importoperation fails if some disks for the disk group cannot be found among the disk drivesattached to the system. When the import operation fails, one of several error messages isdisplayed.The following message indicates a fatal error that requires hardware repair or the creationof a new disk group, and recovery of the disk group configuration and data.118 <strong>VERITAS</strong> <strong>Volume</strong> Manager Administrator’s Guide
Moving Disk Groups Between Systemsvxdg: Disk group groupname: import failed: Disk group has no validconfiguration copiesThe following message indicates a recoverable error.vxdg: Disk group groupname: import failed: Disk for disk group notfoundIf some of the disks in the disk group have failed, force the disk group to be imported withthe command:# vxdg -f import diskgroupCautionBe careful when using the -f option. It can cause the same disk group to beimported twice from different sets of disks, causing the disk group to becomeinconsistent.These operations can also be performed using the vxdiskadm utility. To deport a diskgroup using vxdiskadm, select menu item 8 (Remove access to (deport) adisk group). To import a disk group, select item 7 (Enable access to (import)a disk group). The vxdiskadm import operation checks for host import locks andprompts to see if you want to clear any that are found. It also starts volumes in the diskgroup.Reserving Minor Numbers for Disk GroupsA device minor number uniquely identifies some characteristic of a device to the devicedriver that controls that device. It is often used to identify some characteristic mode of anindividual device, or to identify separate devices that are all under the control of a singlecontroller. VxVM assigns unique device minor numbers to each object (volume, plex,subdisk, disk, or disk group) that it controls.When you move a disk group between systems, it is possible for the minor numbers that itused on its previous system to coincide (or collide) with those of objects known to VxVMon the new system. To get around this potential problem, you can allocate separate rangesof minor numbers for each disk group. VxVM uses the specified range of minor numberswhen it creates volume objects from the disks in the disk group. This guarantees that eachvolume has the same minor number across reboots or reconfigurations. Disk groups maythen be moved between machines without causing device number collisions.To set a base volume device minor number for a disk group, use the following command:# vxdg init diskgroup minor=base_minor devicenameChapter 4, Creating and Administering Disk Groups119
Reorganizing the Contents of Disk GroupsVxVM chooses minor device numbers for objects created from this disk group starting atthe number base_minor. Minor numbers can range from 0 up to 16,777,215. Try to leave areasonable number of unallocated minor numbers near the top of this range to allow fortemporary device number remapping in the event that a device minor number collisionmay still occur.If you do not specify the base of the minor number range for a disk group, VxVM choosesone at random. The number chosen is at least 1000, is a multiple of 1000, and yields ausable range of 1000 device numbers. The chosen number also does not overlap within arange of 1000 of any currently imported disk groups, and it does not overlap any currentlyallocated volume device numbers.Note The default policy ensures that a small number of disk groups can be mergedsuccessfully between a set of machines. However, where disk groups are mergedautomatically using failover mechanisms, select ranges that avoid overlap.For further information on minor number reservation, see the vxdg(1M) manual page.Reorganizing the Contents of Disk GroupsNote You may need an additional license to use this feature.There are several circumstances under which you might want to reorganize the contentsof your existing disk groups:◆◆◆◆To group volumes or disks differently as the needs of your organization change. Forexample, you might want to split disk groups to match the boundaries of separatedepartments, or to join disk groups when departments are merged.To reduce the size of a disk group’s configuration database in the event that its privateregion is nearly full. This is a much simpler solution than the alternative of trying togrow the private region.To perform online maintenance and upgrading of fault-tolerant systems that can besplit into separate hosts for this purpose, and then rejoined.To implement off-host processing solutions for the purposes of backup or decisionsupport in a cluster environment. This is discussed further in “Configuring Off-HostProcessing” on page 269.You can use either the <strong>VERITAS</strong> Enterprise Administrator (VEA) or the vxdg command toreorganize your disk groups. For more information about using the graphical userinterface, see the <strong>VERITAS</strong> <strong>Volume</strong> Manager (UNIX) User’s Guide — VEA. This sectiondescribes how to use the vxdg command.120 <strong>VERITAS</strong> <strong>Volume</strong> Manager Administrator’s Guide
Reorganizing the Contents of Disk GroupsThe vxdg command provides the following operations for reorganizing disk groups:◆move—moves a self-contained set of VxVM objects between imported disk groups.This operation fails if it would remove all the disks from the source disk group.<strong>Volume</strong> states are preserved across the move. The move operation is illustrated in“Disk Group Move Operation” below.Disk Group Move OperationSource Disk GroupTarget Disk GroupmoveSource Disk GroupAftermoveTarget Disk GroupChapter 4, Creating and Administering Disk Groups121
Reorganizing the Contents of Disk Groups◆split—removes a self-contained set of VxVM objects from an imported disk group,and moves them to a newly created target disk group. This operation fails if it wouldremove all the disks from the source disk group, or if an imported disk group existswith the same name as the target disk group. An existing deported disk group isdestroyed if it has the same name as the target disk group (as is the case for the vxdginit command). The split operation is illustrated in “Disk Group Split Operation”below.Disk Group Split OperationSource Disk GroupDisks to be split into new disk groupSource Disk GroupAftersplitNew Target Disk Group122 <strong>VERITAS</strong> <strong>Volume</strong> Manager Administrator’s Guide
Reorganizing the Contents of Disk Groups◆join—removes all VxVM objects from an imported disk group and moves them toan imported target disk group. The source disk group is removed when the join iscomplete. The join operation is illustrated in “Disk Group Join Operation” below.Disk Group Join OperationSource Disk GroupTarget Disk GroupjoinAfterjoinTarget Disk GroupThese operations are performed on VxVM objects such as disks or top-level volumes, andinclude all component objects such as sub-volumes, plexes and subdisks. The objects to bemoved must be self-contained, meaning that the disks that are moved must not contain anyother objects that are not intended for the move.If you specify one or more disks to be moved, all VxVM objects on the disks are moved.You can use the -o expand option to ensure that vxdg moves all disks on which thespecified objects are configured. Take care when doing this as the result may not alwaysbe what you expect. You can use the listmove operation with vxdg to help you establishwhat are the self-contained set of objects that correspond to a specified set of objects.CautionBefore moving volumes between disk groups, stop all applications that areaccessing the volumes, and unmount all file systems that are configured in thevolumes.If the system crashes or a hardware subsystem fails, VxVM attempts to complete orreverse an incomplete disk group reconfiguration when the system is restarted or thehardware subsystem is repaired, depending on how far the reconfiguration hadprogressed. If one of the disk groups is no longer available because it has been importedChapter 4, Creating and Administering Disk Groups123
Reorganizing the Contents of Disk Groupsby another host or because it no longer exists, you must recover the disk group manuallyas described in the section “Recovery from Incomplete Disk Group Moves” in the chapter“Recovery from Hardware Failure” of the <strong>VERITAS</strong> <strong>Volume</strong> Manager Troubleshooting Guide.The disk group move, split and join feature has the following limitations:◆ Disk groups involved in a move, split or join must be version 90 or greater. See“Upgrading a Disk Group” on page 132 for more information on disk group versions.◆◆◆◆◆◆◆◆◆◆◆The reconfiguration must involve an integral number of physical disks.Objects to be moved must not contain open volumes.Moved volumes are initially disabled following a disk group move, split or join. Usethe vxrecover -m and vxvol startall commands to recover and restart thevolumes.Data change objects (DCOs) and snap objects that have been dissociated by PersistentFastResync cannot be moved between disk groups.<strong>VERITAS</strong> <strong>Volume</strong> Replicator (VVR) objects cannot be moved between disk groups.For a disk group move to succeed, the source disk group must contain at least onedisk that can store copies of the configuration database after the move.For a disk group split to succeed, both the source and target disk groups must containat least one disk that can store copies of the configuration database after the split.For a disk group move or join to succeed, the configuration database in the target diskgroup must be able to accommodate information about all the objects in the enlargeddisk group.Splitting or moving a volume into a different disk group changes the volume’s recordID.The operation can only be performed on the master node of a cluster if either thesource disk group or the target disk group is shared.In a cluster environment, disk groups involved in a move or join must both be privateor must both be shared.The following sections describe how to use the vxdg command to reorganize disk groups.For more information about the vxdg command, see the vxdg(1M) manual page.124 <strong>VERITAS</strong> <strong>Volume</strong> Manager Administrator’s Guide
Listing Objects Potentially Affected by a MoveReorganizing the Contents of Disk GroupsTo display the VxVM objects that would be moved for a specified list of objects, use thefollowing command:# vxdg [-o expand] listmove sourcedg targetdg object ...The following example lists the objects that would be affected by moving volume vol1from disk group dg1 to rootdg:# vxdg listmove dg1 rootdg vol1disk01 c0t1d0 disk05 c1t96d0 vol1 vol1-01 vol1-02 disk01-01disk05-01However, the following command produces an error because only part of the volumevol1 is configured on disk01:# vxdg listmove dg1 rootdg disk01vxvm:vxdg: ERROR: vxdg listmove dg1 rootdg failedvxvm:vxdg: ERROR: disk05 : Disk not moving, but subdisks on it areSpecifying the -o expand option ensures that the list of objects encompasses other disks(in this case, disk05) that contain subdisks from vol1.# vxdg -o expand listmove dg1 rootdg disk01disk01 c0t1d0 disk05 c1t96d0 vol1 vol1-01 vol1-02 disk01-01disk05-01Considerations for Placing DCO PlexesIf you use the vxassist command or the <strong>VERITAS</strong> Enterprise Administrator (VEA) tocreate a volume, or to enable Persistent FastResync on a volume, the DCO plexes areautomatically placed on the same disks as the data plexes of the parent volume. When youmove the parent volume (such as a snapshot volume) to a different disk group, thisensures that the DCO volume automatically accompanies it. If you use the vxassistaddlog, vxmake or vxdco commands to set up a DCO for a volume, you must ensurethat the disks that contain the plexes of the DCO volume accompany their parent volumeduring the move. Use the vxprint command on a volume to examine the configurationof its associated DCO volume.“Examples of Disk Groups That Can and Cannot be Split” on page 126 illustrates someinstances in which it is not be possible to split a disk group because of the location of theDCO plexes.For more information about relocating DCO plexes, see “Specifying <strong>Storage</strong> for DCOPlexes” on page 194.Chapter 4, Creating and Administering Disk Groups125
Reorganizing the Contents of Disk GroupsExamples of Disk Groups That Can and Cannot be Split<strong>Volume</strong>Data PlexesSnapshotPlexThe disk group can be split as the DCO plexesare on the same disks as the data plexes andcan therefore accompany their volumes.Split<strong>Volume</strong> DCOPlexes<strong>Volume</strong>Data PlexesXSnapshotDCO PlexSnapshotPlexThe disk group cannot be split as the DCOplexes have been separated from their dataplexes and so cannot accompany theirvolumes. One solution is to relocate the DCOplexes. In this example, it may be necessary touse an additional disk in the disk group as anintermediary to swap the plexes.<strong>Volume</strong> DCOPlexSnapshotDCO Plex<strong>Volume</strong> DCOPlex<strong>Volume</strong>Data PlexesSplit?SnapshotPlex?The disk group can be split as theDCO plexes can accompany theirvolumes even though they are ondifferent disks. However, you maynot wish the data in the portions ofthe disks marked “?” to be moved aswell.<strong>Volume</strong> DCOPlexesSnapshotDCO Plex<strong>Volume</strong> 1Data Plexes<strong>Volume</strong> 1 DCOPlexes?<strong>Volume</strong> 2Data PlexesXSnapshotDCO PlexSnapshotPlex?The disk group cannot besplit as this would separatethe disks that contain thedata plexes of <strong>Volume</strong> 2.Possible solutions are torelocate the snapshot DCOplex to the disk containingthe snapshot plex, or toanother suitable disk thatcan be moved.126 <strong>VERITAS</strong> <strong>Volume</strong> Manager Administrator’s Guide
Moving Objects Between Disk GroupsReorganizing the Contents of Disk GroupsTo move a self-contained set of VxVM objects from an imported source disk group to animported target disk group, use the following command:# vxdg [-o expand] [-o override|verify] move sourcedg targetdg \object ...The -o expand option ensures that the objects that are actually moved include all otherdisks containing subdisks that are associated with the specified objects or with objects thatthey contain.The default behavior of vxdg when moving licensed disks in an EMC array is to performa EMC disk compatibility check for each disk involved in the move. If the compatibilitychecks succeed, the move takes place. vxdg then checks again to ensure that theconfiguration has not changed since it performed the compatibility check. If theconfiguration has changed, vxdg attempts to perform the entire move again.The -o override option enables the move to take place without any EMC checking.The -o verify option returns the access names of the disks that would be moved butdoes not perform the move.Note The -o override and -o verify options require a valid EMC license.See “Moving Objects Between Disk Groups” on page 263 for information on how to moveobjects between disk groups in a cluster.For example, the following output from vxprint shows the contents of disk groupsrootdg and dg1:# vxprintDisk group: rootdgTY NAME ASSOC KSTATE LENGTH PLOFFS STATE TUTIL0 PUTIL0dg rootdg rootdg - - - - - -dm disk02 c1t97d0 - 17678493 - - - -dm disk03 c1t112d0 - 17678493 - - - -dm disk04 c1t114d0 - 17678493 - - - -dm disk06 c1t98d0 - 17678493 - - - -Disk group: dg1TY NAME ASSOC KSTATE LENGTH PLOFFS STATE TUTIL0 PUTIL0dg dg1 dg1 - - - - - -dm disk01 c0t1d0 - 17678493 - - - -dm disk05 c1t96d0 - 17678493 - - - -dm disk07 c1t99d0 - 17678493 - - - -dm disk08 c1t100d0 - 17678493 - - - -v vol1 fsgen ENABLED 2048 - ACTIVE - -pl vol1-01 vol1 ENABLED 3591 - ACTIVE - -Chapter 4, Creating and Administering Disk Groups127
Reorganizing the Contents of Disk Groupssd disk01-01 vol1-01 ENABLED 3591 0 - - -pl vol1-02 vol1 ENABLED 3591 - ACTIVE - -sd disk05-01 vol1-02 ENABLED 3591 0 - - -The following command moves the self-contained set of objects implied by specifyingdisk disk01 from disk group dg1 to rootdg:# vxdg -o expand move dg1 rootdg disk01The moved volumes are initially disabled following the move. Use the followingcommands to recover and restart the volumes in the target disk group:# vxrecover -g targetdg -m [volume ...]# vxvol -g targetdg startallThe output from vxprint after the move shows that not only disk01 but also volumevol1 and disk05 have moved to rootdg, leaving only disk07 and disk08 in diskgroup dg1:# vxprintDisk group: rootdgTY NAME ASSOC KSTATE LENGTH PLOFFS STATE TUTIL0 PUTIL0dg rootdg rootdg - - - - - -dm disk01 c0t1d0 - 17678493 - - - -dm disk02 c1t97d0 - 17678493 - - - -dm disk03 c1t112d0 - 17678493 - - - -dm disk04 c1t114d0 - 17678493 - - - -dm disk05 c1t96d0 - 17678493 - - - -dm disk06 c1t98d0 - 17678493 - - - -v vol1 fsgen ENABLED 2048 - ACTIVE - -pl vol1-01 vol1 ENABLED 3591 - ACTIVE - -sd disk01-01 vol1-01 ENABLED 3591 0 - - -pl vol1-02 vol1 ENABLED 3591 - ACTIVE - -sd disk05-01 vol1-02 ENABLED 3591 0 - - -Disk group: dg1TY NAME ASSOC KSTATE LENGTH PLOFFS STATE TUTIL0 PUTIL0dg dg1 dg1 - - - - - -dm disk07 c1t99d0 - 17678493 - - - -dm disk08 c1t100d0 - 17678493 - - - -The following commands would also achieve the same result:# vxdg move dg1 rootdg disk01 disk05# vxdg move dg1 rootdg vol1128 <strong>VERITAS</strong> <strong>Volume</strong> Manager Administrator’s Guide
Reorganizing the Contents of Disk GroupsSplitting Disk GroupsTo remove a self-contained set of VxVM objects from an imported source disk group to anew target disk group, use the following command:# vxdg [-o expand] [-o override|verify] split sourcedg targetdg \object ...For a description of the -o expand, -o override, and -o verify options, see “MovingObjects Between Disk Groups” on page 127.See “Splitting Disk Groups” on page 263 for more information on splitting shared diskgroups in clusters.For example, the following output from vxprint shows the contents of disk grouprootdg:# vxprintDisk group: rootdgTY NAME ASSOC KSTATE LENGTH PLOFFS STATE TUTIL0 PUTIL0dg rootdg rootdg - - - - - -dm disk01 c0t1d0 - 17678493 - - - -dm disk02 c1t97d0 - 17678493 - - - -dm disk03 c1t112d0 - 17678493 - - - -dm disk04 c1t114d0 - 17678493 - - - -dm disk05 c1t96d0 - 17678493 - - - -dm disk06 c1t98d0 - 17678493 - - - -dm disk07 c1t99d0 - 17678493 - - - -dm disk08 c1t100d0 - 17678493 - - - -v vol1 fsgen ENABLED 2048 - ACTIVE - -pl vol1-01 vol1 ENABLED 3591 - ACTIVE - -sd disk01-01 vol1-01 ENABLED 3591 0 - - -pl vol1-02 vol1 ENABLED 3591 - ACTIVE - -sd disk05-01 vol1-02 ENABLED 3591 0 - - -The following command removes disks disk07 and disk08 from rootdg to form a newdisk group, dg1:# vxdg -o expand split rootdg dg1 disk07 disk08The moved volumes are initially disabled following the split. Use the followingcommands to recover and restart the volumes in the new target disk group:# vxrecover -g targetdg -m [volume ...]# vxvol -g targetdg startallChapter 4, Creating and Administering Disk Groups129
Reorganizing the Contents of Disk GroupsThe output from vxprint after the split shows the new disk group, dg1:# vxprintDisk group: rootdgTY NAME ASSOC KSTATE LENGTH PLOFFS STATE TUTIL0 PUTIL0dg rootdg rootdg - - - - - -dm disk01 c0t1d0 - 17678493 - - - -dm disk02 c1t97d0 - 17678493 - - - -dm disk03 c1t112d0 - 17678493 - - - -dm disk04 c1t114d0 - 17678493 - - - -dm disk05 c1t96d0 - 17678493 - - - -dm disk06 c1t98d0 - 17678493 - - - -v vol1 fsgen ENABLED 2048 - ACTIVE - -pl vol1-01 vol1 ENABLED 3591 - ACTIVE - -sd disk01-01 vol1-01 ENABLED 3591 0 - - -pl vol1-02 vol1 ENABLED 3591 - ACTIVE - -sd disk05-01 vol1-02 ENABLED 3591 0 - - -Disk group: dg1TY NAME ASSOC KSTATE LENGTH PLOFFS STATE TUTIL0 PUTIL0dg dg1 dg1 - - - - - -dm disk07 c1t99d0 - 17678493 - - - -dm disk08 c1t100d0 - 17678493 - - - -Joining Disk GroupsTo remove all VxVM objects from an imported source disk group to an imported targetdisk group, use the following command:# vxdg [-o override|verify] join sourcedg targetdgNote You cannot specify rootdg as the source disk group for a join operation.For a description of the -o override and -o verify options, see “Moving ObjectsBetween Disk Groups” on page 127.See “Joining Disk Groups” on page 263 for information on joining disk groups in a cluster.For example, the following output from vxprint shows the contents of the disk grouprootdg and dg1:# vxprintDisk group: rootdgTY NAME ASSOC KSTATE LENGTH PLOFFS STATE TUTIL0 PUTIL0dg rootdg rootdg - - - - - -dm disk01 c0t1d0 - 17678493 - - - -dm disk02 c1t97d0 - 17678493 - - - -130 <strong>VERITAS</strong> <strong>Volume</strong> Manager Administrator’s Guide
Reorganizing the Contents of Disk Groupsdm disk03 c1t112d0 - 17678493 - - - -dm disk04 c1t114d0 - 17678493 - - - -dm disk07 c1t99d0 - 17678493 - - - -dm disk08 c1t100d0 - 17678493 - - - -Disk group: dg1TY NAME ASSOC KSTATE LENGTH PLOFFS STATE TUTIL0 PUTIL0dg dg1 dg1 - - - - - -dm disk05 c1t96d0 - 17678493 - - - -dm disk06 c1t98d0 - 17678493 - - - -v vol1 fsgen ENABLED 2048 - ACTIVE - -pl vol1-01 vol1 ENABLED 3591 - ACTIVE - -sd disk01-01 vol1-01 ENABLED 3591 0 - - -pl vol1-02 vol1 ENABLED 3591 - ACTIVE - -sd disk05-01 vol1-02 ENABLED 3591 0 - - -The following command joins disk group dg1 to rootdg:# vxdg join dg1 rootdgThe moved volumes are initially disabled following the join. Use the following commandsto recover and restart the volumes in the target disk group:# vxrecover -g targetdg -m [volume ...]# vxvol -g targetdg startallThe output from vxprint after the join shows that disk group dg1 has been removed:# vxprintDisk group: rootdgTY NAME ASSOC KSTATE LENGTH PLOFFS STATE TUTIL0 PUTIL0dg rootdg rootdg - - - - - -dm disk01 c0t1d0 - 17678493 - - - -dm disk02 c1t97d0 - 17678493 - - - -dm disk03 c1t112d0 - 17678493 - - - -dm disk04 c1t114d0 - 17678493 - - - -dm disk05 c1t96d0 - 17678493 - - - -dm disk06 c1t98d0 - 17678493 - - - -dm disk07 c1t99d0 - 17678493 - - - -dm disk08 c1t100d0 - 17678493 - - - -v vol1 fsgen ENABLED 2048 - ACTIVE - -pl vol1-01 vol1 ENABLED 3591 - ACTIVE - -sd disk01-01 vol1-01 ENABLED 3591 0 - - -pl vol1-02 vol1 ENABLED 3591 - ACTIVE - -sd disk05-01 vol1-02 ENABLED 3591 0 - - -Chapter 4, Creating and Administering Disk Groups131
Disabling a Disk GroupDisabling a Disk GroupTo disable a disk group, unmount and stop any volumes in the disk group, and then usethe following command to deport it:# vxdg deport diskgroupDeporting a disk group does not actually remove the disk group. It disables use of thedisk group by the system. Disks in a deported disk group can be reused, reinitialized,added to other disk groups, or imported for use on other systems. Use the vxdg importcommand to re-enable access to the disk group.Destroying a Disk GroupThe vxdg command provides a destroy option that removes a disk group from thesystem and frees the disks in that disk group for reinitialization:# vxdg destroy diskgroupCautionThis command destroys all data on the disks.When a disk group is destroyed, the disks that are released can be re-used in other diskgroups.Upgrading a Disk GroupNote This information is not applicable for platforms whose first release was <strong>VERITAS</strong><strong>Volume</strong> Manager 3.0. However, it is applicable for subsequent releases.Prior to the release of <strong>VERITAS</strong> <strong>Volume</strong> Manager 3.0, the disk group version wasautomatically upgraded (if needed) when the disk group was imported.From release 3.0 of <strong>VERITAS</strong> <strong>Volume</strong> Manager, the two operations of importing a diskgroup and upgrading its version are separate. You can import a disk group from aprevious version and use it without upgrading it.When you want to use new features, the disk group can be upgraded. The upgrade is anexplicit operation. Once the upgrade occurs, the disk group becomes incompatible withearlier releases of VxVM that do not support the new version.Before the imported disk group is upgraded, no changes are made to the disk group toprevent its use on the release from which it was imported until you explicitly upgrade it tothe current release.132 <strong>VERITAS</strong> <strong>Volume</strong> Manager Administrator’s Guide
Upgrading a Disk GroupUntil completion of the upgrade, the disk group can be used “as is” provided there is noattempt to use the features of the current version. Attempts to use a feature of the currentversion that is not a feature of the version from which the disk group was imported resultsin an error message similar to this:vxvm:vxedit: ERROR: Disk group version doesn’t support featureTo use any of the new features, you must run the vxdg upgrade command to explicitlyupgrade the disk group to a version that supports those features.All disk groups have a version number associated with them. <strong>VERITAS</strong> <strong>Volume</strong> Managerreleases support a specific set of disk group versions. VxVM can import and performoperations on a disk group of that version. The operations are limited by what featuresand operations the disk group version supports.The table, “Disk Group Version Assignments,” summarizes the <strong>VERITAS</strong> <strong>Volume</strong>Manager releases that introduce and support specific disk group versions:Disk Group Version AssignmentsVxVM Release Introduces Disk Group Version Supports Disk Group Versions1.2 10 101.3 15 152.0 20 202.2 30 302.3 40 402.5 50 503.0 60 20-40, 603.1 70 20-703.1.1 80 20-803.2, <strong>3.5</strong> 90 20-90Importing the disk group of a previous version on a <strong>VERITAS</strong> <strong>Volume</strong> Manager <strong>3.5</strong>system prevents the use of features introduced since that version was released. The table,“Features Supported by Disk Group Versions,” summarizes the features that aresupported by disk group versions 20 through 90:Chapter 4, Creating and Administering Disk Groups133
Upgrading a Disk GroupFeatures Supported by Disk Group VersionsDisk Group New Features SupportedVersion90 - Cluster Support for Oracle Resilvering- Disk Group Move, Split and Join- Device Discovery Layer (DDL)- Layered <strong>Volume</strong> Support in Clusters- Ordered Allocation- OS Independent Naming Support- Persistent FastResyncTo list the version of a disk group, use this command:# vxdg list dgnameYou can also determine the disk group version by using the vxprint command with the-l format option.To upgrade a disk group to the highest version supported by the release of VxVM that iscurrently running, use this command:# vxdg upgrade dgnamePrevious VersionFeatures Supported20, 30, 40, 50, 60, 70, 8080 - <strong>VERITAS</strong> <strong>Volume</strong> Replicator (VVR) Enhancements 20, 30, 40, 50, 60, 7070 - Non-Persistent FastResync20, 30, 40, 50, 60- <strong>VERITAS</strong> <strong>Volume</strong> Replicator (VVR) Enhancements- Unrelocate60 - Online Relayout- Safe RAID-5 Subdisk Moves20, 30, 4050 - SRVM (now known as <strong>VERITAS</strong> <strong>Volume</strong>20, 30, 40Replicator or VVR)40 - Hot-Relocation 20, 3030 - VxSmartSync Recovery Accelerator 2020 - Dirty Region Logging- Disk Group Configuration Copy Limiting,- Mirrored <strong>Volume</strong>s Logging- New-Style Stripes- RAID-5 <strong>Volume</strong>s- Recovery CheckpointingBy default, VxVM creates a disk group of the highest version supported by the release. Forexample, <strong>VERITAS</strong> <strong>Volume</strong> Manager <strong>3.5</strong> creates disk groups with version 90.134 <strong>VERITAS</strong> <strong>Volume</strong> Manager Administrator’s Guide
Managing the Configuration Daemon in VxVMIt may sometimes be necessary to create a disk group for an older version. The defaultdisk group version for a disk group created on a system running <strong>VERITAS</strong> <strong>Volume</strong>Manager <strong>3.5</strong> is 90. Such a disk group would not be importable on a system running<strong>VERITAS</strong> <strong>Volume</strong> Manager 2.3, which only supports up to version 40. Therefore, to createa disk group on a system running <strong>VERITAS</strong> <strong>Volume</strong> Manager <strong>3.5</strong> that can be imported bya system running <strong>VERITAS</strong> <strong>Volume</strong> Manager 2.3, the disk group must be created with aversion of 40 or less.To create a disk group with a previous version, specify the -T version option to the vxdginit command. For example, to create a disk group with version 40 that can be importedby a system running VxVM 2.3, use the following command:# vxdg -T 40 init newdg newdg01=c0t3d0This creates a disk group, newdg, which can be imported by <strong>VERITAS</strong> <strong>Volume</strong> Manager2.3. Note that while this disk group can be imported on the VxVM 2.3 system, attempts touse features from <strong>VERITAS</strong> <strong>Volume</strong> Manager 3.0 and later releases will fail.Managing the Configuration Daemon in VxVMThe VxVM configuration daemon (vxconfigd) provides the interface between VxVMcommands and the kernel device drivers. vxconfigd handles configuration changerequests from VxVM utilities, communicates the change requests to the VxVM kernel, andmodifies configuration information stored on disk. vxconfigd also initializes VxVMwhen the system is booted.The vxdctl command is the interface to the vxconfigd daemon.You can use vxdctl to:◆◆◆control the operation of the vxconfigd daemonmanage the initialization of the rootdg disk group configurationmanipulate the contents of the volboot file which contains a list of disks that haverootdg disk group configuration databasesIf only simple disks exist in rootdg, the vxconfigd daemon cannot read therootdg configuration without the existence of a /etc/vx/volboot file. Thevolboot file contains entries for disks that contain rootdg configuration databases.To add an entry for a disk to the volboot file, use the following command wheredevice is the disk access name of the disk device to be added:# vxdctl add disk deviceChapter 4, Creating and Administering Disk Groups135
Managing the Configuration Daemon in VxVMIf your system is configured to use Dynamic Multipathing (DMP), you can also usevxdctl to:◆◆reconfigure the DMP database to include disk devices newly attached to, or removedfrom the systemcreate DMP device nodes in the directories /dev/vx/dmp and /dev/vx/rdmp◆ update the DMP database with changes in path type for active/passive disk arrays.Use the utilities provided by the disk-array vendor to change the path type betweenprimary and secondaryFor more information about how to use vxdctl, refer to the vxdctl(1M) manual page.136 <strong>VERITAS</strong> <strong>Volume</strong> Manager Administrator’s Guide
Creating and Administering Subdisks 5IntroductionThis chapter describes how to create and maintain subdisks. Subdisks are the low-levelbuilding blocks in a <strong>VERITAS</strong> <strong>Volume</strong> Mananger (VxVM) configuration that are requiredto create plexes and volumes.Note Most VxVM commands require superuser or equivalent privileges.Creating SubdisksNote Subdisks are created automatically if you use the vxassist command or the<strong>VERITAS</strong> Enterprise Administrator (VEA) to create volumes. For more information,see “Creating a <strong>Volume</strong>” on page 159.Use the vxmake command to create VxVM objects, such as subdisks:# vxmake [-g diskgroup] sd subdisk diskname,offset,lengthwhere: subdisk is the name of the subdisk, diskname is the disk name, offset is the startingpoint (offset) of the subdisk within the disk, and length is the length of the subdisk.For example, to create a subdisk named disk02-01 that starts at the beginning of diskdisk02 and has a length of 8000 sectors, use the following command:# vxmake sd disk02-01 disk02,0,8000Note As for all VxVM commands, the default size unit is s, representing a sector. Add asuffix, such as k for kilobyte, m for megabyte or g for gigabyte, to change the unit ofsize. For example, 500m would represent 500 megabytes.If you intend to use the new subdisk to build a volume, you must associate the subdiskwith a plex (see “Associating Subdisks with Plexes” on page 140). Subdisks for all plexlayouts (concatenated, striped, RAID-5) are created the same way.137
Displaying Subdisk InformationDisplaying Subdisk InformationThe vxprint command displays information about VxVM objects. To display generalinformation for all subdisks, use this command:# vxprint -stThe -s option specifies information about subdisks. The -t option prints a single-lineoutput record that depends on the type of object being listed.The following is example output:SD NAME PLEX DISK DISKOFFS LENGTH [COL/]OFF DEVICE MODESV NAME PLEX VOLNAME NVOLLAYR LENGTH [COL/]OFF AM/NM MODEsd disk01-01 vol1-01 disk01 0 102400 0 c0t10d0 ENAsd disk02-01 vol2-01 disk02 0 102400 0 c0t10d0ENAYou can display complete information about a particular subdisk by using this command:# vxprint -l subdiskFor example, the following command displays all information for subdisk disk02-01:# vxprint -l disk02-01This command provides the following output:Disk group: rootdgSubdisk: disk02-01info: disk=disk02 offset=0 len=205632assoc: vol=mvol plex=mvol-02 (offset=0)flags: enableddevice: device=c2t0d1c0t10d0 path=/dev/vx/dmp/c2t0d1c0t10d0diskdev=32/68Moving SubdisksMoving a subdisk copies the disk space contents of a subdisk onto one or more othersubdisks. If the subdisk being moved is associated with a plex, then the data stored on theoriginal subdisk is copied to the new subdisks. The old subdisk is dissociated from theplex, and the new subdisks are associated with the plex. The association is at the sameoffset within the plex as the source subdisk. To move a subdisk, use the followingcommand:# vxsd mv old_subdisk new_subdisk [new_subdisk ...]For example, if disk03 is to be evacuated and disk22 has enough room on two of itssubdisks, use the following command:# vxsd mv disk03-01 disk22-01 disk22-02138 <strong>VERITAS</strong> <strong>Volume</strong> Manager Administrator’s Guide
Splitting SubdisksFor the subdisk move to work correctly, the following conditions must be met:◆◆The subdisks involved must be the same size.The subdisk being moved must be part of an active plex on an active (ENABLED)volume.◆ The new subdisk must not be associated with any other plex.See “Configuring Hot-Relocation to Use Only Spare Disks” on page 236 for informationabout manually relocating subdisks after hot-relocation.Splitting SubdisksSplitting a subdisk divides an existing subdisk into two separate subdisks. To split asubdisk, use the following command:# vxsd –s size split subdisk newsd1 newsd2where subdisk is the name of the original subdisk, newsd1 is the name of the first of thetwo subdisks to be created and newsd2 is the name of the second subdisk to be created.The –s option is required to specify the size of the first of the two subdisks to be created.The second subdisk occupies the remaining space used by the original subdisk.If the original subdisk is associated with a plex before the task, upon completion of thesplit, both of the resulting subdisks are associated with the same plex.To split the original subdisk into more than two subdisks, repeat the previous commandas many times as necessary on the resulting subdisks.For example, to split subdisk disk03-02, with size 2000 megabytes into subdisksdisk03-02, disk03-03, disk03-04 and disk03-05, each with size 500 megabytes,use the following commands:# vxsd -s 1000m split disk03-02 disk03-02 disk03-04# vxsd -s 500m split disk03-02 disk03-02 disk03-03# vxsd -s 500m split disk03-04 disk03-04 disk03-05Joining SubdisksJoining subdisks combines two or more existing subdisks into one subdisk. To joinsubdisks, the subdisks must be contiguous on the same disk. If the selected subdisks areassociated, they must be associated with the same plex, and be contiguous in that plex. Tojoin several subdisks, use the following command:# vxsd join subdisk1 subdisk2 ... new_subdiskChapter 5, Creating and Administering Subdisks139
Associating Subdisks with PlexesFor example, to join the contiguous subdisks disk03-02, disk03-03, disk03-04 anddisk03-05 as subdisk disk03-02, use the following command:# vxsd join disk03-02 disk03-03 disk03-04 disk03-05 disk03-02Associating Subdisks with PlexesAssociating a subdisk with a plex places the amount of disk space defined by the subdiskat a specific offset within the plex. The entire area that the subdisk fills must not beoccupied by any portion of another subdisk. There are several ways that subdisks can beassociated with plexes, depending on the overall state of the configuration.If you have already created all the subdisks needed for a particular plex, to associatesubdisks at plex creation, use the following command:# vxmake plex plex sd=subdisk,...For example, to create the plex home-1 and associates subdisks disk02-01, disk02-00,and disk02-02 with plex home-1, use the following command:# vxmake plex home-1 sd=disk02-01,disk02-00,disk02-02Subdisks are associated in order starting at offset 0. If you use this type of command, youdo not have to specify the multiple commands needed to create the plex and thenassociate each of the subdisks with that plex. In this example, the subdisks are associatedto the plex in the order they are listed (after sd=). The disk space defined as disk02-01 isfirst, disk02-00 is second, and disk02-02 is third. This method of associating subdisksis convenient during initial configuration.Subdisks can also be associated with a plex that already exists. To associate one or moresubdisks with an existing plex, use the following command:# vxsd assoc plex subdisk1 [subdisk2 subdisk3 ...]For example, to associate subdisks named disk02-01, disk02-00, and disk02-02with a plex named home-1, use the following command:# vxsd assoc home-1 disk02-01 disk02-00 disk02-01If the plex is not empty, the new subdisks are added after any subdisks that are alreadyassociated with the plex, unless the -l option is specified with the command. The -loption associates subdisks at a specific offset within the plex.The -l option is required if you previously created a sparse plex (that is, a plex with gapsbetween its subdisks) for a particular volume, and subsequently want to make the plexcomplete. To complete the plex, create a subdisk of a size that fits the hole in the sparseplex exactly. Then, associate the subdisk with the plex by specifying the offset of thebeginning of the hole in the plex, using the following command:# vxsd -l offset assoc sparse_plex exact_size_subdisk140 <strong>VERITAS</strong> <strong>Volume</strong> Manager Administrator’s Guide
Associating Log SubdisksNote The subdisk must be exactly the right size. VxVM does not allow the space definedfor two subdisks to overlap within a plex.For striped or RAID-5 plexes, use the following command to specify a column numberand column offset for the subdisk to be added:# vxsd -l column_#/offset assoc plex subdisk ...If only one number is specified with the -l option for striped plexes, the number isinterpreted as a column number and the subdisk is associated at the end of the column.Alternatively, to add M subdisks at the end of each of the N columns in a striped orRAID-5 volume, you can use the following form of the vxsd command:# vxsd assoc plex subdisk1:0 ... subdiskM:N-1The following example shows how to append three subdisk to the ends of the threecolumns in a striped plex, vol-01# vxsd assoc vol01-01 disk10-01:0 disk11-01:1 disk12-01:2If a subdisk is filling a “hole” in the plex (that is, some portion of the volume logicaladdress space is mapped by the subdisk), the subdisk is considered stale. If the volume isenabled, the association operation regenerates data that belongs on the subdisk.Otherwise, it is marked as stale and is recovered when the volume is started.Associating Log SubdisksLog subdisks are defined and added to a plex that is to become part of a volume on whichdirty region logging (DRL) is enabled. DRL is enabled for a volume when the volume ismirrored and has at least one log subdisk.For a description of DRL, see “Dirty Region Logging (DRL)” on page 40. Log subdisks areignored as far as the usual plex policies are concerned, and are only used to hold the dirtyregion log.Note Only one log subdisk can be associated with a plex. Because this log subdisk isfrequently written, care should be taken to position it on a disk that is not heavilyused. Placing a log subdisk on a heavily-used disk can degrade systemperformance.To add a log subdisk to an existing plex, use the following command:# vxsd aslog plex subdiskwhere subdisk is the name to be used for the log subdisk. The plex must be associatedwith a mirrored volume before dirty region logging takes effect.Chapter 5, Creating and Administering Subdisks141
Dissociating Subdisks from PlexesFor example, to associate a subdisk named disk02-01 with a plex named vol01-02,which is already associated with volume vol01, use the following command:# vxsd aslog vol01-02 disk02-01You can also add a log subdisk to an existing volume with the following command:# vxassist addlog volume diskThis command automatically creates a log subdisk within a log plex on the specified diskfor the specified volume.Dissociating Subdisks from PlexesTo break an established connection between a subdisk and the plex to which it belongs,the subdisk is dissociated from the plex. A subdisk is dissociated when the subdisk isremoved or used in another plex. To dissociate a subdisk, use the following command:# vxsd dis subdiskFor example, to dissociate a subdisk named disk02-01 from the plex with which it iscurrently associated, use the following command:# vxsd dis disk02-01You can additionally remove the dissociated subdisks from VxVM control using thefollowing form of the command:# vxsd -o rm dis subdiskCautionIf the subdisk maps a portion of a volume’s address space, dissociating it placesthe volume in DEGRADED mode. In this case, the dis operation prints awarning and must be forced using the -o force option to succeed. Also, ifremoving the subdisk makes the volume unusable, because another subdisk inthe same stripe is unusable or missing and the volume is not DISABLED andempty, the operation is not allowed.Removing SubdisksTo remove a subdisk, use the following command:# vxedit rm subdiskFor example, to remove a subdisk named disk02-01, use the following command:# vxedit rm disk02-01142 <strong>VERITAS</strong> <strong>Volume</strong> Manager Administrator’s Guide
Changing Subdisk AttributesChanging Subdisk AttributesCautionChange subdisk attributes with extreme care.The vxedit command changes attributes of subdisks and other VxVM objects. To changesubdisk attributes, use the following command:# vxedit set attribute=value ... subdisk ...Subdisk fields that can be changed using the vxedit command include:◆◆◆◆nameputilntutilnlen◆ commentThe putiln field attributes are maintained on reboot; tutiln fields are temporary andare not retained on reboot. VxVM sets the putil0 and tutil0 utility fields. Other<strong>VERITAS</strong> products, such as the <strong>VERITAS</strong> Enterprise Administrator (VEA), set the putil1and tutil1 fields. The putil2 and tutil2 are available for you to use for site-specificpurposes. The length field, len, can only be changed if the subdisk is dissociated.For example, to change the comment field of a subdisk named disk02-01, use thefollowing command:# vxedit set comment=“subdisk comment” disk02-01To prevent a particular subdisk from being associated with a plex, set the putil0 field toa non-null string, as shown in the following command:# vxedit set putil0=”DO-NOT-USE” disk02-01See the vxedit(1M) manual page for more information about using the vxeditcommand to change the attribute fields of VxVM objects.Chapter 5, Creating and Administering Subdisks143
Changing Subdisk Attributes144 <strong>VERITAS</strong> <strong>Volume</strong> Manager Administrator’s Guide
Creating and Administering Plexes 6IntroductionThis chapter describes how to create and maintain plexes. Plexes are logical groupings ofsubdisks that create an area of disk space independent of physical disk size or otherrestrictions. Replication (mirroring) of disk data is set up by creating multiple data plexesfor a single volume. Each data plex in a mirrored volume contains an identical copy of thevolume data. Because each data plex must reside on different disks from the other plexes,the replication provided by mirroring prevents data loss in the event of a single-pointdisk-subsystem failure. Multiple data plexes also provide increased data integrity andreliability.Note Most VxVM commands require superuser or equivalent privileges.Creating PlexesNote Plexes are created automatically if you use the vxassist command or the<strong>VERITAS</strong> Enterprise Administrator (VEA) to create volumes. For more information,see “Creating a <strong>Volume</strong>” on page 159.Use the vxmake command to create VxVM objects, such as plexes. When creating a plex,identify the subdisks that are to be associated with it:To create a plex from existing subdisks, use the following command:# vxmake [-g diskgroup] plex plex sd=subdisk1[,subdisk2,...]For example, to create a concatenated plex named vol01-02 using two existing subdisksnamed disk02-01 and disk02-02, use the following command:# vxmake plex vol01-02 sd=disk02-01,disk02-02145
Creating a Striped PlexCreating a Striped PlexTo create a striped plex, you must specify additional attributes. For example, to create astriped plex named pl-01 with a stripe width of 32 sectors and 2 columns, use thefollowing command:# vxmake plex pl-01 layout=stripe stwidth=32 ncolumn=2 \sd=disk01-01,disk02-01To use a plex to build a volume, you must associate the plex with the volume. For moreinformation, see the section, “Attaching and Associating Plexes” on page 151.Displaying Plex InformationListing plexes helps identify free plexes for building volumes. Use the plex (–p) option tothe vxprint command to list information about all plexes.To display detailed information about all plexes in the system, use the followingcommand:# vxprint -lpTo display detailed information about a specific plex, use the following command:# vxprint -l plexThe –t option prints a single line of information about the plex. To list free plexes, use thefollowing command:# vxprint -ptThe following section describes the meaning of the various plex states that may bedisplayed in the STATE field of vxprint output.Plex StatesPlex states reflect whether or not plexes are complete and are consistent copies (mirrors)of the volume contents. VxVM utilities automatically maintain the plex state. However, ifa volume should not be written to because there are changes to that volume and if a plexis associated with that volume, you can modify the state of the plex. For example, if a diskwith a particular plex located on it begins to fail, you can temporarily disable that plex.Note A plex does not have to be associated with a volume. A plex can be created with thevxmake plex command and be attached to a volume later.146 <strong>VERITAS</strong> <strong>Volume</strong> Manager Administrator’s Guide
Displaying Plex InformationVxVM utilities use plex states to:◆◆◆indicate whether volume contents have been initialized to a known statedetermine if a plex contains a valid copy (mirror) of the volume contentstrack whether a plex was in active use at the time of a system failure◆ monitor operations on plexesThis section explains the individual plex states in detail. For more information about thepossible transitions between plex states and how these are applied during volumerecovery, see the chapter “Understanding the Plex State Cycle” in the section “Recoveryfrom Hardware Failure” in the <strong>VERITAS</strong> <strong>Volume</strong> Manager Troubleshooting Guide.Plexes that are associated with a volume have one of the following states:ACTIVE Plex StateA plex can be in the ACTIVE state in two ways:◆ when the volume is started and the plex fully participates in normal volume I/O (theplex contents change as the contents of the volume change)◆ when the volume is stopped as a result of a system crash and the plex is ACTIVE atthe moment of the crashIn the latter case, a system failure can leave plex contents in an inconsistent state. When avolume is started, VxVM does the recovery action to guarantee that the contents of theplexes marked as ACTIVE are made identical.Note On a system running well, ACTIVE should be the most common state you see forany volume plexes.CLEAN Plex StateA plex is in a CLEAN state when it is known to contain a consistent copy (mirror) of thevolume contents and an operation has disabled the volume. As a result, when all plexes ofa volume are clean, no action is required to guarantee that the plexes are identical whenthat volume is started.DCOSNP Plex StateThis state indicates that a data change object (DCO) plex attached to a volume can be usedby a snapshot plex to create a DCO volume during a snapshot operation.Chapter 6, Creating and Administering Plexes147
Displaying Plex InformationEMPTY Plex State<strong>Volume</strong> creation sets all plexes associated with the volume to the EMPTY state to indicatethat the plex is not yet initialized.IOFAIL Plex StateThe IOFAIL plex state is associated with persistent state logging. When the vxconfigddaemon detects an uncorrectable I/O failure on an ACTIVE plex, it places the plex in theIOFAIL state to exclude it from the recovery selection process at volume start time.This state indicates that the plex is out-of-date with respect to the volume, and that itrequires complete recovery. It is likely that one or more of the disks associated with theplex should be replaced.LOG Plex StateThe state of a dirty region logging (DRL) or RAID-5 log plex is always set to LOG.OFFLINE Plex StateThe vxmend off task indefinitely detaches a plex from a volume by setting the plex stateto OFFLINE. Although the detached plex maintains its association with the volume,changes to the volume do not update the OFFLINE plex. The plex is not updated until theplex is put online and reattached with the vxplex att task. When this occurs, the plex isplaced in the STALE state, which causes its contents to be recovered at the next vxvolstart operation.SNAPATT Plex StateThis state indicates a snapshot plex that is being attached by the snapstart operation.When the attach is complete, the state for the plex is changed to SNAPDONE. If thesystem fails before the attach completes, the plex and all of its subdisks are removed.SNAPDIS Plex StateThis state indicates a snapshot plex that is fully attached. A plex in this state can be turnedinto a snapshot volume with the vxplex snapshot command. If the system fails beforethe attach completes, the plex is dissociated from the volume. See the vxplex(1M)manual page for more information.148 <strong>VERITAS</strong> <strong>Volume</strong> Manager Administrator’s Guide
Displaying Plex InformationSNAPDONE Plex StateThe SNAPDONE plex state indicates that a snapshot plex is ready for a snapshot to betaken using vxassist snapshot.SNAPTMP Plex StateThe SNAPTMP plex state is used during a vxassist snapstart operation when asnapshot is being prepared on a volume.STALE Plex StateIf there is a possibility that a plex does not have the complete and current volumecontents, that plex is placed in the STALE state. Also, if an I/O error occurs on a plex, thekernel stops using and updating the contents of that plex, and the plex state is set toSTALE.A vxplex att operation recovers the contents of a STALE plex from an ACTIVE plex.Atomic copy operations copy the contents of the volume to the STALE plexes. The systemadministrator can force a plex to the STALE state with a vxplex det operation.TEMP Plex StateSetting a plex to the TEMP state eases some plex operations that cannot occur in a trulyatomic fashion. For example, attaching a plex to an enabled volume requires copyingvolume contents to the plex before it can be considered fully attached.A utility sets the plex state to TEMP at the start of such an operation and to an appropriatestate at the end of the operation. If the system fails for any reason, a TEMP plex stateindicates that the operation is incomplete. A later vxvol start dissociates plexes in theTEMP state.TEMPRM Plex StateA TEMPRM plex state is similar to a TEMP state except that at the completion of theoperation, the TEMPRM plex is removed. Some subdisk operations require a temporaryplex. Associating a subdisk with a plex, for example, requires updating the subdisk withthe volume contents before actually associating the subdisk. This update requiresassociating the subdisk with a temporary plex, marked TEMPRM, until the operationcompletes and removes the TEMPRM plex.If the system fails for any reason, the TEMPRM state indicates that the operation did notcomplete successfully. A later operation dissociates and removes TEMPRM plexes.Chapter 6, Creating and Administering Plexes149
Displaying Plex InformationTEMPRMSD Plex StateThe TEMPRMSD plex state is used by vxassist when attaching new data plexes to avolume. If the synchronization operation does not complete, the plex and its subdisks areremoved.Plex Condition Flagsvxprint may also display one of the following condition flags in the STATE field:IOFAIL Plex ConditionThe plex was detached as a result of an I/O failure detected during normal volume I/O.The plex is out-of-date with respect to the volume, and in need of complete recovery.However, this condition also indicates a likelihood that one of the disks in the systemshould be replaced.NODAREC Plex ConditionNo physical disk could be found corresponding to the disk ID in the disk media record forone of the subdisks associated with the plex. The plex cannot be used until the condition isfixed or the affected subdisk is dissociated.NODEVICE Plex ConditionA physical device could not be found corresponding to the disk ID in the disk mediarecord for one of the subdisks associated with the plex. The plex cannot be used until thiscondition is fixed, or the affected subdisk is dissociated.RECOVER Plex ConditionA disk corresponding to one of the disk media records was replaced, or was reattachedtoo late to prevent the plex from becoming out-of-date with respect to the volume. Theplex required complete recovery from another plex in the volume to synchronize itscontents.REMOVED Plex ConditionSet in the disk media record when one of the subdisks associated with the plex isremoved. The plex cannot be used until this condition is fixed, or the affected subdisk isdissociated.150 <strong>VERITAS</strong> <strong>Volume</strong> Manager Administrator’s Guide
Attaching and Associating PlexesPlex Kernel StatesThe plex kernel state indicates the accessibility of the plex to the volume driver whichmonitors it.Note No user intervention is required to set these states; they are maintained internally.On a system that is operating properly, all plexes are enabled.The following plex kernel states are defined:DETACHED Plex Kernel StateMaintenance is being performed on the plex. Any write request to the volume is notreflected in the plex. A read request from the volume is not satisfied from the plex. Plexoperations and ioctl function calls are accepted.DISABLED Plex Kernel StateThe plex is offline and cannot be accessed.ENABLED Plex Kernel StateThe plex is online. A write request to the volume is reflected in the plex. A read requestfrom the volume is satisfied from the plex.Attaching and Associating PlexesA plex becomes a participating plex for a volume by attaching it to a volume. (Attaching aplex associates it with the volume and enables the plex for use.) To attach a plex to anexisting volume, use the following command:# vxplex [-g diskgroup] att volume plexFor example, to attach a plex named vol01-02 to a volume named vol01, use thefollowing command:# vxplex att vol01 vol01-02If the volume does not already exist, a plex (or multiple plexes) can be associated with thevolume when it is created using the following command:# vxmake [-g diskgroup] -U usetype vol volume plex=plex1[,plex2...]Chapter 6, Creating and Administering Plexes151
Taking Plexes OfflineFor example, to create a mirrored, fsgen-type volume named home, and to associate twoexisting plexes named home-1 and home-2 with home, use the following command:# vxmake -U fsgen vol home plex=home-1,home-2Note You can also use the command vxassist mirror volume to add a data plex as amirror to an existing volume.Taking Plexes OfflineOnce a volume has been created and placed online (ENABLED), VxVM can temporarilydisconnect plexes from the volume. This is useful, for example, when the hardware onwhich the plex resides needs repair or when a volume has been left unstartable and asource plex for the volume revive must be chosen manually.Resolving a disk or system failure includes taking a volume offline and attaching anddetaching its plexes. The two commands used to accomplish disk failure resolution arevxmend and vxplex.To take a plex OFFLINE so that repair or maintenance can be performed on the physicaldisk containing subdisks of that plex, use the following command:# vxmend off plexIf a disk has a head crash, put all plexes that have associated subdisks on the affected diskOFFLINE. For example, if plexes vol01-02 and vol02-02 had subdisks on a drive to berepaired, use the following command to take these plexes offline:# vxmend off vol01-02 vol02-02This command places vol01-02 and vol02-02 in the OFFLINE state, and they remainin that state until it is changed. The plexes are not automatically recovered on rebootingthe system.Detaching PlexesTo temporarily detach one data plex in a mirrored volume, use the following command:# vxplex det plexFor example, to temporarily detach a plex named vol01-02 and place it in maintenancemode, use the following command:# vxplex det vol01-02152 <strong>VERITAS</strong> <strong>Volume</strong> Manager Administrator’s Guide
Reattaching PlexesThis command temporarily detaches the plex, but maintains the association between theplex and its volume. However, the plex is not used for I/O. A plex detached with thepreceding command is recovered at system reboot. The plex state is set to STALE, so that ifa vxvol start command is run on the appropriate volume (for example, on systemreboot), the contents of the plex is recovered and made ACTIVE.When the plex is ready to return as an active part of its volume, follow the procedures inthe following section, “Reattaching Plexes.”Reattaching PlexesWhen a disk has been repaired or replaced and is again ready for use, the plexes must beput back online (plex state set to ACTIVE). To set the plexes to ACTIVE, use one of thefollowing procedures depending on the state of the volume.◆◆If the volume is currently ENABLED, use the following command to reattach the plex:# vxplex att volume plex ...For example, for a plex named vol01-02 on a volume named vol01, use thefollowing command:# vxplex att vol01 vol01-02As when returning an OFFLINE plex to ACTIVE, this command starts to recover thecontents of the plex and, after the revive is complete, sets the plex utility state toACTIVE.If the volume is not in use (not ENABLED), use the following command to re-enablethe plex for use:# vxmend on plexFor example, to re-enable a plex named vol01-02, enter:# vxmend on vol01-02In this case, the state of vol01-02 is set to STALE. When the volume is next started,the data on the plex is revived from another plex, and incorporated into the volumewith its state set to ACTIVE.If the vxinfo command shows that the volume is unstartable (see “ListingUnstartable <strong>Volume</strong>s” in the section “Recovery from Hardware Failure” in the<strong>VERITAS</strong> <strong>Volume</strong> Manager Troubleshooting Guide), set one of the plexes to CLEAN usingthe following command:# vxmend fix clean plexStart the volume using the following command:# vxvol start volumeChapter 6, Creating and Administering Plexes153
Moving PlexesMoving PlexesMoving a plex copies the data content from the original plex onto a new plex. To move aplex, use the following command:# vxplex mv original_plex new_plexFor a move task to be successful, the following criteria must be met:◆◆The old plex must be an active part of an active (ENABLED) volume.The new plex must be at least the same size or larger than the old plex.◆ The new plex must not be associated with another volume.The size of the plex has several implications:◆ If the new plex is smaller or more sparse than the original plex, an incomplete copy ismade of the data on the original plex. If an incomplete copy is desired, use the -oforce option to vxplex.◆◆If the new plex is longer or less sparse than the original plex, the data that exists onthe original plex is copied onto the new plex. Any area that is not on the original plex,but is represented on the new plex, is filled from other complete plexes associatedwith the same volume.If the new plex is longer than the volume itself, then the remaining area of the newplex above the size of the volume is not initialized and remains unused.Copying PlexesThis task copies the contents of a volume onto a specified plex. The volume to be copiedmust not be enabled. The plex cannot be associated with any other volume. To copy aplex, use the following command:# vxplex cp volume new_plexAfter the copy task is complete, new_plex is not associated with the specified volumevolume. The plex contains a complete copy of the volume data. The plex that is beingcopied should be the same size or larger than the volume. If the plex being copied is largerthan the volume, an incomplete copy of the data results. For the same reason, new_plexshould not be sparse.154 <strong>VERITAS</strong> <strong>Volume</strong> Manager Administrator’s Guide
Dissociating and Removing PlexesDissociating and Removing PlexesWhen a plex is no longer needed, you can dissociate it from its volume and remove it asan object from VxVM. You might want to remove a plex for the following reasons:◆◆◆◆to provide free disk spaceto reduce the number of mirrors in a volume so you can increase the length of anothermirror and its associated volume. When the plexes and subdisks are removed, theresulting space can be added to other volumesto remove a temporary mirror that was created to back up a volume and is no longerneededto change the layout of a plexCautionTo save the data on a plex to be removed, the configuration of that plex must beknown. Parameters from that configuration (stripe unit size and subdiskordering) are critical to the creation of a new plex to contain the same data.Before a plex is removed, you must record its configuration. See “DisplayingPlex Information” on page 146” for more information.To dissociate a plex from the associated volume and remove it as an object from VxVM,use the following command:# vxplex -o rm dis plexFor example, to dissociate and remove a plex named vol01-02, use the followingcommand:# vxplex -o rm dis vol01-02This command removes the plex vol01-02 and all associated subdisks.Alternatively, you can first dissociate the plex and subdisks, and then remove them withthe following commands:# vxplex dis plex# vxedit -r rm plexWhen used together, these commands produce the same result as the vxplex -o rmdis command. The -r option to vxedit rm recursively removes all objects from thespecified object downward. In this way, a plex and its associated subdisks can be removedby a single vxedit command.Chapter 6, Creating and Administering Plexes155
Changing Plex AttributesChanging Plex AttributesCautionChange plex attributes with extreme care.The vxedit command changes the attributes of plexes and other volume Managerobjects. To change plex attributes, use the following command:# vxedit set attribute=value ... plexPlex fields that can be changed using the vxedit command include:◆◆◆nameputilntutiln◆ commentThe putiln field attributes are maintained on reboot; tutiln fields are temporary andare not retained on reboot. VxVM sets the putil0 and tutil0 utility fields. Other<strong>VERITAS</strong> products, such as the <strong>VERITAS</strong> Enterprise Administrator (VEA), set the putil1and tutil1 fields. The putil2 and tutil2 are available for you to use for site-specificpurposes.The following example command sets the comment field, and also sets tutil2 to indicatethat the subdisk is in use:# vxedit set comment=”plex comment” tutil2=”u” vol01-02To prevent a particular plex from being associated with a volume, set the putil0 field toa non-null string, as shown in the following command:# vxedit set putil0=”DO-NOT-USE” vol01-02See the vxedit(1M) manual page for more information about using the vxeditcommand to change the attribute fields of VxVM objects.156 <strong>VERITAS</strong> <strong>Volume</strong> Manager Administrator’s Guide
Creating <strong>Volume</strong>s 7IntroductionThis chapter describes how to create volumes in <strong>VERITAS</strong> <strong>Volume</strong> Manager (VxVM).<strong>Volume</strong>s are logical devices that appear as physical disk partition devices to datamanagement systems. <strong>Volume</strong>s enhance recovery from hardware failure, data availability,performance, and storage configuration.<strong>Volume</strong>s are created to take advantage of the VxVM concept of virtual disks. A file systemcan be placed on the volume to organize the disk space with files and directories. Inaddition, you can configure applications such as databases to organize data on volumes.Note Disks and disk groups must be initialized and defined to VxVM before volumes canbe created from them. See “Administering Disks” on page 53 and “Creating andAdministering Disk Groups” on page 107 for more information.Types of <strong>Volume</strong> LayoutsVxVM allows you to create volumes with the following layout types:◆◆Concatenated—A volume whose subdisks are arranged both sequentially andcontiguously within a plex. Concatenation allows a volume to be created frommultiple regions of one or more disks if there is not enough space for an entire volumeon a single region of a disk. For more information, see “Concatenation and Spanning”on page 15.Striped—A volume with data spread evenly across multiple disks. Stripes areequal-sized fragments that are allocated alternately and evenly to the subdisks of asingle plex. There must be at least two subdisks in a striped plex, each of which mustexist on a different disk. Throughput increases with the number of disks across whicha plex is striped. Striping helps to balance I/O load in cases where high traffic areasexist on certain subdisks. For more information, see “Striping (RAID-0)” on page 17.157
Types of <strong>Volume</strong> Layouts◆◆◆◆Mirrored—A volume with multiple data plexes that duplicate the informationcontained in a volume. Although a volume can have a single data plex, at least twoare required for true mirroring to provide redundancy of data. For the redundancy tobe useful, each of these data plexes should contain disk space from different disks. Formore information, see “Mirroring (RAID-1)” on page 21.RAID-5—A volume that uses striping to spread data and parity evenly acrossmultiple disks in an array. Each stripe contains a parity stripe unit and data stripeunits. Parity can be used to reconstruct data if one of the disks fails. In comparison tothe performance of striped volumes, write throughput of RAID-5 volumes decreasessince parity information needs to be updated each time data is accessed. However, incomparison to mirroring, the use of parity to implement data redundancy reduces theamount of space required. For more information, see “RAID-5 (Striping with Parity)”on page 25.Mirrored-stripe—A volume that is configured as a striped plex and another plex thatmirrors the striped one. This requires at least two disks for striping and one or moreother disks for mirroring (depending on whether the plex is simple or striped). Theadvantages of this layout are increased performance by spreading data acrossmultiple disks and redundancy of data. “Striping Plus Mirroring (Mirrored-Stripe orRAID-0+1)” on page 21.Layered <strong>Volume</strong>—A volume constructed from other volumes. Non-layered volumesare constructed by mapping their subdisks to VM disks. Layered volumes areconstructed by mapping their subdisks to underlying volumes (known as storagevolumes), and allow the creation of more complex forms of logical layout. For moreinformation, see “Layered <strong>Volume</strong>s” on page 30.Examples of layered volumes are striped-mirror and concatenated-mirror volumes.Note The <strong>VERITAS</strong> Enterprise Administrator (VEA) terms a striped-mirror volume asStriped-Pro, and a concatenated- mirror volume as Concatenated-Pro.A striped-mirror volume is created by configuring several mirrored volumes as thecolumns of a striped volume. This layout offers the same benefits as a non-layeredmirrored-stripe volume. In addition it provides faster recovery as the failure of singledisk does not force an entire striped plex offline. For more information, see “MirroringPlus Striping (Striped-Mirror, RAID-1+0 or RAID-10)” on page 22.A concatenated-mirror volume is created by concatenating several mirrored volumes.This provides faster recovery as the failure of a single disk does not force the entiremirror offline.158 <strong>VERITAS</strong> <strong>Volume</strong> Manager Administrator’s Guide
Creating a <strong>Volume</strong>Creating a <strong>Volume</strong>You can create volumes using either an advanced approach or an assisted approach. Eachmethod uses different tools although you may switch from one set to another at will.Note Most VxVM commands require superuser or equivalent privileges.Advanced ApproachThe advanced approach consists of a number of commands that typically require you tospecify detailed input. These commands use a “building block” approach that requiresyou to have a detailed knowledge of the underlying structure and components tomanually perform the commands necessary to accomplish a certain task. Advancedoperations are performed using several different VxVM commands.The steps to create a volume using this approach are:1. Create subdisks using vxmake sd; see “Creating Subdisks” on page 137.2. Create plexes using vxmake plex, and associate subdisks with them; see “CreatingPlexes” on page 145, “Associating Subdisks with Plexes” on page 140 and “Creating a<strong>Volume</strong> Using vxmake” on page 176.3. Associate plexes with the volume using vxmake vol; see “Creating a <strong>Volume</strong> Usingvxmake” on page 176.4. Initialize the volume using vxvol start or vxvol init zero; see “Initializing andStarting a <strong>Volume</strong>” on page 179.See “Creating a <strong>Volume</strong> Using a vxmake Description File” on page 178 for an example ofhow you can combine steps 1 through 3 using a volume description file with vxmake.See “Creating a <strong>Volume</strong> Using vxmake” on page 176 for an example of how to performsteps 2 and 3 to create a RAID-5 volume.Assisted ApproachThe assisted approach takes information about what you want to accomplish and thenperforms the necessary underlying tasks. This approach requires only minimal input fromyou, but also permits more detailed specifications.Chapter 7, Creating <strong>Volume</strong>s159
Using vxassistAssisted operations are performed primarily through the vxassist command or the<strong>VERITAS</strong> Enterprise Administrator (VEA). vxassist and the VEA create the requiredplexes and subdisks using only the basic attributes of the desired volume as input.Additionally, they can modify existing volumes while automatically modifying anyunderlying or associated objects.Both vxassist and the VEA use default values for many volume attributes, unless youprovide specific values. They do not require you to have a thorough understanding oflow-level VxVM concepts. vxassist and the VEA do not conflict with other VxVMcommands or preclude their use. Objects created by vxassist and the VEA arecompatible and inter-operable with objects created by other VxVM commands andinterfaces.For more information about the VEA, see the <strong>VERITAS</strong> <strong>Volume</strong> Manager (UNIX) User’sGuide — VEA.Using vxassistYou can use the vxassist command to create and modify volumes. Specify the basicrequirements for volume creation or modification, and vxassist performs the necessarytasks.The advantages of using vxassist rather than the advanced approach include:◆◆Most actions require that you enter only one command rather than several.You are required to specify only minimal information to vxassist. If necessary, youcan specify additional parameters to modify or control its actions.◆ Operations result in a set of configuration changes that either succeed or fail as agroup, rather than individually. System crashes or other interruptions do not leaveintermediate states that you have to clean up. If vxassist finds an error or anexceptional condition, it exits after leaving the system in the same state as it was priorto the attempted operation.vxassist helps you perform the following tasks:◆◆◆◆◆Creating volumes.Creating mirrors for existing volumes.Growing or shrinking existing volumes.Backing up volumes online.Reconfiguring a volume’s layout online.vxassist obtains most of the information it needs from sources other than your input.vxassist obtains information about the existing objects and their layouts from theobjects themselves.160 <strong>VERITAS</strong> <strong>Volume</strong> Manager Administrator’s Guide
Using vxassistFor tasks requiring new disk space, vxassist seeks out available disk space andallocates it in the configuration that conforms to the layout specifications and that offersthe best use of free space.The vxassist command takes this form:# vxassist [options] keyword volume [attributes...]where keyword selects the task to perform. The first argument after a vxassist keyword,volume, is a volume name, which is followed by a set of desired volume attributes. Forexample, the keyword make allows you to create a new volume:# vxassist [options] make volume length [attributes]The length of the volume can be specified in sectors, kilobytes, megabytes, or gigabytesusing a suffix character of s, k, m,org. If no suffix is specified, the size is assumed to be insectors. See the vxintro(1M) manual page for more information on specifying units.Additional attributes can be specified as appropriate, depending on the characteristicsthat you wish the volume to have. Examples are stripe unit width, number of columns in aRAID-5 or stripe volume, number of mirrors, number of logs, and log type.Note By default, the vxassist command creates volumes in the rootdg disk group. Touse a different disk group, specify the -g diskgroup option to vxassist.For details of available vxassist keywords and attributes, refer to the vxassist(1M)manual page.The section, “Creating a <strong>Volume</strong> on Any Disk” on page 163 describes the simplest way tocreate a volume with default attributes. Later sections describe how to create volumeswith specific attributes. For example, “Creating a <strong>Volume</strong> on Specific Disks” on page 164describes how to control how vxassist uses the available storage space.Setting Default Values for vxassistThe default values that the vxassist command uses may be specified in the file/etc/default/vxassist. The defaults listed in this file take effect if you do notoverride them on the command line, or in an alternate defaults file that you specify usingthe -d option. A default value specified on the command line always takes precedence.vxassist also has a set of built-in defaults that it uses if it cannot find a value definedelsewhere.Note You must create the /etc/default directory and the vxassist default file ifthese do not already exist on your system.Chapter 7, Creating <strong>Volume</strong>s161
Using vxassistThe format of entries in a defaults file is a list of attribute-value pairs separated by newlines. These attribute-value pairs are the same as those specified as options on thevxassist command line. Refer to the vxassist(1M) manual page for details.To display the default attributes held in the file /etc/default/vxassist, use thefollowing form of the vxassist command:# vxassist help showattrsThe following is a sample vxassist defaults file:# By default:# create unmirrored, unstriped volumes# allow allocations to span drives# with RAID-5 create a log, with mirroring don’t create a log# align allocations on cylinder boundarieslayout=nomirror,nostripe,span,nocontig,raid5log,noregionlog,diskalign# use the fsgen usage type, except when creating RAID-5 volumesusetype=fsgen# allow only root access to a volumemode=u=rw,g=,o=user=rootgroup=root# when mirroring, create two mirrorsnmirror=2# for regular striping, by default create between 2 and 8 stripe# columnsmax_nstripe=8min_nstripe=2# for RAID-5, by default create between 3 and 8 stripe columnsmax_nraid5stripe=8min_nraid5stripe=3# by default, create 1 log copy for both mirroring and RAID-5 volumesnregionlog=1nraid5log=1# by default, limit mirroring log lengths to 32Kbytesmax_regionloglen=32k# use 64K as the default stripe unit size for regular volumesstripe_stwid=64k# use 16K as the default stripe unit size for RAID-5 volumesraid5_stwid=16k162 <strong>VERITAS</strong> <strong>Volume</strong> Manager Administrator’s Guide
Discovering the Maximum Size of a <strong>Volume</strong>Discovering the Maximum Size of a <strong>Volume</strong>To find out how large a volume you can create within a disk group, use the following formof the vxassist command:# vxassist [-g diskgroup] maxsize layout=layout [attributes]For example, to discover the maximum size RAID-5 volume with 5 columns and 2 logsthat you can create within the disk group dgrp, enter the following command:# vxassist -g dgrp maxsize layout=raid5 nlog=2You can use storage attributes if you want to restrict the disks that vxassist uses whencreating volumes. See “Creating a <strong>Volume</strong> on Specific Disks” on page 164 for moreinformation.Creating a <strong>Volume</strong> on Any DiskBy default, the vxassist make command creates a concatenated volume that uses one ormore sections of disk space. On a fragmented disk, this allows you to put together avolume larger than any individual section of free disk space available.Note To change the default layout, edit the definition of the layout attribute defined inthe /etc/default/vxassist file.If there is not enough space on a single disk, vxassist creates a spanned volume. Aspanned volume is a concatenated volume with sections of disk space spread across morethan one disk. A spanned volume can be larger than any disk on a system, since it takesspace from more than one disk.To create a concatenated, default volume, use the following form of the vxassistcommand:# vxassist [-b] [-g diskgroup] make volume lengthNote Specify the -b option if you want to make the volume immediately available foruse. See “Initializing and Starting a <strong>Volume</strong>” on page 179 for details.For example, to create the concatenated volume voldefault with a length of 10gigabytes in the rootdg disk group:# vxassist -b make voldefault 10gChapter 7, Creating <strong>Volume</strong>s163
Creating a <strong>Volume</strong> on Specific DisksCreating a <strong>Volume</strong> on Specific DisksVxVM automatically selects the disks on which each volume resides, unless you specifyotherwise. If you want a volume to be created on specific disks, you must designate thosedisks to VxVM. More than one disk can be specified.To create a volume on a specific disk or disks, use the following command:# vxassist [-b] [-g diskgroup] make volume length [layout=layout] \diskname ...Note Specify the -b option if you want to make the volume immediately available foruse. See “Initializing and Starting a <strong>Volume</strong>” on page 179 for details.For example, to create the volume volspec with length 5 gigabytes on disk03 anddisk04, use the following command:# vxassist -b make volspec 5g disk03 disk04The vxassist command allows you to specify storage attributes. These give you finecontrol over the devices, including disks, controllers and targets, which vxassist uses toconfigure a volume. For example, you can specifically exclude disk05:# vxassist -b make volspec 5g !disk05or exclude all disks that are on controller c2:# vxassist -b make volspec 5g !ctlr:c2or include only disks on controller c1 except for target t5:# vxassist -b make volspec 5g ctlr:c1 !target:c1t5If you want a volume to be created using only disks from a specific disk group, use the -goption to vxassist, for example:# vxassist -b -g bigone make volmega 20g disk10 disk11or alternatively, use the diskgroup attribute:# vxassist -b make volmega 20g diskgroup=bigone disk10 disk11Note Any storage attributes that you specify for use must belong to the disk group.Otherwise, vxassist will not use them to create a volume.You can also use storage attributes to control how vxassist uses available storage, forexample, when calculating the maximum size of a volume, when growing a volume orwhen removing mirrors or logs from a volume. The following example excludes disksdisk07 and disk08 when calculating the maximum size of RAID-5 volume thatvxassist can create using the disks in the disk group dg:# vxassist -b -g dgrp maxsize layout=raid5 nlog=2 !disk07 !disk08164 <strong>VERITAS</strong> <strong>Volume</strong> Manager Administrator’s Guide
Creating a <strong>Volume</strong> on Specific DisksSee the vxassist(1M) manual page for more information about using storage attributes.It is also possible to control how volumes are laid out on the specified storage as describedin the next section “Specifying Ordered Allocation of <strong>Storage</strong> to <strong>Volume</strong>s.”Specifying Ordered Allocation of <strong>Storage</strong> to <strong>Volume</strong>sIf you specify the -o ordered option to vxassist when creating a volume, any storagethat you also specify is allocated in the following order:1. Concatenate disks.2. Form columns.3. Form mirrors.For example, the following command creates a mirrored-stripe volume with 3 columnsand 2 mirrors on 6 disks:# vxassist -b -o ordered make mirstrvol 10g layout=mirror-stripe \ncol=3 disk01 disk02 disk03 disk04 disk05 disk06This command places columns 1, 2 and 3 of the first mirror on disk01, disk02 anddisk03 respectively, and columns 1, 2 and 3 of the second mirror on disk04, disk05and disk06 respectively. This arrangement is illustrated in “Example of Using OrderedAllocation to Create a Mirrored-Stripe <strong>Volume</strong>.”Example of Using Ordered Allocation to Create a Mirrored-Stripe <strong>Volume</strong>Column 1 Column 2 Column 3disk01-01 disk02-01 disk03-01Striped PlexMirrorColumn 1 Column 2 Column 3disk04-01 disk05-01 disk06-01Striped PlexMirrored-Stripe<strong>Volume</strong>For layered volumes, vxassist applies the same rules to allocate storage as fornon-layered volumes. For example, the following command creates a striped-mirrorvolume with 2 columns:# vxassist -b -o ordered make strmirvol 10g layout=stripe-mirror \ncol=2 disk01 disk02 disk03 disk04Chapter 7, Creating <strong>Volume</strong>s165
Creating a <strong>Volume</strong> on Specific DisksThis command mirrors column 1 across disk01 and disk03, and column 2 acrossdisk02 and disk04 as illustrated in “Example of using Ordered Allocation to Create aStriped-Mirror <strong>Volume</strong>” on page 166.Example of using Ordered Allocation to Create a Striped-Mirror <strong>Volume</strong>Underlying Mirrored <strong>Volume</strong>sColumn 1disk01-01Column 1disk03-01Column 2disk02-01Column 2disk04-01MirrorStriped PlexStriped-Mirror <strong>Volume</strong>Additionally, you can use the col_switch attribute to specify how to concatenate spaceon the disks into columns. For example, the following command creates a mirrored-stripevolume with 2 columns:# vxassist -b -o ordered make strmir2vol 10g layout=mirror-stripe \ncol=2 col_switch=3g,2g disk01 disk02 disk03 disk04 \disk05 disk06 disk07 disk08This command allocates 3 gigabytes from disk01 and 2 gigabytes from disk02 tocolumn 1, and 3 gigabytes from disk03 and 2 gigabytes from disk04 to column 2. Themirrors of these columns are then similarly formed from disks disk05 through disk08.This arrangement is illustrated in “Example of Using Concatenated Disk Space to Create aMirrored-Stripe <strong>Volume</strong>.”Example of Using Concatenated Disk Space to Create a Mirrored-Stripe <strong>Volume</strong>Column 1disk01-01disk02-01Column 1disk05-01disk06-01Column 2disk03-01disk04-01Column 2disk07-01disk08-01Striped PlexMirrorStriped PlexMirrored-Stripe <strong>Volume</strong>166 <strong>VERITAS</strong> <strong>Volume</strong> Manager Administrator’s Guide
Creating a <strong>Volume</strong> on Specific DisksOther storage specification classes, such as those for controllers, enclosures, targets andtrays, can be used with ordered allocation. For example, the following command creates a3-column mirrored-stripe volume between specified controllers:# vxassist -b -o ordered make mirstr2vol 80g layout=mirror-stripe \ncol=3 ctlr:c1 ctlr:c2 ctlr:c3 ctlr:c4 ctlr:c5 \ctlr:c6This command allocates space for column 1 from disks on controllers c1, for column 2from disks on controller c2, and so on as illustrated in“Example of <strong>Storage</strong> AllocationUsed to Create a Mirrored-Stripe <strong>Volume</strong> Across Controllers.”Example of <strong>Storage</strong> Allocation Used to Create a Mirrored-Stripe <strong>Volume</strong> Across Controllersc1 c2 c3ControllersColumn 1 Column 2 Column 3Striped PlexMirrorColumn 1 Column 2 Column 3Striped PlexMirrored-Stripe<strong>Volume</strong>c4 c5 c6ControllersFor other ways in which you can control how vxassist lays out mirrored volumesacross controllers, see “Mirroring across Targets, Controllers or Enclosures” on page 173.Chapter 7, Creating <strong>Volume</strong>s167
Creating a Mirrored <strong>Volume</strong>Creating a Mirrored <strong>Volume</strong>A mirrored volume provides data redundancy by containing more than one copy of itsdata. Each copy (or mirror) is stored on different disks from the original copy of thevolume and from other mirrors. Mirroring a volume ensures that its data is not lost if adisk in one of its component mirrors fails.Note A mirrored volume requires space to be available on at least as many disks in thedisk group as the number of mirrors in the volume.To create a new mirrored volume, use the following command:# vxassist [-b] [-g diskgroup] make volume length layout=mirror \[nmirror=number] [init=active]Note Specify the -b option if you want to make the volume immediately available foruse. See “Initializing and Starting a <strong>Volume</strong>” on page 179 for details.For example, to create the mirrored volume, volmir, use the following command:# vxassist -b make volmir 5g layout=mirrorTo create a volume with 3 instead of the default of 2 mirrors, modify the command toread:# vxassist -b make volmir 5g layout=mirror nmirror=3Creating a Mirrored-Concatenated <strong>Volume</strong>A mirrored-concatenated volume mirrors several concatenated plexes. To create aconcatenated-mirror volume, use the following command:# vxassist [-b] [-g diskgroup] make volume length \layout=mirror-concat [nmirror=number]Note Specify the -b option if you want to make the volume immediately available foruse. See “Initializing and Starting a <strong>Volume</strong>” on page 179 for details.Alternatively, first create a concatenated volume, and then mirror it as described in“Adding a Mirror to a <strong>Volume</strong>” on page 189.168 <strong>VERITAS</strong> <strong>Volume</strong> Manager Administrator’s Guide
Creating a Mirrored <strong>Volume</strong>Creating a Concatenated-Mirror <strong>Volume</strong>Note You may need an additional license to use this feature.A concatenated-mirror volume is an example of a layered volume which concatenatesseveral underlying mirror volumes. To create a concatenated-mirror volume, use thefollowing command:# vxassist [-b] [-g diskgroup] make volume length \layout=concat-mirror [nmirror=number]Note Specify the -b option if you want to make the volume immediately available foruse. See “Initializing and Starting a <strong>Volume</strong>” on page 179 for details.Creating a <strong>Volume</strong> with a DCO and DCO <strong>Volume</strong>If a data change object (DCO) and DCO volume are associated with a volume, this allowsPersistent FastResync to be used with the volume. (See “How Persistent FastResyncWorks with Snapshots” on page 45 for details of how Persistent FastResync performs fastresynchronization of snapshot mirrors when they are returned to their original volume.)To perform fast resynchronization of mirrors after a system crash or reboot, you must alsoenable dirty region logging (DRL) on a mirrored volume. To add a DCO object and DCOvolume to a volume on which DRL logging is enabled, follow the procedure described in“Adding a DCO and DCO <strong>Volume</strong>” on page 191.Note You may need an additional license to use the Persistent FastResync feature. Even ifyou do not have a license, you can configure a DCO object and DCO volume so thatsnap objects are associated with the original and snapshot volumes. For moreinformation about snap objects, see “How Persistent FastResync Works withSnapshots” on page 45.Dirty region logging (DRL) is the default log type if you specify the log attribute toenable logging on a mirrored volume, but do not use the logtype attribute to specify thetype of logging to vxassist.Note Only one type of logging may initially be specified when you use vxassist tocreate a volume.Chapter 7, Creating <strong>Volume</strong>s169
Creating a Mirrored <strong>Volume</strong>To create a volume with an attached DCO object and DCO volume, use the followingprocedure:1. Ensure that the disk group has been upgraded to at least version 90. Use the followingcommand to check the version of a disk group:# vxdg list diskgroupTo upgrade a disk group to the latest version, use the following command:# vxdg upgrade diskgroupFor more information, see “Upgrading a Disk Group” on page 132.2. Use the following command to create the volume (you may need to specify additionalattributes to create a volume with the desired characteristics):# vxassist [-g diskgroup] make volume length layout=layout \logtype=dco [ndcomirror=number] [dcolen=size] [fastresync=on]For non-layered volumes, the default number of plexes in the mirrored DCO volumeis equal to the lesser of the number of plexes in the data volume or 2. For layeredvolumes, the default number of DCO plexes is always 2. If required, use thendcomirror attribute to specify a different number. It is recommended that youconfigure as many DCO plexes as there are data plexes in the volume. For example,specify ndcomirror=3 when creating a 3-way mirrored volume.The default size of each plex is 132 blocks unless you use the dcolen attribute tospecify a different size. If specified, the size of the plex must be a multiple of 33 blocksfrom 33 up to a maximum of 2112 blocks.By default, FastResync is not enabled on newly created volumes. Specify thefastresync=on attribute if you want to also enable FastResync on the volume. If aDCO object and DCO volume are associated with the volume, Persistent FastResyncis enabled; otherwise, Non-Persistent FastResync is enabled.For more information about configuring DCO, see the vxassist(1M) manual page.Creating a Mirrored <strong>Volume</strong> with DRL Logging EnabledTo create a mirrored volume with dirty region logging (DRL) enabled, use this command:# vxassist [-g diskgroup] make volume length layout=mirror \logtype=drlNote By default, the vxassist command creates one log plex for a mirrored volume.170 <strong>VERITAS</strong> <strong>Volume</strong> Manager Administrator’s Guide
Creating a Striped <strong>Volume</strong>For a volume that will be written to sequentially, such as a database log volume, use thefollowing command to specify that sequential DRL is to be used:# vxassist [-g diskgroup] make volume length layout=mirror \logtype=drlseqTo add DRL logging to a volume that has DCO enabled, or to change the number of DRLlogs, follow the procedure that is described in “Adding DRL Logging to a Mirrored<strong>Volume</strong>” on page 195.If you use ordered allocation when creating a mirrored volume on specified storage, youcan use the optional logdisk attribute to specify on which disks the log plexes should becreated. Use the following form of the vxassist command to specify the disks fromwhich space for the logs is to be allocated:# vxassist [-g diskgroup] -o ordered make volume length \layout=mirror logtype=log_type logdisk=disk[,disk,...] \storage_attributesIf you do not specify the logdisk attribute, vxassist locates the logs in the data plexesof the volume.For more information about ordered allocation, see “Specifying Ordered Allocation of<strong>Storage</strong> to <strong>Volume</strong>s” on page 165 and the vxassist(1M) manual page.Creating a Striped <strong>Volume</strong>Note You may need an additional license to use this feature.A striped volume contains at least one plex that consists of two or more subdisks locatedon two or more physical disks. For more information on striping, see “Striping (RAID-0)”on page 17.Note A striped volume requires space to be available on at least as many disks in the diskgroup as the number of columns in the volume.To create a striped volume, use the following command:# vxassist [-b] [-g diskgroup] make volume length layout=stripeNote Specify the -b option if you want to make the volume immediately available foruse. See “Initializing and Starting a <strong>Volume</strong>” on page 179 for details.For example, to create the 10-gigabyte striped volume volzebra, use the followingcommand:# vxassist -b make volzebra 10g layout=stripeChapter 7, Creating <strong>Volume</strong>s171
Creating a Striped <strong>Volume</strong>This creates a striped volume with the default stripe unit size (64 kilobytes) and thedefault number of stripes (2).You can specify the disks on which the volumes are to be created by including the disknames on the command line. For example, to create a 30-gigabyte striped volume on threespecific disks, disk03, disk04, and disk05, use the following command:# vxassist -b make stripevol 30g layout=stripe disk03 disk04 disk05To change the default number of columns from 2, or the stripe width from 64 kilobytes,use the ncolumn and stripeunit modifiers with vxassist. For example, thefollowing command creates a striped volume with 5 columns and a 32-kilobyte stripe size:# vxassist -b make stripevol 30g layout=stripe stripeunit=32k \ncol=5Creating a Mirrored-Stripe <strong>Volume</strong>A mirrored-stripe volume mirrors several striped data plexes.Note A mirrored-stripe volume requires space to be available on at least as many disks inthe disk group as the number of mirrors multiplied by the number of columns in thevolume.To create a striped-mirror volume, use the following command:# vxassist [-b] [-g diskgroup] make volume lengthlayout=mirror-stripe [nmirror=number_mirrors] \[ncol=number_columns] [stripewidth=size]Note Specify the -b option if you want to make the volume immediately available foruse. See “Initializing and Starting a <strong>Volume</strong>” on page 179 for details.Alternatively, first create a striped volume, and then mirror it as described in “Adding aMirror to a <strong>Volume</strong>” on page 189. In this case, the additional data plexes may be eitherstriped or concatenated.172 <strong>VERITAS</strong> <strong>Volume</strong> Manager Administrator’s Guide
Creating a Striped-Mirror <strong>Volume</strong>Mirroring across Targets, Controllers or EnclosuresA striped-mirror volume is an example of a layered volume which stripes severalunderlying mirror volumes.Note A striped-mirror volume requires space to be available on at least as many disks inthe disk group as the number of columns multiplied by the number of stripes in thevolume.To create a striped-mirror volume, use the following command:# vxassist [-b] [-g diskgroup] make volume length \layout=stripe-mirror [nmirror=number_mirrors] \[ncol=number_columns] [stripewidth=size]Note Specify the -b option if you want to make the volume immediately available foruse. See “Initializing and Starting a <strong>Volume</strong>” on page 179 for details.By default, VxVM attempts to create the underlying volumes by mirroring subdisksrather than columns if the size of each column is greater than the value for the attributestripe-mirror-col-split-trigger-pt that is defined in the vxassist defaultsfile.If there are multiple subdisks per column, you can choose to mirror each subdiskindividually instead of each column. To mirror at the subdisk level, specify the layout asstripe-mirror-sd rather than stripe-mirror. To mirror at the column level, specifythe layout as stripe-mirror-col rather than stripe-mirror.Mirroring across Targets, Controllers or EnclosuresTo create a volume whose mirrored data plexes lie on different controllers, you can useeither of the following commands:# vxassist [-b] [-g diskgroup] make volume length layout=layout \mirror=target [attributes]# vxassist [-b] [-g diskgroup] make volume length layout=layout \mirror=ctlr [attributes]The attribute mirror=target specifies that volumes should be mirrored betweenidentical target IDs on different controllers.The attribute mirror=ctlr specifies that disks in one mirror should not be on the samecontroller as disks in other mirrors within the same volume.Chapter 7, Creating <strong>Volume</strong>s173
Creating a RAID-5 <strong>Volume</strong>Note Specify the -b option if you want to make the volume immediately available foruse. See “Initializing and Starting a <strong>Volume</strong>” on page 179 for details.Both paths of an active/passive array are not considered to be on differentcontrollers when mirroring across controllers.The following command creates a mirrored volume with two data plexes:# vxassist -b make volspec 10g layout=mirror nmirror=2 \mirror=ctlr ctlr:c2 ctlr:c3The disks in one data plex are all attached to controller c2, and the disks in the other dataplex are all attached to controller c3. This arrangement ensures continued availability ofthe volume should either controller fail.The attribute mirror=enclr specifies that disks in one mirror should not be in the sameenclosure as disks in other mirrors within the same volume.The following command creates a mirrored volume with two data plexes:# vxassist -b make volspec 10g layout=mirror nmirror=2 \mirror=enclr enclr:enc1 enclr:enc2The disks in one data plex are all taken from enclosure enc1, and the disks in the otherdata plex are all taken from enclosure enc2. This arrangement ensures continuedavailability of the volume should either enclosure become unavailable.See “Specifying Ordered Allocation of <strong>Storage</strong> to <strong>Volume</strong>s” on page 165 for a descriptionof other ways in which you can control how volumes are laid out on the specified storage.Creating a RAID-5 <strong>Volume</strong>Note VxVM supports this feature for private disk groups, but not for shareable diskgroups in a cluster environment.Note You may need an additional license to use this feature.You can create RAID-5 volumes by using either the vxassist command (recommended)or the vxmake command. Both approaches are described below.Note A RAID-5 volume requires space to be available on at least as many disks in thedisk group as the number of columns in the volume. Additional disks may berequired for any RAID-5 logs that are created.174 <strong>VERITAS</strong> <strong>Volume</strong> Manager Administrator’s Guide
Creating a RAID-5 <strong>Volume</strong>A RAID-5 volume contains a RAID-5 data plex that consists of three or more subdiskslocated on three or more physical disks. Only one RAID-5 data plex can exist per volume.A RAID-5 volume can also contain one or more RAID-5 log plexes, which are used to loginformation about data and parity being written to the volume. For more information onRAID-5 volumes, see “RAID-5 (Striping with Parity)” on page 25.CautionDo not create a RAID-5 volume with more than 8 columns because the volumewill be unrecoverable in the event of the failure of more than one disk.To create a RAID-5 volume, use the following command:# vxassist [-b] [-g diskgroup] make volume length layout=raid5 \[ncol=number_columns] [stripewidth=size] [nlog=number] \[loglen=log_length]Note Specify the -b option if you want to make the volume immediately available foruse. See “Initializing and Starting a <strong>Volume</strong>” on page 179 for details.For example, to create the RAID-5 volume volraid together with 2 RAID-5 logs, use thefollowing command:# vxassist -b make volraid 10g layout=raid5 nlog=2This creates a RAID-5 volume with the default stripe unit size on the default number ofdisks. It also creates two RAID-5 logs rather than the default of one log.Note If you require RAID-5 logs, you must use the logdisk attribute to specify the disksto be used for the log plexes.RAID-5 logs can be concatenated or striped plexes, and each RAID-5 log associated with aRAID-5 volume has a complete copy of the logging information for the volume. Tosupport concurrent access to the RAID-5 array, the log should be several times the stripesize of the RAID-5 plex.It is suggested that you configure a minimum of two RAID-5 log plexes for each RAID-5volume. These log plexes should be located on different disks. Having two RAID-5 logplexes for each RAID-5 volume protects against the loss of logging information due to thefailure of a single disk.If you use ordered allocation when creating a RAID-5 volume on specified storage, youmust use the logdisk attribute to specify on which disks the RAID-5 log plexes shouldbe created. Use the following form of the vxassist command to specify the disks fromwhich space for the logs is to be allocated:# vxassist [-b] [-g diskgroup] -o ordered make volume length \layout=raid5 [ncol=number_columns] [nlog=number] \[loglen=log_length] logdisk=disk[,disk,...] storage_attributesChapter 7, Creating <strong>Volume</strong>s175
Creating a <strong>Volume</strong> Using vxmakeFor example, the following command creates a 3-column RAID-5 volume with the defaultstripe unit size on disks disk04, disk05 and disk06. It also creates two RAID-5 logs ondisks disk07 and disk08.# vxassist -b make volraid 10g layout=raid5 ncol=3 nlog=2 \logdisk=disk07,disk08 disk04 disk05 disk06Note The number of logs must equal the number of disks specified to logdisk.For more information about ordered allocation, see “Specifying Ordered Allocation of<strong>Storage</strong> to <strong>Volume</strong>s” on page 165 and the vxassist(1M) manual page.If you need to add more logs to a RAID-5 volume at a later date, follow the proceduredescribed in “Adding a RAID-5 Log” on page 196.Creating a <strong>Volume</strong> Using vxmakeAs an alternative to using vxassist, you can create a volume using the vxmakecommand to arrange existing subdisks into plexes, and then to form these plexes into avolume. Subdisks can be created using the method described in “Creating Subdisks” onpage 137. The example given in this section is to create a RAID-5 volume using vxmake.Creating a RAID-5 plex for a RAID-5 volume is similar to creating striped plexes, exceptthat the layout attribute is set to raid5. Subdisks can be implicitly associated in thesame way as with striped plexes. For example, to create a four-column RAID-5 plex with astripe unit size of 32 sectors, use the following command:# vxmake plex raidplex layout=raid5 stwidth=32 \sd=disk00-01,disk01-00,disk02-00,disk03-00Note that because four subdisks are specified, but the number of columns is not specified,the vxmake command assumes a four-column RAID-5 plex and places one subdisk ineach column. Striped plexes are created using the same method except that the layout isspecified as stripe. If the subdisks are to be created and added later, use the followingcommand to create the plex:# vxmake plex raidplex layout=raid5 ncolumn=4 stwidth=32Note If no subdisks are specified, the ncolumn attribute must be specified. Subdisks canbe added to the plex later using the vxsd assoc command (see “AssociatingSubdisks with Plexes” on page 140).176 <strong>VERITAS</strong> <strong>Volume</strong> Manager Administrator’s Guide
Creating a <strong>Volume</strong> Using vxmakeIf each column in a RAID-5 plex is to be created from multiple subdisks which may spanseveral physical disks, you can specify to which column each subdisk should be added.For example, to create a three-column RAID-5 plex using six subdisks, use the followingform of the vxmake command:# vxmake plex raidplex layout=raid5 stwidth=32 \sd=disk00-00:0,disk01-00:1,disk02-00:2,disk03-00:0, \disk04-00:1,disk05-00:2This command stacks subdisks disk00-00 and disk03-00 consecutively in column 0,subdisks disk01-00 and disk04-00 consecutively in column 1, and subdisksdisk02-00 and disk05-00 in column 2. Offsets can also be specified to create sparseRAID-5 plexes, as for striped plexes.Log plexes may be created as default concatenated plexes by not specifying a layout, forexample:# vxmake plex raidlog1 disk06-00# vxmake plex raidlog2 disk07-00To create a RAID-5 volume, specify the usage type to be RAID-5 using the followingcommand:# vxmake -Uraid5 vol raidvolRAID-5 plexes and RAID-5 log plexes are associated with the volume raidvol using thefollowing command:# vxmake -Uraid5 vol raidvol plex=raidplex,raidlog1,raidlog2Note Each RAID-5 volume has one RAID-5 plex where the data and parity are stored.Any other plexes associated with the volume are used as RAID-5 log plexes to loginformation about data and parity being written to the volume.After creating a volume using vxmake, you must initialize it before it can be used. Theprocedure is described in “Initializing and Starting a <strong>Volume</strong>” on page 179.Chapter 7, Creating <strong>Volume</strong>s177
Creating a <strong>Volume</strong> Using vxmakeCreating a <strong>Volume</strong> Using a vxmake Description FileYou can use the vxmake command to add a new volume, plex or subdisk to the set ofobjects managed by VxVM. vxmake adds a record for each new object to the VxVMconfiguration database. You can create records either by specifying parameters to vxmakeon the command line, or by using a file which contains plain-text descriptions of theobjects. The file can also contain commands for performing a list of tasks. Use thefollowing form of the command to have vxmake read the file from the standard input:# vxmake < description_fileAlternatively, you can specify the file to vxmake using the -d option:# vxmake -d description_fileThe following sample description file defines a volume, db, with two plexes:#rectyp #name #optionssd disk3-01 disk=disk3 offset=0 len=10000sd disk3-02 disk=disk3 offset=25000 len=10480sd disk4-01 disk=disk4 offset=0 len=8000sd disk4-02 disk=disk4 offset=15000 len=8000sd disk4-03 disk=disk4 offset=30000 len=4480plex db-01 layout=STRIPE ncolumn=2 stwidth=16ksd=disk3-01:0/0,disk3-02:0/10000,disk4-01:1/0,disk4-02:1/8000,disk4-03:1/16000sd ramd1-01 disk=ramd1 len=640comment=”Hot spot for dbvolplex db-02 sd=ramd1-01:40320vol db usetype=gen plex=db-01,db-02readpol=prefer prefname=db-02comment=”Uses mem1 for hot spot in last 5mThe first plex, db-01, is striped and has five subdisks on two physical disks, disk3 anddisk4. The second plex, db-02, is the preferred plex in the mirror, and has one subdisk,ramd1-01, on a volatile memory disk.For detailed information about how to use vxmake, refer to the vxmake(1M) manualpage.After creating a volume using vxmake, you must initialize it before it can be used. Theprocedure is described in the following section, “Initializing and Starting a <strong>Volume</strong>.”178 <strong>VERITAS</strong> <strong>Volume</strong> Manager Administrator’s Guide
Initializing and Starting a <strong>Volume</strong>Initializing and Starting a <strong>Volume</strong>A volume must be initialized if it was created by the vxmake command and has not yetbeen initialized, or if the volume has been set to an uninitialized state.Note If you create a volume using the vxassist command, vxassist initializes andstarts the volume automatically unless you specify the attribute init=none.To initialize and start a volume, use the following command:# vxvol start volumeWhen creating a volume, you can make it immediately available for use by specifying the-b option to the vxassist command, as shown here:# vxassist -b make volume length layout=mirrorThe -b option makes VxVM carry out any required initialization as a background task. Italso greatly speeds up the creation of striped volumes by initializing the columns inparallel.As an alternative to the -b option, you can specify the init=active attribute to make anew volume immediately available for use. In this example, init=active is specified toprevent VxVM from synchronizing the empty data plexes of a new mirrored volume:# vxassist make volume length layout=mirror init=activeCautionThere is a very small risk of errors occurring when the init=active attributeis used. Although written blocks are guaranteed to be consistent, read errorscan arise in the unlikely event that fsck attempts to verify uninitialized spacein the file system, or if a file remains unitialized following a system crash. If indoubt, use the -b option to vxassist instead.The following command can be used to enable a volume without initializing it:# vxvol init enable volumeThis allows you to restore data on the volume from a backup before using the followingcommand to make the volume fully active:# vxvol init active volumeIf you want to zero out the contents of an entire volume, use this command to initialize it:# vxvol init zero volumeChapter 7, Creating <strong>Volume</strong>s179
Accessing a <strong>Volume</strong>This command writes zeroes to the entire length of the volume and to any log plexes. Itthen makes the volume active. You can also zero out a volume by specifying the attributeinit=zero to vxassist, as shown in this example:# vxassist make volume length layout=raid5 init=zeroNote You cannot use the -b option to make this operation a background task.Accessing a <strong>Volume</strong>As soon as a volume has been created and initialized, it is available for use as a virtualdisk partition by the operating system for the creation of a file system, or by applicationprograms such as relational databases and other data management software.Creating a volume in the disk group rootdg sets up block and character (raw) device filesthat can be used to access the volume:/dev/vx/dsk/volume—block device file for volume/dev/vx/rdsk/volume—character device file for volumeFor volumes in disk groups other than rootdg, the pathnames include a directory namedfor the disk group:/dev/vx/dsk/diskgroup/volume—block device file for volume/dev/vx/rdsk/diskgroup/volume—character device file for volumeUse the appropriate device node to create, mount and repair file systems, and to lay outdatabases that require raw partitions.180 <strong>VERITAS</strong> <strong>Volume</strong> Manager Administrator’s Guide
Administering <strong>Volume</strong>s 8IntroductionThis chapter describes how to perform common maintenance tasks on volumes in<strong>VERITAS</strong> <strong>Volume</strong> Manager (VxVM). This includes displaying volume information,monitoring tasks, adding and removing logs, resizing volumes, removing mirrors,removing volumes, backing up volumes using mirrors and snapshots, and changing thelayout of volumes without taking them offline.Note Most VxVM commands require superuser or equivalent privileges.Displaying <strong>Volume</strong> InformationYou can use the vxprint command to display information about how a volume isconfigured.To display the volume, plex, and subdisk record information for all volumes in thesystem, use the following command:# vxprint -htThe following is example output from the vxprint command:Disk group: rootdgDG NAME NCONFIG NLOG MINORS GROUP-IDDM NAME DEVICE TYPE PRIVLEN PUBLEN STATEV NAME USETYPE KSTATE STATE LENGTH READPOL PREFPLEXPL NAME VOLUME KSTATE STATE LENGTH LAYOUT NCOL/WID MODESD NAME PLEX DISK DISKOFFS LENGTH [COL/]OFF DEVICE MODEdm disk11 c1t0d0 sliced 559 1044400 -dm disk12 c1t1d0 sliced 559 1044400 -v pubs fsgen ENABLED ACTIVE 2288 SELECT -pl pubs-01 pubs ENABLED ACTIVE 2288 CONCAT - RWsd disk11-01 pubs-01 disk11 0 2288 0 c1t0d0 ENA181
Displaying <strong>Volume</strong> Informationv voldef sgen ENABLED ACTIVE 20480 SELECT -pl voldef-01 voldef ENABLED ACTIVE 20480 CONCAT - RWsd disk12-02 voldef-0disk12 2288 20480 0 c1t1d0 ENAwhere dg is a disk group, dm is a disk, v is a volume, pl is a plex, and sd is a subdisk. Thetop few lines indicate the headers that match each type of output line that follows. Eachvolume is listed along with its associated plexes and subdisks.To display volume-related information for a specific volume, use the following command:# vxprint -t volumeFor example, to display information about the voldef volume, use the followingcommand:# vxprint -t voldefThis is example output from this command:Disk group: rootdgV NAME USETYPE KSTATE STATE LENGTH READPOL PREFPLEXv voldef fsgen ENABLED ACTIVE 20480 SELECT -Note If you enable enclosure-based naming, and use the vxprint command to displaythe structure of a volume, it shows enclosure-based disk device names (disk accessnames) rather than c#t#d# names. See “Using vxprint with Enclosure-Based DiskNames” on page 62 for information on how to obtain the true device names.The following section describes the meaning of the various volume states that may bedisplayed.<strong>Volume</strong> StatesThe following volume states may be displayed by VxVM commands such as vxprint:ACTIVE <strong>Volume</strong> StateThe volume has been started (kernel state is currently ENABLED) or was in use (kernelstate was ENABLED) when the machine was rebooted. If the volume is currentlyENABLED, the state of its plexes at any moment is not certain (since the volume is in use).If the volume is currently DISABLED, this means that the plexes cannot be guaranteed tobe consistent, but are made consistent when the volume is started.For a RAID-5 volume, if the volume is currently DISABLED, parity cannot be guaranteedto be synchronized.182 <strong>VERITAS</strong> <strong>Volume</strong> Manager Administrator’s Guide
Displaying <strong>Volume</strong> InformationCLEAN <strong>Volume</strong> StateThe volume is not started (kernel state is DISABLED) and its plexes are synchronized. Fora RAID-5 volume, its plex stripes are consistent and its parity is good.EMPTY <strong>Volume</strong> StateThe volume contents are not initialized. The kernel state is always DISABLED when thevolume is EMPTY.NEEDSYNC <strong>Volume</strong> StateThe volume requires a resynchronization operation the next time it is started. For aRAID-5 volume, a parity resynchronization operation is required.REPLAY <strong>Volume</strong> StateThe volume is in a transient state as part of a log replay. A log replay occurs when itbecomes necessary to use logged parity and data. This state is only applied to RAID-5volumes.SYNC <strong>Volume</strong> StateThe volume is either in read-writeback recovery mode (kernel state is currentlyENABLED) or was in read-writeback mode when the machine was rebooted (kernel stateis DISABLED). With read-writeback recovery, plex consistency is recovered by readingdata from blocks of one plex and writing the data to all other writable plexes. If thevolume is ENABLED, this means that the plexes are being resynchronized through theread-writeback recovery. If the volume is DISABLED, it means that the plexes were beingresynchronized through read-writeback when the machine rebooted and therefore stillneed to be synchronized.For a RAID-5 volume, the volume is either undergoing a parity resynchronization (kernelstate is currently ENABLED) or was having its parity resynchronized when the machinewas rebooted (kernel state is DISABLED).Note The interpretation of these flags during volume startup is modified by the persistentstate log for the volume (for example, the DIRTY/CLEAN flag). If the clean flag isset, an ACTIVE volume was not written to by any processes or was not even open atthe time of the reboot; therefore, it can be considered CLEAN. The clean flag isalways set in any case where the volume is marked CLEAN.Chapter 8, Administering <strong>Volume</strong>s183
Displaying <strong>Volume</strong> Information<strong>Volume</strong> Kernel StatesThe volume kernel state indicates the accessibility of the volume. The volume kernel stateallows a volume to have an offline (DISABLED), maintenance (DETACHED), or online(ENABLED) mode of operation.Note No user intervention is required to set these states; they are maintained internally.On a system that is operating properly, all volumes are enabled.The following volume kernel states are defined:DETACHED <strong>Volume</strong> Kernel StateMaintenance is being performed on the volume. The volume cannot be read or written,but plex device operations and ioctl function calls are accepted.DISABLED <strong>Volume</strong> Kernel StateThe volume is offline and cannot be accessed.ENABLED <strong>Volume</strong> Kernel StateThe volume is online and can be read from or written to.184 <strong>VERITAS</strong> <strong>Volume</strong> Manager Administrator’s Guide
Monitoring and Controlling TasksMonitoring and Controlling TasksNote VxVM supports this feature for private disk groups, but not for shareable diskgroups in a cluster environment.The VxVM task monitor tracks the progress of system recovery by monitoring taskcreation, maintenance, and completion. The task monitor allows you to monitor taskprogress and to modify characteristics of tasks, such as pausing and recovery rate (forexample, to reduce the impact on system performance).Specifying Task TagsEvery task is given a unique task identifier. This is a numeric identifier for the task that canbe specified to the vxtask utility to specifically identify a single task. Several VxVMutilities also provide a -t option to specify an alphanumeric tag of up to 16 characters inlength. This allows you to group several tasks by associating them with the same tag.The following utilities allow you to specify a tag using the -t option:vxassist, vxevac, vxplex, vxreattach, vxrecover, vxresize, vxsd, and vxvolFor example, to execute a vxrecover command and track all the resulting tasks as agroup with the task tag myrecovery, use the following command:# vxrecover -t myrecovery -b disk05Any tasks started by the utilities invoked by vxrecover also inherit its task ID and tasktag, so establishing a parent-child task relationship.For more information about the utilities that support task tagging, see their respectivemanual pages.Managing Tasks with vxtaskNote New tasks take time to be set up, and so may not be immediately available for useafter a command is invoked. Any script that operates on tasks may need to poll forthe existence of a new task.You can use the vxtask command to administer operations on VxVM tasks that arerunning on the system. Operations include listing tasks, modifying the state of a task(pausing, resuming, aborting) and modifying the rate of progress of a task. For detailedinformation about how to use vxtask, refer to the vxtask(1M) manual page.Chapter 8, Administering <strong>Volume</strong>s185
Monitoring and Controlling TasksVxVM tasks represent long-term operations in progress on the system. Every task givesinformation on the time the operation started, the size and progress of the operation, andthe state and rate of progress of the operation. The administrator can change the state of atask, giving coarse-grained control over the progress of the operation. For thoseoperations that support it, the rate of progress of the task can be changed, giving morefine-grained control over the task.vxtask OperationsThe vxtask command supports the following operations:abort Causes the specified task to cease operation. In most cases, the operations“back out” as if an I/O error occurred, reversing what has been done so far tothe largest extent possible.list Lists tasks running on the system in one-line summaries. The -l option printstasks in long format. The -h option prints tasks hierarchically, with childtasks following the parent tasks. By default, all tasks running on the systemare printed. If a taskid argument is supplied, the output is limited to thosetasks whose taskid or task tag match taskid. The remaining arguments areused to filter tasks and limit the tasks actually listed.monitor Prints information continuously about a task or group of tasks as taskinformation changes. This allows you to track the progression of tasks.Specifying -l causes a long listing to be printed. By default, short one-linelistings are printed. In addition to printing task information when a task statechanges, output is also generated when the task completes. When this occurs,the state of the task is printed as EXITED.pause Puts a running task in the paused state, causing it to suspend operation.resume Causes a paused task to continue operation.set Changes modifiable parameters of a task. Currently, there is only onemodifiable parameter, slow[=iodelay], which can be used to reduce theimpact that copy operations have on system performance. If slow isspecified, this introduces a delay between such operations with a defaultvalue for iodelay of 250 milliseconds. The larger the value of iodelay that isspecified, the slower is the progress of the task and the fewer systemresources that it consumes in a given time. (The slow attribute is alsoaccepted by the vxplex, vxvol and vxrecover commands.)186 <strong>VERITAS</strong> <strong>Volume</strong> Manager Administrator’s Guide
Stopping a <strong>Volume</strong>vxtask UsageTo list all tasks currently running on the system, use the following command:# vxtask listTo print tasks hierarchically, with child tasks following the parent tasks, us the -h option,as follows:# vxtask -h listTo trace all tasks in the disk group foodg that are currently paused, as well as any taskswith the tag sysstart, use the following command:# vxtask -G foodg -p -i sysstart listUse the vxtask -p list command lists all paused tasks, and use vxtask resume tocontinue execution (the task may be specified by its ID or by its tag):# vxtask -p list# vxtask resume 167To monitor all tasks with the tag myoperation, use the following command:# vxtask monitor myoperationTo cause all tasks tagged with recovall to exit, use the following command:# vxtask abort recovallThis command causes VxVM to attempt to reverse the progress of the operation so far. Foran example of how to use vxtask to monitor and modify the progress of the OnlineRelayout feature, see “Controlling the Progress of a Relayout” on page 221.Stopping a <strong>Volume</strong>Stopping a volume renders it unavailable to the user, and changes the volume state fromENABLED or DETACHED to DISABLED. If the volume cannot be disabled, it remains inits current state. To stop a volume, use the following command:# vxvol stop volume ...For example, to stop a volume named vol01, use the following command:# vxvol stop vol01To stop all ENABLED volumes, use the following command:# vxvol stopallTo stop all ENABLED volumes in a specified disk group, use the following command:# vxvol -g diskgroup stopallChapter 8, Administering <strong>Volume</strong>s187
Starting a <strong>Volume</strong>Putting a <strong>Volume</strong> in Maintenance ModeIf all mirrors of a volume become STALE, you can place the volume in maintenance mode.Then you can view the plexes while the volume is DETACHED and determine which plexto use for reviving the others. To place a volume in maintenance mode, use the followingcommand:# vxvol maint volumeTo assist in choosing the revival source plex, use vxprint to list the stopped volume andits plexes.To take a plex (in this example, vol01-02) offline, use the following command:# vxmend off vol01-02The vxmend on command can change the state of an OFFLINE plex of a DISABLEDvolume to STALE. For example, to put a plex named vol01-02 in the STALE state, usethe following command:# vxmend on vol01-02Running the vxvol start command on the volume then revives the plex as described inthe next section.Starting a <strong>Volume</strong>Starting a volume makes it available for use, and changes the volume state fromDISABLED or DETACHED to ENABLED. To start a DISABLED or DETACHED volume,use the following command:# vxvol -g diskgroup start volume ...If a volume cannot be enabled, it remains in its current state.To start all DISABLED or DETACHED volumes in a disk group, enter:# vxvol -g diskgroup startallAlternatively, to start a DISABLED volume, use the following command:# vxrecover -g diskgroup -s volume ...To start all DISABLED volumes, enter:# vxrecover -sTo prevent any recovery operations from being performed on the volumes, additionallyspecify the -n option to vxrecover.188 <strong>VERITAS</strong> <strong>Volume</strong> Manager Administrator’s Guide
Adding a Mirror to a <strong>Volume</strong>Adding a Mirror to a <strong>Volume</strong>A mirror can be added to an existing volume with the vxassist command, as follows:# vxassist [-b] [-g diskgroup] mirror volumeNote If specified, the -b option makes synchronizing the new mirror a background task.For example, to create a mirror of the volume voltest, use the following command:# vxassist -b mirror voltestAnother way to mirror an existing volume is by first creating a plex, and then attaching itto a volume, using the following commands:# vxmake plex plex sd=subdisk ...# vxplex att volume plexMirroring All <strong>Volume</strong>sTo mirror all volumes in a disk group to available disk space, use the following command:# /etc/vx/bin/vxmirror -g diskgroup -aTo configure VxVM to create mirrored volumes by default, use the following command:# /etc/vx/bin/vxmirror -d yesIf you make this change, you can still make unmirrored volumes by specifyingnmirror=1 as an attribute to the vxassist command. For example, to create anunmirrored 20-gigabyte volume named nomirror, use the following command:# vxassist make nomirror 20g nmirror=1Mirroring <strong>Volume</strong>s on a VM DiskMirroring volumes on a VM disk gives you one or more copies of your volumes inanother disk location. By creating mirror copies of your volumes, you protect your systemagainst loss of data in case of a disk failure.Note This task only mirrors concatenated volumes. <strong>Volume</strong>s that are already mirrored orthat contain subdisks that reside on multiple disks are ignored.Chapter 8, Administering <strong>Volume</strong>s189
Adding a Mirror to a <strong>Volume</strong>To mirror volumes on a disk, make sure that the target disk has an equal or greateramount of space as the originating disk and then do the following:1. Select menu item 5 (Mirror volumes on a disk) from the vxdiskadm mainmenu.2. At the following prompt, enter the disk name of the disk that you wish to mirror:Mirror volumes on a diskMenu: <strong>Volume</strong>Manager/Disk/MirrorThis operation can be used to mirror volumes on a disk. Thesevolumes can be mirrored onto another disk or onto anyavailable disk space. <strong>Volume</strong>s will not be mirrored if they arealready mirrored. Also, volumes that are comprised of more thanone subdisk will not be mirrored.Enter disk name [,list,q,?] disk023. At the following prompt, enter the target disk name (this disk must be the same sizeor larger than the originating disk):You can choose to mirror volumes from disk disk02 onto anyavailable disk space, or you can choose to mirror onto aspecific disk. To mirror to a specific disk, select the name ofthat disk. To mirror to any available disk space, select "any".Enter destination disk [,list,q,?] (default: any) disk014. At the following prompt, press Return to make the mirror:The requested operation is to mirror all volumes on disk disk02in disk group rootdg onto available disk space on disk disk01.NOTE: This operation can take a long time to complete.Continue with operation? [y,n,q,?] (default: y)The vxdiskadm program displays the status of the mirroringoperation, as follows:Mirror volume voltest-bk00 ...Mirroring of disk disk01 is complete.5. At the following prompt, indicate whether you want to mirror volumes on anotherdisk (y) or return to the vxdiskadm main menu (n):Mirror volumes on another disk? [y,n,q,?] (default: n)190 <strong>VERITAS</strong> <strong>Volume</strong> Manager Administrator’s Guide
Removing a MirrorRemoving a MirrorWhen a mirror is no longer needed, you can remove it to free up disk space.Note The last valid plex associated with a volume cannot be removed.To remove a mirror from a volume, use the following command:# vxassist remove mirror volumeAdditionally, you can use storage attributes to specify the storage to be removed. Forexample, to remove a mirror on disk disk01, from volume vol01, enter:# vxassist remove mirror vol01 !disk01For more information about storage attributes, see “Creating a <strong>Volume</strong> on Specific Disks”on page 164.Alternatively, use the following command to dissociate and remove a mirror from avolume:# vxplex -o rm dis plexFor example, to dissociate and remove a mirror named vol01-02, use the followingcommand:# vxplex -o rm dis vol01-02This command removes the mirror vol01-02 and all associated subdisks. This isequivalent to entering the following separate commands:# vxplex dis vol01-02# vxedit -r rm vol01-02Adding a DCO and DCO <strong>Volume</strong>CautionIf the existing volume was created before release 3.2 of VxVM, and it has anyattached snapshot plexes or it is associated with any snapshot volumes, followthe procedure given in “Enabling Persistent FastResync on Existing <strong>Volume</strong>swith Associated Snapshots” on page 207. The procedure given in this section isfor existing volumes without existing snapshot plexes or associated snapshotvolumes.To put Persistent FastResync into effect for a volume, a Data Change Object (DCO) andDCO volume must first be associated with that volume. When you have added a DCOobject and DCO volume to a volume, you can then enable Persistent FastResync on thevolume as described in “Enabling FastResync on a <strong>Volume</strong>” on page 205.Chapter 8, Administering <strong>Volume</strong>s191
Adding a DCO and DCO <strong>Volume</strong>Note You may need an additional license to use the Persistent FastResync feature. Even ifyou do not have a license, you can configure a DCO object and DCO volume so thatsnap objects are associated with the original and snapshot volumes. For moreinformation about snap objects, see “How Persistent FastResync Works withSnapshots” on page 45.To add a DCO object and DCO volume to an existing volume (which may already havedirty region logging (DRL) enabled), use the following procedure:1. Ensure that the disk group containing the existing volume has been upgraded to atleast version 90. Use the following command to check the version of a disk group:# vxdg list diskgroupTo upgrade a disk group to the latest version, use the following command:# vxdg upgrade diskgroupFor more information, see “Upgrading a Disk Group” on page 132.2. Use the following command to turn off Non-Persistent FastResync on the originalvolume if it is currently enabled:# vxvol [-g diskgroup] set fastresync=off volumeIf you are uncertain about which volumes have Non-Persistent FastResync enabled,use the following command to obtain a listing of such volumes:# vxprint [-g diskgroup] -F “%name” \-e “v_fastresync=on && !v_hasdcolog”3. Use the following command to add a DCO and DCO volume to the existing volume:# vxassist [-g diskgroup[ addlog volume logtype=dco \[ndcomirror=number] [dcolen=size] [storage_attributes]For non-layered volumes, the default number of plexes in the mirrored DCO volumeis equal to the lesser of the number of plexes in the data volume or 2. For layeredvolumes, the default number of DCO plexes is always 2. If required, use thendcomirror attribute to specify a different number. It is recommended that youconfigure as many DCO plexes as there are existing data and snapshot plexes in thevolume. For example, specify ndcomirror=3 when adding a DCO to a 3-waymirrored volume.The default size of each plex is 132 blocks. You can use the dcolen attribute to specifya different size. If specified, the size of the plex must be a integer multiple of 33 blocksfrom 33 up to a maximum of 2112 blocks.192 <strong>VERITAS</strong> <strong>Volume</strong> Manager Administrator’s Guide
Adding a DCO and DCO <strong>Volume</strong>To view the details of the DCO object and DCO volume that are associated with a volume,use the vxprint command. The following is example vxprint output for the volumenamed zoo (the TUTIL0 and PUTIL0 columns are omitted for clarity):TY NAME ASSOC KSTATE LENGTH PLOFFS STATE ...v zoo fsgen ENABLED 1024 - ACTIVEpl zoo-01 zoo ENABLED 1024 - ACTIVEsd c1t66d0-02 zoo-01 ENABLED 1024 0 -pl foo-02 zoo ENABLED 1024 - ACTIVEsd c1t67d0-02 zoo-02 ENABLED 1024 0 -dc zoo_dco zoo - - - -v zoo_dcl gen ENABLED 132 - ACTIVEpl zoo_dcl-01 zoo_dcl ENABLED 132 - ACTIVEsd c1t66d0-01 zoo_dcl-01 ENABLED 132 0 -pl zoo_dcl-02 zoo_dcl ENABLED 132 - ACTIVEsd c1t67d0-01 zoo_dcl-02 ENABLED 132 0 -In this output, the DCO object is shown as zoo_dco, and the DCO volume as zoo_dclwith 2 plexes, zoo_dcl-01 and zoo_dcl-02.For more information, see the vxassist(1M) manual page.Attaching a DCO and DCO volume to a RAID-5 <strong>Volume</strong>The procedure in the previous section can be used to add a DCO and DCO volume to aRAID-5 volume. This allows you to enable Persistent FastResync on the volume for fastresynchronization of snapshots on snapback (see “Enabling FastResync on a <strong>Volume</strong>” onpage 205). However, the procedure has the side effect of converting the RAID-5 volumeinto a special type of layered volume. You cannot relayout or resize such a volume unlessyou convert it back to a pure RAID-5 volume. To do this, remove any snapshot plexesfrom the volume, and dissociate the DCO and DCO volume from the layered volumeusing the procedure described in “Removing a DCO and DCO <strong>Volume</strong>” on page 194. Youcan then perform relayout and resize operations on the resulting non-layered RAID-5volume.To allow Persistent FastResync to be used with the RAID-5 volume again, re-associate theDCO and DCO volume as described in “Reattaching a DCO and DCO <strong>Volume</strong>” onpage 195.Note Dissociating a DCO and DCO volume disables Persistent FastResync on thevolume. A full resynchronization of any remaining snapshots is required when theyare snapped back.Chapter 8, Administering <strong>Volume</strong>s193
Removing a DCO and DCO <strong>Volume</strong>Specifying <strong>Storage</strong> for DCO PlexesIf the disks that contain volumes and their snapshots are to be moved or split intodifferent disk groups, the disks that contain their respective DCO plexes must be able toaccompany them. By default, VxVM attempts to place the DCO plexes on the same disksas the data plexes of the parent volume. However, this may be impossible if there isinsufficient space available on those disks. In this case, VxVM uses any available space onother disks in the disk group. If the DCO plexes are placed on disks which are used tohold the plexes of other volumes, this may cause problems when you subsequentlyattempt to move volumes into other disk groups.You can use storage attributes to specify explicitly which disks to use for the DCO plexes.If possible, specify the same disks as those on which the volume is configured. Forexample, to add a DCO object and DCO volume with plexes on disk5 and disk6, and aplex size of 264 blocks to the volume, myvol, use the following command:# vxassist -g mydg addlog myvol logtype=dco dcolen=264 \disk5 disk6If required, you can use the vxassist move command to relocate DCO plexes todifferent disks. For example, the following command moves the plexes of the DCOvolume for volume vol1 from disk3 and disk4 to disk7 and disk8:# vxassist -g mydg move vol1_dcl !disk3 !disk4 disk7 disk8For more information, see “Considerations for Placing DCO Plexes” on page 125.Removing a DCO and DCO <strong>Volume</strong>To dissociate a DCO object, DCO volume and any snap objects from a volume, use thefollowing command:# vxassist [-g diskgroup] remove log volume logtype=dcoThis completely removes the DCO object, DCO volume and any snap objects. It also hasthe effect of disabling FastResync for the volume.Alternatively, you can use the vxdco command to the same effect:# vxdco [-g diskgroup] [-o rm] dis dco_objThe default name of the DCO object, dco_obj, for a volume is usually formed byappending the string _dco to the name of the parent volume. To find out the name of theassociated DCO object, use the vxprint command on the volume.To dissociate, but not remove, the DCO object, DCO volume and any snap objects fromthe volume, myvol, in the disk group, mydg, use the following command:# vxdco -g mydg dis myvol_dco194 <strong>VERITAS</strong> <strong>Volume</strong> Manager Administrator’s Guide
Reattaching a DCO and DCO <strong>Volume</strong>This form of the command dissociates the DCO object from the volume but does notdestroy it or the DCO volume. If the -o rm option is specified, the DCO object, DCOvolume and its plexes, and any snap objects are also removed.Note Dissociating a DCO and DCO volume disables Persistent FastResync on thevolume. A full resynchronization of any remaining snapshots is required when theyare snapped back.For more information, see the vxassist(1M) and vxdco(1M) manual pages.Reattaching a DCO and DCO <strong>Volume</strong>If the DCO object and DCO volume are not removed by specifying the -o rm option tovxdco, they can be reattached to the parent volume using the following command:# vxdco [-g diskgroup] att volume dco_objFor example, to reattach the DCO object, myvol_dco, to the volume, myvol, use thefollowing command:# vxdco -g mydg att myvol myvol_dcoFor more information, see the vxdco(1M) manual page.Adding DRL Logging to a Mirrored <strong>Volume</strong>To put dirty region logging (DRL) into effect for a mirrored volume, a log subdisk must beadded to that volume. Only one log subdisk can exist per plex.To add DRL logs to an existing volume, use the following command:# vxassist [-b] addlog volume logtype=drl [nlog=n]Note If specified, the -b option makes adding the new logs a background task.The nlog attribute can be used to specify the number of log plexes to add. By default, onelog plex is added. For example, to add a single log plex for the volume vol03, use thefollowing command:# vxassist addlog vol03 logtype=drlWhen the vxassist command is used to add a log subdisk to a volume, by default a logplex is also created to contain the log subdisk unless you include the keyword nolog inthe layout specification.Chapter 8, Administering <strong>Volume</strong>s195
Removing a DRL LogFor a volume that will be written to sequentially, such as a database log volume, includethe logtype=drlseq attribute to specify that sequential DRL is to be used:# vxassist addlog volume logtype=drlseq [nlog=n]Once created, the plex containing a log subdisk can be treated as a regular plex. Datasubdisks can be added to the log plex. The log plex and log subdisk can be removed usingthe same procedures as are used to remove ordinary plexes and subdisks.Removing a DRL LogTo remove a DRL log, use the vxassist command as follows:# vxassist remove log volume [nlog=n]Use the optional attribute nlog=n to specify the number, n, of logs to be removed. Bydefault, the vxassist command removes one log.Adding a RAID-5 LogNote You may need an additional license to use this feature.Only one RAID-5 plex can exist per RAID-5 volume. Any additional plexes becomeRAID-5 log plexes, which are used to log information about data and parity being writtento the volume. When a RAID-5 volume is created using the vxassist command, a logplex is created for that volume by default.To add a RAID-5 log to an existing volume, use the following command:# vxassist [-b] addlog volume [loglen=length]Note If specified, the -b option makes adding the new log a background task.Note You can specify the log length used when adding the first log to a volume. Any logsthat you add subsequently are configured with the same length as the existing log.For example, to create a log for the RAID-5 volume volraid, use the followingcommand:# vxassist addlog volraid196 <strong>VERITAS</strong> <strong>Volume</strong> Manager Administrator’s Guide
Removing a RAID-5 LogAdding a RAID-5 Log using vxplexAs an alternative to using vxassist, you can add a RAID-5 log using the vxplexcommand. For example, to attach a RAID-5 log plex, r5log, to a RAID-5 volume, r5vol,use the following command:# vxplex att r5vol r5logThe attach operation can only proceed if the size of the new log is large enough to hold allof the data on the stripe. If the RAID-5 volume already contains logs, the new log length isthe minimum of each individual log length. This is because the new log is a mirror of theold logs.If the RAID-5 volume is not enabled, the new log is marked as BADLOG and is enabledwhen the volume is started. However, the contents of the log are ignored.If the RAID-5 volume is enabled and has other enabled RAID-5 logs, the new log’scontents are synchronized with the other logs.If the RAID-5 volume currently has no enabled logs, the new log is zeroed before it isenabled.Removing a RAID-5 LogTo identify the plex of the RAID-5 log, use the following command:# vxprint -ht volumewhere volume is the name of the RAID-5 volume. For a RAID-5 log, the output lists a plexwith a STATE field entry of LOG.To dissociate and remove a RAID-5 log and any associated subdisks from an existingvolume, use the following command:# vxplex -o rm dis plexFor example, to dissociate and remove the log plex volraid-02 from volraid, use thefollowing command:# vxplex -o rm dis volraid-02You can also remove a RAID-5 log with the vxassist command, as follows:# vxassist remove log volume [nlog=n]Use the optional attribute nlog=n to specify the number, n, of logs to be removed. Bydefault, the vxassist command removes one log.Chapter 8, Administering <strong>Volume</strong>s197
Resizing a <strong>Volume</strong>Note When removing the log leaves the volume with less than two valid logs, a warningis printed and the operation is not allowed to continue. The operation may be forcedby additionally specifying the -f option to vxplex or vxassist.Resizing a <strong>Volume</strong>Resizing a volume changes the volume size. For example, you might need to increase thelength of a volume if it is no longer large enough for the amount of data to be stored on it.To resize a volume, use one of the commands: vxresize (preferred), vxassist, orvxvol. Alternatively, you can use the graphical <strong>VERITAS</strong> Enterprise Administrator(VEA) to resize volumes.If a volume is increased in size, the vxassist command automatically locates availabledisk space. The vxresize command requires that you specify the names of the disks tobe used to increase the size of a volume. The vxvol command requires that you havepreviously ensured that there is sufficient space available in the plexes of the volume toincrease its size. The vxassist and vxresize commands automatically free unusedspace for use by the disk group. For the vxvol command, you must do this yourself. Tofind out by how much you can grow a volume, use the following command:# vxassist maxgrow volumeWhen you resize a volume, you can specify the length of a new volume in sectors,kilobytes, megabytes, or gigabytes. The unit of measure is added as a suffix to the length(s, m, k, or g). If no unit is specified, sectors are assumed. The vxassist command alsoallows you to specify an increment by which to change the volume’s size.CautionIf you use vxassist or vxvol to resize a volume, do not shrink it below thesize of the file system which is located on it. If you do not shrink the file systemfirst, you risk unrecoverable data loss. If you have a VxFS file system, shrink thefile system first, and then shrink the volume. Other file systems may requireyou to back up your data so that you can later recreate the file system andrestore its data.198 <strong>VERITAS</strong> <strong>Volume</strong> Manager Administrator’s Guide
Resizing a <strong>Volume</strong>Resizing <strong>Volume</strong>s using vxresizeUse the vxresize command to resize a volume containing a file system. Although othercommands can be used to resize volumes containing file systems, the vxresizecommand offers the advantage of automatically resizing certain types of file system aswell as the volume.See the following table for details of what operations are permitted and whether the filesystem must first be unmounted to resize the file system:Permitted Resizing Operations on File SystemsFor example, the following command resizes the 1-gigabyte volume, homevol, thatcontains a VxFS file system to 10 gigabytes using the spare disks disk10 and disk11:# vxresize -b -F vxfs -t homevolresize homevol 10g disk10 disk11The -b option specifies that this operation runs in the background. Its progress can bemonitored by specifying the task tag homevolresize to the vxtask command.Note the following restrictions for using vxresize:◆◆◆◆Online JFS(Full-VxFS)Base JFS(Lite-VxFS)vxresize works with VxFS, JFS (derived from VxFS) and HFS file systems only.In some situations, when resizing large volumes, vxresize may take a long time tocomplete.Resizing a volume with a usage type other than FSGEN or RAID5 can result in loss ofdata. If such an operation is required, use the -f option to forcibly resize such avolume.You cannot resize a volume that contains plexes with different layout types.Attempting to do so results in the following error message:vxvm:vxresize: ERROR: <strong>Volume</strong> volume has different organization ineach mirrorFor more information about the vxresize command, see the vxresize(1M) manualpage.HFSMounted File System Grow and shrink Not allowed Not allowedUnmounted File System Grow only Grow only Grow onlyChapter 8, Administering <strong>Volume</strong>s199
Resizing a <strong>Volume</strong>Resizing <strong>Volume</strong>s using vxassistThe following modifiers are used with the vxassist command to resize a volume:◆ growto—increase volume to a specified length◆ growby—increase volume by a specified amount◆ shrinkto—reduce volume to a specified length◆ shrinkby—reduce volume by a specified amountExtending to a Given LengthTo extend a volume to a specific length, use the following command:# vxassist [-b] growto volume lengthNote If specified, the -b option makes growing the volume a background task.For example, to extend volcat to 2000 sectors, use the following command:# vxassist growto volcat 2000Note If you previously performed a relayout on the volume, additionally specify theattribute layout=nodiskalign to the growto command if you want thesubdisks to be grown using contiguous disk space.Extending by a Given LengthTo extend a volume by a specific length, use the following command:# vxassist [-b] growby volume lengthNote If specified, the -b option makes growing the volume a background task.For example, to extend volcat by 100 sectors, use the following command:# vxassist growby volcat 100Note If you previously performed a relayout on the volume, additionally specify theattribute layout=nodiskalign to the growby command if you want thesubdisks to be grown using contiguous disk space.Shrinking to a Given LengthTo shrink a volume to a specific length, use the following command:200 <strong>VERITAS</strong> <strong>Volume</strong> Manager Administrator’s Guide
Resizing a <strong>Volume</strong># vxassist shrinkto volume lengthFor example, to shrink volcat to 1300 sectors, use the following command:# vxassist shrinkto volcat 1300CautionDo not shrink the volume below the current size of the file system or databaseusing the volume. The vxassist shrinkto command can be safely used onempty volumes.Shrinking by a Given LengthTo shrink a volume by a specific length, use the following command:# vxassist shrinkby volume lengthFor example, to shrink volcat by 300 sectors, use the following command:# vxassist shrinkby volcat 300CautionDo not shrink the volume below the current size of the file system or databaseusing the volume. The vxassist shrinkby command can be safely used onempty volumes.Resizing <strong>Volume</strong>s using vxvolTo change the length of a volume using the vxvol set command, use the followingcommand:# vxvol set len=length volumeFor example, to change the length to 100000 sectors, use the following command:# vxvol set len=100000 vol01Note The vxvol set len command cannot increase the size of a volume unless theneeded space is available in the plexes of the volume. When the size of a volume isreduced using the vxvol set len command, the freed space is not released intothe disk group’s free space pool.If a volume is active and its length is being reduced, the operation must be forced usingthe -o force option to vxvol. This prevents accidental removal of space fromapplications using the volume.The length of logs can also be changed using the following command:# vxvol set loglen=length log_volumeChapter 8, Administering <strong>Volume</strong>s201
Changing the Read Policy for Mirrored <strong>Volume</strong>sNote Sparse log plexes are not valid. They must map the entire length of the log. Ifincreasing the log length would make any of the logs invalid, the operation is notallowed. Also, if the volume is not active and is dirty (for example, if it has not beenshut down cleanly), the log length cannot be changed. This avoids the loss of any ofthe log contents (if the log length is decreased), or the introduction of random datainto the logs (if the log length is being increased).Changing the Read Policy for Mirrored <strong>Volume</strong>sVxVM offers the choice of the following read policies on the data plexes in a mirroredvolume:◆◆round—reads each plex in turn in “round-robin” fashion for each nonsequential I/Odetected. Sequential access causes only one plex to be accessed. This takes advantageof the drive or controller read-ahead caching policies.prefer—reads first from a plex that has been named as the preferred plex.◆ select—chooses a default policy based on plex associations to the volume. If thevolume has an enabled striped plex, the select option defaults to preferring thatplex; otherwise, it defaults to round-robin.The read policy can be changed from round to prefer (or the reverse), or to a differentpreferred plex. The vxvol rdpol command sets the read policy for a volume.Note You cannot set the read policy on a RAID-5 volume. RAID-5 plexes have their ownread policy (RAID).To set the read policy to round, use the following command:# vxvol rdpol round volumeFor example, to set the read policy for volume vol01 to round-robin, use the followingcommand:# vxvol rdpol round vol01To set the read policy to prefer, use the following command:# vxvol rdpol prefer volume preferred_plexFor example, to set the policy for vol01 to read preferentially from the plex vol01-02,use the following command:# vxvol rdpol prefer vol01 vol01-02202 <strong>VERITAS</strong> <strong>Volume</strong> Manager Administrator’s Guide
Removing a <strong>Volume</strong>To set the read policy to select, use the following command:# vxvol rdpol select volumeFor more information about how read policies affect performance, see “<strong>Volume</strong> ReadPolicies” on page 282.Removing a <strong>Volume</strong>Once a volume is no longer necessary (it is inactive and its contents have been archived,for example), it is possible to remove the volume and free up the disk space for other uses.Before removing a volume, use the following procedure to stop all activity on the volume:1. Remove all references to the volume by application programs, including shells, thatare running on the system.2. If the volume is mounted as a file system, unmount it with this command:# umount /dev/vx/dsk/diskgroup/volume3. If the volume is listed in the /etc/fstab file, remove its entry by editing this file.Refer to your operating system documentation for more information about the formatof this file and how you can modify it.4. Stop all activity by VxVM on the volume with the command:# vxvol stop volumeAfter following these steps, remove the volume with the vxassist command:# vxassist remove volume volumeAlternatively, you can use the vxedit command to remove a volume:# vxedit [-r] [-f] rm volumeThe -r option to vxedit indicates recursive removal. This removes all plexes associatedwith the volume and all subdisks associated with those plexes. The -f option to vxeditforces removal. This is necessary if the volume is still enabled.Chapter 8, Administering <strong>Volume</strong>s203
Moving <strong>Volume</strong>s from a VM DiskMoving <strong>Volume</strong>s from a VM DiskBefore you disable or remove a disk, you can move the data from that disk to other diskson the system. To do this, ensure that the target disks have sufficient space, and then usethe following procedure:1. Select menu item 6 (Move volumes from a disk) from the vxdiskadm mainmenu.2. At the following prompt, enter the disk name of the disk whose volumes you wish tomove, as follows:Move volumes from a diskMenu: <strong>Volume</strong>Manager/Disk/EvacuateUse this menu operation to move any volumes that are using adisk onto other disks. Use this menu immediately prior toremoving a disk, either permanently or for replacement. You canspecify a list of disks to move volumes onto, or you can movethe volumes to any available disk space in the same disk group.NOTE: Simply moving volumes off of a disk, without also removingthe disk, does not prevent volumes from being moved ontothe disk by future operations. For example, using twoconsecutive move operations may move volumes from thesecond disk to the first.Enter disk name [,list,q,?] disk01After the following display, you can optionally specify a list ofdisks to which the volume(s) should be moved.You can now specify a list of disks to move onto. Specify alist of disk media names (e.g., disk01) all on one lineseparated by blanks. If you do not enter any disk media names,then the volumes will be moved to any available space in thedisk group.At the following prompt, press Return to move the volumes:Requested operation is to move all volumes from disk disk01 ingroup rootdg.NOTE: This operation can take a long time to complete.Continue with operation? [y,n,q,?] (default: y)204 <strong>VERITAS</strong> <strong>Volume</strong> Manager Administrator’s Guide
Enabling FastResync on a <strong>Volume</strong>As the volumes are moved from the disk, the vxdiskadm program displays the statusof the operation:Move volume voltest ...Move volume voltest-bk00 ...When the volumes have all been moved, the vxdiskadm program displays thefollowing success message:Evacuation of disk disk01 is complete.3. At the following prompt, indicate whether you want to move volumes from anotherdisk (y) or return to the vxdiskadm main menu (n):Move volumes from another disk? [y,n,q,?] (default: n)Enabling FastResync on a <strong>Volume</strong>Note You may need an additional license to use this feature.FastResync performs quick and efficient resynchronization of stale mirrors. It alsoincreases the efficiency of the VxVM snapshot mechanism when used with operationssuch as backup and decision support. See “Backing Up <strong>Volume</strong>s Online Using Snapshots”on page 212 and “FastResync” on page 43 for more information.From Release 3.2, there are two possible versions of FastResync that can be enabled on avolume:◆◆Persistent FastResync, introduced in VxVM 3.2, holds copies of the FastResync mapson disk. These can be used for the speedy recovery of mirrored volumes if a system isrebooted. This form of FastResync requires that both a data change object (DCO) andDCO volume first be associated with the volume.See “Creating a <strong>Volume</strong> with a DCO and DCO <strong>Volume</strong>” on page 169, and “Adding aDCO and DCO <strong>Volume</strong>” on page 191 for more information.If the existing volume was created before release 3.2 of VxVM, and it has any attachedsnapshot plexes or it is associated with any snapshot volumes, follow the proceduregiven in “Enabling Persistent FastResync on Existing <strong>Volume</strong>s with AssociatedSnapshots” on page 207.Non-Persistent FastResync, introduced in VxVM 3.1, holds the FastResync maps inmemory. These do not survive on a system that is rebooted.By default, FastResync is not enabled on newly created volumes. Specify thefastresync=on attribute to the vxassist make command if you want to enableFastResync on a volume that you are creating.Chapter 8, Administering <strong>Volume</strong>s205
Enabling FastResync on a <strong>Volume</strong>Note It is not possible to configure both Persistent and Non-Persistent FastResync on avolume. Persistent FastResync is used if a DCO object and a DCO volume areassociated with the volume. Otherwise, Non-Persistent FastResync is used.To turn FastResync on for an existing volume, specify fastresync=on to the vxvolcommand as shown here:# vxvol [-g diskgroup] set fastresync=on volumeNote To use FastResync with a snapshot, FastResync must be enabled before the snapshotis taken, and must remain enabled until after the snapback is completed.Checking Whether FastResync is Enabled on a <strong>Volume</strong>To check whether FastResync is enabled on a volume, use the following command:# vxprint [-g diskgroup] -F%fastresync volumeThis command returns on if FastResync is enabled; otherwise, it returns off.If FastResync is enabled, to check whether it is Non-Persistent or Persistent FastResync,use the following command:# vxprint [-g diskgroup] -F%hasdcolog volumeThis command returns on if Persistent FastResync is enabled; otherwise, it returns off.To list all volumes on which Non-Persistent FastResync is enabled, use the followingcommand:# vxprint [-g diskgroup] -F “%name” \-e “v_fastresync=on && !v_hasdcolog”To list all volumes on which Persistent FastResync is enabled, use the followingcommand:# vxprint [-g diskgroup] -F “%name” -e “v_fastresync=on \&& v_hasdcolog”206 <strong>VERITAS</strong> <strong>Volume</strong> Manager Administrator’s Guide
Disabling FastResyncDisabling FastResyncUse the vxvol command to turn off Persistent or Non-Persistent FastResync for anexisting volume, as shown here:# vxvol [-g diskgroup] set fastresync=off volumeTurning FastResync off releases all tracking maps for the specified volume. All subsequentreattaches will not use the FastResync facility, but perform a full resynchronization of thevolume. This occurs even if FastResync is later turned on.Enabling Persistent FastResync on Existing <strong>Volume</strong>s withAssociated SnapshotsThe procedure described in this section describes how to enable Persistent FastResync ona volume created before release 3.2 of VxVM, and which has attached snapshot plexes oris associated with one or more snapshot volumes.Note If you do not perform the reconfiguration described in this section, fullresynchronization is required every time that snapback is used to reattach asnapshot to its original volume.If a volume was created before release 3.2 of VxVM, but does not have any snapshotplexes or associated snapshot volumes, you do not need to perform this procedure if youperform a snapstart operation on the volume after you have added a data changeobject (DCO) and DCO volume to it.Before enabling Persistent FastResync on an existing volume that contains any snapshotplexes, or which has any snapshot volumes, you must create and associate a data changeobject (DCO) and DCO volume with the volume. The number of plexes that you need toconfigure in a DCO volume is determined by the number of data and snapshot plexes thatmust be tracked. (A volume’s snapshot plexes are those that the vxprint commanddisplays with their state set to SNAPDONE.)Because Persistent FastResync performs tracking on the original volume and on itssnapshot volumes, you must also configure and associate a DCO and DCO volume witheach snapshot volume. It is only necessary to do this before you have enabled PersistentFastResync on a volume. Once you have enabled Persistent FastResync on a volume, thesnapstart, snapshot and snapback operations handle the creation and managementof DCOs and DCO volumes automatically.Chapter 8, Administering <strong>Volume</strong>s207
Enabling Persistent FastResync on Existing <strong>Volume</strong>s with Associated SnapshotsNote The DCO plexes require persistent storage space on disk to be available for theFastResync maps. To make room for the DCO plexes, you may need to add extradisks to the disk group, or reconfigure existing volumes to free up space in the diskgroup. Another way to add disk space is to use the disk group move feature to bringin spare disks from a different disk group. For more information, see “Reorganizingthe Contents of Disk Groups” on page 120.Perform the following steps to enable Persistent FastResync on an existing volume thathas attached snapshot plexes or associated snapshot volumes:1. Upgrade the disk group containing the existing volume to at least version 90 beforeperforming the remainder of the procedure described in this section. Use thefollowing command to check the version of a disk group:# vxdg list diskgroupTo upgrade a disk group to the latest version, use the following command:# vxdg upgrade diskgroupFor more information, see “Upgrading a Disk Group” on page 132.2. For a volume that has one or more associated snapshot volumes, it is recommendedthat you use following command to reattach and resynchronize each snapshot:# vxassist [-g diskgroup] snapback snapvolIf Non-Persistent FastResync was enabled on the volume before the snapshot wastaken, the data in the snapshot plexes is quickly resynchronized from the originalvolume. If Non-Persistent FastResync was not enabled, a full resynchronization isperformed.If you choose to reattach all the snapshots, you need only add a DCO and DCOvolume to the original volume.If you choose not to snapback the snapshot volumes, you must add a DCO and DCOvolume to the original volume, and separately to each of its snapshot volumes. Thisapproach requires a full resynchronization on the first subsequent snapback of eachsnapshot volume after you have enabled Persistent FastResync.3. Use the following command to turn off Non-Persistent FastResync on the originalvolume if it is currently enabled:# vxvol [-g diskgroup] set fastresync=off volumeIf you are uncertain about which volumes have Non-Persistent FastResync enabled,use the following command to obtain a listing of such volumes:# vxprint [-g diskgroup] -F “%name” \-e “v_fastresync=on && !v_hasdcolog”208 <strong>VERITAS</strong> <strong>Volume</strong> Manager Administrator’s Guide
Enabling Persistent FastResync on Existing <strong>Volume</strong>s with Associated Snapshots4. Use the following command on the original volume and on each of its snapshotvolumes (if any) to add a DCO and DCO volume.# vxassist [-g diskgroup] addlog volume logtype=dco \dcolen=loglen ndcomirror=number [storage_attribute ...]Set the value of ndcomirror equal to the number of data and snapshot plexes in thevolume.The ndcomirror attribute specifies the number of DCO plexes that are created in theDCO volume. It is recommended that you configure as many DCO plexes as there aredata plexes in the volume. For example, specify ndcomirror=3 when adding a DCOto a 3-way mirrored volume. If a volume has any snapshot plexes, a separate DCOplex must also be reserved for each of these plexes. These DCO plexes are used to setup a DCO volume for any snapshot volume that you subsequently create from thesnapshot plexes. For example, specify ndcomirror=5 for a volume with 3 dataplexes and 2 snapshot plexes. For a snapshot volume, set the value of ndcomirror tothe number of plexes in the volume.The value of the dcolen attribute specifies the size of a DCO plex, and must be ainteger multiple of 33 blocks from 33 to 2112 blocks. The default value is 132 blocks. Alarger value requires more disk space, but the finer granularity provided by theFastResync maps provides faster resynchronization.If a snapshot volume is to be moved to a separate disk group (using the disk groupmove, split and join feature), you must ensure that the plexes its DCO volume are notset up on the same physical disk as the plexes of any volume that is to remain in theoriginal disk group. To ensure this, specify appropriate storage attributes to define thedisks that can and/or cannot be used. For example, the following command wouldallow the DCO plex for the volume SNAP-vol to be set up on disk disk03, but noton disk01 or disk02:# vxassist -g egdg addlog SNAP-vol logtype=dco \dcolen=264 ndcomirror=1 !disk01 !disk02 disk03Note If the DCO plexes of the snapshot volume are configured on disks that also containthe plexes of other volumes, this prevents the snapshot volume from being movedto a different disk group. See “Considerations for Placing DCO Plexes” on page 125for more information.5. Perform this step for each snapshot volume and for each snapshot plex in the originalvolume. It is optional for the data plexes of the original volume. If thedco_plex_rid attribute is not set, or if it is set incorrectly on a plex in a snapshotvolume, then Persistent FastResync is configured incorrectly, and a fullresynchronization is required on snapback. You can omit this step if you chose toreattach all the snapshot volumes in step 2.Chapter 8, Administering <strong>Volume</strong>s209
Backing up <strong>Volume</strong>s OnlineFor each plex in each volume, use the following command to set the plex’sdco_plex_rid attribute to refer to the corresponding plex in the DCO volume.# vxedit [-g diskgroup] set dco_plex_rid=`vxprint -F”%rid” \dcologplex` plexFor example, to set the dco_plex_rid attribute of the plex SNAP-vol-01 to point tothe DCO plex SNAP-vol_dcl-01, use the following command:# vxedit -g egdg set dco_plex_rid=`vxprint -F”%rid” \SNAP-vol_dcl-01` SNAP-vol-01Note The choice of which DCO plex to associate with a given plex is arbitrary unless thesnapshot plex is to be moved along with a snapshot volume to a different diskgroup. If such is the case, the DCO plex must not be configured on the samephysical disk as the plexes of any volume that is to remain in the original diskgroup. If any DCO plex of a snapshot volume is configured on a disk that alsocontains the plexes of other volumes, this prevents the snapshot volume from beingmoved to a different disk group. For more information, see “Considerations forPlacing DCO Plexes” on page 125.6. Perform this step on any snapshot volumes as well as on the original volume.Enable Persistent FastResync on the volume using this command:# vxvol [-g diskgroup] set fastresync=on volumeBacking up <strong>Volume</strong>s OnlineIt is important to make backup copies of your volumes. These provide replicas of the dataas it existed at the time of the backup. Backup copies are used to restore volumes lost dueto disk failure, or data destroyed due to human error. VxVM allows you to back upvolumes online with minimal interruption to users.Two methods of backing up volumes online are described in the following sections:“Backing Up <strong>Volume</strong>s Online Using Mirrors” and “Backing Up <strong>Volume</strong>s Online UsingSnapshots” on page 212. For information on implementing off-host online backup, see“Configuring Off-Host Processing” on page 269.Backing Up <strong>Volume</strong>s Online Using MirrorsIf a volume is mirrored, it can be backed up by taking one of the data plexes offline for aperiod of time. This removes the need for extra disk space for the purpose of backup only.However, if the volume only has two data plexes, it also removes redundancy of thevolume for the duration of the time needed for the backup to take place.210 <strong>VERITAS</strong> <strong>Volume</strong> Manager Administrator’s Guide
Backing up <strong>Volume</strong>s OnlineYou can perform backup of a mirrored volume on an active system with these steps:1. Dissociate one of the volume’s data plexes (vol01-01, for example) using thefollowing command:# vxplex [-g diskgroup] dis plexOptionally, stop user activity during this time to improve the consistency of thebackup.2. Create a temporary volume, tempvol, that uses the dissociated plex, using thefollowing command:# vxmake -g diskgroup -U gen vol tempvol plex=plex3. Start the temporary volume, using the following command:# vxvol [-g diskgroup] start tempvol4. Use fsck (or some utility appropriate for the application running on the volume) toclean the temporary volume’s contents. For example, you can use this command:# fsck -F vxfs /dev/vx/rdsk/diskgroup/tempvol5. Perform appropriate backup procedures, using the temporary volume.6. Stop the temporary volume, using the following command:# vxvol [-g diskgroup] stop tempvol7. Dissociate the backup plex from its temporary volume, using the followingcommand:# vxplex [-g diskgroup] dis plex8. Reassociate the backup plex with its original volume to regain redundancy of thevolume, using the following command:# vxplex [-g diskgroup] att original_volume plex9. Remove the temporary volume, using the following command:# vxedit [-g diskgroup] rm tempvolNote If the file system is active during the period that the temporary volume is created,its contents may be inconsistent. For information on an alternative online backupmethod using the VxVM snapshot facility, see the next section “Backing Up<strong>Volume</strong>s Online Using Snapshots.”Chapter 8, Administering <strong>Volume</strong>s211
Backing up <strong>Volume</strong>s OnlineBacking Up <strong>Volume</strong>s Online Using SnapshotsNote You can use the procedure described in this section to create a snapshot of a RAID-5volume and to back it up.Note You may need an additional license to use this feature.VxVM provides snapshot images of volume devices using vxassist and othercommands. If the fsgen volume usage type is set on a volume that contains a <strong>VERITAS</strong>File System (VxFS), the snapshot mechanism ensures the internal consistency of the filesystem that is backed up. For hfs and other file system types, there may beinconsistencies between in-memory data and the data in the snapshot image.There are various procedures for doing backups, depending upon the requirements forintegrity of the volume contents. The procedures require a plex that is large enough tostore the complete contents of the volume. The plex can be larger than necessary, but if aplex that is too small is used, an incomplete copy results.The recommended approach to performing volume backup from the command line, orfrom a script, is to use the vxassist command. The vxassist snapstart,snapwait, and snapshot tasks allow you to back up volumes online with minimaldisruption to users.The vxassist snapshot procedure consists of two steps:1. Running vxassist snapstart to create a snapshot mirror2. Running vxassist snapshot to create a snapshot volumeThe vxassist snapstart step creates a write-only backup plex which gets attached toand synchronized with the volume. When synchronized with the volume, the backup plexis ready to be used as a snapshot mirror. The end of the update procedure is indicated bythe new snapshot mirror changing its state to SNAPDONE. This change can be trackedby the vxassist snapwait task, which waits until at least one of the mirrors changesits state to SNAPDONE. If the attach process fails, the snapshot mirror is removed andits space is released.Once the snapshot mirror is synchronized, it continues being updated until it isdetached. You can then select a convenient time at which to create a snapshot volume asan image of the existing volume. You can also ask users to refrain from using the systemduring the brief time required to perform the snapshot (typically less than a minute).The amount of time involved in creating the snapshot mirror is long in contrast to thebrief amount of time that it takes to create the snapshot volume.212 <strong>VERITAS</strong> <strong>Volume</strong> Manager Administrator’s Guide
Backing up <strong>Volume</strong>s OnlineThe online backup procedure is completed by running the vxassist snapshotcommand on a volume with a SNAPDONE mirror. This task detaches the finishedsnapshot (which becomes a normal mirror), creates a new normal volume and attachesthe snapshot mirror to the snapshot volume. The snapshot then becomes a normal,functioning mirror and the state of the snapshot is set to ACTIVE.If the snapshot procedure is interrupted, the snapshot mirror is automaticallyremoved when the volume is started.To back up a volume with the vxassist command, use the following procedure:1. Create a snapshot mirror for a volume using the following command:# vxassist [-b] [-g diskgroup] snapstart [nmirror=N] volumeFor example, to create a snapshot mirror of a volume called voldef, use thefollowing command:# vxassist [-g diskgroup] snapstart voldefThe vxassist snapstart task creates a write-only mirror, which is attached to andsynchronized from the volume to be backed up.Note By default, VxVM attempts to avoid placing a snapshot mirrors on a disk thatalready holds any plexes of a data volume. However, this may be impossible ifinsufficient space is available in the disk group. In this case, VxVM uses anyavailable space on other disks in the disk group. If the snapshot plexes are placed ondisks which are used to hold the plexes of other volumes, this may cause problemswhen you subsequently attempt to move a snapshot volume into another diskgroup as described in “Considerations for Placing DCO Plexes” on page 125. Tooverride the default storage allocation policy, you can use storage attributes tospecify explicitly which disks to use for the snapshot plexes. See “Creating a<strong>Volume</strong> on Specific Disks” on page 164 for more information.If you start vxassist snapstart in the background using the -b option, you canuse the vxassist snapwait command to wait for the creation of the mirror tocomplete as shown here:# vxassist [-g diskgroup] snapwait volumeIf vxassist snapstart is not run in the background, it does not exit until themirror has been synchronized with the volume. The mirror is then ready to be used asa plex of a snapshot volume. While attached to the original volume, its contentscontinue to be updated until you take the snapshot.Use the nmirror attribute to create as many snapshot mirrors as you need for thesnapshot volume. For a backup, you should usually only require the default of one.It is also possible to make a snapshot plex from an existing plex in a volume. See“Converting a Plex into a Snapshot Plex” on page 215 for details.Chapter 8, Administering <strong>Volume</strong>s213
Backing up <strong>Volume</strong>s Online2. Choose a suitable time to create a snapshot. If possible, plan to take the snapshot at atime when users are accessing the volume as little as possible.3. Create a snapshot volume using the following command:# vxassist [-g diskgroup] snapshot [nmirror=N] volume snapshotIf required, use the nmirror attribute to specify the number of mirrors in thesnapshot volume.For example, to create a snapshot of voldef, use the following command:# vxassist [-g diskgroup] snapshot voldef snapvolThe vxassist snapshot task detaches the finished snapshot mirror, creates a newvolume, and attaches the snapshot mirror to it. This step should only take a fewminutes. The snapshot volume, which reflects the original volume at the time of thesnapshot is now available for backing up, while the original volume continues to beavailable for applications and users.If required, you can make snapshot volumes for several volumes in a disk group atthe same time. See “Backing Up Multiple <strong>Volume</strong>s Using Snapshots” on page 216 formore information.4. Use fsck (or some utility appropriate for the application running on the volume) toclean the temporary volume’s contents. For example, you can use this command:# fsck -F vxfs /dev/vx/rdsk/diskgroup/snapshot5. Use a backup utility or operating system command to copy the temporary volume totape, or to some other appropriate backup media.When the backup is complete, you have three choices for what to do with the snapshotvolume:◆◆◆Reattach some or all of the plexes of the snapshot volume with the original volume asdescribed in “Merging a Snapshot <strong>Volume</strong> (snapback)” on page 216. If FastResyncwas enabled on the volume before the snapshot was taken, this speedsresynchronization of the snapshot plexes before the backup cycle starts again atstep 3.Dissociate the snapshot volume entirely from the original volume as described in“Dissociating a Snapshot <strong>Volume</strong> (snapclear)” on page 217. This may be useful if youwant to use the copy for other purposes such as testing or report generation.Remove the snapshot volume to save space with this command:# vxedit [-g diskgroup] -rf rm snapshot214 <strong>VERITAS</strong> <strong>Volume</strong> Manager Administrator’s Guide
Backing up <strong>Volume</strong>s OnlineNote Dissociating or removing the snapshot volume loses the advantage of fastresynchronization if FastResync was enabled. If there are no further snapshot plexesavailable, any subsequent snapshots that you take require another complete copy ofthe original volume to be made.Converting a Plex into a Snapshot PlexIn some circumstances, you may find it more convenient to convert an existing plex in avolume into a snapshot plex rather than running vxassist snapstart. For example,you may want to do this if you are short of disk space for creating the snapshot plex andthe volume that you want to snapshot contains more than two plexes.Note It is advisable to retain at least two plexes in a volume to maintain data redundancy.To convert an existing plex into a snapshot plex for a volume on which PersistentFastResync is enabled, use the following command:# vxplex [-g diskgroup] dcoplex=dcologplex convert \state=SNAPDONE plexdcologplex is the name of an existing DCO plex that is to be associated with the newsnapshot plex. You can use the vxprint command to find out the name of the DCOvolume as described in “Adding a DCO and DCO <strong>Volume</strong>” on page 191.For example, to make a snapshot plex from the plex trivol-03 in the 3-plex volumetrivol, you would use the following command:# vxplex dcoplex=trivol_dcl-03 convert state=SNAPDONE trivol-03Here the DCO plex trivol_dco_03 is specified as the DCO plex for the new snapshotplex.To convert an existing plex into a snapshot plex in the SNAPDONE state for a volume onwhich Non-Persistent FastResync is enabled, use the following command:# vxplex [-g diskgroup] convert state=SNAPDONE plexA converted plex is in the SNAPDONE state, and can be used immediately to create asnapshot volume.Note The last complete regular plex in a volume, an incomplete regular plex, or a dirtyregion logging (DRL) log plex cannot be converted into a snapshot plex.Chapter 8, Administering <strong>Volume</strong>s215
Backing up <strong>Volume</strong>s OnlineBacking Up Multiple <strong>Volume</strong>s Using SnapshotsTo make it easier to create snapshots of several volumes at the same time, the snapshotoption accepts more than one volume name as its argument, for example:# vxassist [-g diskgroup] snapshot volume1 volume2 ...By default, each replica volume is named SNAPnumber-volume, where number is aunique serial number, and volume is the name of the volume for which the snapshot isbeing taken. This default pattern can be overridden by using the option -o name=pattern,as described on the vxassist(1M) manual page. For example, the pattern SNAP%v-%dreverses the order of the number and volume components in the name.To snapshot all the volumes in a single disk group, specify the option -o allvols tovxassist:# vxassist -g diskgroup -o allvols snapshotThis operation requires that all snapstart operations are complete on the volumes. Itfails if any of the volumes in the disk group do not have a complete snapshot plex in theSNAPDONE state.Merging a Snapshot <strong>Volume</strong> (snapback)Note The information in this section does not apply to RAID-5 volumes unless they havebeen converted to a special layered volume layout by the addition of a DCO andDCO volume. See “Attaching a DCO and DCO volume to a RAID-5 <strong>Volume</strong>” onpage 193 for details.Snapback merges a snapshot copy of a volume with the original volume. One or moresnapshot plexes are detached from the snapshot volume and re-attached to the originalvolume. The snapshot volume is removed if all its snapshot plexes are snapped back. Thistask resynchronizes the data in the volume so that the plexes are consistent.Note To enhance the efficiency of the snapback operation, enable FastResync on thevolume before taking the snapshot, as described in “Enabling FastResync on a<strong>Volume</strong>” on page 205.To merge one snapshot plex with the original volume, use the following command:# vxassist snapback snapshotwhere snapshot is the snapshot copy of the volume.To merge all snapshot plexes in the snapshot volume with the original volume, use thefollowing command:# vxassist -o allplexes snapback snapshot216 <strong>VERITAS</strong> <strong>Volume</strong> Manager Administrator’s Guide
Backing up <strong>Volume</strong>s OnlineTo merge a specified number of plexes from the snapshot volume with the originalvolume, use the following command:# vxassist snapback nmirror=number snapshotHere the nmirror attribute specifies the number of mirrors in the snapshot volume thatare to be re-attached.Once the snapshot plexes have been reattached and their data resynchronized, they areready to be used in another snapshot operation.By default, the data in the original volume is used to update the snapshot plexes that havebeen re-attached. To copy the data from the replica volume instead, use the followingcommand:# vxassist -o resyncfromreplica snapback snapshotCautionAlways unmount the snapshot volume (if mounted) before performing asnapback. In addition, you must unmount the file system corresponding to theprimary volume before using the resyncfromreplica option.Dissociating a Snapshot <strong>Volume</strong> (snapclear)The link between a snapshot and its original volume can be permanently broken so thatthe snapshot volume becomes an independent volume.If Non-Persistent FastResync is enabled on the original volume, use the followingcommand to dissociate the snapshot volume, snapshot:# vxassist snapclear snapshotIf Persistent FastResync is enabled, and both the snapshot volume and the originalvolume are still in the same disk group, use either of the following commands to stopFastResync tracking on both volumes with respect to each other:# vxassist snapclear volume snap_object1# vxassist snapclear snapshot snap_object2Here snap_object1 is the snap object in the original volume that refers to the snapshotvolume, and snap_object2 is the snap object in the snapshot volume that refers to theoriginal volume. For example, if myvol and SNAP-myvol are in the same disk groupmydg, either of the following commands stops tracking for both myvol and SNAP-myvol:# vxassist -g mydg snapclear SNAP-myvol myvol_snp# vxassist -g mydg snapclear myvol SNAP-myvol_snpIf you have split or moved the snapshot volume and the original volume into differentdisk groups, you must run snapclear on the each volume separately, specifying thesnap object in the volume that points to the other volume:Chapter 8, Administering <strong>Volume</strong>s217
Backing up <strong>Volume</strong>s Online# vxassist snapclear volume snap_objectFor example, if myvol1 and SNAP-myvol1 are in separate disk groups mydg1 andmydg2 respectively, the following commands stop the tracking on SNAP-myvol1 withrespect to myvol1 and on myvol1 with respect to SNAP-myvol1:# vxassist -g mydg2 snapclear SNAP-myvol1 myvol1_snp# vxassist -g mydg1 snapclear myvol1 SNAP-myvol1_snpDisplaying Snapshot Information (snapprint)The vxassist snapprint command displays the associations between the originalvolumes and their respective replicas (snapshot copies):# vxassist snapprint [volume]Output from this command is shown in the following examples:# vxassist -g mydg snapprint v1V NAME USETYPE LENGTHSS SNAPOBJ NAME LENGTH %DIRTYDP NAME VOLUME LENGTH %DIRTYv v1 fsgen 20480ss SNAP-v1_snp SNAP-v1 20480 4dp v1-01 v1 20480 0dp v1-02 v1 20480 0v SNAP-v1 fsgen 20480ss v1_snp v1 20480 0# vxassist -g mydg snapprint v2V NAME USETYPE LENGTHSS SNAPOBJ NAME LENGTH %DIRTYDP NAME VOLUME LENGTH %DIRTYv v2 fsgen 20480ss -- SNAP-v2 20480 0dp v2-01 v2 20480 0v SNAP-v2 fsgen 20480ss -- v2 20480 0In this example, Persistent FastResync is enabled on volume v1, and Non-PersistentFastResync on volume v2. Lines beginning with v, dp and ss indicate a volume, detachedplex and snapshot plex respectively. The %DIRTY field indicates the percentage of asnapshot plex or detached plex that is dirty with respect to the original volume. Notice218 <strong>VERITAS</strong> <strong>Volume</strong> Manager Administrator’s Guide
Performing Online Relayoutthat no snap objects are associated with volume v2 or with its snapshot volume SNAP-v2.See “How Persistent FastResync Works with Snapshots” on page 45 for more informationabout snap objects.If a volume is specified, the snapprint command displays an error message if noFastResync maps are enabled for that volume.Performing Online RelayoutNote You may need an additional license to use this feature.You can use the vxassist relayout command to reconfigure the layout of a volumewithout taking it offline. The general form of this command is:# vxassist [-b] [-g diskgroup] relayout volume [layout=layout] \[relayout_options]Note If specified, the -b option makes relayout of the volume a background task.The following are valid destination layout configurations as determined by the tables in“Permitted Relayout Transformations” on page 35:concat-mirror—concatenated-mirrorconcat or span, nostripe, nomirror—concatenatedraid5—RAID-5 (not supported for shared disk groups)stripe—stripedstripe-mirror—striped-mirrorFor example, the following command changes a concatenated volume to a striped volumewith the default number of columns, 2, and stripe unit size, 64k:# vxassist relayout vol02 layout=stripeOn occasions, it may be necessary to perform a relayout on a plex rather than on avolume. See “Specifying a Plex for Relayout” on page 220 for more information.Specifying a Non-Default LayoutYou can specify one or more relayout options to change the default layout configuration.Examples of these options are:ncol=number—specifies the number of columnsncol=+number—specifies the number of columns to addChapter 8, Administering <strong>Volume</strong>s219
Performing Online Relayoutncol=-number—specifies the number of colums to removestripeunit=size—specifies the stripe widthSee the vxassist(1M) manual page for more information about relayout options.The following are some examples of using vxassist to change the stripe width and numberof columns for a striped volume in the disk group dbaseg:# vxassist -g dbaseg relayout vol03 stripeunit=64k ncol=6# vxassist -g dbaseg relayout vol03 ncol=+2# vxassist -g dbaseg relayout vol03 stripeunit=128kThe next example changes a concatenated volume to a RAID-5 volume with four columns:# vxassist -g fsgrp relayout vol04 layout=raid5 ncol=4Specifying a Plex for RelayoutAny layout can be changed to RAID-5 if there are sufficient disks and space in the diskgroup. If you convert a mirrored volume to RAID-5, you must specify which plex is to beconverted. All other plexes are removed when the conversion has finished, releasing theirspace for other purposes. If you convert a mirrored volume to a layout other than RAID-5,the unconverted plexes are not removed. You can specify the plex to be converted bynaming it in place of a volume:# vxassist relayout plex [layout=layout] [relayout_options]Tagging a Relayout OperationIf you want to control the progress of a relayout operation, for example to pause or reverseit, use the -t option to vxassist to specify a task tag for the operation. For example, thisrelayout is performed as a background task and has the tag myconv:# vxassist -b -g fsgrp -t myconv relayout vol04 layout=raid5 ncol=4See the following sections, “Viewing the Status of a Relayout” and “Controlling theProgress of a Relayout,” for more information about tracking and controlling the progressof relayout.220 <strong>VERITAS</strong> <strong>Volume</strong> Manager Administrator’s Guide
Performing Online RelayoutViewing the Status of a RelayoutOnline relayout operations take some time to perform. You can use the vxrelayoutcommand to obtain information about the status of a relayout operation. For example, thecommand:# vxrelayout status vol04might display output similar to this:STRIPED, columns=5, stwidth=128--> STRIPED, columns=6, stwidth=128Relayout running, 68.58% completed.In this example, the reconfiguration of a striped volume from 5 to 6 columns is inprogress, and is just over two-thirds complete.See the vxrelayout(1M) manual page for more information about this command.If you specified a task tag to vxassist when you started the relayout, you can use thistag with the vxtask command to monitor the progress of the relayout. For example, tomonitor the task tagged as myconv, enter:# vxtask monitor myconvControlling the Progress of a RelayoutYou can use the vxtask command to stop (pause) the relayout temporarily, or to cancelit altogether (abort). If you specified a task tag to vxassist when you started therelayout, you can use this tag to specify the task to vxtask. For example, to pause therelayout operation tagged as myconv, enter:# vxtask pause myconvTo resume the operation, use the vxtask command:# vxtask resume myconvFor relayout operations that have not been stopped using the vxtask pause command(for example, the vxtask abort command was used to stop the task, the transformationprocess died, or there was an I/O failure), resume the relayout by specifying the startkeyword to vxrelayout, as shown here:# vxrelayout -o bg start vol04Note If you use the vxrelayout start command to restart a relayout that youpreviously suspended using the vxtask pause command, a new untagged task iscreated to complete the operation. You cannot then use the original task tag tocontrol the relayout.Chapter 8, Administering <strong>Volume</strong>s221
Converting Between Layered and Non-Layered <strong>Volume</strong>sThe -o bg option restarts the relayout in the background. You can also specify the slowand iosize option modifiers to control the speed of the relayout and the size of eachregion that is copied. For example, the following command inserts a delay of 1000milliseconds (1 second) between copying each 64-kilobyte region:# vxrelayout -o bg,slow=1000,iosize=64 start vol04The default delay and region size values are 250 milliseconds and 32 kilobytesrespectively.To reverse the direction of relayout operation that is currently stopped, specify thereverse keyword to vxrelayout as shown in this example:# vxrelayout -o bg reverse vol04This undoes changes made to the volume so far, and returns it to its original layout.If you cancel a relayout using vxtask abort, the direction of the conversion is alsoreversed, and the volume is returned to its original configuration.See the vxrelayout(1M) and vxtask(1M) manual pages for more information aboutthese commands. See “Managing Tasks with vxtask” on page 185 for more informationabout controlling tasks in VxVM.Converting Between Layered and Non-Layered <strong>Volume</strong>sThe vxassist convert command transforms volume layouts between layered andnon-layered forms:# vxassist [-b] convert volume [layout=layout] [convert_options]Note If specified, the -b option makes conversion of the volume a background task.The following conversion layouts are supported:stripe-mirror—mirrored-stripe to striped-mirrormirror-stripe—striped-mirror to mirrored-stripeconcat-mirror—mirrored-concatenated to concatenated-mirrormirror-concat—concatenated-mirror to mirrored-concatenated<strong>Volume</strong> conversion can be used before or after performing online relayout to achieve alarger number of transformations than would otherwise be possible. During relayoutprocess, a volume may also be converted into a layout that is intermediate to the one that222 <strong>VERITAS</strong> <strong>Volume</strong> Manager Administrator’s Guide
Converting Between Layered and Non-Layered <strong>Volume</strong>sis desired. For example, to convert a volume from a 4-column mirrored-stripe to a5-column mirrored-stripe, first use vxassist relayout to convert the volume to a5-column striped-mirror:# vxassist relayout vol1 ncol=5When the relayout has completed, use the vxassist convert command to change theresulting layered striped-mirror volume to a non-layered mirrored-stripe:# vxassist convert vol1 layout=mirror-stripeNote If the system crashes during relayout or conversion, the process continues when thesystem is rebooted. However, if the crash occurred during the first stage of atwo-stage relayout and convert operation, only the first stage will be completed.You must run vxassist convert manually to complete the operation.Chapter 8, Administering <strong>Volume</strong>s223
Converting Between Layered and Non-Layered <strong>Volume</strong>s224 <strong>VERITAS</strong> <strong>Volume</strong> Manager Administrator’s Guide
Administering Hot-Relocation 9IntroductionIf a volume has a disk I/O failure (for example, because the disk has an uncorrectableerror), <strong>VERITAS</strong> <strong>Volume</strong> Manager (VxVM) can detach the plex involved in the failure.I/O stops on that plex but continues on the remaining plexes of the volume.If a disk fails completely, VxVM can detach the disk from its disk group. All plexes on thedisk are disabled. If there are any unmirrored volumes on a disk when it is detached,those volumes are also disabled.Note Apparent disk failure may not be due to a fault in the physical disk media or thedisk controller, but may instead be caused by a fault in an intermediate or ancillarycomponent such as a cable, host bus adapter, or power supply.The hot-relocation feature in VxVM automatically detects disk failures, and notifies thesystem administrator and other nominated users of the failures by electronic mail.Hot-relocation also attempts to use spare disks and free disk space to restore redundancyand to preserve access to mirrored and RAID-5 volumes. For more information, see thefollowing section, “How Hot-Relocation works.”If hot-relocation is disabled or you miss the electronic mail, you can use the vxprintcommand or the graphical user interface to examine the status of the disks. You may alsosee driver error messages on the console or in the system messages file.Failed disks must be removed and replaced manually as described in “Removing andReplacing Disks” on page 76.For more information about recovering volumes and their data after hardware failure, seethe <strong>VERITAS</strong> <strong>Volume</strong> Manager Troubleshooting Guide.225
How Hot-Relocation worksHow Hot-Relocation worksHot-relocation allows a system to react automatically to I/O failures on redundant(mirrored or RAID-5) VxVM objects, and to restore redundancy and access to thoseobjects. VxVM detects I/O failures on objects and relocates the affected subdisks to disksdesignated as spare disks or to free space within the disk group. VxVM then reconstructsthe objects that existed before the failure and makes them redundant and accessible again.When a partial disk failure occurs (that is, a failure affecting only some subdisks on adisk), redundant data on the failed portion of the disk is relocated. Existing volumes onthe unaffected portions of the disk remain accessible.Note Hot-relocation is only performed for redundant (mirrored or RAID-5) subdisks on afailed disk. Non-redundant subdisks on a failed disk are not relocated, but thesystem administrator is notified of their failure.Hot-relocation is enabled by default and takes effect without the intervention of thesystem administrator when a failure occurs.The hot-relocation daemon, vxrelocd, detects and reacts to VxVM events that signify thefollowing types of failures:◆◆disk failure—this is normally detected as a result of an I/O failure from a VxVMobject. VxVM attempts to correct the error. If the error cannot be corrected, VxVMtries to access configuration information in the private region of the disk. If it cannotaccess the private region, it considers the disk failed.plex failure—this is normally detected as a result of an uncorrectable I/O error in theplex (which affects subdisks within the plex). For mirrored volumes, the plex isdetached.◆ RAID-5 subdisk failure—this is normally detected as a result of an uncorrectable I/Oerror. The subdisk is detached.When vxrelocd detects such a failure, it performs the following steps:1. vxrelocd informs the system administrator (and other nominated users, see“Modifying the Behavior of Hot-Relocation” on page 241) by electronic mail of thefailure and which VxVM objects are affected. See “Partial Disk Failure Mail Messages”on page 229 and “Complete Disk Failure Mail Messages” on page 230 for moreinformation.2. vxrelocd next determines if any subdisks can be relocated. vxrelocd looks forsuitable space on disks that have been reserved as hot-relocation spares (markedspare) in the disk group where the failure occurred. It then relocates the subdisks touse this space.226 <strong>VERITAS</strong> <strong>Volume</strong> Manager Administrator’s Guide
How Hot-Relocation works3. If no spare disks are available or additional space is needed, vxrelocd uses freespace on disks in the same disk group, except those disks that have been excluded forhot-relocation use (marked nohotuse). When vxrelocd has relocated the subdisks,it reattaches each relocated subdisk to its plex.4. Finally, vxrelocd initiates appropriate recovery procedures. For example, recoveryincludes mirror resynchronization for mirrored volumes or data recovery for RAID-5volumes. It also notifies the system administrator of the hot-relocation and recoveryactions that have been taken.If relocation is not possible, vxrelocd notifies the system administrator and takes nofurther action.Note Hot-relocation does not guarantee the same layout of data or the same performanceafter relocation. The system administrator can make configuration changes afterhot-relocation occurs.Relocation of failing subdisks is not possible in the following cases:◆ The failing subdisks are on non-redundant volumes (that is, volumes of types otherthan mirrored or RAID-5).◆◆◆◆◆If you use vxdiskadm to remove a disk that contains subdisks of a volume.There are insufficient spare disks or free disk space in the disk group.The only available space is on a disk that already contains a mirror of the failing plex.The only available space is on a disk that already contains the RAID-5 log plex or oneof its healthy subdisks, failing subdisks in the RAID-5 plex cannot be relocated.If a mirrored volume has a dirty region logging (DRL) log subdisk as part of its dataplex, failing subdisks belonging to that plex cannot be relocated.◆ If a RAID-5 volume log plex or a mirrored volume DRL log plex fails, a new log plexis created elsewhere. There is no need to relocate the failed subdisks of log plex.See the xvrelocd(1M) manual page for more information about the hot-relocationdaemon.“Example of Hot-Relocation for a Subdisk in a RAID-5 <strong>Volume</strong>” on page 228 illustratesthe hot-relocation process in the case of the failure of a single subdisk of a RAID-5 volume.Chapter 9, Administering Hot-Relocation227
How Hot-Relocation worksExample of Hot-Relocation for a Subdisk in a RAID-5 <strong>Volume</strong>a) Disk group contains five disks. Two RAID-5 volumes are configured across four of the disks.One spare disk is available for hot-relocation.disk01 disk02 disk03 disk04 disk05disk01-01disk02-01disk02-02disk03-01disk03-02disk04-01Spare Diskb) Subdisk disk02-01 in one RAID-5 volume fails. Hot-relocation replaces it with subdisk disk05-01that it has created on the spare disk, and then initiates recovery of the RAID-5 volume.disk01 disk02 disk03 disk04 disk05disk01-01Xdisk02-01disk02-02disk03-01 disk04-01 disk05-01disk03-02c) RAID-5 recovery recreates subdisk disk02-01’s data and parity on subdisk disk05-01 fromthe data and parity information remaining on subdisks disk01-01 and disk03-01.disk01 disk02 disk03 disk04 disk05disk01-01Xdisk02-01disk03-01disk04-01disk05-01disk02-02disk03-02228 <strong>VERITAS</strong> <strong>Volume</strong> Manager Administrator’s Guide
How Hot-Relocation worksPartial Disk Failure Mail MessagesIf hot-relocation is enabled when a plex or disk is detached by a failure, mail indicatingthe failed objects is sent to root. If a partial disk failure occurs, the mail identifies thefailed plexes. For example, if a disk containing mirrored volumes fails, you can receivemail information as shown in the following example:To: rootSubject: <strong>Volume</strong> Manager failures on host tealFailures have been detected by the <strong>VERITAS</strong> <strong>Volume</strong> Manager:failed plexes:home-02src-02See “Modifying the Behavior of Hot-Relocation” on page 241 for information on how tosend the mail to users other than root.You can determine which disk is causing the failures in the above example message byusing the following command:# vxstat -s -ff home-02 src-02The -s option asks for information about individual subdisks, and the -ff optiondisplays the number of failed read and write operations. The following output display istypical:FAILEDTYP NAME READS WRITESsd disk01-04 0 0sd disk01-06 0 0sd disk02-03 1 0sd disk02-04 1 0This example shows failures on reading from subdisks disk02-03 and disk02-04 ofdisk02.Hot-relocation automatically relocates the affected subdisks and initiates any necessaryrecovery procedures. However, if relocation is not possible or the hot-relocation feature isdisabled, you must investigate the problem and attempt to recover the plexes. Errors canbe caused by cabling failures, so check the cables connecting your disks to your system. Ifthere are obvious problems, correct them and recover the plexes using the followingcommand:# vxrecover -b home srcThis starts recovery of the failed plexes in the background (the command promptreappears before the operation completes). If an error message appears later, or if theplexes become detached again and there are no obvious cabling failures, replace the disk(see “Removing and Replacing Disks” on page 76).Chapter 9, Administering Hot-Relocation229
How Hot-Relocation worksComplete Disk Failure Mail MessagesIf a disk fails completely and hot-relocation is enabled, the mail message lists the disk thatfailed and all plexes that use the disk. For example, you can receive mail as shown in thisexample display:To: rootSubject: <strong>Volume</strong> Manager failures on host tealFailures have been detected by the <strong>VERITAS</strong> <strong>Volume</strong> Manager:failed disks:disk02failed plexes:home-02src-02mkting-01failing disks:disk02This message shows that disk02 was detached by a failure. When a disk is detached, I/Ocannot get to that disk. The plexes home-02, src-02, and mkting-01 were alsodetached (probably because of the failure of the disk).As described in “Partial Disk Failure Mail Messages” on page 229, the problem can be acabling error. If the problem is not a cabling error, replace the disk (see “Removing andReplacing Disks” on page 76).How Space is Chosen for RelocationA spare disk must be initialized and placed in a disk group as a spare before it can be usedfor replacement purposes. If no disks have been designated as spares when a failureoccurs, VxVM automatically uses any available free space in the disk group in which thefailure occurs. If there is not enough spare disk space, a combination of spare space andfree space is used.The free space used in hot-relocation must not have been excluded from hot-relocationuse. Disks can be excluded from hot-relocation use by using vxdiskadm, vxedit or the<strong>VERITAS</strong> Enterprise Administrator (VEA).You can designate one or more disks as hot-relocation spares within each disk group.Disks can be designated as spares by using vxdiskadm, vxedit, or the VEA. Disksdesignated as spares do not participate in the free space model and should not havestorage space allocated on them.230 <strong>VERITAS</strong> <strong>Volume</strong> Manager Administrator’s Guide
Configuring a System for Hot-RelocationWhen selecting space for relocation, hot-relocation preserves the redundancycharacteristics of the VxVM object to which the relocated subdisk belongs. For example,hot-relocation ensures that subdisks from a failed plex are not relocated to a diskcontaining a mirror of the failed plex. If redundancy cannot be preserved using anyavailable spare disks and/or free space, hot-relocation does not take place. If relocation isnot possible, the system administrator is notified and no further action is taken.From the eligible disks, hot-relocation attempts to use the disk that is “closest” to thefailed disk. The value of “closeness” depends on the controller, target, and disk number ofthe failed disk. A disk on the same controller as the failed disk is closer than a disk on adifferent controller. A disk under the same target as the failed disk is closer than one on adifferent target.Hot-relocation tries to move all subdisks from a failing drive to the same destination disk,if possible.When hot-relocation takes place, the failed subdisk is removed from the configurationdatabase, and VxVM ensures that the disk space used by the failed subdisk is not recycledas free space.Configuring a System for Hot-RelocationBy designating spare disks and making free space on disks available for use by hotrelocation, you can control how disk space is used for relocating subdisks in the event of adisk failure. If the combined free space and space on spare disks is not sufficient or doesnot meet the redundancy constraints, the subdisks are not relocated.◆ To find out which disks are spares or are excluded from hot-relocation, see“Displaying Spare Disk Information” on page 232.You can prepare for hot-relocation by designating one or more disks per disk group ashot-relocation spares.◆To designate a disk as being a hot-relocation spare for a disk group, see “Marking aDisk as a Hot-Relocation Spare” on page 232.◆ To remove a disk from use as a hot-relocation spare, see “Removing a Disk from Useas a Hot-Relocation Spare” on page 233.If no spares are available at the time of a failure or if there is not enough space on thespares, free space on disks in the same disk group as where the failure occurred isautomatically used, unless it has been excluded from hot-relocation use.◆◆To exclude a disk from hot-relocation use, see “Excluding a Disk from Hot-RelocationUse” on page 234.To make a disk available for hot-relocation use, see “Making a Disk Available forHot-Relocation Use” on page 235.Chapter 9, Administering Hot-Relocation231
Displaying Spare Disk InformationDepending on the locations of the relocated subdisks, you can choose to move themelsewhere after hot-relocation occurs (see “Configuring Hot-Relocation to Use Only SpareDisks” on page 236).After a successful relocation, remove and replace the failed disk as described in“Removing and Replacing Disks” on page 76).Displaying Spare Disk InformationUse the following command to display information about spare disks that are availablefor relocation:# vxdg spareThe following is example output:GROUP DISK DEVICE TAG OFFSET LENGTH FLAGSrootdg disk02 c0t2d0 c0t2d0 0 658007 sHere disk02 is the only disk designated as a spare. The LENGTH field indicates howmuch spare space is currently available on disk02 for relocation.The following commands can also be used to display information about disks that arecurrently designated as spares:◆◆◆vxdisk list lists disk information and displays spare disks with a spare flag.vxprint lists disk and other information and displays spare disks with a SPARE flag.The list menu item on the vxdiskadm main menu lists spare disks.Marking a Disk as a Hot-Relocation SpareHot-relocation allows the system to react automatically to I/O failure by relocatingredundant subdisks to other disks. Hot-relocation then restores the affected VxVM objectsand data. If a disk has already been designated as a spare in the disk group, the subdisksfrom the failed disk are relocated to the spare disk. Otherwise, any suitable free space inthe disk group is used.To designate a disk as a hot-relocation spare, enter the following command:# vxedit set spare=on disknameFor example, to designate disk01 as a spare, enter the following command:# vxedit set spare=on disk01You can use the vxdisk list command to confirm that this disk is now a spare; disk01should be listed with a spare flag.232 <strong>VERITAS</strong> <strong>Volume</strong> Manager Administrator’s Guide
Removing a Disk from Use as a Hot-Relocation SpareAny VM disk in this disk group can now use this disk as a spare in the event of a failure. Ifa disk fails, hot-relocation automatically occurs (if possible). You are notified of the failureand relocation through electronic mail. After successful relocation, you may want toreplace the failed disk.Alternatively, you can use vxdiskadm to designate a disk as a hot-relocation spare:1. Select menu item 11 (Mark a disk as a spare for a disk group) from thevxdiskadm main menu.2. At the following prompt, enter a disk name (such as disk01):Menu: <strong>Volume</strong>Manager/Disk/MarkSpareDiskUse this operation to mark a disk as a spare for a diskgroup.This operation takes, as input, a disk name. This is the samename that you gave to the disk when you added the disk to thedisk group.Enter disk name [,list,q,?] disk013. At the following prompt, indicate whether you want to add more disks as spares (y)or return to the vxdiskadm main menu (n):Mark another disk as a spare? [y,n,q,?] (default: n)Any VM disk in this disk group can now use this disk as a spare in the event of afailure. If a disk fails, hot-relocation should automatically occur (if possible). Youshould be notified of the failure and relocation through electronic mail. Aftersuccessful relocation, you may want to replace the failed disk.Removing a Disk from Use as a Hot-Relocation SpareWhile a disk is designated as a spare, the space on that disk is not used for the creation ofVxVM objects within its disk group. If necessary, you can free a spare disk for general useby removing it from the pool of hot-relocation disks.To remove a spare from the hot-relocation pool, use the following command:# vxedit set spare=off disknameFor example, to make disk01 available for normal use, use the following command:# vxedit set spare=off disk01Chapter 9, Administering Hot-Relocation233
Excluding a Disk from Hot-Relocation UseAlternatively, you can use vxdiskadm to remove a disk from the hot-relocation pool:1. Select menu item 12 (Turn off the spare flag on a disk) from thevxdiskadm main menu.2. At the following prompt, enter the name of a spare disk (such as disk01):Menu: <strong>Volume</strong>Manager/Disk/UnmarkSpareDiskUse this operation to turn off the spare flag on a disk.This operation takes, as input, a disk name. This is the samename that you gave to the disk when you added the disk to thedisk group.Enter disk name [,list,q,?] disk01The vxdiskadm program displays the following confirmation:Disk disk01 in rootdg no longer marked as a spare disk.3. At the following prompt, indicate whether you want to disable more spare disks (y)or return to the vxdiskadm main menu (n):Turn-off spare flag on another disk? [y,n,q,?] (default: n)Excluding a Disk from Hot-Relocation UseTo exclude a disk from hot-relocation use, use the following command:# vxedit -g disk_group set nohotuse=on disknameAlternatively, using vxdiskadm:1. Select menu item 15 (Exclude a disk from hot-relocation use) from thevxdiskadm main menu.2. At the following prompt, enter the disk name (such as disk01):Exclude a disk from hot-relocation useMenu: <strong>Volume</strong>Manager/Disk/UnmarkSpareDiskUse this operation to exclude a disk from hot-relocation use.This operation takes, as input, a disk name. This is the samename that you gave to the disk when you added the disk to thedisk group.Enter disk name [,list,q,?] disk01234 <strong>VERITAS</strong> <strong>Volume</strong> Manager Administrator’s Guide
Making a Disk Available for Hot-Relocation UseThe vxdiskadm program displays the following confirmation:Excluding disk01 in rootdg from hot-relocation use is complete.3. At the following prompt, indicate whether you want to add more disks to be excludedfrom hot-relocation (y) or return to the vxdiskadm main menu (n):Exclude another disk from hot-relocation use? [y,n,q,?](default: n)Making a Disk Available for Hot-Relocation UseFree space is used automatically by hot-relocation in case spare space is not sufficient torelocate failed subdisks. You can limit this free space usage by hot-relocation by specifyingwhich free disks should not be touched by hot-relocation. If a disk was previouslyexcluded from hot-relocation use, you can undo the exclusion and add the disk back tothe hot-relocation pool.To make a disk available for hot-relocation use, use the following command:# vxedit -g disk_group set nohotuse=off disknameAlternatively, using vxdiskadm:1. Select menu item 16 (Make a disk available for hot-relocation use)from the vxdiskadm main menu.2. At the following prompt, enter the disk name (such as disk01):Menu: <strong>Volume</strong>Manager/Disk/UnmarkSpareDiskUse this operation to make a disk available for hot-relocationuse. This only applies to disks that were previously excludedfrom hot-relocation use. This operation takes, as input, a diskname. This is the same name that you gave to the disk when youadded the disk to the disk group.Enter disk name [,list,q,?] disk01The vxdiskadm program displays the following confirmation:Making disk01 in rootdg available for hot-relocation use iscomplete.3. At the following prompt, indicate whether you want to add more disks to be excludedfrom hot-relocation (y) or return to the vxdiskadm main menu (n):Make another disk available for hot-relocation use? [y,n,q,?](default: n)Chapter 9, Administering Hot-Relocation235
Configuring Hot-Relocation to Use Only Spare DisksConfiguring Hot-Relocation to Use Only Spare DisksIf you want VxVM to use only spare disks for hot-relocation, add the following line to thefile /etc/default/vxassist:spare=onlyIf not enough storage can be located on disks marked as spare, the relocation fails. Anyfree space on non-spare disks is not used.Moving and Unrelocating SubdisksWhen hot-relocation occurs, subdisks are relocated to spare disks and/or available freespace within the disk group. The new subdisk locations may not provide the sameperformance or data layout that existed before hot-relocation took place. You can movethe relocated subdisks (after hot-relocation is complete) to improve performance.You can also move the relocated subdisks off the spare disks to keep the spare disk spacefree for future hot-relocation needs. Another reason for moving subdisks is to recreate theconfiguration that existed before hot-relocation occurred.During hot-relocation, one of the electronic mail messages sent to root is shown in thefollowing example:To: rootSubject: <strong>Volume</strong> Manager failures on host tealAttempting to relocate subdisk disk02-03 from plex home-02.Dev_offset 0 length 1164 dm_name disk02 da_name c0t5d0.The available plex home-01 will be used to recover the data.This message has information about the subdisk before relocation and can be used todecide where to move the subdisk after relocation.Here is an example message that shows the new location for the relocated subdisk:To: rootSubject: Attempting VxVM relocation on host teal<strong>Volume</strong> home Subdisk disk02-03 relocated to disk05-01,but not yet recovered.Before you move any relocated subdisks, fix or replace the disk that failed (as described in“Removing and Replacing Disks” on page 76). Once this is done, you can move arelocated subdisk back to the original disk as described in the following sections.CautionDuring subdisk move operations, RAID-5 volumes are not redundant.236 <strong>VERITAS</strong> <strong>Volume</strong> Manager Administrator’s Guide
Moving and Unrelocating SubdisksMoving and Unrelocating Subdisks using vxdiskadmTo move the hot-relocated subdisks back to the disk where they originally resided afterthe disk has been replaced following a failure, use the following procedure:1. Select menu item 14 (Unrelocate subdisks back to a disk) from thevxdiskadm main menu.2. This option prompts for the original disk media name first.Enter the disk media name where the hot-relocated subdisks originally resided at thefollowing prompt:Enter the original disk name [,list,q,?]If there are no hot-relocated subdisks in the system, vxdiskadm displays Currentlythere are no hot-relocated disks, and asks you to press Return to continue.3. You are next asked if you want to move the subdisks to a destination disk other thanthe original disk.While unrelocating the subdisks, you can choose to move thesubdisks to a different disk from the original disk.Unrelocate to a new disk [y,n,q,?] (default: n)4. If moving subdisks to their original offsets is not possible, you can choose tounrelocate the subdisks forcibly to the specified disk, but not necessarily to the sameoffsets.Use -f option to unrelocate the subdisks if moving to the exactoffset fails? [y,n,q,?] (default: n)5. If you entered y at step 4 to unrelocate the subdisks forcibly, enter y or press Return atthe following prompt to confirm the operation:Requested operation is to move all the subdisks which werehot-relocated from disk10 back to disk10 of disk group rootdg.Continue with operation? [y,n,q,?] (default: y)A status message is displayed at the end of the operation.Unrelocate to disk disk10 is complete.As an alternative to this procedure, use either the vxassist command or the vxunreloccommand directly, as described in “Moving and Unrelocating subdisks using vxassist”and “Moving and Unrelocating Subdisks using vxunreloc” on page 238.Chapter 9, Administering Hot-Relocation237
Moving and Unrelocating SubdisksMoving and Unrelocating subdisks using vxassistYou can use the vxassist command to move and unrelocate subdisks. For example, tomove the relocated subdisks on disk05 belonging to the volume home back to disk02,enter the following command:# vxassist -g rootdg move home !disk05 disk02Here, !disk05 specifies the current location of the subdisks, and disk02 specifies wherethe subdisks should be relocated.If the volume is enabled, subdisks within detached or disabled plexes, and detached logor RAID-5 subdisks, are moved without recovery of data.If the volume is not enabled, subdisks within STALE or OFFLINE plexes, and stale log orRAID-5 subdisks, are moved without recovery. If there are other subdisks within anon-enabled volume that require moving, the relocation fails.For enabled subdisks in enabled plexes within an enabled volume, data is moved to thenew location, without loss of either availability or redundancy of the volume.Moving and Unrelocating Subdisks using vxunrelocVxVM hot-relocation allows the system to automatically react to I/O failures on aredundant VxVM object at the subdisk level and then take necessary action to make theobject available again. This mechanism detects I/O failures in a subdisk, relocates thesubdisk, and recovers the plex associated with the subdisk. After the disk has beenreplaced, vxunreloc allows you to restore the system back to the configuration thatexisted before the disk failure. vxunreloc allows you to move the hot-relocated subdisksback onto a disk that was replaced due to a failure.When vxunreloc is invoked, you must specify the disk media name where thehot-relocated subdisks originally resided. When vxunreloc moves the subdisks, itmoves them to the original offsets. If you try to unrelocate to a disk that is smaller than theoriginal disk that failed,vxunreloc does nothing except return an error.vxunreloc provides an option to move the subdisks to a different disk from where theywere originally relocated. It also provides an option to unrelocate subdisks to a differentoffset as long as the destination disk is large enough to accommodate all the subdisks.If vxunreloc cannot replace the subdisks back to the same original offsets, a force optionis available that allows you to move the subdisks to a specified disk without using theoriginal offsets. Refer to the vxunreloc(1M) manual page for more information.The following examples demonstrate the use of vxunreloc.238 <strong>VERITAS</strong> <strong>Volume</strong> Manager Administrator’s Guide
Moving and Unrelocating SubdisksMoving hot-relocated subdisks back to their original diskAssume that disk01 failed and all the subdisks were relocated. After disk01 is replaced,vxunreloc can be used to move all the hot-relocated subdisks back to disk01.# vxunreloc -g newdg disk01Moving hot-relocated subdisks to a different diskThe vxunreloc utility provides the -n option to move the subdisks to a different diskfrom where they were originally relocated.Assume that disk01 failed, and that all of the subdisks that resided on it werehot-relocated to other disks. vxunreloc provides an option to move the subdisks to adifferent disk from where they were originally relocated. After the disk is repaired, it isadded back to the disk group using a different name, e.g, disk05. If you want to move allthe hot-relocated subdisks back to the new disk, the following command can be used:# vxunreloc -g newdg -n disk05 disk01The destination disk should have at least as much storage capacity as was in use on theoriginal disk. If there is not enough space, the unrelocate operation will fail and none ofthe subdisks will be moved.Forcing hot-relocated subdisks to accept different offsetsBy default, vxunreloc attempts to move hot-relocated subdisks to their original offsets.However, vxunreloc fails if any subdisks already occupy part or all of the area on thedestination disk. In such a case, you have two choices:◆Move the existing subdisks somewhere else, and then re-run vxunreloc.◆ Use the -f option provided by vxunreloc to move the subdisks to the destinationdisk, but leave it to vxunreloc to find the space on the disk. As long as thedestination disk is large enough so that the region of the disk for storing subdisks canaccommodate all subdisks, all the hot-relocated subdisks will be “unrelocated”without using the original offsets.Assume that disk01 failed and the subdisks were relocated and that you want to movethe hot-relocated subdisks to disk05 where some subdisks already reside. You can usethe force option to move the hot-relocated subdisks to disk05, but not to the exact offsets:# vxunreloc -g newdg -f -n disk05 disk01Chapter 9, Administering Hot-Relocation239
Moving and Unrelocating SubdisksExamining which subdisks were hot-relocated from a diskIf a subdisk was hot relocated more than once due to multiple disk failures, it can still beunrelocated back to its original location. For instance, if disk01 failed and a subdisknamed disk01-01 was moved to disk02, and then disk02 experienced disk failure, allof the subdisks residing on it, including the one which was hot-relocated to it, will bemoved again. When disk02 was replaced, a vxunreloc operation for disk02 will donothing to the hot-relocated subdisk disk01-01. However, a replacement of disk01followed by a vxunreloc operation, moves disk01-01 back to disk01 if vxunrelocis run immediately after the replacement.After the disk that experienced the failure is fixed or replaced, vxunreloc can be used tomove all the hot-relocated subdisks back to the disk. When a subdisk is hot-relocated, itsoriginal disk-media name and the offset into the disk, are saved in the configurationdatabase. When a subdisk is moved back to the original disk or to a new disk usingvxunreloc, the information is erased. The original disk-media name and the originaloffset are saved in the subdisk records. To print all of the subdisks that were hot-relocatedfrom disk01 in the rootdg disk group, use the following command:# vxprint -g rootdg -se 'sd_orig_dmname="disk01"'Restarting vxunreloc After Errorsvxunreloc moves subdisks in three phases:1. vxunreloc creates as many subdisks on the specified destination disk as there aresubdisks to be unrelocated. The string UNRELOC is placed in the comment field ofeach subdisk record.Creating the subdisk is an all-or-nothing operation. If vxunreloc cannot create all thesubdisks successfully, none are created, and vxunreloc exits.2. vxunreloc moves the data from each subdisk to the corresponding newly createdsubdisk on the destination disk.3. When all subdisk data moves have been completed successfully, vxunreloc sets thecomment field to the null string for each subdisk on the destination disk whosecomment field is currently set to UNRELOC.The comment fields of all the subdisks on the destination disk remain marked asUNRELOC until phase 3 completes. If its execution is interrupted, vxunreloc cansubsequently re-use subdisks that it created on the destination disk during a previousexecution, but it does not use any data that was moved to the destination disk.If a subdisk data move fails, vxunreloc displays an error message and exits. Determinethe problem that caused the move to fail, and fix it before re-executing vxunreloc.240 <strong>VERITAS</strong> <strong>Volume</strong> Manager Administrator’s Guide
Modifying the Behavior of Hot-RelocationIf the system goes down after the new subdisks are created on the destination disk, butbefore all the data has been moved, re-execute vxunreloc when the system has beenrebooted.CautionDo not modify the string UNRELOC in the comment field of a subdisk record.Modifying the Behavior of Hot-RelocationHot-relocation is turned on as long as vxrelocd is running. You leave hot-relocationturned on so that you can take advantage of this feature if a failure occurs. However, ifyou choose to disable this feature (perhaps because you do not want the free space onsome of your disks to be used for relocation), prevent vxrelocd from starting at systemstartup time.You can stop hot-relocation at any time by killing the vxrelocd process (this should notbe done while a hot-relocation attempt is in progress).You can make some minor changes to the way vxrelocd behaves by either editing thevxrelocd line in the startup file that invokes vxrelocd(/sbin/rc2.d/S95vxvm-recover), or by killing the existing vxrelocd process andrestarting it with different options. After making changes to the way vxrelocd isinvoked in the startup file, you need to reboot the system so that the changes go intoeffect. If you choose to kill and restart the daemon instead, make sure that hot-relocation isnot in progress when you kill the vxrelocd process. You should also restart the daemonimmediately so that hot-relocation can take effect if a failure occurs.You can alter vxrelocd behavior as follows:◆◆◆To prevent vxrelocd starting, comment out the entry that invokes it in the startup file:# nohup vxrelocd root &By default, vxrelocd sends electronic mail to root when failures are detected andrelocation actions are performed. You can instruct vxrelocd to notify additionalusers by adding the appropriate user names as shown here:nohup vxrelocd root user1 user2 &To reduce the impact of recovery on system performance, you can instruct vxrelocdto increase the delay between the recovery of each region of the volume, as shown inthe following example:nohup vxrelocd -o slow[=IOdelay] root &where the optional IOdelay value indicates the desired delay in milliseconds. Thedefault value for the delay is 250 milliseconds.Chapter 9, Administering Hot-Relocation241
Modifying the Behavior of Hot-RelocationWhen executing vxrelocd manually, either include /etc/vx/bin in your PATH orspecify vxrelocd’s absolute pathname, for example:# PATH=/etc/vx/bin:$PATH# export PATH# nohup vxrelocd root &or# nohup /etc/vx/bin/vxrelocd root user1 user2 &See the vxrelocd(1M) manual page for more information.242 <strong>VERITAS</strong> <strong>Volume</strong> Manager Administrator’s Guide
Administering Cluster Functionality 10IntroductionA cluster consists of a number of hosts or nodes that share a set of disks. The main benefitsof cluster configurations are:◆Availability—If one node fails, the other nodes can still access the shared disks. Whenconfigured with suitable software, mission-critical applications can continue runningby transferring their execution to a standby node in the cluster. This ability to providecontinuous uninterrupted service by switching to redundant hardware is commonlytermed failover.Failover is transparent to users and high-level applications for database andfile-sharing. You must configure cluster management software to monitor systemsand services, and to restart applications on another node in the event of eitherhardware or software failure.◆ Off-host processing—Clusters can reduce contention for system resources byperforming activities such as backup, decision support and report generation on themore lightly loaded nodes of the cluster. This allows businesses to derive enhancedvalue from their investment in cluster systems.The cluster functionality of <strong>VERITAS</strong> <strong>Volume</strong> Manager (VxVM) allows up to 16 nodes in acluster to simultaneously access and manage a set of disks under VxVM control (VMdisks). The same logical view of disk configuration and any changes to this is available onall the nodes. When the cluster functionality is enabled, all the nodes in the cluster canshare VxVM objects. This chapter discusses the cluster functionality that is provided withVxVM.Note You need an additional license to use this feature.This chapter does not discuss <strong>VERITAS</strong> Cluster File System TM nor cluster managementsoftware. See the documentation provided with these products for more informationabout them.For additional information about using the Dynamic Multipathing (DMP) feature ofVxVM in a clustered environment, see “DMP in a Clustered Environment” on page 105.243
Overview of Cluster <strong>Volume</strong> ManagementOverview of Cluster <strong>Volume</strong> ManagementIn recent years, tightly coupled cluster systems have become increasingly popular in therealm of enterprise-scale mission-critical data processing. The primary advantage ofclusters is protection against hardware failure. Should the primary node fail or otherwisebecome unavailable, applications can continue to run by transferring their execution tostandby nodes in the cluster. This ability to provide continuous availability of service byswitching to redundant hardware is commonly termed failover.Another major advantage of clustered systems is their ability to reduce contention forsystem resources caused by activities such as backup, decision support and reportgeneration. Businesses can derive enhanced value from their investment in clustersystems by performing such operations on lightly loaded nodes in the cluster rather thanon the heavily loaded nodes that answer requests for service. This ability to perform someoperations on the lightly loaded nodes is commonly termed load balancing.The cluster functionality of VxVM works together with the cluster monitor daemon that isprovided by the host operating system. The cluster monitor informs VxVM of changes incluster membership. Each node starts up independently and has its own cluster monitorplus its own copies of the operating system and VxVM with support for clusterfunctionality. When a node joins a cluster, it gains access to shared disks. When a nodeleaves a cluster, it no longer has access to shared disks. A node joins a cluster when thecluster monitor is started on that node.“Example of a 4-Node Cluster” on page 245illustrates a simple cluster arrangementconsisting of four nodes with similar or identical hardware characteristics (CPUs, RAMand host adapters), and configured with identical software (including the operatingsystem). The nodes are fully connected by a private network and they are also separatelyconnected to shared external storage (either disk arrays or JBODs: just a bunch of disks) viaSCSI or Fibre Channel. Each node has two independent paths to these disks, which areconfigured in one or more cluster-shareable disk groups.The private network allows the nodes to share information about system resources andabout each other’s state. Using the private network, any node can recognize which othernodes are currently active, which are joining or leaving the cluster, and which have failed.The private network requires at least two communication channels to provideredundancy against one of the channels failing. If only one channel were used, its failurewould be indistinguishable from node failure—a condition known as network partitioning.244 <strong>VERITAS</strong> <strong>Volume</strong> Manager Administrator’s Guide
Overview of Cluster <strong>Volume</strong> ManagementExample of a 4-Node ClusterRedundant Private NetworkNode 0(master)Node 1(slave)Node 2(slave)Node 3(slave)RedundantSCSI or FibreChannelConnectivityCluster-ShareableDisksCluster-ShareableDisk GroupsTo the cluster monitor, all nodes are the same. VxVM objects configured within shareddisk groups can potentially be accessed by all nodes that join the cluster. However, thecluster functionality of VxVM requires that one node act as the master node; all other nodesin the cluster are slave nodes. Any node is capable of being the master node, and it isresponsible for coordinating certain VxVM activities.Note You must run commands that configure or reconfigure VxVM objects on the masternode. Tasks that must be initiated from the master node include setting up shareddisk groups, creating and reconfiguring volumes, and performing snapshotoperations.VxVM determines that the first node to join a cluster performs the function of masternode. If the master node leaves a cluster, one of the slave nodes is chosen to be the newmaster. In “Example of a 4-Node Cluster,” node 0 is the master node and nodes 1, 2 and 3are slave nodes.Chapter 10, Administering Cluster Functionality245
Overview of Cluster <strong>Volume</strong> ManagementPrivate and Shared Disk GroupsTwo types of disk groups are defined:◆Private disk groups—belong to only one node. A private disk group is only importedby one system. Disks in a private disk group may be physically accessible from one ormore systems, but access is restricted to one system only. The root disk group(rootdg) is always a private disk group.◆ Shared disk groups—shared by all nodes. A shared (or cluster-shareable) disk group isimported by all cluster nodes. Disks in a shared disk group must be physicallyaccessible from all systems that may join the cluster.In a cluster, most disk groups are shared. Disks in a shared disk group are accessible fromall nodes in a cluster, allowing applications on multiple cluster nodes to simultaneouslyaccess the same disk. A volume in a shared disk group can be simultaneously accessed bymore than one node in the cluster, subject to licensing and disk group activation moderestrictions.You can use the vxdg command to designate a disk group as cluster-shareable asdescribed in “Importing Disk Groups as Shared” on page 262. When a disk group isimported as cluster-shareable for one node, each disk header is marked with the clusterID. As each node subsequently joins the cluster, it recognizes the disk group as beingcluster-shareable and imports it. As system administrator, you can also import or deport ashared disk group at any time; the operation takes places in a distributed fashion on allnodes.Each physical disk is marked with a unique disk ID. When cluster functionality for VxVMstarts on the master, it imports all shared disk groups (except for any that have thenoautoimport attribute set). When a slave tries to join a cluster, the master sends it a listof the disk IDs that it has imported, and the slave checks to see if it can access them all. Ifthe slave cannot access one of the listed disks, it abandons its attempt to join the cluster. Ifit can access all of the listed disks, it imports the same shared disk groups as the masterand joins the cluster. When a node leaves the cluster, it deports all its imported shareddisk groups, but they remain imported on the surviving nodes.Reconfiguring a shared disk group is performed with the cooperation of all nodes.Configuration changes to the disk group happen simultaneously on all nodes and thechanges are identical. Such changes are atomic in nature, which means that they eitheroccur simultaneously on all nodes or not at all.Whether all members of the cluster have simultaneous read and write access to acluster-shareable disk group depends on its activation mode setting as discussed in“Activation Modes of Shared Disk Groups.” The data contained in a cluster-shareabledisk group is available as long as at least one node is active in the cluster. The failure of acluster node does not affect access by the remaining active nodes. Regardless of whichnode accesses a cluster-shareable disk group, the configuration of the disk group looks thesame.246 <strong>VERITAS</strong> <strong>Volume</strong> Manager Administrator’s Guide
Overview of Cluster <strong>Volume</strong> ManagementNote Applications running on each node can access the data on the VM diskssimultaneously. VxVM does not protect against simultaneous writes to sharedvolumes by more than one node. It is assumed that applications control consistency(by using a distributed lock manager, for example).Activation Modes of Shared Disk GroupsA shared disk group must be activated on a node in order for the volumes in the diskgroup to become accessible for application I/O from that node. The ability of applicationsto read from or to write to volumes is dictated by the activation mode of a shared diskgroup. Valid activation modes for a shared disk group are exclusive-write,read-only, shared-read, shared-write, and off (inactive). These activation modesare described in detail in the table “Activation Modes for Shared Disk Groups” onpage 247.Note The default activation mode for shared disk groups is off (inactive).Special uses of clusters, such as high availability (HA) applications and off-host backup,can use disk group activation to explicitly control volume access from different nodes inthe cluster.The activation mode of a disk group controls volume I/O from different nodes in thecluster. It is not possible to activate a disk group on a given node if it is activated in aconflicting mode on another node in the cluster.Activation Modes for Shared Disk GroupsActivation Modeexclusive-write (ew)read-only (ro)shared-read (sr)shared-write (sw)offDescriptionThe node has exclusive write access to the disk group. No othernode can activate the disk group for write access.The node has read access to the disk group and denies writeaccess for all other nodes in the cluster. The node has no writeaccess to the disk group. Attempts to activate a disk group foreither of the write modes on other nodes fail.The node has read access to the disk group. The node has nowrite access to the disk group, however other nodes can obtainwrite access.The node has write access to the disk group.The node has neither read nor write access to the disk group.Query operations on the disk group are permitted.Chapter 10, Administering Cluster Functionality247
Overview of Cluster <strong>Volume</strong> ManagementThe table “Allowed and Conflicting Activation Modes” summarizes the allowed andconflicting activation modes for shared disk groups:Allowed and Conflicting Activation ModesDisk group activatedin cluster as...Attempt to activate disk group on another node as...exclusivewriteShared disk groups can be automatically activated in any mode during disk groupcreation or during manual or auto-import. To control auto-activation of shared diskgroups, the defaults file /etc/default/vxdg must be created.The defaults file /etc/default/vxdg must contain the following lines:enable_activation=truedefault_activation_mode=activation-moderead-only shared-read shared-writeexclusive-write Fails Fails Succeeds Failsread-only Fails Succeeds Succeeds Failsshared-read Succeeds Succeeds Succeeds Succeedsshared-write Fails Fails Succeeds SucceedsThe activation-mode is one of exclusive-write, read-only, shared-read,shared-write, or off.Note When enabling activation using the defaults file, it is recommended that thedefaults file be identical on all nodes in the cluster. Otherwise, the results ofactivation are unpredictable.When a shared disk group is created or imported, it is activated in the specified mode.When a node joins the cluster, all shared disk groups accessible from the node areactivated in the specified mode.If the defaults file is edited while the vxconfigd daemon is already running, thevxconfigd process must be restarted for the changes in the defaults file to take effect.Note If the default activation node is anything other than off, an activation following acluster join, or a disk group creation or import can fail if another node in the clusterhas activated the disk group in a conflicting mode.To display the activation mode for a shared disk group, use the vxdg list diskgroupcommand as described in “Listing Shared Disk Groups” on page 260.248 <strong>VERITAS</strong> <strong>Volume</strong> Manager Administrator’s Guide
Overview of Cluster <strong>Volume</strong> ManagementYou can also use the vxdg command to change the activation mode on a shared diskgroup as described in “Changing the Activation Mode on a Shared Disk Group” onpage 264.For a description of how to configure a volume so that it can only be opened by a singlenode in a cluster, see “Creating <strong>Volume</strong>s with Exclusive Open Access by a Node” onpage 264 and “Setting Exclusive Open Access to a <strong>Volume</strong> by a Node” on page 265.Connectivity Policy of Shared Disk GroupsThe nodes in a cluster must always agree on the status of a disk. In particular, if one nodecannot write to a given disk, all nodes must stop accessing that disk before the results ofthe write operation are returned to the caller. Therefore, if a node cannot contact a disk, itshould contact another node to check on the disk’s status. If the disk fails, no node canaccess it and the nodes can agree to detach the disk. If the disk does not fail, but rather theaccess paths from some of the nodes fail, the nodes cannot agree on the status of the disk.Either of the following policies for resolving this type of discrepancy may be applied:◆Under the global connectivity policy, the detach occurs cluster-wide (globally) if anynode in the cluster reports a disk failure. This is the default policy.◆ Under the local connectivity policy, in the event of disks failing, the failures areconfined to the particular nodes that saw the failure. Note that an attempt is made tocommunicate with all nodes in the cluster to ascertain the disks’ usability. If all nodesreport a problem with the disks, a cluster-wide detach occurs.See “Setting the Connectivity Policy on a Shared Disk Group” on page 264 for informationon how to use the vxedit command to set the connectivity policy on a shared disk group.Limitations of Shared Disk GroupsThe cluster functionality of VxVM does not support RAID-5 volumes, or task monitoringfor cluster-shareable disk groups. These features can, however, be used in private diskgroups that are attached to specific nodes of a cluster. Online relayout is supportedprovided that it does not involve RAID-5 volumes.The root disk group (rootdg) cannot be made cluster-shareable. It must be private.Only raw device access may be performed via the cluster functionality of VxVM. It doesnot support shared access to file systems in shared volumes unless the appropriatesoftware is installed and configured.If a shared disk group contains unsupported objects, deport it and then re-import the diskgroup as private on one of the cluster nodes. Reorganize the volumes into layouts that aresupported for shared disk groups, and then deport and reimport the disk group as shared.Chapter 10, Administering Cluster Functionality249
Cluster Initialization and ConfigurationCluster Initialization and ConfigurationBefore any nodes can join a new cluster for the first time, you must supply certainconfiguration information during cluster monitor setup. This information is normallystored in some form of cluster monitor configuration database. The precise content andformat of this information depends on the characteristics of the cluster monitor. Theinformation required by VxVM is as follows:◆◆◆cluster IDnode IDsnetwork addresses of nodes◆ port addressesWhen a node joins the cluster, this information is automatically loaded into VxVM on thatnode at node startup time.Note The cluster functionality of VxVM requires that a cluster monitor (such as providedby MC/ServiceGuard) has been configured. If MC/ServiceGuard is chosen as yourcluster monitor, no additional configuration of VxVM is required, apart from thecluster configuration requirements of MC/ServiceGuard.The cluster monitor startup procedure effects node initialization, and brings up thevarious cluster components (such as VxVM with cluster support, the cluster monitor, anda distributed lock manager) on the node. Once this is complete, applications may bestarted. The cluster monitor startup procedure must be invoked on each node to be joinedto the cluster.For VxVM in a cluster environment, initialization consists of loading the clusterconfiguration information and joining the nodes in the cluster. The first node to joinbecomes the master node, and later nodes (slaves) join to the master. If two nodes joinsimultaneously, VxVM chooses the master. Once the join for a given node is complete, thatnode has access to the shared disks.Cluster ReconfigurationA cluster reconfiguration occurs if a node leaves or joins a cluster. Each node’s clustermonitor continuously watches the other cluster nodes. When the membership of thecluster changes, the cluster monitor calls the vxclustd cluster reconfiguration daemon.The vxclustd daemon coordinates cluster reconfigurations and providescommunication between VxVM and the cluster monitor.During cluster reconfiguration, VxVM suspends I/O to shared disks. I/O resumes whenthe reconfiguration completes. Applications may appear to freeze for a short time duringreconfiguration.250 <strong>VERITAS</strong> <strong>Volume</strong> Manager Administrator’s Guide
Cluster Initialization and ConfigurationIf other operations, such as VxVM operations or recoveries, are in progress, clusterreconfiguration can be delayed until those operations have completed. <strong>Volume</strong>reconfigurations (see “<strong>Volume</strong> Reconfiguration” on page 252) do not take place at thesame time as cluster reconfigurations. Depending on the circumstances, an operation maybe held up and restarted later. In most cases, cluster reconfiguration takes precedence.However, if the volume reconfiguration is in the commit stage, it completes first.For more information on cluster reconfiguration, see “vxclustd Daemon.”vxclustd DaemonThe vxclustd daemon is the VxVM cluster reconfiguration daemon. The vxclustddaemon provides communication between the cluster monitor and VxVM, and initiatescluster reconfiguration. Every node currently in the cluster runs an instance of thevxclustd daemon. Whenever cluster membership changes, the cluster monitor notifiesthe vxclustd daemon, which then initiates a reconfiguration within VxVM.The vxclustd daemon is started up by the cluster monitor when the node initiallyattempts to join the cluster. The vxclustd daemon first registers with the cluster monitorand obtains the following information from the cluster monitor:◆◆cluster ID and cluster namenode IDs and hostnames of all configured nodes◆ IP addresses of the network interfaces through which the nodes communicate witheach otherRegistration also sets up a callback mechanism for the cluster monitor to notify thevxclustd daemon when cluster membership changes. After initializing kernel clustervariables, the vxclustd daemon waits for a callback from the cluster monitor. When thevxclustd daemon obtains membership information from the cluster monitor, it validatesthe membership change, and provides the new membership to the kernel. Thereconfiguration process continues within the kernel and the vxconfigd daemon. Thisincludes selection of a new master node if necessary, initiation of communication betweenvxconfigd daemons on the master and slave nodes, and a join protocol at thevxconfigd and kernel levels that validates VxVM objects and distributes VxVMconfiguration information across the cluster.If reconfiguration completes successfully, the vxclustd daemon does not take anyfurther action; it waits for the next membership change from the cluster monitor. Ifreconfiguration within the kernel or within the vxconfigd daemon fails, the node mustleave the cluster. The kernel fails I/O in progress to shared disks, and stops access toshared disks and the vxclustd daemon. The vxclustd daemon invokes the clustermonitor command to halt the cluster on this node.When a clean node shutdown is performed, vxclustd waits until kernel clusterreconfiguration completes and then exits.Chapter 10, Administering Cluster Functionality251
Cluster Initialization and ConfigurationNote If MC/ServiceGuard is the cluster monitor, it expects the vxclustd daemonregistration to complete within a given timeout period. If registration times out,MC/ServiceGuard aborts cluster initialization and fails cluster startup.<strong>Volume</strong> Reconfiguration<strong>Volume</strong> reconfiguration is the process of creating, changing, and removing VxVM objectssuch as disk groups, volumes and plexes. In a cluster, all nodes cooperate to perform suchoperations. The vxconfigd daemons (see “vxconfigd Daemon” on page 253) play anactive role in volume reconfiguration. For reconfiguration to succeed, a vxconfigddaemon must be running on each of the nodes.A volume reconfiguration transaction is initiated by running a VxVM utility on the masternode. The utility contacts the local vxconfigd daemon on the master node, whichvalidates the requested change. For example, vxconfigd rejects an attempt to create anew disk group with the same name as an existing disk group. The vxconfigd daemonon the master node then sends details of the changes to the vxconfigd daemons on theslave nodes. The vxconfigd daemons on the slave nodes then perform their ownchecking. For example, each slave node checks that it does not have a private disk groupwith the same name as the one being created; if the operation involves a new disk, eachnode checks that it can access that disk. When the vxconfigd daemons on all the nodesagree that the proposed change is reasonable, each notifies its kernel. The kernels thencooperate to either commit or to abandon the transaction. Before the transaction can becommitted, all of the kernels ensure that no I/O is underway. The master node isresponsible both for initiating the reconfiguration, and for coordinating the commitmentof the transaction. The resulting configuration changes appear to occur simultaneously onall nodes.If a vxconfigd daemon on any node goes away during reconfiguration, all nodes arenotified and the operation fails. If any node leaves the cluster, the operation fails unlessthe master has already committed it. If the master node leaves the cluster, the new masternode, which was previously a slave node, completes or fails the operation depending onwhether or not it received notification of successful completion from the previous masternode. This notification is performed in such a way that if the new master does not receiveit, neither does any other slave.If a node attempts to join a cluster while a volume reconfiguration is being performed, theresult of the reconfiguration depends on how far it has progressed. If the kernel has notyet been invoked, the volume reconfiguration is suspended until the node has joined thecluster. If the kernel has been invoked, the node waits until the reconfiguration iscomplete before joining the cluster.When an error occurs, such as when a check on a slave fails or a node leaves the cluster,the error is returned to the utility and a message is sent to the console on the master nodeto identify on which node the error occurred.252 <strong>VERITAS</strong> <strong>Volume</strong> Manager Administrator’s Guide
Cluster Initialization and Configurationvxconfigd DaemonThe VxVM configuration daemon, vxconfigd, maintains the configuration of VxVMobjects. It receives cluster-related instructions from the kernel. A separate copy ofvxconfigd runs on each node, and these copies communicate with each other over anetwork. When invoked, a VxVM utility communicates with the vxconfigd daemonrunning on the same node; it does not attempt to connect with vxconfigd daemons onother nodes. During cluster startup, the kernel prompts vxconfigd to begin clusteroperation and indicates whether it is a master node or a slave node.When a node is initialized for cluster operation, the vxconfigd daemon is notified thatthe node is about to join the cluster and is provided with the following information fromthe cluster monitor configuration database:◆◆◆◆cluster IDnode IDsmaster node IDrole of the node◆ network address of the vxconfigd daemon on each nodeOn the master node, the vxconfigd daemon sets up the shared configuration byimporting shared disk groups, and informs the vxclustd daemon when it is ready forthe slave nodes to join the cluster.On slave nodes, the vxconfigd daemon is notified when the slave node can join thecluster. When the slave node joins the cluster, the vxconfigd daemon and the VxVMkernel communicate with their counterparts on the master node to set up the sharedconfiguration.When a node leaves the cluster, the vxclustd daemon notifies the kernel on all the othernodes. The master node then performs any necessary cleanup. If the master node leavesthe cluster, the kernels choose a new master node and the vxconfigd daemons on allnodes are notified of the choice.The vxconfigd daemon also participates in volume reconfiguration as described in“<strong>Volume</strong> Reconfiguration” on page 252.vxconfigd Daemon RecoveryIn a cluster, the vxconfigd daemons on the slave nodes are always connected to thevxconfigd daemon on the master node. If the vxconfigd daemon is stopped, volumereconfiguration cannot take place and other nodes cannot join the cluster until it isrestarted. If a cluster monitor is enabled, it may try to fail over VxVM to another node inthe cluster. It is therefore inadvisable to stop the vxconfigd daemon on any cluster node.Different actions are taken depending on which node the vxconfigd daemon is stopped:Chapter 10, Administering Cluster Functionality253
Cluster Initialization and Configuration◆◆If the vxconfigd daemon is stopped on the master node, the vxconfigd daemonson the slave nodes periodically attempt to rejoin to the master node. Such attempts donot succeed until the vxconfigd daemon is restarted on the master. In this case, thevxconfigd daemons on the slave nodes have not lost information about the sharedconfiguration, so that any displayed configuration information is correct.If the vxconfigd daemon is stopped on a slave node, the master node takes noaction. When the vxconfigd daemon is restarted on the slave, the slave vxconfigddaemon attempts to reconnect to the master daemon and to re-acquire theinformation about the shared configuration. (Neither the kernel view of the sharedconfiguration nor access to shared disks is affected.) Until the vxconfigd daemon onthe slave node has successfully reconnected to the vxconfigd daemon on the masternode, it has very little information about the shared configuration and any attempts todisplay or modify the shared configuration can fail. For example, shared disk groupslisted using the vxdg list command are marked as disabled; when the rejoincompletes successfully, they are marked as enabled.◆ If the vxconfigd daemon is stopped on both the master and slave nodes, the slavenodes do not display accurate configuration information until vxconfigd isrestarted on the master and slave nodes, and the daemons have reconnected.If the vxclustd daemon determines that the vxconfigd daemon is not running on anode during a cluster reconfiguration, vxclustd restarts vxconfigd automatically.Note The -r reset option to vxconfigd restarts the vxconfigd daemon and recreatesall states from scratch. This option cannot be used to restart vxconfigd while anode is joined to a cluster because it causes cluster information to be discarded.Node ShutdownAlthough it is possible to shut down the cluster on a node by invoking the shutdownprocedure of the node’s cluster monitor, this procedure is intended for terminating clustercomponents after stopping any applications on the node that have access to sharedstorage. VxVM supports clean node shutdown, which allows a node to leave the clustergracefully when all access to shared volumes has ceased. The host is still operational, butcluster applications cannot be run on it.The cluster functionality of VxVM maintains global state information for each volume.This enables VxVM to determine which volumes need to be recovered when a nodecrashes. When a node leaves the cluster due to a crash or by some other means that is notclean, VxVM determines which volumes may have writes that have not completed andthe master node resynchronizes these volumes. It can use dirty region logging (DRL) orFastResync if these are active for any of the volumes.254 <strong>VERITAS</strong> <strong>Volume</strong> Manager Administrator’s Guide
Cluster Initialization and ConfigurationClean node shutdown must be used after, or in conjunction with, a procedure to halt allcluster applications. Depending on the characteristics of the clustered application and itsshutdown procedure, a successful shutdown can require a lot of time (minutes to hours).For instance, many applications have the concept of draining, where they accept no newwork, but complete any work in progress before exiting. This process can take a long timeif, for example, a long-running transaction is active.When the VxVM shutdown procedure is invoked, it checks all volumes in all shared diskgroups on the node that is being shut down. The procedure then either continues with theshutdown, or fails for one of the following reasons:◆◆If all volumes in shared disk groups are closed, VxVM makes them unavailable toapplications. Because all nodes are informed that these volumes are closed on theleaving node, no resynchronization is performed.If any volume in a shared disk group is open, the shutdown operation in the kernelwaits until the volume is closed. There is no timeout checking in this operation.Note Once shutdown succeeds, the node has left the cluster. It is not possible to access theshared volumes until the node joins the cluster again.Since shutdown can be a lengthy process, other reconfiguration can take place whileshutdown is in progress. Normally, the shutdown attempt is suspended until the otherreconfiguration completes. However, if it is already too far advanced, the shutdown maycomplete first.Note The MC/ServiceGuard cmhaltnode command first attempts to halt all packagesthat are using shared disks before attempting to shut down VxVM. If an applicationrunning outside of a defined package performs I/O to a shared volume, it can delayshutdown of VxVM, resulting in an MC/ServiceGuard timeout.Node AbortIf a node does not leave a cluster cleanly, this is because it crashed or because some clustercomponent made the node leave on an emergency basis. The ensuing clusterreconfiguration calls the VxVM abort function. This procedure immediately attempts tohalt all access to shared volumes, although it does wait until pending I/O from or to thedisk completes.I/O operations that have not yet been started are failed, and the shared volumes areremoved. Applications that were accessing the shared volumes therefore fail with errors.After a node abort or crash, shared volumes must be recovered, either by a surviving nodeor by a subsequent cluster restart, because it is very likely that there are unsynchronizedmirrors.Chapter 10, Administering Cluster Functionality255
Upgrading Cluster FunctionalityCluster ShutdownIf all nodes leave a cluster, shared volumes must be recovered when the cluster is nextstarted if the last node did not leave cleanly, or if resynchronization from previous nodesleaving uncleanly is incomplete.Upgrading Cluster FunctionalityThe rolling upgrade feature allows you to upgrade the version of VxVM running in acluster without shutting down the entire cluster. To install the new version of VxVMrunning on a cluster, make one node leave the cluster, upgrade it, and then join it back intothe cluster. This operation is repeated for each node in the cluster.Each <strong>VERITAS</strong> <strong>Volume</strong> Manager release starting with Release 3.1 has a cluster protocolversion number associated with it. The cluster protocol version is not the same as therelease number or the disk group version number. The cluster protocol version is stored inthe /etc/vx/volboot file. During a new installation of VxVM, the vxdctl initcommand creates the volboot file and sets the cluster protocol version to the highestsupported version.Each new <strong>VERITAS</strong> <strong>Volume</strong> Manager release supports two cluster protocol versions. Thelower version number corresponds to a previous <strong>VERITAS</strong> <strong>Volume</strong> Manager release. Thishas a fixed set of features and communication protocols. The higher version numbercorresponds to the new release of VxVM which has a new set of these features. If the newrelease of VxVM does not have any functional or protocol changes, but only bug fixes orminor changes, the cluster protocol version remains unchanged. In this case, the clusterprotocol version does not need to be upgraded.During a rolling upgrade, each node must be shut down and the <strong>VERITAS</strong> <strong>Volume</strong>Manager release with the latest cluster protocol version must be installed. All nodes thathave the new release of VxVM continue to use the lower level version. A slave node thathas the new cluster protocol version installed tries to join the cluster. If the new clusterprotocol version is not in use on the master node, it rejects the join and provides thecurrent cluster protocol version to the slave node. The slave retries the join with thecluster protocol version provided by the master node. If the join fails at this point, thecluster protocol version on the master node is out of range of the protocol versionssupported by the joining slave. In such a situation, you must upgrade the remainder of thecluster through each intermediate release of VxVM to reach the latest supported clusterprotocol version.Once you have installed the new release on all nodes, run the vxdctl upgradecommand on the master node to switch the cluster to the higher cluster protocol version.See “Upgrading the Cluster Protocol Version” on page 266 for more information.256 <strong>VERITAS</strong> <strong>Volume</strong> Manager Administrator’s Guide
Dirty Region Logging (DRL) in Cluster EnvironmentsDirty Region Logging (DRL) in Cluster EnvironmentsDirty region logging (DRL) is an optional property of a volume that provides speedyrecovery of mirrored volumes after a system failure. DRL is supported incluster-shareable disk groups. This section provides a brief overview of DRL anddescribes how DRL behaves in a cluster environment. For more information on DRL, see“Dirty Region Logging (DRL)” on page 40.In a cluster environment, the VxVM implementation of DRL differs slightly from thenormal implementation. The following sections outline some of the differences anddiscuss some aspects of the cluster environment implementation.Header CompatibilityExcept for the addition of a cluster-specific magic number, DRL headers in a clusterenvironment are the same as their non-clustered counterparts.Dirty Region Log Format and Size RequirementsAs in the non-clustered case, the dirty region log in clusters exists on a log subdisk in amirrored volume.A dirty region log on a system without cluster support has a recovery map and a singleactive map. A dirty region log in a cluster, however, has one recovery map and one activemap for each node in the cluster). The cluster functionality of VxVM places the recoverymap at the beginning of the log.The dirty region log size in clusters is typically larger than in non-clustered systems, as itmust accommodate a recovery map plus active maps for each node in the cluster. The sizeof each map within the dirty region log is one or more whole blocks. The vxassistcommand automatically allocates a sufficiently large dirty region log.The log size depends on the volume size and the number of nodes. The log must be largeenough to accommodate all maps (one map per node plus a recovery map). Each mapmust be one block long for each 2 gigabytes of volume size. For a 2-gigabyte volume in a2-node cluster, a log size of 2 blocks (one block per map) is sufficient; this is the minimumlog size. A 4-gigabyte volume in a 4-node cluster requires a log size of 10 blocks, and soon.It is possible to re-import a non-shared disk group (and its volumes) as a shared diskgroup in a cluster environment. However, the dirty region logs of the imported disk groupmay be considered invalid and a full recovery may result.If a shared disk group is imported by a system without cluster support, VxVM considersthe logs of the shared volumes to be invalid and conducts a full volume recovery. Afterthe recovery completes, VxVM uses DRL.Chapter 10, Administering Cluster Functionality257
Administering VxVM in Cluster EnvironmentsThe cluster functionality of VxVM can perform a DRL recovery on a non-shared volume.However, if such a volume is moved to a VxVM system with cluster support andimported as shared, the dirty region log is probably too small to accommodate maps forall the cluster nodes. VxVM then marks the log invalid and performs a full recoveryanyway. Similarly, moving a DRL volume from a two-node cluster to a four-node clustercan result in too small a log size, which the cluster functionality of VxVM handles with afull volume recovery. In both cases, you are responsible for allocating a new log ofsufficient size.To increase the size of an existing DRL log so that it can accommodate maps for extranodes, use the vxplex -o rm dis command to detach and remove the log plex, and thenuse the vxassist addlog command to recreate the log.How DRL Works in a Cluster EnvironmentWhen one or more nodes in a cluster crash, DRL must handle the recovery of all volumesthat were in use by those nodes when the crashes occurred. On initial cluster startup, allactive maps are incorporated into the recovery map during the volume start operation.Nodes that crash (that is, leave the cluster as dirty) are not allowed to rejoin the clusteruntil their DRL active maps have been incorporated into the recovery maps on all affectedvolumes. The recovery utilities compare a crashed node’s active maps with the recoverymap and make any necessary updates before the node can rejoin the cluster and resumeI/O to the volume (which overwrites the active map). During this time, other nodes cancontinue to perform I/O.VxVM tracks which nodes have crashed. If multiple node recoveries are underway in acluster at a given time, their respective recoveries and recovery map updates can competewith each other. VxVM tracks changes in the state of DRL recovery and prevents I/Ocollisions.The master node performs volatile tracking of DRL recovery map updates for eachvolume, and prevents multiple utilities from changing the recovery map simultaneously.Administering VxVM in Cluster EnvironmentsThe following sections describe procedures for administering the cluster functionality ofVxVM.Note Most VxVM commands require superuser or equivalent privileges.258 <strong>VERITAS</strong> <strong>Volume</strong> Manager Administrator’s Guide
Requesting the Status of a Cluster NodeAdministering VxVM in Cluster EnvironmentsThe vxdctl utility controls the operation of the vxconfigd volume configurationdaemon. The -c option can be used to request cluster information. To determine whetherthe vxconfigd daemon is enabled and/or running, use the following command:# vxdctl -c modeThis produces one of the following output messages depending on the current status ofthe cluster node:mode: enabled: cluster active - MASTERmode: enabled: cluster active - SLAVEmode: enabled: cluster active - role not setmode: enabled: cluster inactiveNote If the vxconfigd daemon is disabled, no cluster information is displayed.See the vxdctl(1M) manual page for more information.Determining if a Disk is ShareableThe vxdisk utility manages VxVM disks. To use the vxdisk utility to determine whethera disk is part of a cluster-shareable disk group, use the following command:# vxdisk list accessnamewhere accessname is the disk access name (or device name).A portion of the output from this command (for the device c4t1d0) is shown here:Device: c4t1d0devicetag: c4t1d0type: slicedclusterid: cvm2disk: name=disk01 id=963616090.1034.cvm2timeout: 30group: name=rootdg id=963616065.1032.cvm2flags: online ready autoconfig shared imported...Note that the clusterid field is set to cvm2 (the name of the cluster), and the flagsfield includes an entry for shared. When a node is not joined to the cluster, the flagsfield contains the autoimport flag instead of imported.Chapter 10, Administering Cluster Functionality259
Administering VxVM in Cluster EnvironmentsListing Shared Disk Groupsvxdg can be used to list information about shared disk groups. To display information forall disk groups, use the following command:# vxdg listExample output from this command is displayed here:NAME STATE IDrootdg enabled 774215886.1025.tealgroup2 enabled,shared 774575420.1170.tealgroup1 enabled,shared 774222028.1090.tealShared disk groups are designated with the flag shared.To display information for shared disk groups only, use the following command:# vxdg -s listExample output from this command is as follows:NAME STATE IDgroup2 enabled,shared 774575420.1170.tealgroup1 enabled,shared 774222028.1090.tealTo display information about one specific disk group, use the following command:# vxdg list diskgroupwhere diskgroup is the disk group name.For example, the output for the command vxdg list group1 on the master is as follows:Group: group1dgid: 774222028.1090.tealimport-id: 32768.1749flags: sharedversion: 70local-activation: exclusive-writecluster-actv-modes: node0=ew node1=offdetach-policy: localcopies: nconfig=default nlog=defaultconfig: seqno=0.1976 permlen=1456 free=1448 templen=6 loglen=220config disk c1t0d0s2 copy 1 len=1456 state=clean onlineconfig disk c1t1d0s2 copy 1 len=1456 state=clean onlinelog disk c1t0d0s2 copy 1 len=220log disk c1t1d0s2 copy 1 len=220Note that the flags field is set to shared. The output for the same command when runon a slave is slightly different. Also note the local-activation andcluster-actv-modes fields. These display the activation mode for this node and foreach node in the cluster respectively.260 <strong>VERITAS</strong> <strong>Volume</strong> Manager Administrator’s Guide
Administering VxVM in Cluster EnvironmentsCreating a Shared Disk GroupNote Shared disk groups can only be created on the master node.If the cluster software has been run to set up the cluster, a shared disk group can becreated using the following command:# vxdg -s init diskgroup [diskname=]devicenamewhere diskgroup is the disk group name, diskname is the administrative name chosen fora VM disk, and devicename is the device name (or disk access name).CautionThe operating system cannot tell if a disk is shared. To protect data integritywhen dealing with disks that can be accessed by multiple systems, use thecorrect designation when adding a disk to a disk group. VxVM allows you toadd a disk that is not physically shared to a shared disk group if the node wherethe disk is accessible is the only node in the cluster. However, this means thatother nodes cannot join the cluster. Furthermore, if you attempt to add the samedisk to different disk groups on two nodes at the same time, the results areundefined. Perform all configuration on one node only, and preferably on themaster node.Forcibly Adding a Disk to a Disk GroupNote Disks can only be forcibly added to a shared disk group on the master node.If VxVM does not add a disk to an existing disk group because that disk is not attached tothe same nodes as the other disks in the disk group, you can forcibly add the disk usingthe following command:# vxdg -f adddisk -g diskgroup [diskname=]devicenameCautionOnly use the force option(-f) if you are fully aware of the consequences such aspossible data corruption.Chapter 10, Administering Cluster Functionality261
Administering VxVM in Cluster EnvironmentsImporting Disk Groups as SharedNote Shared disk groups can only be imported on the master node.Disk groups can be imported as shared using the vxdg -s import command. If the diskgroups are set up before the cluster software is run, the disk groups can be imported intothe cluster arrangement using the following command:# vxdg -s import diskgroupwhere diskgroup is the disk group name or ID. On subsequent cluster restarts, the diskgroup is automatically imported as shared. Note that it can be necessary to deport the diskgroup (using the vxdg deport diskgroup command) before invoking the vxdg utility.Forcibly Importing a Disk GroupYou can use the -f option to the vxdg command to import a disk group forcibly.CautionThe force option(-f) must be used with caution and only if you are fully awareof the consequences such as possible data corruption.When a cluster is restarted, VxVM can refuse to auto-import a disk group for one of thefollowing reasons:◆◆A disk in the disk group is no longer accessible because of hardware errors on thedisk. In this case, use the following command to forcibly reimport the disk group:# vxdg -s -f import diskgroupSome of the nodes to which disks in the disk group are attached are not currently inthe cluster, so the disk group cannot access all of its disks. In this case, a forced importis unsafe and must not be attempted because it can result in inconsistent mirrors.Converting a Disk Group from Shared to PrivateNote Shared disk groups can only be deported on the master node.To convert a shared disk group to a private disk group, first deport it on the master nodeusing this command:# vxdg deport diskgroupThen reimport the disk group on any cluster node using this command:# vxdg import diskgroup262 <strong>VERITAS</strong> <strong>Volume</strong> Manager Administrator’s Guide
Moving Objects Between Disk GroupsAdministering VxVM in Cluster EnvironmentsAs described in “Moving Objects Between Disk Groups” on page 127, you can use thevxdg move command to move a self-contained set of VxVM objects such as disks andtop-level volumes between disk groups. In a cluster, you can move such objects betweenprivate disk groups on any cluster node where those disk groups are imported.Note You can only move objects between shared disk groups on the master node. Youcannot move objects between private and shared disk groups.Splitting Disk GroupsAs described in “Splitting Disk Groups” on page 129, you can use the vxdg splitcommand to remove a self-contained set of VxVM objects from an imported disk group,and move them to a newly created disk group.Splitting a private disk group creates a private disk group, and splitting a shared diskgroup creates a shared disk group. You can split a private disk group on any cluster nodewhere that disk group is imported. You can only split a shared disk group or create ashared target disk group on the master node.For a description of the other options, see “Moving Objects Between Disk Groups” onpage 127.Joining Disk GroupsAs described in “Joining Disk Groups” on page 130, you can use the vxdg joincommand to merge the contents of two imported disk groups. In a cluster, you can jointwo private disk groups on any cluster node where those disk groups are imported.If the source disk group and the target disk group are both shared, you must perform thejoin on the master node.Note You cannot join a private disk group and a shared disk group.Chapter 10, Administering Cluster Functionality263
Administering VxVM in Cluster EnvironmentsChanging the Activation Mode on a Shared Disk GroupNote The activation mode for access by a cluster node to a shared disk group is set on thatnode.The activation mode of a shared disk group can be changed using the followingcommand:# vxdg -g diskgroup set activation=modeThe activation mode is one of exclusive-write or ew, read-only or ro,shared-read or sr, shared-write or sw, or off. See “Activation Modes of SharedDisk Groups” on page 247 for more information.Setting the Connectivity Policy on a Shared Disk GroupNote The connectivity policy for a shared disk group can only be set on the master node.The vxedit command may be used to set either the global or local connectivitypolicy for a shared disk group:# vxedit -g diskgroup set diskdetpolicy=global|local diskgroupSee “Connectivity Policy of Shared Disk Groups” on page 249 for more information.Creating <strong>Volume</strong>s with Exclusive Open Access by a NodeNote <strong>Volume</strong>s with exclusive open access can only be created on the master node.When using the vxassist command to create a volume, you can use the exclusive=onattribute to specify that the volume may only be opened by one node in the cluster at atime. For example, to create the mirrored volume volmir in the disk group dskgrp, andconfigure it for exclusive open, use the following command:# vxassist -g dskgrp make volmir 5g layout=mirror exclusive=onMultiple opens by the same node are also supported. Any attempts by other nodes toopen the volume fail until the final close of the volume by the node that opened it.Specifying exclusive=off instead means that more than one node in a cluster can opena volume simultaneously.264 <strong>VERITAS</strong> <strong>Volume</strong> Manager Administrator’s Guide
Administering VxVM in Cluster EnvironmentsSetting Exclusive Open Access to a <strong>Volume</strong> by a NodeNote Exclusive open access on a volume can only be set on the master node. Ensure thatnone of the nodes in the cluster have the volume open when setting this attribute.You can set the exclusive=on attribute with the vxvol command to specify that anexisting volume may only be opened by one node in the cluster at a time.For example, to set exclusive open on the volume volmir in the disk group dskgrp, usethe following command:# vxvol -g dskgrp set exclusive=on volmirMultiple opens by the same node are also supported. Any attempts by other nodes toopen the volume fail until the final close of the volume by the node that opened it.Specifying exclusive=off instead means that more than one node in a cluster can opena volume simultaneously.Displaying the Cluster Protocol VersionThe following command displays the cluster protocol version running on a node:# vxdctl listThis command produces output similar to the following:Volboot fileversion: 3/1seqno: 0.19cluster protocol version: 40hostid: gigaentries:You can also check the existing cluster protocol version using the following command:# vxdctl protocolversionThis produces output similar to the following:Cluster running at protocol 40Chapter 10, Administering Cluster Functionality265
Administering VxVM in Cluster EnvironmentsDisplaying the Supported Cluster Protocol Version RangeThe following command displays the maximum and minimum protocol versionsupported by the node and the current protocol version:# vxdctl supportThis command produces out put similar to the following:Support information:vold_vrsn: 11dg_minimum: 60dg_maximum: 70kernel: 10protocol_minimum: 30protocol_maximum: 40protocol_current: 40You can also use the following command to display the maximum and minimum clusterprotocol version supported by the current <strong>VERITAS</strong> <strong>Volume</strong> Manager release:# vxdctl protocolrangeThis produces output similar to the following:minprotoversion: 30, maxprotoversion: 40Upgrading the Cluster Protocol VersionNote The cluster protocol version can only be updated on the master node.After all the nodes in the cluster have been updated with a new cluster protocol, you canupgrade the entire cluster using the following command on the master node:# vxdctl upgrade266 <strong>VERITAS</strong> <strong>Volume</strong> Manager Administrator’s Guide
Recovering <strong>Volume</strong>s in Shared Disk GroupsNote <strong>Volume</strong>s can only be recovered on the master node.Administering VxVM in Cluster EnvironmentsThe vxrecover utility is used to recover plexes and volumes after disk replacement.When a node leaves a cluster, it can leave some mirrors in an inconsistent state. Thevxrecover utility can be used to recover such volumes. The -c option to vxrecovercauses it to recover all volumes in shared disk groups. The vxconfigd daemonautomatically calls the vxrecover utility with the -c option when necessary.Note While the vxrecover utility is active, there can be some degradation in systemperformance.Obtaining Cluster Performance StatisticsThe vxstat utility returns statistics for specified objects. In a cluster environment,vxstat gathers statistics from all of the nodes in the cluster. The statistics give the totalusage, by all nodes, for the requested objects. If a local object is specified, its local usage isreturned.You can optionally specify a subset of nodes using the following form of the command:# vxstat -g diskgroup -n node[,node...]where node is an integer. If a comma-separated list of nodes is supplied, the vxstat utilitydisplays the sum of the statistics for the nodes in the list.For example, to obtain statistics for node 2, volume vol1,use the following command:# vxstat -g group1 -n 2 vol1This command produces output similar to the following:OPERATIONS BLOCKS AVG TIME(ms)TYP NAME READ WRITE READ WRITE READ WRITEvol vol1 2421 0 600000 0 99.0 0.0To obtain and display statistics for the entire cluster, use the following command:# vxstat -bThe statistics for all nodes are summed. For example, if node 1 performed 100 I/Ooperations and node 2 performed 200 I/O operations, vxstat -b displays a total of 300I/O operations.Chapter 10, Administering Cluster Functionality267
Administering VxVM in Cluster Environments268 <strong>VERITAS</strong> <strong>Volume</strong> Manager Administrator’s Guide
Configuring Off-Host Processing 11IntroductionOff-host processing allows you to implement the following activities:◆◆◆Data Backup—As the requirement for 24 x 7 availability becomes essential for manybusinesses, organizations cannot afford the downtime involved in backing up criticaldata offline. By taking a snapshot of the data, and backing up from this snapshot,business-critical applications can continue to run without extended down time orimpacted performance.Decision Support Analysis and Reporting—Because snapshots hold a point-in-time copyof a production database, a replica of the database can be set up using the snapshots.Operations such as decision support analysis and business reporting do not requireaccess to up-to-the-minute information. This means that they can use a database copythat is running on a host other than the primary. When required, the database copycan quickly be synchronized with the data in the primary database.Testing and Training—Development or service groups can use snapshots as test datafor new applications. Snapshot data provides developers, system testers and QAgroups with a realistic basis for testing the robustness, integrity and performance ofnew applications.◆ Database Error Recovery—Logic errors caused by an administrator or an applicationprogram can compromise the integrity of a database. By restoring the database tablefiles from a snapshot copy, the database can be recovered more quickly than by fullrestoration from tape or other backup media.Off-host processing is made possible by using the FastResync and disk group move, splitand join features of VxVM. These features are described in the following sections.You can also use such solutions in conjunction with the cluster functionality of VxVM.Forimplementation guidelines, see “Implementing Off-Host Processing Solutions” onpage 271.269
IntroductionFastResync of <strong>Volume</strong> SnapshotsNote You may need an additional license to use this feature.VxVM allows you to take multiple snapshots of your data at the level of a volume. Asnapshot volume contains a stable copy of a volume’s data at a given moment in time thatyou can use for online backup or decision support. If FastResync is enabled on a volume,VxVM uses a FastResync map to keep track of which blocks are updated in the volume andin the snapshot. If the data in one mirror is not updated for some reason, it becomesout-of-date, or stale, with respect to the other mirrors in the volume. The presence of theFastResync map means that only those updates that the mirror has missed need bereapplied to resynchronize it with the volume. A full, and thereby much slower,resynchronization of the mirror from the volume is unnecessary.Two forms or FastResync may be configured on a volume: Persistent FastResync andNon-Persistent FastResync. Persistent FastResync uses disk storage to ensure thatFastResync maps survive both system and cluster crashes. Non-Persistent FastResyncmaps are held in memory. Non-Persistent FastResync maps for volumes in shared diskgroups can survive individual system crashes in a cluster but cannot survive clustercrashes. Non-Persistent FastResync maps for volumes in private disk groups do notsurvive if the system crashes that is accessing them.When snapshot volumes are reattached to their original volumes, FastResync allows thesnapshot data to be quickly refreshed and re-used. If Persistent FastResync is enabled on avolume in a private disk group, such incremental resynchronization can happen even ifthe host is rebooted.Persistent FastResync can track the association between volumes and their snapshotvolumes after they are moved into different disk groups. When the disk groups arerejoined, this allows the snapshot plexes to be quickly resynchronized. Non-PersistentFastResync cannot be used for this purpose.Note If you move or split an original volume into a separate disk group from its snapshotvolume, and then move or join the volumes into the same disk group, you must usethe vxplex snapback command with the -f option to resynchronize the snapshotplexes. You cannot use vxassist snapback for this purpose. This restriction doesnot apply if you split a snapshot volume into a separate disk group from its originalvolume, and subsequently return the snapshot volume to the original disk group.For more information, see “<strong>Volume</strong> Snapshots” on page 42 and “FastResync” on page 43.270 <strong>VERITAS</strong> <strong>Volume</strong> Manager Administrator’s Guide
Implementing Off-Host Processing SolutionsDisk Group Split and JoinNote You may need an additional license to use this feature.A volume, such as a snapshot volume, can be split off into a separate disk group anddeported. It is then ready for importing on another host that is dedicated to off-hostprocessing. This host need not be a member of a cluster but must have access to the disks.At a later stage, the disk group can be deported, re-imported, and joined with the originaldisk group or with a different disk group.For more information, see “Reorganizing the Contents of Disk Groups” on page 120.Implementing Off-Host Processing SolutionsAs shown in “Example Implementation of Off-Host Processing” on page 271, by accessingsnapshot volumes from a lightly loaded host (shown here as the OHP host), CPU- andI/O-intensive operations for online backup and decision support do not degrade theperformance of the primary host that is performing the main production activity (such asrunning a database). Also, if you place the snapshot volumes on disks that are attached todifferent host controllers than the disks in the primary volumes, it is possible to avoidcontending with the primary host for I/O resources.Example Implementation of Off-Host ProcessingPrimary HostOHP HostSCSI or FibreChannelConnectivityDisks containing primaryvolumes used to holdproduction databases orfile systemsDisks containing snapshotvolumes used toimplement off-hostprocessing solutionsChapter 11, Configuring Off-Host Processing271
Implementing Off-Host Processing SolutionsThe following sections describe how you can apply off-host processing to implementregular online backup of a volume in a private disk group, and to set up a replica of aproduction database for decision support. Two applications are outlined in the followingsections:◆Implementing Online Backup◆ Implementing Decision SupportThese applications use the Persistent FastResync and disk group move, split and joinfeatures of VxVM in conjunction with volume snapshots.Implementing Online BackupThis section describes a procedure for implementing off-host online backup for a volumein a private disk group. The intention is to present an outline of how to set up a regularbackup cycle by combining the Persistent FastResync and disk group split and joinfeatures of VxVM. It is beyond the scope of this guide to describe how to configure adatabase to use this procedure, or how to perform the backup itself.To back up a volume in a private disk group, use the following procedure.1. Use the following command on the primary host to see if the volume is associatedwith a data change object (DCO) and DCO volume that allow Persistent FastResync tobe used with the volume:# vxprint -g volumedg -F%hasdcolog volumeThis command returns on if there is a DCO and DCO volume; otherwise, it returnsoff.If the volume is not associated with a DCO object and DCO volume, follow theprocedure described in “Adding a DCO and DCO <strong>Volume</strong>” on page 191.2. Use the following command on the primary host to check whether FastResync isenabled on a volume:# vxprint -g volumedg -F%fastresync volumeThis command returns on if FastResync is enabled; otherwise, it returns off.If Persistent FastResync is disabled, enable it using the following command on theprimary host:# vxvol -g volumedg set fastresync=on volume272 <strong>VERITAS</strong> <strong>Volume</strong> Manager Administrator’s Guide
Implementing Off-Host Processing SolutionsNote If the volume was created before release 3.2 of VxVM, and it has any attachedsnapshot plexes or it is associated with any snapshot volumes, follow the proceduregiven in “Enabling Persistent FastResync on Existing <strong>Volume</strong>s with AssociatedSnapshots” on page 207.3. If the volume does not already contain a snapshot plex, create a snapshot mirror for avolume using the following command on the primary host:# vxassist -g volumedg [-b] snapstart [nmirror=N] volumeThe vxassist snapstart task creates a write-only mirror, which is attached to andsynchronized from the volume to be backed up.Note By default, VxVM attempts to avoid placing a snapshot mirrors on a disk thatalready holds any plexes of a data volume. However, this may be impossible ifinsufficient space is available in the disk group. In this case, VxVM uses anyavailable space on other disks in the disk group. If the snapshot plexes are placed ondisks which are used to hold the plexes of other volumes, this may cause problemswhen you subsequently attempt to move a snapshot volume into another diskgroup as described in “Considerations for Placing DCO Plexes” on page 125. Tooverride the default storage allocation policy, you can use storage attributes tospecify explicitly which disks to use for the snapshot plexes. See “Creating a<strong>Volume</strong> on Specific Disks” on page 164 for more information.If you start vxassist snapstart in the background using the -b option, you canuse the vxassist snapwait command to wait for the creation of the mirror tocomplete as shown here:# vxassist -g volumedg snapwait volumeIf vxassist snapstart is not run in the background, it does not exit until themirror has been synchronized with the volume. The mirror is then ready to be used asa plex of a snapshot volume. While attached to the original volume, its contentscontinue to be updated until you take the snapshot.Use the nmirror attribute to create as many snapshot mirrors as you need for thesnapshot volume. For a backup, you should usually only require the default of one.4. If the volume to be backed up contains database tables in a file system, suspendupdates to the volume. The database may have a hot backup mode that allows you todo this by temporarily suspending writes to its tables.Chapter 11, Configuring Off-Host Processing273
Implementing Off-Host Processing Solutions5. On the primary host, make a snapshot volume, snapvol, using the followingcommand:# vxassist -g volumedg snapshot [nmirrors=N] volume snapvolIf required, use the nmirrors attribute to specify the number of mirrors in thesnapshot volume.If a database spans more than one volume, specify all the volumes and their snapshotvolumes on the same line, for example:# vxassist -g dbasedg snapshot vol1 snapvol1 vol2 snapvol2 \vol3 snapvol36. If you temporarily suspended updates to the volume by a database in step 4, releaseall the tables from hot backup mode.7. On the primary host, use the following command to split the snapshot volume into aseparate disk group, snapvoldg, from the original disk group, volumedg:# vxdg split volumedg snapvoldg snapvol8. On the primary host, deport the snapshot volume’s disk group using the followingcommand:# vxdg deport snapvoldg9. On the OHP host where the backup is to be performed, use the following command toimport the snapshot volume’s disk group:# vxdg import snapvoldg10. The snapshot volume is initially disabled following the split. Use the followingcommands on the OHP host to recover and restart the snapshot volume:# vxrecover -g snapvoldg -m snapvol# vxvol -g snapvoldg start snapvol11. On the OHP host, back up the snapshot volume. If you need to remount the filesystem in the volume to back it up, first run fsck on the volume. The following aresample commands for checking and mounting a file system:# fsck -F vxfs /dev/vx/rdsk/snapvoldg/snapvol# mount -F vxfs /dev/vx/dsk/snapvoldg/snapvol mount_pointBack up the file system at this point, and then use the following command tounmount it.# umount mount_point274 <strong>VERITAS</strong> <strong>Volume</strong> Manager Administrator’s Guide
Implementing Off-Host Processing Solutions12. On the OHP host, use the following command to deport the snapshot volume’s diskgroup:# vxdg deport snapvoldg13. On the primary host, re-import the snapshot volume’s disk group using the followingcommand:# vxdg import snapvoldg14. On the primary host, use the following command to rejoin the snapshot volume’s diskgroup with the original volume’s disk group:# vxdg join snapvoldg volumedg15. The snapshot volume is initially disabled following the join. Use the followingcommands on the primary host to recover and restart the snapshot volume:# vxrecover -g volumedg -m snapvol# vxvol -g volumedg start snapvol16. On the primary host, reattach the plexes of the snapshot volume to the originalvolume, and resynchronize their contents using the following command:# vxassist -g volumedg -o allplexes snapback snapvolRepeat steps 4 through 16 each time that you need to back up the volume.Implementing Decision SupportThis section describes a procedure for implementing off-host decision support for avolume in a private disk group. The intention is to present an outline of how to set up areplica database by combining the Persistent FastResync and disk group split and joinfeatures of VxVM. It is beyond the scope of this guide to describe how to configure adatabase to use this procedure.To set up a replica database using the table files that are configured within a volume in aprivate disk group, use the following procedure.1. Use the following command on the primary host to see if the volume is associatedwith a data change object (DCO) and DCO volume that allow Persistent FastResync tobe used with the volume:# vxprint -g volumedg -F%hasdcolog volumeThis command returns on if there is a DCO and DCO volume; otherwise, it returnsoff.Chapter 11, Configuring Off-Host Processing275
Implementing Off-Host Processing SolutionsIf the volume is not associated with a DCO object and DCO volume, follow theprocedure described in “Adding a DCO and DCO <strong>Volume</strong>” on page 191.2. Use the following command on the primary host to check whether FastResync isenabled on a volume:# vxprint -g volumedg -F%fastresync volumeThis command returns on if FastResync is enabled; otherwise, it returns off.If Persistent FastResync is disabled, enable it using the following command on themaster host:# vxvol -g volumedg set fastresync=on volume3. If the volume does not already contain a snapshot plex, create one using the followingcommand on the primary host:# vxassist -g volumedg [-b] snapstart [nmirror=N] volumeThe vxassist snapstart task creates a write-only mirror, which is attached to andsynchronized from the volume to be backed up.Note By default, VxVM attempts to avoid placing a snapshot mirrors on a disk thatalready holds any plexes of a data volume. However, this may be impossible ifinsufficient space is available in the disk group. In this case, VxVM uses anyavailable space on other disks in the disk group. If the snapshot plexes are placed ondisks which are used to hold the plexes of other volumes, this may cause problemswhen you subsequently attempt to move a snapshot volume into another diskgroup as described in “Considerations for Placing DCO Plexes” on page 125. Tooverride the default storage allocation policy, you can use storage attributes tospecify explicitly which disks to use for the snapshot plexes. See “Creating a<strong>Volume</strong> on Specific Disks” on page 164 for more information.If you start vxassist snapstart in the background using the -b option, you canuse the vxassist snapwait command to wait for the creation of the mirror tocomplete as shown here:# vxassist -g volumedg snapwait volumeIf vxassist snapstart is not run in the background, it does not exit until themirror has been synchronized with the volume. The mirror is then ready to be used asa plex of a snapshot volume. While attached to the original volume, its contentscontinue to be updated until you take the snapshot.Use the nmirror attribute to create as many snapshot mirrors as you need for thesnapshot volume. For applications where data redundancy is required for the volumethat contains the replica database, specify a number greater than one.276 <strong>VERITAS</strong> <strong>Volume</strong> Manager Administrator’s Guide
Implementing Off-Host Processing Solutions4. Prepare the OHP host to receive the snapshot volume that contains the copy of thedatabase tables. This may involve setting up private volumes to contain any redologs, and configuring any files that are used to initialize the database.5. On the primary host, suspend updates to the volume that contains the databasetables. The database may have a hot backup mode that allows you to do this bytemporarily suspending writes to its tables.6. On the primary host, make a snapshot volume, snapvol, using the followingcommand:# vxassist -g volumedg snapshot [nmirrors=N] volume snapvolIf required, use the nmirrors attribute to specify the number of mirrors in thesnapshot volume.If a database spans more than one volume, specify all the volumes and their snapshotvolumes on the same line, for example:# vxassist -g dbasedg snapshot vol1 snapvol1 vol2 snapvol2 \vol3 snapvol37. On the primary host, release the tables from hot backup mode.8. On the primary host, use the following command to split the snapshot volume into aseparate disk group, snapvoldg, from the original disk group, volumedg:# vxdg split volumedg snapvoldg snapvol9. On the primary host, deport the snapshot volume’s disk group using the followingcommand:# vxdg deport snapvoldg10. On the OHP host where the replica database is to be set up, use the followingcommand to import the snapshot volume’s disk group:# vxdg import snapvoldg11. The snapshot volume is initially disabled following the split. Use the followingcommands on the OHP host to recover and restart the snapshot volume:# vxrecover -g snapvoldg -m snapvol# vxvol -g snapvoldg start snapvol12. On the OHP host, check and mount the snapshot volume. The following are samplecommands for checking and mounting a file system:# fsck -F vxfs /dev/vx/rdsk/snapvoldg/snapvol# mount -F vxfs /dev/vx/dsk/snapvoldg/snapvol mount_pointChapter 11, Configuring Off-Host Processing277
Implementing Off-Host Processing Solutions13. On the OHP host, use the appropriate database commands to recover and start thereplica database for its decision support role.When you no longer need the replica database, or you want to resynchronize its data withthe primary database, you can reattach the snapshot plexes with the original volume asdescribed below:1. On the OHP host, shut down the replica database, and use the following command tounmount the snapshot volume:# umount mount_point2. On the OHP host, use the following command to deport the snapshot volume’s diskgroup:# vxdg deport snapvoldg3. On the primary host, re-import the snapshot volume’s disk group using the followingcommand:# vxdg import snapvoldg4. On the primary host, use the following command to rejoin the snapshot volume’s diskgroup with the original volume’s disk group:# vxdg join snapvoldg volumedg5. The snapshot volume is initially disabled following the join. Use the followingcommands on the primary host to recover and restart the snapshot volume:# vxrecover -g volumedg -m snapvol# vxvol -g volumedg start snapvol6. On the primary host, reattach the plexes of the snapshot volume to the originalvolume, and resynchronize their contents using the following command:# vxassist -g volumedg -o allplexes snapback snapvol278 <strong>VERITAS</strong> <strong>Volume</strong> Manager Administrator’s Guide
Performance Monitoring and Tuning 12Introduction<strong>VERITAS</strong> <strong>Volume</strong> Manager (VxVM) can improve overall system performance byoptimizing the layout of data storage on the available hardware. This chapter containsguidelines establishing performance priorities, for monitoring performance, and forconfiguring your system appropriately.Performance GuidelinesVxVM allows you to optimize data storage performance using the following twostrategies:◆Balance the I/O load among the available disk drives.◆ Use striping and mirroring to increase I/O bandwidth to the most frequently accesseddata.VxVM also provides data redundancy (through mirroring and RAID-5) that allowscontinuous access to data in the event of disk failure.Data AssignmentWhen deciding where to locate file systems, you, as a system administrator, typicallyattempt to balance I/O load among available disk drives. The effectiveness of thisapproach is limited by the difficulty of anticipating future usage patterns, as well as theinability to split file systems across drives. For example, if a single file system receivesmost disk accesses, moving the file system to another drive also moves the bottleneck tothat drive.VxVM can split volumes across multiple drives. This permits you a finer level ofgranularity when locating data. After measuring actual access patterns, you can adjustyour previous decisions on the placement of file systems. You can reconfigure volumesonline without adversely impacting their availability.279
Performance GuidelinesStripingStriping improves access performance by cutting data into slices and storing it onmultiple devices that can be accessed in parallel. Striped plexes improve accessperformance for both read and write operations.Having identified the most heavily accessed volumes (containing file systems ordatabases), you can increase access bandwidth to this data by striping it across portions ofmultiple disks.The figure “Use of Striping for Optimal Data Access” shows an example of a singlevolume (HotVol) that has been identified as a data-access bottleneck. This volume isstriped across four disks, leaving the remaining space on these disks free for use byless-heavily used volumes.Use of Striping for Optimal Data AccessHotVolPL1 SD1HotVolPL1 SD2HotVolPL1 SD3HotVolPL1 SD4Cool <strong>Volume</strong>Another<strong>Volume</strong>LightlyUsed<strong>Volume</strong>HomeDirectory<strong>Volume</strong>LessImportant<strong>Volume</strong>Disk 1 Disk 2 Disk 3 Disk 4MirroringNote You may need an additional license to use this feature.Mirroring stores multiple copies of data on a system. When properly applied, mirroringprovides continuous availability of data and protection against data loss due to physicalmedia failure. Mirroring improves the chance of data recovery in the event of a systemcrash or the failure of a disk or other hardware.In some cases, you can also use mirroring to improve I/O performance. Unlike striping,the performance gain depends on the ratio of reads to writes in the disk accesses. If thesystem workload is primarily write-intensive (for example, greater than 30 percentwrites), mirroring can result in reduced performance.280 <strong>VERITAS</strong> <strong>Volume</strong> Manager Administrator’s Guide
Performance GuidelinesCombining Mirroring and StripingNote You may need an additional license to use this feature.Mirroring and striping can be used together to achieve a significant improvement inperformance when there are multiple I/O streams.Striping provides better throughput because parallel I/O streams can operateconcurrently on separate devices. Serial access is optimized when I/O exactly fits acrossall stripe units in one stripe.Because mirroring is generally used to protect against loss of data due to disk failures, it isoften applied to write-intensive workloads which degrades throughput. In such cases,combining mirroring with striping delivers both high availability and increasedthroughput.A mirrored-stripe volume may be created by striping half of the available disks to formone striped data plex, and striping the remaining disks to form the other striped data plexin the mirror. This is often the best way to configure a set of disks for optimal performancewith reasonable reliability. However, the failure of a single disk in one of the plexes makesthe entire plex unavailable.Alternatively, you can arrange equal numbers of disks into separate mirror volumes, andthen create a striped plex across these mirror volumes to form a striped-mirror volume(see “Mirroring Plus Striping (Striped-Mirror, RAID-1+0 or RAID-10)” on page 22). Thefailure of a single disk in a mirror does not take the disks in the other mirrors out of use. Astriped-mirror layout is preferred over a mirrored-stripe layout for large volumes or largenumbers of disks.RAID-5Note You may need an additional license to use this feature.RAID-5 offers many of the advantages of combined mirroring and striping, but requiresless disk space. RAID-5 read performance is similar to that of striping and RAID-5 parityoffers redundancy similar to mirroring. Disadvantages of RAID-5 include relatively slowwrite performance.RAID-5 is not usually seen as a way of improving throughput performance except in caseswhere the access patterns of applications show a high ratio of reads to writes.Chapter 12, Performance Monitoring and Tuning281
Performance Guidelines<strong>Volume</strong> Read PoliciesTo help optimize performance for different types of volumes, VxVM supports thefollowing read policies on data plexes:◆◆◆round—a round-robin read policy, where all plexes in the volume take turns satisfyingread requests to the volume.prefer—a preferred-plex read policy, where the plex with the highest performanceusually satisfies read requests. If that plex fails, another plex is accessed.select—default read policy, where the appropriate read policy for the configurationis selected automatically. For example, prefer is selected when there is only onestriped plex associated with the volume, and round is selected in most other cases.Note You cannot set the read policy on a RAID-5 data plex. RAID-5 plexes have their ownread policy (RAID).For instructions on how to configure the read policy for a volume’s data plexes, see“Changing the Read Policy for Mirrored <strong>Volume</strong>s” on page 202.In the configuration example shown in the figure “Use of Mirroring and Striping forImproved Performance,” the read policy of the mirrored-stripe volume labeled Hot Volis set to prefer for the striped plex PL1. This policy distributes the load when readingacross the otherwise lightly-used disks in PL1, as opposed to the single disk in plex PL2.(HotVol is an example of a mirrored-stripe volume in which one data plex is striped andthe other data plex is concatenated.)Use of Mirroring and Striping for Improved PerformanceHotVolPL1 SD1HotVolPL1 SD2HotVolPL1 SD3HotVolPL2 SD1LightlyUsedAreaLightlyUsedAreaLightlyUsedAreaLightlyUsedAreaDisk 1 Disk 2 Disk 3 Disk 4Note To improve performance for read-intensive workloads, you can attach up to 32 dataplexes to the same volume. However, this would usually be an ineffective use ofdisk space for the gain in read performance.282 <strong>VERITAS</strong> <strong>Volume</strong> Manager Administrator’s Guide
Performance MonitoringPerformance MonitoringAs a system administrator, you have two sets of priorities for setting priorities forperformance. One set is physical, concerned with hardware such as disks and controllers.The other set is logical, concerned with managing software and its operation.Setting Performance PrioritiesThe important physical performance characteristics of disk hardware are the relativeamounts of I/O on each drive, and the concentration of the I/O within a drive tominimize seek time. Based on monitored results, you can then move the location ofsubdisks to balance I/O activity across the disks.The logical priorities involve software operations and how they are managed. Based onmonitoring, you may choose to change the layout of certain volumes to improve theirperformance. You might even choose to reduce overall throughput to improve theperformance of certain critical volumes. Only you can decide what is important on yoursystem and what trade-offs you need to make.Best performance is usually achieved by striping and mirroring all volumes across areasonable number of disks and mirroring between controllers, when possible. Thisprocedure tends to even out the load between all disks, but it can make VxVM moredifficult to administer. For large numbers of disks (hundreds or thousands), set up diskgroups containing 10 disks, where each group is used to create a striped-mirror volume.This technique provides good performance while easing the task of administration.Obtaining Performance DataVxVM provides two types of performance information: I/O statistics and I/O traces. Eachof these can help in performance monitoring. You can obtain I/O statistics using thevxstat command, and I/O traces using the vxtrace command. A brief discussion ofeach of these utilities may be found in the following sections.Tracing <strong>Volume</strong> OperationsUse the vxtrace command to trace operations on specified volumes, kernel I/O objecttypes or devices. The vxtrace command either prints kernel I/O errors or I/O tracerecords to the standard output or writes the records to a file in binary format. Binary tracerecords written to a file can also be read back and formatted by vxtrace.Chapter 12, Performance Monitoring and Tuning283
Performance MonitoringIf you do not specify any operands, vxtrace reports either all error trace data or all I/Otrace data on all virtual disk devices. With error trace data, you can select all accumulatederror trace data, wait for new error trace data, or both of these (this is the default action).Selection can be limited to a specific disk group, to specific VxVM kernel I/O object types,or to particular named objects or devices.For detailed information about how to use vxtrace, refer to the vxtrace(1M) manualpage.Printing <strong>Volume</strong> StatisticsUse the vxstat command to access information about activity on volumes, plexes,subdisks, and disks under VxVM control, and to print summary statistics to the standardoutput. These statistics represent VxVM activity from the time the system initially bootedor from the last time the counters were reset to zero. If no VxVM object name is specified,statistics from all volumes in the configuration database are reported.VxVM records the following I/O statistics:◆ count of operations◆ number of blocks transferred (one operation can involve more than one block)◆ average operation time (which reflects the total time through the VxVM interface andis not suitable for comparison against other statistics programs)These statistics are recorded for logical I/O including reads, writes, atomic copies, verifiedreads, verified writes, plex reads, and plex writes for each volume. As a result, one writeto a two-plex volume results in at least five operations: one for each plex, one for eachsubdisk, and one for the volume. Also, one read that spans two subdisks shows at leastfour reads—one read for each subdisk, one for the plex, and one for the volume.VxVM also maintains other statistical data. For each plex, it records read and writefailures. For volumes, it records corrected read and write failures in addition to read andwrite failures.To reset the statistics information to zero, use the -r option. This can be done for allobjects or for only those objects that are specified. Resetting just prior to an operationmakes it possible to measure the impact of that particular operation.284 <strong>VERITAS</strong> <strong>Volume</strong> Manager Administrator’s Guide
Performance MonitoringThe following is an example of output produced using the vxstat command:OPERATIONS BLOCKS AVG TIME(ms)TYP NAME READ WRITE READ WRITE READ WRITEvol blop 0 0 0 0 0.0 0.0vol foobarvol 0 0 0 0 0.0 0.0vol rootvol 73017 181735 718528 1114227 26.8 27.9vol swapvol 13197 20252 105569 162009 25.8 397.0vol testvol 0 0 0 0 0.0 0.0Additional volume statistics are available for RAID-5 configurations.For detailed information about how to use vxstat, refer to the vxstat(1M) manualpage.Using Performance DataWhen you have gathered performance data, you can use it to determine how to configureyour system to use resources most effectively. The following sections provide an overviewof how you can use this data.Using I/O StatisticsExamination of the I/O statistics can suggest how to reconfigure your system. You shouldexamine two primary statistics: volume I/O activity and disk I/O activity.Before obtaining statistics, reset the counters for all existing statistics using the vxstat -rcommand. This eliminates any differences between volumes or disks due to volumesbeing created, and also removes statistics from boot time (which are not usually ofinterest).After resetting the counters, allow the system to run during typical system activity. Runthe application or workload of interest on the system to measure its effect. Whenmonitoring a system that is used for multiple purposes, try not to exercise any oneapplication more than usual. When monitoring a time-sharing system with many users,let statistics accumulate for several hours during the normal working day.Chapter 12, Performance Monitoring and Tuning285
Performance MonitoringTo display volume statistics, enter the vxstat command with no arguments. Thefollowing is a typical display of volume statistics:OPERATIONS BLOCKS AVG TIME(ms)TYP NAME READ WRITE READ WRITE READ WRITEvol archive 865 807 5722 3809 32.5 24.0vol home 2980 5287 6504 10550 37.7 221.1vol local 49477 49230 507892 204975 28.5 3<strong>3.5</strong>vol rootvol 102906 342664 1085520 1962946 28.1 25.6vol src 79174 23603 425472 139302 22.4 30.9vol swapvol 22751 32364 182001 258905 25.3 323.2Such output helps to identify volumes with an unusually large number of operations orexcessive read or write times.To display disk statistics, use the vxstat -d command. The following is a typical displayof disk statistics:OPERATIONS BLOCKS AVG TIME(ms)TYP NAME READ WRITE READ WRITE READ WRITEdm disk01 40473 174045 455898 951379 29.5 35.4dm disk02 32668 16873 470337 351351 35.2 102.9dm disk03 55249 60043 780779 731979 35.3 61.2dm disk04 11909 13745 114508 128605 25.0 30.7If the you need to move the volume named archive onto another disk, use the followingcommand to identify on which disks it lies:# vxprint -tvh archiveThe following is a typical display:V NAME SETYPE STATE STATE LENGTH READPOL REFPLEXPL NAME VOLUMEK STATE STATE LENGTH LAYOUT NCOL/WDTH MODESD NAME PLEX PLOFFS DISKOFFSLENGTH [COL/]OFF FLAGSv archive fsgen ENABLED ACTIVE 20480 0 SELECT -pl archive-01archive ENABLED ACTIVE 20480 0 CONCAT RWsd disk03-03archive-010 409600 20480 0/0 c1t2d0Note Your system may use a device name that differs from the examples. For moreinformation on device names, see “Administering Disks” on page 53.The subdisks line (beginning sd) indicates that the archive volume is on disk disk03.To move the volume off disk03, use the following command:# vxassist move archive !disk03 dest_disk286 <strong>VERITAS</strong> <strong>Volume</strong> Manager Administrator’s Guide
Performance Monitoringwhere dest_disk is the disk to which you want to move the volume. It is not necessary tospecify a dest_disk. If you do not specify a dest_disk, the volume is moved to an availabledisk with enough space to contain the volume.For example, to move the volume from disk03 to disk04, use the following command:# vxassist move archive !disk03 disk04This command indicates that the volume is to be reorganized so that no part remains ondisk03.Note The graphical user interface (GUI) provides an easy way to move pieces of volumesbetween disks and may be preferable to using the command line.If two volumes (other than the root volume) on the same disk are busy, move them so thateach is on a different disk.If one volume is particularly busy (especially if it has unusually large average read orwrite times), stripe the volume (or split the volume into multiple pieces, with each pieceon a different disk). If done online, converting a volume to use striping requires sufficientfree space to store an extra copy of the volume. If sufficient free space is not available, abackup copy can be made instead. To convert a volume, create a striped plex as a mirror ofthe volume and then remove the old plex. For example, the following commands stripethe volume archive across disks disk02, disk03, and disk04, and then remove theoriginal plex archive-01:# vxassist mirror archive layout=stripe disk02 disk03 disk04# vxplex -o rm dis archive-01After reorganizing any particularly busy volumes, check the disk statistics. If somevolumes have been reorganized, clear statistics first and then accumulate statistics for areasonable period of time.If some disks appear to be excessively busy (or have particularly long read or write times),you may want to reconfigure some volumes. If there are two relatively busy volumes on adisk, move them closer together to reduce seek times on the disk. If there are too manyrelatively busy volumes on one disk, move them to a disk that is less busy.Use I/O tracing (or subdisk statistics) to determine whether volumes have excessiveactivity in particular regions of the volume. If the active regions can be identified, split thesubdisks in the volume and move those regions to a less busy disk.Chapter 12, Performance Monitoring and Tuning287
Performance MonitoringCautionStriping a volume, or splitting a volume across multiple disks, increases thechance that a disk failure results in failure of that volume. For example, if fivevolumes are striped across the same five disks, then failure of any one of thefive disks requires that all five volumes be restored from a backup. If eachvolume were on a separate disk, only one volume would need to be restored.Use mirroring or RAID-5 to reduce the chance that a single disk failure resultsin failure of a large number of volumes.Note that file systems and databases typically shift their use of allocated space over time,so this position-specific information on a volume is often not useful. Databases arereasonable candidates for moving to non-busy disks if the space used by a particularlybusy index or table can be identified.Examining the ratio of reads to writes helps to identify volumes that can be mirrored toimprove their performance. If the read-to-write ratio is high, mirroring can increaseperformance as well as reliability. The ratio of reads to writes where mirroring canimprove performance depends greatly on the disks, the disk controller, whether multiplecontrollers can be used, and the speed of the system bus. If a particularly busy volume hasa high ratio of reads to writes, it is likely that mirroring can significantly improveperformance of that volume.Using I/O TracingI/O statistics provide the data for basic performance analysis; I/O traces serve for moredetailed analysis. With an I/O trace, focus is narrowed to obtain an event trace for aspecific workload. This helps to explicitly identify the location and size of a hot spot, aswell as which application is causing it.Using data from I/O traces, real work loads on disks can be simulated and the resultstraced. By using these statistics, you can anticipate system limitations and plan foradditional resources.288 <strong>VERITAS</strong> <strong>Volume</strong> Manager Administrator’s Guide
Tuning VxVMTuning VxVMThis section describes how to adjust the tunable parameters that control the systemresources used by VxVM. Depending on the system resources that are available,adjustments may be required to the values of some tunable parameters to optimizeperformance.General Tuning GuidelinesVxVM is optimally tuned for most configurations ranging from small systems to largerservers. In cases where tuning can be used to increase performance on larger systems atthe expense of a valuable resource (such as memory), VxVM is generally tuned to run onthe smallest supported configuration. Any tuning changes must be performed with care,as they may adversely affect overall system performance or may even leave VxVMunusable.Various mechanisms exist for tuning VxVM. Many parameters can be tuned using theglobal tunable file /stand/system. Other values can only be tuned using the commandline interface to VxVM.Tuning Guidelines for Large SystemsOn smaller systems (with less than a hundred disk drives), tuning is unnecessary andVxVM is capable of adopting reasonable defaults for all configuration parameters. Onlarger systems, configurations can require additional control over the tuning of theseparameters, both for capacity and performance reasons.Generally, only a few significant decisions must be made when setting up VxVM on alarge system. One is to decide on the size of the disk groups and the number ofconfiguration copies to maintain for each disk group. Another is to choose the size of theprivate region for all the disks in a disk group.Larger disk groups have the advantage of providing a larger free-space pool for thevxassist(1M) command to select from, and also allow for the creation of larger arrays.Smaller disk groups do not require as large a configuration database and so can exist withsmaller private regions. Very large disk groups can eventually exhaust the private regionsize in the disk group with the result that no more configuration objects can be added tothat disk group. At that point, the configuration either has to be split into multiple diskgroups, or the private regions have to be enlarged. This involves re-initializing each diskin the disk group (and can involve reconfiguring everything and restoring from backup).A general recommendation for users of disk array subsystems is to create a single diskgroup for each array so the disk group can be physically moved as a unit betweensystems.Chapter 12, Performance Monitoring and Tuning289
Tuning VxVMNumber of Configuration Copies for a Disk GroupSelection of the number of configuration copies for a disk group is based on a trade-offbetween redundancy and performance. As a general rule, reducing the numberconfiguration copies in a disk group speeds up initial access of the disk group, initialstartup of the vxconfigd daemon, and transactions performed within the disk group.However, reducing the number of configuration copies also increases the risk of completeloss of the configuration database, which results in the loss of all objects in the databaseand of all data in the disk group.The default policy for configuration copies in the disk group is to allocate a configurationcopy for each controller identified in the disk group, or for each target that containsmultiple addressable disks. This provides a sufficient degree of redundancy, but can leadto a large number of configuration copies under some circumstances. If this is the case, werecommended that you limit the number of configuration copies to a minimum of 4.Distribute the copies across separate controllers or targets to enhance the effectiveness ofthis redundancy.To set the number of configuration copies for a new disk group, use the nconfig operandwith the vxdg init command (see the vxdg(1M) manual page for details).You can also change the number of copies for an existing group by using the vxedit setcommand (see the vxedit(1M) manual page). For example, to configure fiveconfiguration copies for the disk group, bigdg, use the following command:# vxedit set nconfig=5 bigdgChanging Values of TunablesTunables are modified by adding a line to /stand/system file. Changed tunables takeeffect only after relinking the kernel and booting the system from the new kernel.Modify tunables in /stand/system using the following format:tunable valueThe values of system tunables can be examined by selecting Kernel Configuration >Configuration Parameters in the System Administration Manager (SAM).290 <strong>VERITAS</strong> <strong>Volume</strong> Manager Administrator’s Guide
Tuning VxVMTunable ParametersThe following sections describe specific tunable parameters.dmp_pathswitch_blks_shiftThe number of contiguous I/O blocks (expressed as an integer power of 2) that aresent along a DMP path to an Active/Active array before switching to the nextavailable path.The default value of this parameter is set to 10 so that 1024 blocks (1MB) of contiguousI/O are sent over a DMP path before switching. For intelligent disk arrays withinternal data caches, better throughput may be obtained by increasing the value ofthis tunable. For example, for the HDS 9960 A/A array, the optimal value is between15 and 17 for an I/O activity pattern that consists mostly of sequential reads or writes.The DMP path that is used for a block is calculated as follows:path = (block# >> dmp_pathswitch_blks_shift) % number of pathsvol_checkpt_defaultThe interval at which utilities performing recoveries or resynchronization operationsload the current offset into the kernel as a checkpoint. A system failure during suchoperations does not require a full recovery, but can continue from the last reachedcheckpoint.The default value of the checkpoint is 10240 sectors (10MB).Increasing this size reduces the overhead of checkpointing on recovery operations atthe expense of additional recovery following a system failure during a recovery.vol_default_iodelayThe count in clock ticks for which utilities pause if they have been directed to reducethe frequency of issuing I/O requests, but have not been given a specific delay time.This tunable is used by utilities performing operations such as resynchronizingmirrors or rebuilding RAID-5 columns.The default for this tunable is 50 ticks.Increasing this value results in slower recovery operations and consequently lowersystem impact while recoveries are being performed.Chapter 12, Performance Monitoring and Tuning291
Tuning VxVMvol_fmr_logszThe maximum size in kilobytes of the bitmap that Non-Persistent FastResync uses totrack changed blocks in a volume. The number of blocks in a volume that are mappedto each bit in the bitmap depends on the size of the volume, and this value changes ifthe size of the volume is changed. For example, if the volume size is 1 gigabyte andthe system block size is 1024 bytes, a vol_fmr_logsz value of 4 yields a mapcontains 32,768 bits, each bit representing one region of 32 blocks.The larger is the bitmap size, the fewer the number of blocks that are mapped to eachbit. This can reduce the amount of reading and writing required on resynchronization,at the expense of requiring more non-pagable kernel memory for the bitmap.Additionally, on clustered systems, a larger bitmap size increases the latency in I/Operformance, and it also increases the load on the private network between the clustermembers. This is because every other member of the cluster must be informed eachtime a bit in the map is marked.Since the region size must be the same on all nodes in a cluster for a shared volume,the value of the vol_fmr_logsz tunable on the master node overrides the tunablevalues on the slave nodes, if these values are different. Because the value of a sharedvolume can change, the value of vol_fmr_logsz is retained for the life of thevolume or until FastResync is turned on for the volume.In configurations which have thousands of mirrors with attached snapshot plexes, thetotal memory overhead can represent a significantly higher overhead in memoryconsumption than is usual for VxVM.The default value of this tunable is 4 KB. The maximum and minimum permittedvalues are 1 and 8 KB.Note The value of this tunable does not have any effect on Persistent FastResync.vol_max_volThe maximum number of volumes that can be created on the system. This value canbe set to between 1 and the maximum number of minor numbers representable in thesystem.The default value for this tunable is 16777215.292 <strong>VERITAS</strong> <strong>Volume</strong> Manager Administrator’s Guide
Tuning VxVMvol_maxioThe maximum size of logical I/O operations that can be performed without breakingup the request. I/O requests to VxVM that are larger than this value are broken upand performed synchronously. Physical I/O requests are broken up based on thecapabilities of the disk device and are unaffected by changes to this maximum logicalrequest limit.The default value for this tunable is 256 sectors (256KB).Note The value of voliomem_maxpool_sz must be at least 10 times greater than thevalue of vol_maxio.vol_maxioctlThe maximum size of data that can be passed into VxVM via an ioctl call.Increasing this limit allows larger operations to be performed. Decreasing the limit isnot generally recommended, because some utilities depend upon performingoperations of a certain size and can fail unexpectedly if they issue oversized ioctlrequests.The default value for this tunable is 32768 bytes (32KB).vol_maxkiocountThe maximum number of I/O operations that can be performed by VxVM in parallel.Additional I/O requests that attempt to use a volume device are queued until thecurrent activity count drops below this value.The default value for this tunable is 2048.Because most process threads can only issue a single I/O request at a time, reachingthe limit of active I/O requests in the kernel requires 2048 I/O operations to beperformed in parallel. Raising this limit is unlikely to provide much benefit except onthe largest of systems.vol_maxparallelioThe number of I/O operations that the vxconfigd(1M) daemon is permitted torequest from the kernel in a single VOL_VOLDIO_READ per VOL_VOLDIO_WRITEioctl call.The default value for this tunable is 256. It is not desirable to change this value.Chapter 12, Performance Monitoring and Tuning293
Tuning VxVMvol_maxspecialioThe maximum size of an I/O request that can be issued by an ioctl call. Althoughthe ioctl request itself can be small, it can request a large I/O request be performed.This tunable limits the size of these I/O requests. If necessary, a request that exceedsthis value can be failed, or the request can be broken up and performedsynchronously.The default value for this tunable is 256 sectors (256KB).Raising this limit can cause difficulties if the size of an I/O request causes the processto take more memory or kernel virtual mapping space than exists and thus deadlock.The maximum limit for vol_maxspecialio is 20% of the smaller of physicalmemory or kernel virtual memory. It is inadvisable to go over this limit, becausedeadlock is likely to occur.If stripes are larger than vol_maxspecialio, full stripe I/O requests are broken up,which prevents full-stripe read/writes. This throttles the volume I/O throughput forsequential I/O or larger I/O requests.This tunable limits the size of an I/O request at a higher level in VxVM than the levelof an individual disk. For example, for an 8 by 64KB stripe, a value of 256KB onlyallows I/O requests that use half the disks in the stripe; thus, it cuts potentialthroughput in half. If you have more columns or you have used a larger interleavefactor, then your relative performance is worse.This tunable must be set, as a minimum, to the size of your largest stripe (RAID-0 orRAID-5).vol_subdisk_numThe maximum number of subdisks that can be attached to a single plex. There is notheoretical limit to this number, but it has been limited to a default value of 4096. Thisdefault can be changed, if required.volcvm_smartsyncIf set to 0, volcvm_smartsync disables SmartSync on shared disk groups. If set to 1,this parameter enables the use of SmartSync with shared disk groups. See“SmartSyncRecovery Accelerator” on page 49 for more information.294 <strong>VERITAS</strong> <strong>Volume</strong> Manager Administrator’s Guide
Tuning VxVMvoldrl_max_drtregsThe maximum number of dirty regions that can exist on the system for non-sequentialDRL on volumes. A larger value may result in improved system performance at theexpense of recovery time. This tunable can be used to regulate the worse-caserecovery time for the system following a failure.The default value for this tunable is 2048 sectors (2MB).voldrl_max_seq_dirtyThe maximum number of dirty regions allowed for sequential DRL. This is useful forvolumes that are usually written to sequentially, such as database logs. Limiting thenumber of dirty regions allows for faster recovery if a crash occurs.The default value for this tunable is 3.voldrl_min_regionszThe minimum number of sectors for a dirty region logging (DRL) volume region.With DRL, VxVM logically divides a volume into a set of consecutive regions. Largerregion sizes tend to cause the cache hit-ratio for regions to improve. This improves thewrite performance, but it also prolongs the recovery time.The VxVM kernel currently sets the default value for this tunable to 512 sectors.voliomem_chunk_sizeThe granularity of memory chunks used by VxVM when allocating or releasingsystem memory. A larger granularity reduces CPU overhead due to memoryallocation by allowing VxVM to retain hold of a larger amount of memory.The default size for this tunable is 64KB.voliomem_maxpool_szThe maximum memory requested from the system by VxVM for internal purposes.This tunable has a direct impact on the performance of VxVM as it prevents one I/Ooperation from using all the memory in the system.VxVM allocates two pools that can grow up to voliomem_maxpool_sz, one forRAID-5 and one for mirrored volumes.A write request to a RAID-5 volume that is greater than voliomem_maxpool_sz/10is broken up and performed in chunks of size voliomem_maxpool_sz/10.Chapter 12, Performance Monitoring and Tuning295
Tuning VxVMA write request to a mirrored volume that is greater than voliomem_maxpool_sz/2is broken up and performed in chunks of size voliomem_maxpool_sz/2.The default value for this tunable is 4M.Note The value of voliomem_maxpool_sz must be at least 10 times greater than thevalue of vol_maxio.voliot_errbuf_defaultThe default size of the buffer maintained for error tracing events. This buffer isallocated at driver load time and is not adjustable for size while VxVM is running.The default size for this buffer is 16384 bytes (16KB).Increasing this buffer can provide storage for more error events at the expense ofsystem memory. Decreasing the size of the buffer can result in an error not beingdetected via the tracing device. Applications that depend on error tracing to performsome responsive action are dependent on this buffer.voliot_iobuf_dfltThe default size for the creation of a tracing buffer in the absence of any otherspecification of desired kernel buffer size as part of the trace ioctl.The default size of this tunable is 8192 bytes (8KB).If trace data is often being lost due to this buffer size being too small, then this valuecan be tuned to a more generous amount.voliot_iobuf_limitThe upper limit to the size of memory that can be used for storing tracing buffers inthe kernel. Tracing buffers are used by the VxVM kernel to store the tracing eventrecords. As trace buffers are requested to be stored in the kernel, the memory for themis drawn from this pool.Increasing this size can allow additional tracing to be performed at the expense ofsystem memory usage. Setting this value to a size greater than can readily beaccommodated on the system is inadvisable.The default value for this tunable is 131072 bytes (128KB).296 <strong>VERITAS</strong> <strong>Volume</strong> Manager Administrator’s Guide
Tuning VxVMvoliot_iobuf_maxThe maximum buffer size that can be used for a single trace buffer. Requests of abuffer larger than this size are silently truncated to this size. A request for a maximalbuffer size from the tracing interface results (subject to limits of usage) in a buffer ofthis size.The default size for this buffer is 65536 bytes (64KB).Increasing this buffer can provide for larger traces to be taken without loss for veryheavily used volumes. Care should be taken not to increase this value above the valuefor the voliot_iobuf_limit tunable value.voliot_max_openThe maximum number of tracing channels that can be open simultaneously. Tracingchannels are clone entry points into the tracing device driver. Each vxtrace processrunning on a system consumes a single trace channel.The default number of channels is 32. The allocation of each channel takes upapproximately 20 bytes even when not in use.volraid_minpool_szThe initial amount of memory that is requested from the system by VxVM for RAID-5operations. The maximum size of this memory pool is limited by the value ofvoliomem_maxpool_sz.The default value for this tunable is 2048 sectors (2MB).volraid_rsrtransmaxThe maximum number of transient reconstruct operations that can be performed inparallel for RAID-5. A transient reconstruct operation is one that occurs on anon-degraded RAID-5 volume that has not been predicted. Limiting the number ofthese operations that can occur simultaneously removes the possibility of flooding thesystem with many reconstruct operations, and so reduces the risk of causing memorystarvation.The default number of transient reconstruct operations that can be performed inparallel is 1.Increasing this size improves the initial performance on the system when a failure firstoccurs and before a detach of a failing object is performed, but can lead to memorystarvation.Chapter 12, Performance Monitoring and Tuning297
Tuning VxVM298 <strong>VERITAS</strong> <strong>Volume</strong> Manager Administrator’s Guide
Commands SummaryAThis appendix summarizes the usage and purpose of important commands in <strong>VERITAS</strong><strong>Volume</strong> Manager (VxVM). References are included to longer descriptions in theremainder of this book. For detailed information about an individual command, refer tothe appropriate manual page in the 1M section.Obtaining Information About Objects in VxVMCommandvxdctl licensevxdisk list [diskname]vxdg list [diskgroup]vxdg -s listvxinfo [-g diskgroup] [volume ...]vxprint -hrt [object]vxprint -st [subdisk]vxprint -pt [plex]DescriptionList licensed features of VxVM.Lists disks under control of VxVM. See“Displaying Disk Information” on page 83.Lists information about disk groups. See“Displaying Disk Group Information” onpage 109.Lists information about shared disk groups in acluster. See “Creating <strong>Volume</strong>s with ExclusiveOpen Access by a Node” on page 264.Displays information about the accessibility andusability of volumes. See “Stopping a <strong>Volume</strong>”on page 187.Prints single-line information about objects inVxVM. See “Displaying <strong>Volume</strong> Information”onpage 181.Displays information about subdisks. See“Displaying Subdisk Information” on page 138.Displays information about plexes. See“Displaying Plex Information” on page 146.299
Administering DisksCommandvxdiskadmvxdiskadd [devicename]vxedit rename olddisk newdiskvxedit set reserve=on|off disknamevxedit set nohotuse=on|off disknamevxedit set spare=on|off disknamevxdisk offline devicenamevxdg -g diskgroup rmdisk disknamevxdiskunsetup disknameDescriptionAdministers disks in VxVM using a menu-basedinterface.Adds a disk specified by device name. See“Using vxdiskadd to Place a Disk Under Controlof VxVM” on page 68.Renames a disk under control of VxVM.See“Renaming a Disk” on page 81.Sets aside/does not set aside a disk from use in adisk group. See “Reserving Disks” on page 82.Does not/does allow free space on a disk to beused for hot-relocation. See “Excluding a Diskfrom Hot-Relocation Use” on page 234 and“Making a Disk Available for Hot-RelocationUse” on page 235.Adds/removes a disk from the pool ofhot-relocation spares. See “Marking a Disk as aHot-Relocation Spare” on page 232 and“Removing a Disk from Use as a Hot-RelocationSpare” on page 233.Takes a disk offline. See “Taking a Disk Offline”on page 81.Removes a disk from its disk group. See“Removing a Disk from a Disk Group” onpage 111.Removes a disk from control of VxVM. See“Removing a Disk from a Disk Group” onpage 111.300 <strong>VERITAS</strong> <strong>Volume</strong> Manager Administrator’s Guide
Creating and Administering Disk GroupsCommandvxdg init diskgroup[diskname=]devicenamevxdg -s init diskgroup \[diskname=]devicenamevxdg [-n newname] deport diskgroupvxdg [-n newname] import diskgroupvxdg [-n newname] -s import diskgroupvxdg [-o expand] listmove sourcedg \targetdg object ...vxdg [-o expand] move sourcedg \targetdg object ...vxdg [-o expand] split sourcedg \targetdg object ...DescriptionCreates a disk group using a pre-initialized disk.See “Creating a Disk Group” on page 110.Creates a shared disk group in a cluster using apre-initialized disk. See “Creating a Shared DiskGroup” on page 261.Deports a disk group and optionally renames it.See “Deporting a Disk Group” on page 113.Imports a disk group and optionally renames it.See “Importing a Disk Group” on page 114.Imports a disk group as shared by a cluster, andoptionally renames it. See “Importing DiskGroups as Shared” on page 262.Lists the objects potentially affected by moving adisk group. See “Listing Objects PotentiallyAffected by a Move” on page 125.Moves objects between disk groups. See“Moving Objects Between Disk Groups” onpage 127.Splits a disk group and moves the specifiedobjects into the target disk group. See “SplittingDisk Groups” on page 129.vxdg [-o expand] join sourcedg targetdg Joins two disk groups and removes the sourcedisk group. See “Joining Disk Groups” onpage 130.vxdg -g diskgroup set \activation=ew|ro|sr|sw|offvxrecover -g diskgroup -sbvxdg destroy diskgroupSets the activation mode of a shared disk groupin a cluster. See “Changing the Activation Modeon a Shared Disk Group” on page 264.Starts all volumes in an imported disk group. See“Moving Disk Groups Between Systems” onpage 117.Destroys a disk group and releases its disks. See“Destroying a Disk Group” on page 132.Appendix A, Commands Summary 301
Creating and Administering SubdisksCommandvxmake sd subdisk diskname,offset,lengthvxsd assoc plex subdisk ...vxsd assoc plex subdisk1:0 ... subdiskM:N-1vxsd aslog plex subdiskvxsd mv oldsubdisk newsubdiskvxsd -s size split subdisk sd1 sd2vxsd join sd1 sd2 subdiskvxassist [-g diskgroup] move \volume !olddisk newdiskvxunreloc [-g diskgroup] original_diskvxsd dis subdiskvxedit rm subdiskvxsd -o rm dis subdiskDescriptionCreates a subdisk. See “Creating Subdisks” onpage 137.Associates subdisks with an existing plex. See“Associating Subdisks with Plexes” on page 140.Adds subdisks to the ends of the columns in astriped or RAID-5 volume. See “AssociatingSubdisks with Plexes” on page 140.Associates a log subdisk with an exiting plex.See “Associating Subdisks with Plexes” onpage 140.Replaces a subdisk. See “Moving Subdisks” onpage 138.Splits a subdisk in two. See “Splitting Subdisks”on page 139.Joins two subdisks. See “Joining Subdisks” onpage 139.Relocates subdisks in a volume between disks.See “Moving and Unrelocating subdisks usingvxassist” on page 238.Relocates subdisks to their original disks. See“Moving and Unrelocating Subdisks usingvxunreloc” on page 238Dissociates a subdisk from a plex. See“Dissociating Subdisks from Plexes” onpage 142.Removes a subdisk. See “Removing Subdisks”on page 142.Dissociates and removes a subdisk from a plex.See “Dissociating Subdisks from Plexes” onpage 142.302 <strong>VERITAS</strong> <strong>Volume</strong> Manager Administrator’s Guide
Creating and Administering PlexesCommandvxmake plex plex \sd=subdisk1[,subdisk2,...]vxmake plex plex \layout=stripe|raid5 stwidth=Wncolumn=N \ sd=subdisk1[,subdisk2,...]vxplex att volume plexvxplex det plexvxmend off plexvxmend on plexvxplex mv oldplex newplexvxplex cp volume newplexvxmend fix clean plexvxplex -o rm dis plexDescriptionCreates a concatenated plex. See “CreatingPlexes” on page 145.Creates a striped or RAID-5 plex. See “Creating aStriped Plex” on page 146.Attaches a plex to an existing volume. See“Attaching and Associating Plexes” on page 151and “Reattaching Plexes” on page 153.Detaches a plex. See “Detaching Plexes” onpage 152.Takes a plex offline for maintenance. See “TakingPlexes Offline” on page 152.Re-enables a plex for use. See “ReattachingPlexes” on page 153.Replaces a plex. See “Moving Plexes” onpage 154.Copies a volume onto a plex. See “CopyingPlexes” on page 154.Sets the state of a plex in an unstartable volumeto CLEAN. See “Reattaching Plexes” onpage 153.Dissociates and removes a plex from a volume.See “Dissociating and Removing Plexes” onpage 155.Appendix A, Commands Summary 303
Creating <strong>Volume</strong>sCommandvxassist [-g diskgroup] maxsize \layout=layout [attributes]vxassist make volume length \[layout=layout ] [attributes]vxassist make volume length \layout=mirror [nmirror=N] [attributes]vxassist make volume length \layout=layout exclusive=on [attributes]vxassist make volume length \layout=stripe|raid5 \[stripeunit=W] [ncol=N] [attributes]vxassist make volume length \layout=layout mirror=ctlr [attributes]vxmake -Uusage_type vol volume \[len=length] plex=plex,...vxvol start volumevxvol init zero volumeDescriptionDisplays the maximum size of volume that canbe created. See “Discovering the Maximum Sizeof a <strong>Volume</strong>” on page 163.Creates a volume. See “Creating a <strong>Volume</strong> onAny Disk” on page 163 and “Creating a <strong>Volume</strong>on Specific Disks” on page 164Creates a mirrored volume. See “Creating aMirrored <strong>Volume</strong>” on page 168.Creates a volume that may be openedexclusively by a single node in a cluster. See“Creating <strong>Volume</strong>s with Exclusive Open Accessby a Node” on page 264.Creates a striped or RAID-5 volume. See“Creating a Striped <strong>Volume</strong>” on page 171 and“Creating a RAID-5 <strong>Volume</strong>” on page 174.Creates a volume with mirrored data plexes onseparate controllers. See “Mirroring acrossTargets, Controllers or Enclosures” on page 173.Creates a volume from existing plexes. See“Creating a <strong>Volume</strong> Using vxmake” on page 176.Initializes and starts a volume for use. See“Initializing and Starting a <strong>Volume</strong>” on page 179and “Starting a <strong>Volume</strong>” on page 188.Initializes and zeros out a volume for use. See“Initializing and Starting a <strong>Volume</strong>” onpage 179.304 <strong>VERITAS</strong> <strong>Volume</strong> Manager Administrator’s Guide
Administering <strong>Volume</strong>sCommandvxassist mirror volume [attributes]vxassist remove mirror volume [attributes]vxassist addlog volume [attributes]vxassist remove log volume [attributes]vxvol set fastresync=on|off volumevxassist growto volume lengthvxassist growby volume lengthvxassist shrinkto volume lengthvxassist shrinkby volume lengthvxresize -b -F xvfs volume length \diskname ...DescriptionAdds a mirror to a volume. See “Adding aMirror to a <strong>Volume</strong>” on page 189.Removes a mirror from a volume. See“Removing a Mirror” on page 191.Adds a log to a volume. See “Adding a DCOand DCO <strong>Volume</strong>” on page 191, “AddingDRL Logging to a Mirrored <strong>Volume</strong>” onpage 195 and “Adding a RAID-5 Log” onpage 196.Removes a log from a volume. See“Removing a DCO and DCO <strong>Volume</strong>” onpage 194, “Removing a DRL Log” onpage 196 and “Removing a RAID-5 Log”onpage 197.Turns FastResync on or off for a volume. See“Adding a RAID-5 Log” on page 196.Grows a volume to a specified size. See“Resizing <strong>Volume</strong>s using vxassist” onpage 200.Grows a volume by a specified size. See“Resizing <strong>Volume</strong>s using vxassist” onpage 200.Shrinks a volume to a specified size. See“Resizing <strong>Volume</strong>s using vxassist” onpage 200.Shrinks a volume by a specified size. See“Resizing <strong>Volume</strong>s using vxassist” onpage 200.Resizes a volume and the underlying<strong>VERITAS</strong> File System. See “Resizing<strong>Volume</strong>s using vxresize” on page 199.Appendix A, Commands Summary 305
Administering <strong>Volume</strong>sCommandvxassist snapstart volumevxassist snapshot volume snapshotvxassist snapback volume snapshotvxassist snapclear snapshotvxassist [-g diskgroup] relayout volume \[layout=layout] [relayout_options]vxassist relayout volume layout=raid5 \stripeunit=W ncol=Nvxrelayout -o bg reverse volumevxassist convert volume [layout=layout][convert_options]vxassist convert volume \layout=mirror-stripevxvol stop volumevxassist remove volume volumeDescriptionPrepares a snapshot mirror of a volume. See“Backing Up <strong>Volume</strong>s Online UsingSnapshots” on page 212.Takes a snapshot of a volume. See “BackingUp <strong>Volume</strong>s Online Using Snapshots” onpage 212.Merges a snapshot with its original volume.See “Merging a Snapshot <strong>Volume</strong>(snapback)” on page 216.Makes the snapshot volume independent.See “Dissociating a Snapshot <strong>Volume</strong>(snapclear)” on page 217.Performs online relayout of a volume. See“Performing Online Relayout” on page 219.Relays out a volume as a RAID-5 volumewith stripe width W and N columns. See“Performing Online Relayout” on page 219.Reverses the direction of a paused volumerelayout. See “Controlling the Progress of aRelayout” on page 221.Converts between a layered volume and anon-layered volume layout. See“Converting Between Layered andNon-Layered <strong>Volume</strong>s” on page 222.Converts a striped-mirror volume to amirrored-stripe volume. See “ConvertingBetween Layered and Non-Layered<strong>Volume</strong>s” on page 222.Stops a volume. See “Stopping a <strong>Volume</strong>”on page 187.Removes a volume. See “Removing a<strong>Volume</strong>” on page 203.306 <strong>VERITAS</strong> <strong>Volume</strong> Manager Administrator’s Guide
Monitoring and Controlling TasksCommandvxcommand -t tasktag [options][arguments]vxtask [-h] listvxtask monitor taskvxtask pause taskvxtask -p listvxtask resume taskvxtask abort taskDescriptionSpecifies a task tag to a command. See“Specifying Task Tags” on page 185.Lists tasks running on a system. See “vxtaskUsage” on page 187.Monitors the progress of a task. See “vxtaskUsage” on page 187.Suspends operation of a task. See “vxtaskUsage” on page 187.Lists all paused tasks. See “Moving Disk GroupsBetween Systems” on page 117.Resumes a paused task. See “vxtask Usage”onpage 187.Cancels a task and attempts to reverse its effects.See “vxtask Usage” on page 187.Appendix A, Commands Summary 307
308 <strong>VERITAS</strong> <strong>Volume</strong> Manager Administrator’s Guide
Glossaryactive/active disk arraysThis type of multipathed disk array allows you to access a disk in the disk array throughall the paths to the disk simultaneously, without any performance degradation.active/passive disk arraysThis type of multipathed disk array allows one path to a disk to be designated as primaryand used to access the disk at any time. Using a path other than the designated active pathresults in severe performance degradation in some disk arrays. Also see path, primarypath, and secondary path.associateThe process of establishing a relationship between VxVM objects; for example, a subdiskthat has been created and defined as having a starting point within a plex is referred to asbeing associated with that plex.associated plexA plex associated with a volume.associated subdiskA subdisk associated with a plex.atomic operationAn operation that either succeeds completely or fails and leaves everything as it wasbefore the operation was started. If the operation succeeds, all aspects of the operationtake effect at once and the intermediate states of change are invisible. If any aspect of theoperation fails, then the operation aborts without leaving partial changes.In a cluster, an atomic operation takes place either on all nodes or not at all.attachedA state in which a VxVM object is both associated with another object and enabled for use.309
lockboot diskThe minimum unit of data transfer to or from a disk or array as determined by theoperating system. The size of a block is 1024 bytes on HP-UX.A disk that is used for the purpose of booting a system.clean node shutdownThe ability of a node to leave a cluster gracefully when all access to shared volumes hasceased.clusterA set of hosts (each termed a node) that share a set of disks.cluster managerAn externally-provided daemon that runs on each node in a cluster. The cluster managerson each node communicate with each other and inform VxVM of changes in clustermembership.cluster-shareable disk groupA disk group in which access to the disks is shared by multiple hosts (also referred to as ashared disk group). Also see private disk group.columnA set of one or more subdisks within a striped plex. Striping is achieved by allocating dataalternately and evenly across the columns within a plex.concatenationA layout style characterized by subdisks that are arranged sequentially and contiguously.configuration copyA single copy of a configuration database.configuration databaseA set of records containing detailed information on existing VxVM objects (such as diskand volume attributes).310 <strong>VERITAS</strong> <strong>Volume</strong> Manager Administrator’s Guide
data change object (DCO)A VxVM object that is used to manage information about the FastResync maps in theDCO volume. Both a DCO object and a DCO volume must be associated with a volume toimplement Persistent FastResync on that volume.data stripeThis represents the usable data portion of a stripe and is equal to the stripe minus theparity region.DCO volumeA special volume that is used to hold Persistent FastResync change maps.detachedA state in which a VxVM object is associated with another object, but not enabled for use.device nameThe device name or address used to access a physical disk, such as c0t0d0. The c#t#d#syntax identifies the controller, target address, and disk. In a SAN environment, it is moreconvenient to use enclosure-based naming, which forms the device name by concatenatingthe name of the enclosure (such as enc0) with the disk’s number within the enclosure,separated by an underscore (for example, enc0_2). The term disk access name can also beused to refer to a device name.dirty region loggingThe procedure by which the VxVM monitors and logs modifications to a plex. A bitmap ofchanged regions is kept in an associated subdisk called a log subdisk.disabled pathA path to a disk that is not available for I/O. A path can be disabled due to real hardwarefailures or if the user has used the vxdmpadm disable command on that controller.diskA collection of read/write data blocks that are indexed and can be accessed fairly quickly.Each disk has a universally unique identifier.disk access nameAn alternative term for a device name.Glossary 311
disk access recordsConfiguration records used to specify the access path to particular disks. Each disk accessrecord contains a name, a type, and possibly some type-specific information, which isused by VxVM in deciding how to access and manipulate the disk that is defined by thedisk access record.disk arrayA collection of disks logically arranged into an object. Arrays tend to provide benefitssuch as redundancy or improved performance. Also see disk enclosure and JBOD.disk array serial numberThis is the serial number of the disk array. It is usually printed on the disk array cabinet orcan be obtained by issuing a vendor- specific SCSI command to the disks on the disk array.This number is used by the DMP subsystem to uniquely identify a disk array.disk controllerIn the multipathing subsystem of VxVM, the controller (host bus adapter or HBA) or diskarray connected to the host, which the Operating System represents as the parent node ofa disk.disk enclosureAn intelligent disk array that usually has a backplane with a built-in Fibre Channel loop,and which permits hot-swapping of disks.disk groupA collection of disks that share a common configuration. A disk group configuration is aset of records containing detailed information on existing VxVM objects (such as disk andvolume attributes) and their relationships. Each disk group has an administrator-assignedname and an internally defined unique ID. The root disk group (rootdg) is a specialprivate disk group that always exists.disk group IDA unique identifier used to identify a disk group.disk IDA universally unique identifier that is given to each disk and can be used to identify thedisk, even if it is moved.disk media nameAn alternative term for a disk name.312 <strong>VERITAS</strong> <strong>Volume</strong> Manager Administrator’s Guide
disk media recordA configuration record that identifies a particular disk, by disk ID, and gives that disk alogical (or administrative) name.disk nameA logical or administrative name chosen for a disk that is under the control of VxVM, suchas disk03. The term disk media name is also used to refer to a disk name.dissociateThe process by which any link that exists between two VxVM objects is removed. Forexample, dissociating a subdisk from a plex removes the subdisk from the plex and addsthe subdisk to the free space pool.dissociated plexA plex dissociated from a volume.dissociated subdiskA subdisk dissociated from a plex.distributed lock managerA lock manager that runs on different systems in a cluster, and ensures consistent accessto distributed resources.enabled pathA path to a disk that is available for I/O.encapsulationA process that converts existing partitions on a specified disk to volumes. Encapsulationdoes not apply to HP-UX.enclosureSee disk enclosure.enclosure-based namingSee device name.fabric mode diskA disk device that is accessible on a <strong>Storage</strong> Area Network (SAN) via a Fibre Channelswitch.Glossary 313
FastResyncA fast resynchronization feature that is used to perform quick and efficientresynchronization of stale mirrors, and to increase the efficiency of the snapshotmechanism. Also see Persistent FastResync and Non-Persistent FastResync.Fibre ChannelA collective name for the fiber optic technology that is commonly used to set up a <strong>Storage</strong>Area Network (SAN).file systemA collection of files organized together into a structure. The UNIX file system is ahierarchical structure consisting of directories and files.free spaceAn area of a disk under VxVM control that is not allocated to any subdisk or reserved foruse by any other VxVM object.free subdiskA subdisk that is not associated with any plex and has an empty putil[0] field.hostidA string that identifies a host to VxVM. The hostid for a host is stored in its volboot file,and is used in defining ownership of disks and disk groups.hot-relocationA technique of automatically restoring redundancy and access to mirrored and RAID-5volumes when a disk fails. This is done by relocating the affected subdisks to disksdesignated as spares and/or free space in the same disk group.hot-swapRefers to devices that can be removed from, or inserted into, a system without firstturning off the power supply to the system.initiating nodeThe node on which the system administrator is running a utility that requests a change toVxVM objects. This node initiates a volume reconfiguration.JBODThe common name for an unintelligent disk array which may, or may not, support thehot-swapping of disks. The name is derived from “just a bunch of disks.”314 <strong>VERITAS</strong> <strong>Volume</strong> Manager Administrator’s Guide
log plexA plex used to store a RAID-5 log. The term log plex may also be used to refer to a DirtyRegion Logging plex.log subdiskA subdisk that is used to store a dirty region log.master nodeA node that is designated by the software to coordinate certain VxVM operations in acluster. Any node is capable of being the master node.mastering nodeThe node to which a disk is attached. This is also known as a disk owner.mirrormirroringA duplicate copy of a volume and the data therein (in the form of an ordered collection ofsubdisks). Each mirror consists of one plex of the volume with which the mirror isassociated.A layout technique that mirrors the contents of a volume onto multiple plexes. Each plexduplicates the data stored on the volume, but the plexes themselves may have differentlayouts.multipathingWhere there are multiple physical access paths to a disk connected to a system, the disk iscalled multipathed. Any software residing on the host, (for example, the DMP driver) thathides this fact from the user is said to provide multipathing functionality.nodeOne of the hosts in a cluster.node abortA situation where a node leaves a cluster (on an emergency basis) without attempting tostop ongoing operations.node joinThe process through which a node joins a cluster and gains access to shared disks.Glossary 315
Non-Persistent FastResyncA form of FastResync that cannot preserve its maps across reboots of the system because itstores its change map in memory.objectparityAn entity that is defined to and recognized internally by VxVM. The VxVM objects are:volume, plex, subdisk, disk, and disk group. There are actually two types of diskobjects—one for the physical aspect of the disk and the other for the logical aspect.A calculated value that can be used to reconstruct data after a failure. While data is beingwritten to a RAID-5 volume, parity is also calculated by performing an exclusive OR(XOR) procedure on data. The resulting parity is then written to the volume. If a portionof a RAID-5 volume fails, the data that was on that portion of the failed volume can berecreated from the remaining data and the parity.parity stripe unitA RAID-5 volume storage region that contains parity information. The data contained inthe parity stripe unit can be used to help reconstruct regions of a RAID-5 volume that aremissing because of I/O or disk failures.partitionpathThe standard division of a physical disk device, as supported directly by the operatingsystem and disk drives.When a disk is connected to a host, the path to the disk consists of the HBA (Host BusAdapter) on the host, the SCSI or fibre cable connector and the controller on the disk ordisk array. These components constitute a path to a disk. A failure on any of these resultsin DMP trying to shift all I/O for that disk onto the remaining (alternate) paths. Also seeactive/passive disk arrays, primary path and secondary path.pathgroupIn case of disks which are not multipathed by vxdmp, VxVM will see each path as a disk.In such cases, all paths to the disk can be grouped. This way only one of the paths fromthe group is made visible to VxVM.Persistent FastResyncA form of FastResync that can preserve its maps across reboots of the system by storing itschange map in a DCO volume on disk. Also see data change object (DCO).316 <strong>VERITAS</strong> <strong>Volume</strong> Manager Administrator’s Guide
persistent state loggingA logging type that ensures that only active mirrors are used for recovery purposes andprevents failed mirrors from being selected for recovery. This is also known as kernellogging.physical diskThe underlying storage device, which may or may not be under VxVM control.plexA plex is a logical grouping of subdisks that creates an area of disk space independent ofphysical disk size or other restrictions. Mirroring is set up by creating multiple data plexesfor a single volume. Each data plex in a mirrored volume contains an identical copy of thevolume data. Plexes may also be created to represent concatenated, striped and RAID-5volume layouts, and to store volume logs.primary pathIn active/passive disk arrays, a disk can be bound to one particular controller on the diskarray or owned by a controller. The disk can then be accessed using the path through thisparticular controller. Also see path and secondary path.private disk groupA disk group in which the disks are accessed by only one specific host in a cluster. Alsosee shared disk group.private regionA region of a physical disk used to store private, structured VxVM information. Theprivate region contains a disk header, a table of contents, and a configuration database. Thetable of contents maps the contents of the disk. The disk header contains a disk ID. Alldata in the private region is duplicated for extra reliability.public regionA region of a physical disk managed by VxVM that contains available space and is usedfor allocating subdisks.RAIDA Redundant Array of Independent Disks (RAID) is a disk array set up with part of thecombined storage capacity used for storing duplicate information about the data stored inthat array. This makes it possible to regenerate the data if a disk failure occurs.Glossary 317
ead-writeback modeA recovery mode in which each read operation recovers plex consistency for the regioncovered by the read. Plex consistency is recovered by reading data from blocks of one plexand writing the data to all other writable plexes.root configurationThe configuration database for the root disk group. This is special in that it alwayscontains records for other disk groups, which are used for backup purposes only. It alsocontains disk records that define all disk devices on the system.root diskThe disk containing the root file system. This disk may be under VxVM control.root disk groupA special private disk group that always exists on the system. The root disk group isnamed rootdg. Even though rootdg is the default disk group, it does not necessarilycontain the root disk unless this is under VxVM control.root file systemThe initial file system mounted as part of the UNIX kernel startup sequence.root partitionThe disk region on which the root file system resides.root volumeThe VxVM volume that contains the root file system, if such a volume is designated by thesystem configuration.rootabilityThe ability to place the root file system and the swap device under VxVM control. Theresulting volumes can then be mirrored to provide redundancy and allow recovery in theevent of disk failure.secondary pathIn active/passive disk arrays, the paths to a disk other than the primary path are calledsecondary paths. A disk is supposed to be accessed only through the primary path until itfails, after which ownership of the disk is transferred to one of the secondary paths. Alsosee path and primary path.318 <strong>VERITAS</strong> <strong>Volume</strong> Manager Administrator’s Guide
sectorA unit of size, which can vary between systems. Sector size is set per device (hard drive,CD-ROM, and so on). Although all devices within a system are usually configured to thesame sector size for interoperability, this is not always the case. The size of a sector iscommonly 1024 bytes on HP-UX.shared disk groupA disk group in which access to the disks is shared by multiple hosts (also referred to as acluster-shareable disk group). Also see private disk group.shared volumeA volume that belongs to a shared disk group and is open on more than one node of acluster at the same time.shared VM diskA VM disk that belongs to a shared disk group in a cluster.slave nodeA node that is not designated as the master node of a cluster.slicespanningThe standard division of a logical disk device. The terms partition and slice are sometimesused synonymously.A layout technique that permits a volume (and its file system or database) that is too largeto fit on a single disk to be configured across multiple physical disks.sparse plexA plex that is not as long as the volume or that has holes (regions of the plex that do nothave a backing subdisk).<strong>Storage</strong> Area Network (SAN)A networking paradigm that provides easily reconfigurable connectivity between anysubset of computers, disk storage and interconnecting hardware such as switches, hubsand bridges.stripeA set of stripe units that occupy the same positions across a series of columns.Glossary 319
stripe sizeThe sum of the stripe unit sizes comprising a single stripe across all columns beingstriped.stripe unitEqually-sized areas that are allocated alternately on the subdisks (within columns) of eachstriped plex. In an array, this is a set of logically contiguous blocks that exist on each diskbefore allocations are made from the next disk in the array. A stripe unit may also bereferred to as a stripe element.stripe unit sizeThe size of each stripe unit. The default stripe unit size is 32 sectors (16K). A stripe unit sizehas also historically been referred to as a stripe width.stripingsubdiskA layout technique that spreads data across several physical disks using stripes. The datais allocated alternately to the stripes within the subdisks of each plex.A consecutive set of contiguous disk blocks that form a logical disk segment. Subdisks canbe associated with plexes to form volumes.swap areaA disk region used to hold copies of memory pages swapped out by the system pagerprocess.swap volumeA VxVM volume that is configured for use as a swap area.transactionA set of configuration changes that succeed or fail as a group, rather than individually.Transactions are used internally to maintain consistent configurations.volboot fileA small file that is used to locate copies of the rootdg (root disk group) configuration.The file may list disks that contain configuration copies in standard locations, and can alsocontain direct pointers to configuration copy locations. A rootdg that contains onlysimple disks requires entries for at least some of those disks in the volboot file so thatvxconfigd can configure the disk group. The volboot file is stored in a system-dependentlocation.320 <strong>VERITAS</strong> <strong>Volume</strong> Manager Administrator’s Guide
VM diskvolumeA disk that is both under VxVM control and assigned to a disk group. VM disks aresometimes referred to as VxVM disks or simply disks.A virtual disk, representing an addressable range of disk blocks used by applications suchas file systems or databases. A volume is a collection of from one to 32 plexes.volume configuration deviceThe volume configuration device (/dev/vx/config) is the interface through which allconfiguration changes to the volume device driver are performed.volume device driverThe driver that forms the virtual disk drive between the application and the physicaldevice driver level. The volume device driver is accessed through a virtual disk devicenode whose character device nodes appear in /dev/vx/rdsk/diskgroup, and whoseblock device nodes appear in /dev/vx/dsk/diskgroup.volume event logThe device interface (/dev/vx/event) through which volume driver events are reportedto utilities.vxconfigdThe VxVM configuration daemon, which is responsible for making changes to the VxVMconfiguration. This daemon must be running before VxVM operations can be performed.Glossary 321
322 <strong>VERITAS</strong> <strong>Volume</strong> Manager Administrator’s Guide
IndexSymbols/dev/vx/dsk block device files 180/dev/vx/rdsk character device files 180/etc/default/vxassist defaults file 161/etc/default/vxassist file 236/etc/default/vxdg defaults file 248/etc/fstab file 203/etc/vx/cntrls.exclude file 61/etc/vx/disks.exclude file 60/etc/vx/enclr.exclude file 61/etc/vx/volboot file 135/sbin/rc2.d/S95vxvm-recover file 241/stand/system file 289ABA/A disk arrays 85A/P disk arrays 85A/PF disk arrays 85A/PG disk arrays 85activation modes for shared disk groups 247ACTIVEplex state 147volume state 182active/active disk arrays 85active/passive disk arrays 85adding disks 68attributesplex 156subdisk 143backupscreated using snapshots 212creating for volumes 210creating from a mirror 210creating using snapshots 212for multiple volumes 216of RAID-5 volumes 212blocks on disks 9Cc# 3, 54c#t#d# 54c#t#d# based naming scheme 54check_all policy 103check_alternate policy 103check_disabled policy 103check_periodic policy 104checkpoint interval 291CLEANplex state 147volume state 183cluster protocol versionchecking 266number 256upgrading 266clustersactivating disk groups 248activating shared disk groups 264activation modes for shared diskgroups 247benefits 243checking cluster protocol version 265cluster protocol version number 256cluster-shareable disk groups 246configuration 250configuring exclusive open of volume bynode 264, 265converting shared disk groups toprivate 262creating shared disk groups 261designating shareable disk groups 246determining if disks are shared 259dirty region log 257forcibly adding disks to disk groups 262forcibly importing disk groups 262global connectivity policy 249importing disk groups as shared 262323
initialization 250interaction of MC/ServiceGuard andVxVM 255introduced 244joining disk groups in 263limitations of shared disk groups 249listing shared disk groups 260local connectivity policy 249maximum number of nodes in 243moving objects between disk groups 263node abort 255node shutdown 254nodes 244operation of DRL in 257, 258operation of vxconfigd in 253operation of VxVM in 244private disk groups 246private networks 244protection against simultaneouswrites 247reconfiguration daemon 250reconfiguration of 250resolving disk status in 249setting disk connectivity policies in 264shared disk groups 246shared objects 247splitting disk groups in 263upgrading cluster protocol version 266upgrading online 256use of MC/ServiceGuard withVxVM 250used of DMP in 105vol_fmr_logsz tunable 292volume reconfiguration 252vxclustd 251vxdctl 259vxrecover 267vxstat 267cluster-shareable disk groups in clusters 246cmhaltnodeinteraction with VXVM 255columnschanging number of 219in striping 17mirroring in striped-mirror volumes 173commentplex attribute 156subdisk attribute 143concatenated volumes 15, 157Dconcatenated-mirror volumesconverting tomirrored-concatenated 222creating 169defined 24recovery 158Concatenated-Pro volumes 158concatenation 15condition flags for plexes 150configuration copies for disk group 290configuration databasecopy size 107in private region 55reducing size of 120connectivity policiesglobal 249local 249setting for disk groups 264controllersdisabling for DMP 102disabling in DMP 98mirroring across 167, 173number 3specifying to vxassist 164converting disks 60CVMcluster functionality of VxVM 243d# 3, 54data change objectDCO 44data redundancy 21, 22, 25data volume configuration 50database replay logs and sequential DRL 41databasesresilvering 49resynchronizing 49DCOadding to RAID-5 volumes 193adding to volumes 191considerations for disk layout 125creating volumes with DCOsattached 169data change object 44dissociating from volumes 194effect on disk group split and join 125log plexes 46log volume 44324 <strong>VERITAS</strong> <strong>Volume</strong> Manager Administrator’s Guide
moving log plexes 194reattaching to volumes 195removing from volumes 194specifying storage for 194dcolen attribute 45, 170, 192DCOSNPplex state 147DDL 5Device Discovery Layer 58description file with vxmake 178DETACHEDplex kernel state 151volume kernel state 184Device Discovery 5Device Discovery Layer 58Device Discovery Layer (DDL) 5device files to access volumes 180device names 3, 54devicesmetadevices 56pathname 54special 56standard 56dirty bits in DRL 40dirty flags set on volumes 39dirty region logging. See DRLdirty regions 295DISABLEDplex kernel state 151volume kernel state 184disabled paths 100disk arraysA/A 85A/P 85A/PF 85A/PG 85active/active 85active/passive 85adding vendor-supplied supportpackage 57defined 4excluding support for 58listing excluded 59listing supported 58multipathed 5re-including support for 59removing vendor-supplied supportpackage 57disk groupsactivating shared 264activation in clusters 248adding disks to 111avoiding conflicting minor numbers onimport 119clearing locks on disks 118cluster-shareable 246converting to private 262creating 110creating shared 261creating with old version number 135default 107defaults file for shared 248defined 9deporting 113designating as shareable 246destroying 132disabling 132displaying free space in 110displaying information about 109displaying version of 134effect of size on private region 107features supported by version 133forcing import of 119free space in 230global connectivity policy for shared 249impact of number of configurationcopies on performance 290importing 114importing as shared 262importing forcibly 262joining 123, 130joining in clusters 263layout of DCO plexes 125limitations of move, split, and join 124listing objects affected by a move 125listing shared 260local connectivity policy for shared 249moving between systems 117moving disks between 117, 127moving disks in EMC arrays 127moving licensed EMC disks between 127moving object between 121moving objects between 127moving objects in clusters 263private in clusters 246recovery from failed reconfiguration 123removing disks from 111renaming 115Index 325
eorganizing 120reserving minor numbers 119restarting moved volumes 128, 129, 131root 9rootdg 9, 107setting connectivity policies inclusters 264setting number of configurationcopies 290shared in clusters 246specifying to commands 108splitting 122, 129splitting in clusters 263upgrading version of 132, 134version 132, 134disk media names 8, 53disk names 53disk## 9, 53disk##-## 9disksadding 68adding to disk groups 111adding to disk groups forcibly 262changing naming scheme 61clearing locks on 118complete failure messages 230configuring newly added 56converting 60determining failed 229determining if shared 259Device Discovery Layer 58disabled path 100discovery of by VxVM 57disk arrays 4displaying information 83, 84displaying information about 109displaying spare 232enabled path 100enabling 80enclosures 5excluding free space from hot-relocationuse 234failure handled by hot-relocation 226formatting 64hot-relocation 225initializing 60, 65installing 64invoking discovery of 57layout of DCO plexes 125making available for hot-relocation 232making free space available forhot-relocation use 235marking as spare 232media name 53metadevices 56mirroring volumes on 189moving between disk groups 117, 127moving disk groups betweensystems 117moving volumes from 204names 53naming schemes 54nopriv 56number 3obtaining performance statistics 286partial failure messages 229postponing replacement 76primary path 100putting under control of VxVM 60reinitializing 68releasing from disk groups 132removing 74, 76removing from disk groups 111removing from pool of hot-relocationspares 233removing with subdisks 75, 76renaming 81replacing 76replacing removed 78reserving for special purposes 82resolving status in clusters 249scanning for 57secondary path 100setting connectivity policies inclusters 264simple 56spare 230special devices 56specifying to vxassist 164standard devices 56taking offline 81unreserving 82VM 8DMPcheck_all restore policy 103check_alternate restore policy 103check_disabled restore policy 103check_periodic restore policy 104326 <strong>VERITAS</strong> <strong>Volume</strong> Manager Administrator’s Guide
disabling controllers 102displaying DMP databaseinformation 99displaying DMP node for a path 101displaying DMP node for anenclosure 101displaying information about paths 99displaying paths controlled by DMPnode 101displaying status of DMP errordaemons 105displaying status of DMP restoredaemon 104dynamic multipathing 85enclosure-based naming 86in a clustered environment 105listing controllers 102listing enclosures 102load balancing 88metanodes 86path failover mechanism 87path-switch tunable 291renaming an enclosure 103restore policy 103setting the DMP restore pollinginterval 103starting the DMP restore daemon 103stopping the DMP restore daemon 104vxdmp device driver 87vxdmpadm 101dmp_pathswitch_blks_shift tunable 291DRLadding log subdisks 141adding logs to mirrored volumes 195creating mirrored volumes with loggingenabled 170creating mirrored volumes withsequential DRL enabled 171dirty region logging 40handling recovery in clusters 258hot-relocation limitations 227log subdisks 40logs. See DRL logsmaximum number of dirty regions 295minimum number of sectors 295operation in clusters 257removing logs from mirroredvolumes 196sequential 41EDRL logshandling additional nodes inclusters 258in clusters 257increasing size of 258EMC arraymoving licensed disks between diskgroups 127EMC arraysmoving disks between disk groups 127EMPTYplex state 148volume state 183ENABLEDplex kernel state 151volume kernel state 184enabled paths, displaying 100enclosure-based naming 5, 61displayed by vxprint 62DMP 86enclosure-based naming scheme 54enclosures 5discovering disk access names in 62issues with nopriv disks 62issues with simple disks 62mirroring across 173error messagesDisk for disk group not found 119Disk group has no valid configurationcopies 118Disk group version doesn’t supportfeature 133Disk is in use by another host 118Disk is used by one or more subdisks 112Disk not moving, but subdisks on itare 125import failed 118tmpsize too small to perform thisrelayout 32<strong>Volume</strong> has different organization ineach mirror 199vxdg listmove failed 125Exclude controllers 89Exclude devices 88Exclude devices from being multipathed 91Exclude disks 90Exclude disks from being multipathed 92Index 327
FGHExclude paths 89Exclude paths from being multipathed 92exclusive-write mode 247failover 243, 244failure handled by hot-relocation 226failure in RAID-5 handled byhot-relocation 226fast mirror resynchronization. SeeFastResyncFastResyncchecking if enabled on volumes 206disabling on volumes 207enabling on new volumes 170enabling on volumes 205enabling on volumes with snapshots 207limitations 49Non-Persistent 44operation with off-host processing 270Persistent 44size of bitmap 292snapshot enhancements 42use by snapshots 45use with snapshots 43fastresync attribute 170, 206file systemsgrowing using vxresize 199shrinking using vxresize 199unmounting 203FMR. See FastResyncformatting disks 64free space in disk groups 230groupname## 53hasdcolog attribute 206HFS file systemsresizing 199hot_relocationusing only spare disks for 236hot-relocationcomplete failure messages 230configuration summary 231daemon 226defined 51detecting disk failure 226detecting plex failure 226IKLdetecting RAID-5 subdisk failure 226excluding free space on disks from useby 234limitations 227making free space on disks available foruse by 235marking disks as spare 232modifying behavior of 241notifying users other than root 241operation of 225partial failure messages 229preventing from running 241reducing performance impact ofrecovery 241removing disks from spare pool 233subdisk relocation 231subdisk relocation messages 236unrelocating subdisks 236unrelocating subdisks using vxassist 238unrelocating subdisks usingvxdiskadm 237unrelocating subdisks usingvxunreloc 238use of free space in disk groups 230use of spare disks 230use of spare disks and free space 231vxrelocd 226I/Ouse of statistics in performancetuning 285using traces for performance tuning 288I/O operationsmaximum number in parallel 293maximum size of 293identifiers for tasks 185initialization of disks 60, 65ioctl calls 293, 294IOFAIL plex condition 150IOFAIL plex state 148kernel statesfor plexes 151volumes 184layered volumesconverting to non-layered 222328 <strong>VERITAS</strong> <strong>Volume</strong> Manager Administrator’s Guide
Mdefined 30, 158striped-mirror 22layoutschanging default used by vxassist 163left-symmetric 27specifying default 163types of volume 157left-symmetric layout 27len subdisk attribute 143LIF area 69LIF LABEL record 69load balancing 85, 244lock clearing on disks 118LOG plex state 148log subdisksassociating with plexes 141DRL 40logdisk 171, 175logsadding DRL log 195adding for RAID-5 196adding sequential DRL logs 195RAID-5 29, 39removing DRL log 196removing for RAID-5 197removing sequential DRL logs 196resizing using vxvol 201specifying number for RAID-5 175master node 245MC/ServiceGuardinteraction with vxclustd 252interaction with VXVM 255use with VxVM in clusters 250memorygranularity of allocation by VxVM 295maximum size of pool for VxVM 295minimum size of pool for VxVM 297persistence of FastResync in 44messagescomplete disk failure 230hot-relocation of subdisks 236partial disk failure 229metadevices 56metanodesDMP 86minor numbers 119mirrored volumesNadding DRL logs 195adding sequential DRL logs 195changing read policies for 202configuring VxVM to create bydefault 189creating 168creating across controllers 167, 173creating across enclosures 173creating across targets 165creating with logging enabled 170creating with sequential DRLenabled 171defined 158dirty region logging 39DRL 39FastResync 39FR 39logging 39performance 280removing DRL logs 196removing sequential DRL logs 196snapshots 43mirrored-concatenated volumesconverting to concatenated-mirror 222creating 168defined 22mirrored-stripe volumesbenefits of 21converting to striped-mirror 222creating 172defined 158performance 281mirroringdefined 21mirroring plus striping 22mirrorsadding to volumes 189boot disk 70creating of VxVM root disk 71creating snapshot 213defined 11removing from volumes 191specifying number of 168multipathingdisplaying information about 99nameschanging for disk groups 115Index 329
Odefining for snapshot volumes 216device 3, 54disk 53disk media 8, 53plex 11plex attribute 156renaming disks 81subdisk 9subdisk attribute 143VM disk 9volume 11naming schemechanging for disks 61naming schemesfor disks 54ndcomirror attribute 170, 192NEEDSYNC volume state 183NODAREC plex condition 150nodesin clusters 244maximum number in a cluster 243node abort in clusters 255shutdown in clusters 254NODEVICE plex condition 150non-layered volume conversion 222Non-Persistent FastResync 44nopriv disk type 56nopriv disksissues with enclosures 62objectsphysical 3virtual 7off-host processing 243, 269OFFLINE plex state 148online relayoutchanging number of columns 219changing region size 222changing speed of 222changing stripe unit size 219combining with conversion 222controlling progress of 221defined 31destination layouts 219failure recovery 38how it works 31limitations 37monitoring tasks for 221Ppausing 221performing 219resuming 221reversing direction of 222specifying non-default 219specifying plexes 220specifying task tags for 220temporary area 32transformation characteristics 38transformations and volume length 38types of transformation 35viewing status of 221ordered allocation 165, 171, 175parity in RAID-5 25path failover in DMP 87pathgroupcreate 91remove 96performanceanalyzing data 285benefits of using VxVM 279changing values of tunables 290combining mirroring and striping 281effect of read policies 282examining ratio of reads to writes 288hot spots identified by I/O traces 288impact of number of disk groupconfiguration copies 290load balancing in DMP 88mirrored volumes 280monitoring 283moving volumes to improve 286obtaining statistics for disks 286obtaining statistics for volumes 284RAID-5 volumes 281setting priorities 283striped volumes 280striping to improve 287tracing volume operations 283tuning large systems 289tuning VxVM 289using I/O statistics 285Persistent FastResync 44, 45physical disksadding to disk groups 111clearing locks on 118complete failure messages 230330 <strong>VERITAS</strong> <strong>Volume</strong> Manager Administrator’s Guide
determining failed 229displaying information 83displaying information about 109displaying spare 232enabling 80excluding free space from hot-relocationuse 234failure handled by hot-relocation 226initializing 60installing 64making available for hot-relocation 232making free space available forhot-relocation use 235marking as spare 232moving between disk groups 117, 127moving disk groups betweensystems 117moving volumes from 204partial failure messages 229postponing replacement 76releasing from disk groups 132removing 74, 76removing from disk groups 111removing from pool of hot-relocationspares 233removing with subdisks 75, 76replacing 76replacing removed 78reserving for special purposes 82spare 230taking offline 81unreserving 82physical objects 3plex conditionsIOFAIL 150NODAREC 150NODEVICE 150RECOVER 150REMOVED 150plex kernel statesDETACHED 151DISABLED 151ENABLED 151plex statesACTIVE 147CLEAN 147DCOSNP 147EMPTY 148IOFAIL 148LOG 148OFFLINE 148SNAPATT 148SNAPDIS 148SNAPDONE 149SNAPTMP 149STALE 149TEMP 149TEMPRM 149TEMPRMSD 150plexesassociating log subdisks with 141associating subdisks with 140associating with volumes 151attaching to volumes 151changing attributes 156changing read policies for 202comment attribute 156complete failure messages 230condition flags 150converting to snapshot 215copying 154creating 145creating striped 146defined 10detaching from volumestemporarily 152disconnecting from volumes 152displaying information about 146dissociating from volumes 155dissociating subdisks from 142failure in hot-relocation 226kernel states 151limit on number per volume 282maximum number of subdisks 294maximum number per volume 11mirrors 11moving 154, 194name attribute 156names 11partial failure messages 229putil attribute 156putting online 153, 188reattaching 153recovering after correctable hardwarefailure 229removing 155removing from volumes 191sparse 37, 140Index 331
Rspecifying for online relayout 220states 146striped 17taking offline 152, 188tutil attribute 156types 10polling interval for DMP restore 103preferred plexperformance of read policy 282read policy 202primary path 85, 100private disk groupsconverting from shared 262in clusters 246private networkin clusters 244private regionconfiguration database 55defined 55effect of large disk groups on 107public region 55putilplex attribute 156subdisk attribute 143RAID-0 17RAID-0+1 21RAID-1 21RAID-1+0 22RAID-5adding logs 196adding subdisks to plexes 141hot-relocation limitations 227logs 29, 39parity 25removing logs 197specifying number of logs 175subdisk failure handled byhot-relocation 226volumes 25RAID-5 volumesadding DCOs to 193adding logs 196changing number of columns 219changing stripe unit size 219creating 174defined 158making backups of 212performance 281removing logs 197taking snapshots of 212read policieschanging 202performance of 282prefer 202round 202select 202read-only mode 247RECOVER plex condition 150recoverycheckpoint interval 291I/O delay 291preventing on restarting volumes 188recovery accelerator 49redo log configuration 50redundancyof data on mirrors 158of data on RAID-5 158redundant-loop access 6region 55Re-include controllers for multipathing 96Re-include controllers in VxVM 94Re-include devices in VxVM 93Re-include disks for multipathing 97Re-include disks in VxVM 95Re-include paths for multipathing 96, 97Re-include paths in VxVM 95reinitialization of disks 68relayoutchanging number of columns 219changing region size 222changing speed of 222changing stripe unit size 219combining with conversion 222controlling progress of 221limitations 37monitoring tasks for 221online 31pausing 221performing online 219resuming 221reversing direction of 222specifying non-default 219specifying plexes 220specifying task tags for 220storage 31transformation characteristics 38332 <strong>VERITAS</strong> <strong>Volume</strong> Manager Administrator’s Guide
Stypes of transformation 35viewing status of 221relocationautomatic 225complete failure messages 230limitations 227partial failure messages 229REMOVED plex condition 150removing disks 76removing physical disks 74replacing disks 76replay logs and sequential DRL 41REPLAY volume state 183resilveringdatabases 49restore policycheck_all 103check_alternate 103check_disabled 103check_periodic 104restrictionsVxVM-bootable volumes 70resyncfromoriginal snapback 48resyncfromreplica snapback 48resynchronizationcheckpoint interval 291I/O delay 291of volumes 38resynchronizingdatabases 49root diskcreating mirrors 71root disk group 9, 107requiring existence of volboot file 135root diskscreating LVM from VxVM 73creating VxVM 71removing LVM 72root volumesbooting 70rootability 69rootdg 9requiring existence of volboot file 135round-robinperformance of read policy 282read policy 202scandisksvxdisk subcommand 57secondary path 85secondary path display 100sequential DRLcreating mirrored volumes with loggingenabled 171defined 41maximum number of dirty regions 295shared disk groupsactivating 264activation modes 247converting to private 262creating 261importing 262in clusters 246limitations of 249listing 260shared-read mode 247shared-write mode 247simple disk type 56simple disksissues with enclosures 62size units 137slave nodes 245SmartSync 49disabling on shared disk groups 294enabling on shared disk groups 294snap objects 46snap volume naming 47snapabort 42SNAPATT plex state 148snapbackdefined 42resyncfromoriginal 48resyncfromreplica 48, 217used to merge snapshot volumes 216snapcleardefined 43used to create independent volumes 217SNAPDIS plex state 148SNAPDONE plex state 149snapshotsand FastResync 43backing up multiple volumes 216converting plexes to 215creating backups 212creating independent volumes 217defining names for 216displaying information about 218Index 333
merging with original volumes 216of RAID-5 volumes 212on multiple volumes 48removing 214resynchronization on snapback 48resynchronizing volumes from 217used to back up volumes online 212snapstart 42SNAPTMP plex state 149spanned volumes 15spanning 15spare disksdisplaying 232marking disks as 232used for hot-relocation 230sparse plexes 37, 140special disk devices 56STALE plex state 149standard disk devices 56statesfor plexes 146volume 182storageordered allocation of 165, 171, 175storage attributes and volume layout 164storage relayout 31stripe columns 17stripe unitschanging size 219defined 17striped plexesadding subdisks 141defined 17striped volumeschanging number of columns 219changing stripe unit size 219creating 171defined 157failure of 17performance 280specifying non-default number ofcolumns 172specifying non-default stripe unitsize 172striped-mirror volumesbenefits of 22converting to mirrored-stripe 222creating 173defined 158mirroring columns 173mirroring subdisks 173performance 281trigger point for mirroring 173Striped-Pro volumes 158stripe-mirror-col-split-trigger-pt 173striping 17striping plus mirroring 21subdisk names 9subdisksassociating log subdisks 141associating with plexes 140associating with RAID-5 plexes 141associating with striped plexes 141blocks 9changing attributes 143comment attribute 143complete failure messages 230copying contents of 138creating 137defined 9determining failed 229displaying information about 138dissociating from plexes 142dividing 139DRL log 40hot-relocated 231hot-relocation 51, 225hot-relocation messages 236joining 139len attribute 143listing original disks afterhot-relocation 240maximum number per plex 294mirroring in striped-mirror volumes 173moving after hot-relocation 236moving contents of 138name attribute 143partial failure messages 229putil attribute 143RAID-5 failure of 226removing from VxVM 142restrictions on moving 139specifying different offsets forunrelocation 239splitting 139tutil attribute 143unrelocating after hot-relocation 236unrelocating to different disks 239334 <strong>VERITAS</strong> <strong>Volume</strong> Manager Administrator’s Guide
Tunrelocating using vxassist 238unrelocating using vxdiskadm 237unrelocating using vxunreloc 238swap spaceincreasing for VxVM rootable system 73SYNC volume state 183t# 3, 54tagsfor tasks 185specifying for online relayout tasks 220specifying for tasks 185target IDsnumber 3specifying to vxassist 164target mirroring 165, 173task monitor in VxVM 185tasksaborting 186changing state of 186identifiers 185listing 186managing 185modifying parameters of 186monitoring 186monitoring online relayout 221pausing 186resuming 186specifying tags 185specifying tags on online relayoutoperation 220tags 185TEMP plex state 149temporary area used by online relayout 32TEMPRM plex state 149TEMPRMSD plex state 150trigger point in striped-mirror volumes 173tunableschanging values of 290dmp_pathswitch_blks_shift 291vol_checkpt_default 291vol_default_iodelay 291vol_fmr_logsz 45, 292vol_max_vol 292vol_maxio 293vol_maxioctl 293vol_maxkiocount 293vol_maxparallelio 293UVvol_maxspecialio 294vol_subdisk_num 294volcvm_smartsync 294voldrl_max_drtregs 295voldrl_max_seq_dirty 41, 295voldrl_min_regionsz 295voliomem_chunk_size 295voliomem_maxpool_sz 295voliot_errbuf_default 296voliot_iobuf_dflt 296voliot_iobuf_limit 296voliot_iobuf_max 297voliot_max_open 297volraid_minpool_size 297volraid_rsrtransmax 297tutilplex attribute 156subdisk attribute 143units of size 137versionsdisk group 132displaying for disk group 134upgrading 132virtual objects 7VM disksdefined 8determining if shared 259displaying spare 232excluding free space from hot-relocationuse 234initializing 60making free space available forhot-relocation use 235marking as spare 232mirroring volumes on 189moving volumes from 204names 9postponing replacement 76removing from pool of hot-relocationspares 233renaming 81vol## 11vol##-## 11vol_checkpt_default tunable 291vol_default_iodelay tunable 291vol_fmr_logsz tunable 45, 292Index 335
vol_max_vol tunable 292vol_maxio tunable 293vol_maxioctl tunable 293vol_maxkiocount tunable 293vol_maxparallelio tunable 293vol_maxspecialio tunable 294vol_subdisk_num tunable 294volboot file 135adding entry to 135volcvm_smartsync tunable 294voldrl_max_drtregs tunable 295voldrl_max_seq_dirty tunable 41, 295voldrl_min_regionsz tunable 295voliomem_chunk_size tunable 295voliomem_maxpool_sz tunable 295voliot_errbuf_default tunable 296voliot_iobuf_dflt tunable 296voliot_iobuf_limit tunable 296voliot_iobuf_max tunable 297voliot_max_open tunable 297volraid_minpool_size tunable 297volraid_rsrtransmax tunable 297volume kernel statesDETACHED 184DISABLED 184ENABLED 184volume resynchronization 38volume statesACTIVE 182CLEAN 183EMPTY 183NEEDSYNC 183REPLAY 183SYNC 183volumesaccessing device files 180adding DCOs to 191adding DRL logs 195adding mirrors 189adding RAID-5 logs 196adding sequential DRL logs 195adding subdisks to plexes of 141advanced approach to creating 159assisted approach to creating 159associating plexes with 151attaching plexes to 151backing up 210backing up online using snapshots 212block device files 180booting VxVM-rootable 70changing layout online 219changing number of columns 219changing read policies for mirrored 202changing stripe unit size 219character device files 180checking if FastResync is enabled 206combining mirroring and striping forperformance 281combining online relayout andconversion 222concatenated 15, 157concatenated-mirror 24, 158Concatenated-Pro 158configuring exclusive open by clusternode 264, 265converting between layered andnon-layered 222converting concatenated-mirror tomirrored-concatenated 222converting mirrored-concatenated toconcatenated-mirror 222converting mirrored-stripe tostriped-mirror 222converting striped-mirror tomirrored-stripe 222creating 159creating concatenated-mirror 169creating from snapshots 217creating mirrored 168creating mirrored-concatenated 168creating mirrored-stripe 172creating RAID-5 174creating snapshots 214creating striped 171creating striped-mirror 173creating using vxmake 176creating using vxmake descriptionfile 178creating with DCOs attached 169creating with DRL logging enabled 170creating with sequential DRLenabled 171defined 11detaching plexes from temporarily 152disabling FastResync 207disconnecting plexes 152displaying information 181displaying information about336 <strong>VERITAS</strong> <strong>Volume</strong> Manager Administrator’s Guide
snapshots 218dissociating DCO from 194dissociating plexes from 155enabling FastResync 207enabling FastResync on 205enabling FastResync on new 170excluding storage from use byvxassist 164finding maximum size of 163finding out by how much can grow 198flagged as dirty 39initializing 179initializing contents to zero 179kernel states 184layered 22, 30, 158limit on number of plexes 11limitations 11making immediately available foruse 179maximum number of 292maximum number of data plexes 282merging snapshots 216mirrored 21, 158mirrored-concatenated 22mirrored-stripe 21, 158mirroring across controllers 167, 173mirroring across targets 165, 173mirroring all 189mirroring on disks 189mirroring VxVM-rootable 70moving from VM disks 204moving to improve performance 286names 11naming snap 47obtaining performance statistics 284performance of mirrored 280performance of RAID-5 281performance of striped 280performing online relayout 219placing in maintenance mode 188preventing recovery on restarting 188RAID-0 17RAID-0+1 21RAID-1 21RAID-1+0 22RAID-10 22RAID-5 25, 158raw device files 180reattaching DCOs to 195reattaching plexes 153reconfiguration in clusters 252recovering after correctable hardwarefailure 229removing 203removing DCOs from 194removing DRL logs 196removing from /etc/fstab 203removing mirrors from 191removing plexes from 191removing RAID-5 logs 197removing sequential DRL logs 196resizing 198resizing using vxassist 200resizing using vxresize 199resizing using vxvol 201restarting moved 128, 129, 131restrictions on VxVM-bootable 70resynchronizing from snapshots 217spanned 15specifying default layout 163specifying non-default number ofcolumns 172specifying non-default relayout 219specifying non-default stripe unitsize 172specifying storage for DCO plexes 194specifying use of storage to vxassist 164starting 179, 188states 182stopping 187stopping activity on 203striped 17, 157striped-mirror 22, 158Striped-Pro 158striping to improve performance 287taking multiple snapshots 48tracing operations 283trigger point for mirroring instriped-mirror 173types of layout 157VRTSexplorer xixvxassistadvantages of using 160command usage 161defaults file 161setting default values 161snapabort 42snapback 42Index 337
snapclear 43snapshot 42snapstart 42used to add a log subdisk 142used to add a RAID-5 log 196used to add DCOs to volumes 192used to add DRL logs 195used to add mirrors to volumes 152, 189used to add sequential DRL logs 196used to change number of columns 220used to change stripe unit size 220used to configure exclusive access to avolume 264used to convert between layered andnon-layered volumes 222used to create concatenated-mirrorvolumes 169used to create mirrored volumes 168used to create mirrored-concatenatedvolumes 168used to create mirrored-stripevolumes 172used to create RAID-5 volumes 175used to create snapshots 212used to create striped volumes 171used to create striped-mirrorvolumes 173used to create volumes 160used to create volumes with DCOsattached 170used to define layout on specifiedstorage 164used to discover maximum volumesize 163used to display information aboutsnapshots 218used to dissociate snapshots fromvolumes 217used to exclude storage from use 164used to find out by how much volumescan grow 198used to merge snapshots withvolumes 216used to mirror across controllers 167, 173used to mirror across enclosures 173used to mirror across targets 165, 167used to move DCO plexes 194used to move subdisks afterhot-relocation 238used to move volumes 286used to relayout volumes online 219used to remove DCOs from volumes 194used to remove DRL logs 196used to remove mirrors 191used to remove plexes 191used to remove RAID-5 logs 197used to remove volumes 203used to reserve disks 82used to resize volumes 200used to resynchronize volumes fromsnapshots 217used to snapshot multiple volumes 216used to specify number of mirrors 168used to specify number of RAID-5logs 175used to specify ordered allocation ofstorage 165used to specify plexes for onlinerelayout 220used to specify sequential DRLlogging 171used to specify storage attributes 164used to specify storage for DCOplexes 194used to specify tags for online relayouttasks 220used to unrelocate subdisks afterhot-relocation 238vxclustdcluster reconfiguration daemon 250, 251interaction with MC/ServiceGuard 252vxconfigdmanaged using vxdctl 135operation in clusters 253vxcp_lvm_rootused to create VxVM root disk 71used to create VxVM root diskmirrors 71vxdarestoreused to handle simple/nopriv diskfailures 62vxdcoused to dissociate DCOs fromvolumes 194used to reattach DCOs to volumes 195used to remove DCOs from volumes 194vxdctlused in clusters 259338 <strong>VERITAS</strong> <strong>Volume</strong> Manager Administrator’s Guide
used to add entry to volboot file 135used to check cluster protocolversion 265used to manage vxconfigd 135used to upgrade cluster protocolversion 266vxdctl enableused to configure new disks 56used to invoke device discovery 57vxddladmused to exclude support for diskarrays 58used to list excluded disk arrays 59used to list supported disk arrays 58used to re-include support for diskarrays 59vxdestroy_lvmrootused to remove LVM root disks 72vxdgused to add disks to disk groupsforcibly 261used to assign minor number ranges 119used to change activation mode onshared disk groups 264used to clear locks on disks 118used to convert shared disk groups toprivate 262used to create disk groups 111used to create disk groups with oldversion number 135used to create shared disk groups 261used to deport disk groups 114used to destroy disk groups 132used to disable a disk group 132used to display disk group version 134used to display free space in diskgroups 110used to display information about diskgroups 109used to force import of disk groups 119used to import disk groups 115used to import shared disk groups 262used to join disk groups 130used to list objects affected by move 125used to list shared disk groups 260used to list spare disks 232used to move disk groups betweensystems 117used to move disks between diskgroups 117used to move objects between diskgroups 127used to obtain copy size of configurationdatabase 107used to remove disks from diskgroups 111used to rename disk groups 115used to split disk groups 129used to upgrade disk group version 134vxdiskused to clear locks on disks 118used to determine if disks are shared 259used to discover disk access names 62used to display information aboutdisks 109used to display multipathinginformation 99used to list disks 83used to list spare disks 232used to scan disk devices 57vxdiskaddused to add disks to disk groups 111used to create disk groups 111used to place disks under VxVMcontrol 68vxdiskadmAdd or initialize one or more disks 65,111Disable (offline) a disk device 81Enable (online) a disk device 80Enable access to (import) a diskgroup 114Exclude a disk from hot-relocationuse 234List disk information 84Make a disk available for hot-relocationuse 235Mark a disk as a spare for a diskgroup 233Mirror volumes on a disk 190Move volumes from a disk 204Remove a disk 74, 112Remove a disk for replacement 76Remove access to (deport) a diskgroup 113Replace a failed or removed disk 78Turn off the spare flag on a disk 234Unrelocate subdisks back to a disk 237Index 339
used to add disks 65used to add disks to disk groups 111used to change disk-naming scheme 61used to create disk groups 111used to deport disk groups 113used to exclude free space on disks fromhot-relocation use 234used to import disk groups 114used to initialize disks 65used to list spare disks 232used to make free space on disksavailable for hot-relocation use 235used to mark disks as spare 233used to mirror volumes 190used to move disk groups betweensystems 119used to move disks between diskgroups 117used to move subdisks afterhot-relocation 237used to move subdisks from disks 112used to move volumes from VMdisks 204used to remove disks from pool ofhot-relocation spares 234used to unrelocate subdisks afterhot-relocation 237vxdiskconfigpurpose of 57vxdmp device driver 87vxdmpadmused to disable controllers 102used to disable controllers in DMP 98used to discover disk access names 62used to display a DMP node for anenclosure 101used to display DMP databaseinformation 99used to display paths controlled by DMPnode 101used to display status of DMP errordaemons 105used to display status of DMP restoredaemon 104used to list controllers 102used to list enclosures 102used to rename enclosures 103used to set restore polling interval 103used to specify DMP restore policy 103used to start DMP restore daemon 103used to stop DMP restore daemon 104vxeditused to change plex attributes 156used to change subdisk attributes 143used to configure number ofconfiguration copies for a diskgroup 290used to exclude free space on disks fromhot-relocation use 234used to make free space on disksavailable for hot-relocation use 235used to mark disks as spare 232used to remove disks from pool ofhot-relocation spares 233used to remove plexes 155used to remove subdisks fromVxVM 142used to remove volumes 203used to rename disks 81used to reserve disks 82used to set disk connectivity policy in acluster 264VxFS file system resizing 199vxmakeused to associate plexes withvolumes 151used to associate subdisks with newplexes 140used to create plexes 145, 189used to create striped plexes 146used to create subdisks 137used to create volumes 176using description file with 178vxmendused to put plexes online 188used to re-enable plexes 153used to take plexes offline 152, 188vxmirrorused to configure VxVM defaultbehavior 189used to mirror volumes 189vxplexused to add a RAID-5 log 197used to attach plexes to volumes 151, 189used to convert plexes to snapshots 215used to copy plexes 154used to detach plexes temporarily 152used to dissociate and remove340 <strong>VERITAS</strong> <strong>Volume</strong> Manager Administrator’s Guide
plexes 155used to dissociate plexes fromvolumes 155used to move plexes 154used to reattach plexes 153used to remove mirrors 191used to remove plexes 191used to remove RAID-5 logs 197vxprintused to check if FastResync isenabled 206used to display DCO information 193used to display plex information 146used to display subdisk information 138used to display volume information 181used to identify RAID-5 log plexes 197used to list spare disks 232used with enclosure-based disknames 62vxrecoverused to prevent recovery 188used to recover plexes 229used to restart a volume 188used to restart moved volumes 128, 129,131vxrelayoutused to resume online relayout 221used to reverse direction of onlinerelayout 222used to view status of onlinerelayout 221vxrelocdhot-relocation daemon 226modifying behavior of 241notifying users other than root 241operation of 227preventing from running 241reducing performance impact ofrecovery 241vxres_lvmrootused to create LVM root disks 73vxresizelimitations 199used to grow volumes and filesystems 199used to shrink volumes and filesystems 199vxrootmirused to create VxVM root diskmirrors 72vxsdused to add log subdisk 141used to add subdisks to RAID-5plexes 141used to add subdisks to stripedplexes 141used to associate subdisks with existingplexes 140used to dissociate subdisks 142used to fill in sparse plexes 140used to join subdisks 139used to move subdisk contents 138used to remove subdisks fromVxVM 142used to split subdisks 139vxstatused to determine failed disk 229used to obtain disk performancestatistics 286used to obtain volume performancestatistics 284used with clusters 267zeroing counters 285vxtaskused to abort tasks 187used to lists tasks 187used to monitor online relayout 221used to monitor tasks 187used to pause online relayout 221used to resume online relayout 221used to resume tasks 187vxtrace used to trace volume operations 283vxunrelocrestarting after errors 240used to list original disks ofhot-relocated subdisks 240used to move subdisks afterhot-relocation 238used to specify different offsets forunrelocated subdisks 239used to unrelocate subdisks afterhot-relocation 238used to unrelocate subdisks to differentdisks 239VxVMbenefits to performance 279cluster functionality (CVM) 243configuration daemon 135Index 341
configuring disk devices 56configuring to create mirroredvolumes 189dependency on operating system 2disk discovery 57granularity of memory allocation by 295interaction with MC/ServiceGuard 255limitations of shared disk groups 249maximum number of data plexes pervolume 282maximum number of subdisks perplex 294maximum number of volumes 292maximum size of memory pool 295minimum size of memory pool 297objects in 7obtaining system information xixoperation in clusters 244performance tuning 289shared objects in cluster 247size units 137task monitor 185types of volume layout 157upgrading 132upgrading disk group version 134use with MC/ServiceGuard inclusters 250VxVM-rootable volumesmirroring 70vxvolused to configure exclusive access to avolume 265used to disable FastResync 207used to enable FastResync 206used to initialize volumes 179used to put volumes in maintenancemode 188used to resize logs 201used to resize volumes 201used to restart moved volumes 128, 129,131used to set read policy 202used to start volumes 179, 188used to stop volumes 187, 203used to zero out volumes 179342 <strong>VERITAS</strong> <strong>Volume</strong> Manager Administrator’s Guide