Installation Instructions Repair Seal Kit PS 80E
Installation Instructions Repair Seal Kit PS 80E
Installation Instructions Repair Seal Kit PS 80E

You also want an ePaper? Increase the reach of your titles
YUMPU automatically turns print PDFs into web optimized ePapers that Google loves.
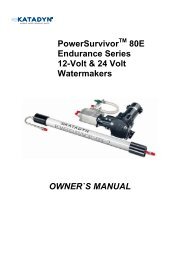
Reassembly: Before you begin reassembly of the watermaker, clean all parts using clean, lint-freerags. At this time, all parts should be carefully inspected for wear or damage. Use a 10x magnifier orloupe to examine the seals, o-rings and other small parts. Stubborn rust stains and deposits on metalparts may be cleaned with a soft-metal wirebrush (e.g., stainless steel or brass). Do not use polishes,cleaning compounds containing abrasive materials, or regular steel wire brushes. Refer to the explodeddrawing of the pump in Figure A-2 in the Appendix for the location of parts and seals duringreassembly. Refer to Figures A-3 and A-4 in the Appendix for full-size drawings and identification ofthe components included in the <strong>Repair</strong> <strong>Seal</strong> <strong>Kit</strong>. In the following procedure, references to the <strong>Repair</strong><strong>Seal</strong> <strong>Kit</strong> will be abbreviated to “RSK.” It will be assumed that all o-rings, seals, and mating surfaceshave been lightly lubricated with non-petroleum silicon grease (supplied with the RSK).Warning: Use only non-petroleum silicon grease to lubricate your watermaker. Lubricants with apetroleum base will damage several watermaker components, including the reverse osmosis membrane.Be especially cautious of lubricants that “contain” teflon, silicon, etc.—such products couldalso contain petroleum-based components. An ample supply of silicon grease is included with eachRSK. Reinstall the piston: If you want to replace the O-rings on the piston, refer to the figure below• Install washer with chamfer onwasher facing ½” dia of plungerrod and a new O-ring onto theplunger rod, if you have an oldstylepiston, you only have toinstall a new O-ring into theplunger rod without a washer.• Slide piston onto the threadedend of the plunger rod, andsecure with the washer and nut.1. Refer to Figure R-5 during the following procedure.Place the piston assembly on a flat, stable surfacewith the shaft pointing up. Slide the installation tool(provided in the RSK) over the piston shaft with thewide end down. Lubricate the new PIP ring, cupseal and the installation tool with silicon grease.With the grooved side facingup, slide the PIP ring down theinstallation tool and onto thepiston. Repeat this process forthe cup seal. Note that thegrooved side of the cup sealshould be facing down; i.e.,the grooved sides of the PIPring and the cup seal shouldbe facing each other. Whenfinished with the installation,remove the installation toolfrom the piston shaft.2. To install the check valve components, refer to Figure R-3. Locate the two new check valve seats inthe RSK. Observe that the hole in the center of each valve seat has a beveled edge on one side.Use your finger to press a valve seat into the bore for the reject check valve assembly. The seatshould be pressed all the way in, with the beveled side of the valve facing outward (that is, against