KCI Cisco VPN Client Installation for PCs - Karmanos Cancer Institute
KCI Cisco VPN Client Installation for PCs - Karmanos Cancer Institute
KCI Cisco VPN Client Installation for PCs - Karmanos Cancer Institute

You also want an ePaper? Increase the reach of your titles
YUMPU automatically turns print PDFs into web optimized ePapers that Google loves.
REQUIREMENTS1. High Speed internet (DSL, or cable)2. At Home – Windows XP SP1, SP2, and SP3, Windows Vista SP1, or Macintosh OSX 10.3or higher.3. At Work - Windows XP (is required no other operating systems are supported)4. Active and up to date anti-virus software on your home computerINSTALLATION PROCEDURETo install the <strong>Cisco</strong> <strong>VPN</strong> <strong>Client</strong> software on your computer, run setup.exe from proper directoryon the <strong>VPN</strong> CD you were provided::\<strong>Cisco</strong><strong>VPN</strong> client\vpnclient\setup.exeOnce the software setup is started, follow the install screens below:Left click Next to continue.2
Left click Yes.Left click Next.3
Left click Next.Left click Finish to reboot computer****Note: If you receive any Microsoft error messages stating something like “Digital SignatureNot Found”, ignore the message and click the button to accept the error and continue. Thiserror may occur several times depending upon the configuration of your machine.**Note: You must reboot your computer be<strong>for</strong>e proceeding to the next steps.4
Once the reboot is complete click Start > Click Programs > Click <strong>Cisco</strong> Systems <strong>VPN</strong> <strong>Client</strong> >Click <strong>VPN</strong> <strong>Client</strong>The following screen will be displayed with connection entry New<strong>KCI</strong> listed:5
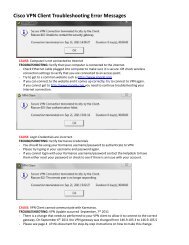
Connecting to the <strong>Karmanos</strong> <strong>VPN</strong>If you did not create an icon in previous step follow these steps to connect:Click Start > Click Programs > Click <strong>Cisco</strong> Systems <strong>VPN</strong> <strong>Client</strong> > Click <strong>VPN</strong> <strong>Client</strong> > ClickConnect. You can click the “X” box in the upper right hand corner to minimize the applicationafter your connection is made.After you have successfully connected to the <strong>VPN</strong> you can use remote control to connect toyour office desktop computer using remote control. Refer to <strong>KCI</strong>-<strong>VPN</strong>-Remote-Desktop.doclocated on the <strong>VPN</strong> CD.**Note: From time to time, you may be required to re-authenticate to the firewall to access<strong>KCI</strong> resources. This is due to a timeout between your <strong>Cisco</strong> <strong>VPN</strong> client and the <strong>KCI</strong> firewall.This is normal behavior.**Note: If you are using a home gateway that does Network Address Translation(NAT), you may need to disconnect your PC from that device and plug it directly intoyour DSL or Cable Modem prior to installation (This may require a reboot of theModem and your PC), in order <strong>for</strong> the initial authentication to be successful.**Note: Once the initial authentication is complete you can reconnect to your NATdevice (once again a reboot may be required).Connection problems: If you cannot start a <strong>VPN</strong> connection on a machine where itpreviously worked, try rebooting the computer. A left-over connection could keep you fromreconnecting to the <strong>VPN</strong>.General Support: Contact the <strong>KCI</strong> Helpdesk at 313-576-9400 or emailhelpdesk@karmanos.org7