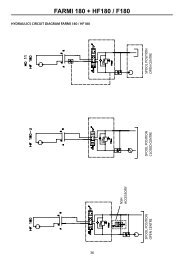
SKIDDING WINCH JL 601T - Farmi Forest
SKIDDING WINCH JL 601T - Farmi Forest
SKIDDING WINCH JL 601T - Farmi Forest
- No tags were found...

Create successful ePaper yourself
Turn your PDF publications into a flip-book with our unique Google optimized e-Paper software.
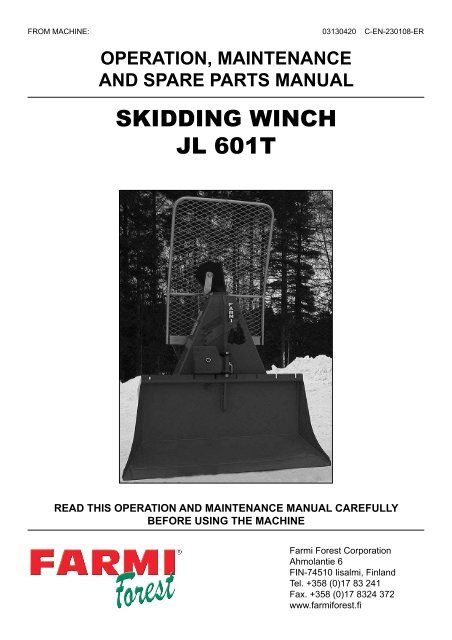
FROM MACHINE:03130420 C-EN-230108-EROPERATION, MAINTENANCEAND SPARE PARTS MANUAL<strong>SKIDDING</strong> <strong>WINCH</strong><strong>JL</strong> <strong>601T</strong>READ THIS OPERATION AND MAINTENANCE MANUAL CAREFULLYBEFORE USING THE MACHINE<strong>Farmi</strong> <strong>Forest</strong> CorporationAhmolantie 6FIN-74510 Iisalmi, FinlandTel. +358 (0)17 83 241Fax. +358 (0)17 8324 372
<strong>JL</strong> <strong>601T</strong>TABLE OF CONTENTSSAFETY INSTRUCTIONS 5STICKERS AND PLATES 9MAIN PARTS 12TECHNICAL SPECIFICATION 13MOUNTING 14PRE-OPERATION CHECKS 15CONTROLS 16OPERATION 17PRE-OPERATION CHECKS 18<strong>WINCH</strong>ING 19<strong>SKIDDING</strong> 19DROPPING THE LOAD 20TRANSPORTATION 20MAINTENANCE 21LUBRICATION 21CLUTCH ADJUSTMENT 21ADJUSTING THE ROLLER CHAIN TIGHTNESS 22ADJUSTING THE DRUM BRAKE 22REMOVING THE <strong>WINCH</strong> MECHANISM 22ASSEMBLY OF THE MECHANISM 23FUNCTION AND ADJUSTMENT OF THE SAFETY BRAKE 24TROUBLE SHOOTING 25FRAME 26MACHINERY 28CABLE WINDER PLL600 32COVER OF THE UNIVERSAL SHAFT 32ACCESSORIES 34Thread Millimeter InchM6 10 7/16M8 13 1/2M10 17 11/16M12 19 3/4M16 24 15/16M20 30 1 3/16M24 34 1 7/16When ordering spare parts, please indicate the machine’s type from the machine plate,spare part’s order number, description and quantity required.Example. <strong>JL</strong><strong>601T</strong>, 92820190, pin, 2 pc4
<strong>JL</strong> <strong>601T</strong>SAFETY INSTRUCTIONSThese safety instructions are meant for the ownersof FARMI equipment, as well as those who operate,service or repair it.The instructions help with:!CAUTION!Written authorizationmust be requested from themanufacturer for anyalterations to the machine.••using the machine safely, appropriately andeffectively.identifying, avoiding and preventing potentiallydangerous situations.The manufacturer supplies an instruction manual,which must always be available at the place ofoperation of the machine. Each user must read thesafety, maintenance and operating instructions beforeoperating the machine, and comply with theseinstructions at all times.Ensure that every operator of the machine isfamiliar with the content of the instructioninstructions, and has been suitably trainedbefore operating the machine.The machine complies with technical requirementsand applicable safety regulations. However, incorrectuse, maintenance or repair of the machine maycause risks.In addition to the instruction manual, remember tocomply with regulations of the local occupationalhealth and safety authorities, and with yourcountry’s laws and decrees.The manufacturer is not liable for damagescaused by:•••••incorrect, negligent or inappropriate use of theproduct.non-original spare parts.normal wear and tear.misuse caused by an untrained person’simproper actions.alterations made without the manufacturer’spermission.STARTING••••••••••••••Familiarize yourself thoroughly with the use,operation and controls of the machine and itsequipment before starting.Familiarize yourself with the capacities andlimitations of the machine and its equipment.Do not use the machine unless you arecompletely familiar with its operation.Be aware of the machine’s danger zones.During operation, prevent bystanders fromentering the danger zone.Ensure that each operator has the necessarysafety equipment, such as a helmet, safetygoggles, work safety boots and suitable protectiveclothing.Never wear loose clothing around moving parts.Protect long hair!Ensure that work is carried out according to thestipulations of applicable occupational healthand safety legislation.Before starting up or using the machine, ensurethat it cannot cause a risk to other people orproperty.Perform a safety check on the machine beforeevery use. If you observe any faults orBefore operating the machine, ensure that thereare no foreign articles in it.Place the machine on a hard, level surface foroperation. In the winter avoid working in slipperyareas.Before operation, ensure the machine is properlyconnected.5
<strong>JL</strong> <strong>601T</strong>OPERATIONMAINTENANCE••••••••••••!DANGER!Many occupational accidentstake place in abnormalcircumstances. Therefore it isimportant to take into accountall the possible circumstancesthat may arise during operationof the machine.Depending on the machine’s type, it will havediverse safety devices and protectors. These aremeant to protect the machine and its operator,and they must never be removed or altered.Never start up or use the machine without allthe safety devices and protectors in place. Alsocheck the universal joint’s safety equipment andjoins.Never insert any body part into the machine withthe engine running.If any faults arise that may jeopardize occupationalsafety, turn off the machine.During operation, the machine’s operator isresponsible for safety in the whole work area.Work may not be carried out in the presence ofany factors that jeopardize occupational safety.Exercise extreme caution when hitching /unhitching the machine from a tractor/trailer.CAUTION!The machine’s operator must!have constant, unobstructedvisibility of the work area. Ifthis is not possible, the ope-CAUTION!rator must work with an assistant.Look out for moving parts when the machine isin operation.Secure the machine against unauthorized andaccidental operation (e.g. moving when parked)whenever it is left unattended.Never leave the machine running unattended.Avoid causing fast, stroke-like loading.Never exceed the given operating values.All safety and warning signs on and in themachine must be legible and intact.The machine may not be operated by personsor alcohol.6••••••••••The machine may only be serviced and repairedby professionals.Electrical and hydraulic faults may only berepaired by authorized professionals.In cases requiring welding, contactthe manufacturer.Turn off the tractor engine and disconnect theuniversal joint before beginning service ormaintenance actions.Ensure that there is no pressure in the hydraulicsystem.Take out the key from the tractor’s ignition forthe duration of the servicing or maintenance.Check that the power is off from the machineyou are working on.When servicing the machine, place it on a levelsurface and ensure that it cannot be moved.Observe the service intervals and annual safetyinspections.manufacturer’s requirements. This can beguaranteed by using original parts.Put all safety devices back into place immediatelyonce servicing or maintenance is complete.When lifting the machine,check that the lifting/hoistingequipment is in perfectworking order. Check theweight of the machine beforelifting it. Choose liftingtrajectories so that they do notcause any danger.hoisting cables and hoists. Always comply with localsafety regulations.OILS AND LUBRICATION••••!Always use the oil types recommended by themanufacturer. Other types of oil may causefaults or improper operation of the equipment,which could lead to serious damage to people orproperty.Never mix different liquids or oils.Always follow the manufacturer’s lubricationinstructions.Use control equipment carefully until the hydraulicoil has had time to reach its operating temperature.
<strong>JL</strong> <strong>601T</strong>SAFETY INSTRUCTIONSFOR HYDRAULIC CIRCUITS1.2.3.4.5.6.7.8.9.10.11.12.13.Work on hydraulic equipment may only becarried out by professional hydraulic engineers.Be cautious when using the equipment in coldconditions.Check the machine for leaks. Do not use themachine if there is a leak from any system.Check all hydraulic hoses – particularly thosewhich are bent during use – and replace anythat are in poor condition or have leaks. Ensurethat all joins are tight and that the lines are notdamaged. Check that all protective caps andCheck that all hose connectors, lengths andqualities comply with applicable requirements.When replacing or repairing hoses, use originalparts or hoses and connectors recommendedby the manufacturer. Check particularly that thepressure classes of the hoses and connectorsare suitable to the operating pressure levels.Check that all safety devices such as pressurerelief valves, etc., are in place and work properly.Familiarize yourself with their use.Safety systems may never be bypassed.Check the main hydraulic parts daily, andalways after a fault. Replace any damagedparts immediately.If a component is damaged, clean it beforerepairing it. Do not use solvents when cleaningparts.Do not attempt to carry out repairs that you arenot fully familiar with.Never carry out repairs of the hydraulic circuitwhen the system is pressurized. Whenpressurized, the oil spray can penetrate the skinand cause mortal danger.Never work below a device or component that isonly being held up by hydraulics.Use separate supports when carrying ourmaintenance or repairs. Do not disconnectcylinders or their valves until the machine is wellsupported.Most hydraulic oils do not evaporate easily. Riskfactors include hot oil, spills and oil mist(pressurized).If oil gets into your eyes, rinse with plenty ofwater and contact a doctor.Avoid prolonged or repeated contact with yourskin.14. If sprays or contact with the skin cannot beavoided, use protective gloves, goggles andclothing as necessary. Do not use oily clothing.15. Avoid discharging hydraulic oil into theenvironment, as it can pollute waterways andthe groundwater. When working in ecologicallyvulnerable areas, use biofuel.16. Store the oil in sealed containers provided bythe manufacturer. Try to transfer the oil directlyfrom its container into the tank.17. If the oil must be passed through other containers,ensure that they are completely clean. Caps,clean.18. Never store oil outdoors, as water could condensein it.19. Always dispose of oil in a suitable container,never into the environment!7
<strong>JL</strong> <strong>601T</strong>SAFETY INSTRUCTIONS FOR <strong>WINCH</strong>ES• Check that the wire cable is in good conditionbefore using the winch (check for corrosion,sharp bends, breakage and thickness ofstrands). If a cable snaps, it can whip towardsthe operator or away from the winch.• Operate the winch with a guide cable at least 2meters away to the side of the machine. Do notoperate the winch from the tractor cabin unlessa safety net has been installed.• When winching downhill, the pulling must bedone from the side using an additional idler.• When winching on a hill, do not follow the loadfrom below.• Side-winching must not be done at angles ofmore than 30 degrees.• It is extremely dangerous to be in the spacebetween a load attached to the wire cable andthe winch.• Check that all bystanders are at a safe distanceof at least 15 meters whenever the machine isrunning. Place warning signs on approachingroads.• Never touch the wire cable by hand duringwinching.• The maximum load must be adjusted to conditions.• Check that the winching chains are carefullyattached. Do not attach the wire cable directly tothe load.• fasteners and 2 for chain-type fasteners.• Disconnect the transmission before examiningthe machine in the case of any faults.• Ensure the wire cable is as short as possibleduring transport.• The winch may only be used for winching andhauling. Do not use the winch for lifting loads.8
<strong>JL</strong> <strong>601T</strong>STICKERS AND PLATESThe following plates and labels must be correctly attached to the machine.Missing safety plates / labels must be replaced immediately.1926437582. Note! See manual for operation andmaintenance. (41014750)1. Machine plate <strong>JL</strong><strong>601T</strong> (40146230)3. Controls (41015670)9
<strong>JL</strong> <strong>601T</strong>STICKERS AND PLATES4. Nr 41014740Falling danger!Do not work in an oblique position.Crushing danger!Do not use the winch for the lifting.Watch out for a breaking cable!Always use the protective screen.5. Nr 41014730Note!Before doing maintenance work turn off themotor, remove the ignition key and disengagethe P.T.O.Accident danger!Keep the safety equipment where it belongs.Winding danger!Do not wear too loose clothes and keep the hairbound inside the cap.10
<strong>JL</strong> <strong>601T</strong>STICKERS AND PLATES6. Nr 41014720Falling danger!Do not winch at sideways angles exceeding30 degrees.Crushing danger!Do not stand in front of the winch when working.Stand on the side at a distance of at least6 ft from the winch.Crushing danger!Do not winch downhill.7. Maximum rpm (42381474)8. METSÄ-sticker (43402070)43402070FARMI307305019. FARMI-sticker (30730501)11
<strong>JL</strong> <strong>601T</strong>MAIN PARTSSnatch blockControl ropeCable(optional)12
<strong>JL</strong> <strong>601T</strong>MOUNTINGSHORTEN THE DRIVE SHAFTMOUNTING TO THE 3-POINT HITCHThe winch can be mounted to the 3-point linkageof any tractor. Power transmission is obtainedthrough universal shaft from tractor.!CAUTION!Both PTO halves mustbe shortened by equalamounts.ASSEMBLY OF THE PTO SHAFTAIf the PTO shaft is too longit may get pressed when thethree point hitch is lifted up.! This may cause damage toCAUTION!the bearings of the winchor to the PTO of the tractor.The PTO shaft must not be too short in anyposition.The PTO length is suitable, if the pipes donot reach the bottom.PTO is optional equipment.20A1.2.3.4.Mount the winch to the 3-point hitch of thetractor.Raise the winch high enough to get the PTOshaft of the tractor and the winch to a horizontallevel.If you have a shortened PTO shaft available,put one end into the drive shaft and check thatthe distance of the locking of the other end.1 2Take into account the additional clearance ofapprox. 20 mm (0.78”).Fasten the other end of the PTO shaft in itsplace and also move the winch sideways at the same time securing that the axis does not • First cut the thicker cover to a correct lenghtbase.(1). Remember 20 mm (0.78”) clearance.Then cut away the same amount from theform pipe. Make a similar shortening to thesecond half of the PTO shaft. Remove the burr• Connect the PTO shafts within each other.Make sure by moving eevator carefully up andcient.Check that the axis have 20 mm (0.78”)latitude.14
<strong>JL</strong> <strong>601T</strong>FASTENING THE CABLE TO THE DRUMPRE-OPERATION CHECKS1.2.3.4.5.6.7.Tape the cable end to prevent loosening of thecore wires.Pass the cable through the hole in cableguard, over the upper snatch block and theninside the winch.Insert the cable from behind the roll of thedrum brake.Pull the cable onto the drum from the left handside (the same side as the clutch lever).Pass the cable end through the hole in thedrum plate, pull about 15 cm (6”), and insertunder the wedge of the cable lock device. SeeTighten the cable lock screw.Winch the cable on the drum. BUT REMEM-BER THAT THE CABLE HAS TO BE LOADEDHEAVILY, WHEN <strong>WINCH</strong>ING THE CABLEBACK ON THE DRUM.CABLECheck that:•••the cable is faultless (breakage risk).there are no twists or kinks (breakage risk) inthe cable.the cable has been properly fastened to thewinch.<strong>WINCH</strong>Check that:••••••all the pins and lynch pins are in place.all bolts and nuts have been tightened.roller chain is tight.the drum brake has been properly adjusted.the clutch has been correctly adjusted.lubrication is carried out correctly. See lubricatinginstructions.MOUNTING TO THE TRACTORCheck that:•••••the tractor’s top link point is locked. (with thehelp of a support, if necessary).the pins are properly secured.the sway bars or turnbuckles are suitably tight.the PTO-shaft is suitably long, properly fastenedand the shield chains attached.the support leg of the winch is turned upward.Do not use longer cable than needed. Withcorrect length you achieve good pulling strengthand proper winding of the cable.15
<strong>JL</strong> <strong>601T</strong>CONTROLS!WARNING!Get acquainted with thecontrollers of the winch beforethe use, tests the stoppingfunctions of the winchand the tractor and all otherfunctions. Each function hasto be in perfect condition.AUTOMATIC FUNCTIONS• When winching in the safety brake lever is in“READY-POSITION”. The rotating movementof the cable drum loosens the safety brake sothat the drum can rotate.• If for some reason the clutch disedgages andthe cable is about to wind out the reversedrotating direction of the drum tightens the brakeband and stops the drum before the cablewinds out.PULLING OUT THE CABLE• The cable can be freely drawn out if the safetybrake lever is in “RELEASE” position.ENGAGING THE SAFETY BRAKE• The safety brake can be engaged by pullingthe control rope.<strong>WINCH</strong>ING• The winch is equipped with a clutch, which willbe used by the control rope. When the userdraws the control rope, the winch begings todraw in the cable. Winching will stop when therope is released.• The end of the cable drum is equipped witha friction clutch, which slips, if the load is tooheavy. This prevents cable break or damagesif the load gets caught.DROPPING THE LOAD• The winched or skidded load can be droppedby carefully releasing the safety brake.16
<strong>JL</strong> <strong>601T</strong>• The falling danger of the tractor can bereduced by winching through the lowersnatchblock.PRE-OPERATION CHECKSMOUNTING AND USE OF THE LOWERSNATCHBLOCK• Usually the logs are winched in through theupper pulley of the winch. This lifts the logsand they dig less into the ground. The weightof the load also pushes the blade into theground thus anchoring the winch and thetractor to the ground.• The winch has a lower snatchblock. The mainuse of the lower snatchblock is to lower thepulling point. This enables larger loads to beskidded out . For skidding out the load thecable is transferred to the lower snatchblock.• Several logs can be hooked up and winchedin at one time by means of keyhole sliders onthe cable. The skidding chain should have apin on the end, which makes it easier to passWhen using the lowersnatch block make sure thatit follows the direction of the!cable. Otherwise the cableCAUTION! will be damaged, when it ispressed between the snatchblock and the lower snatchblock frame.!CAUTION!When wInching an unloadedcable, make sure that thewith cable and doesn’tcause cable to crosscut.18
<strong>JL</strong> <strong>601T</strong><strong>WINCH</strong>ING!CAUTION!Before using the winch,you have to pull the cablecompletely out of the drumand winch the cable back onthe drum with a heavy load.Otherwise the cable will bedamaged.4.heavier than the selected pull. This preventsdamages to the cable or winch. Avoid extralarge loads. The winding speed depends onthe number of revolutions of the tractor. Do notwind too fast.Stop winching when the logs are at about1,5-3 m (5-10 ft) from the tractor. Install thecable on the lower snatch block.• Park the winch and tractor on level, stableground. Lock the brakes of the tractor beforewinching. Lower the 3-point hitch so that thedozer blade anchors the winch to the ground..!CAUTION!Do not let the dozer bladesink too deeply into theground, so that the PTOshaft is not damaged.• Before using the skidding winch, make surethat the lower snatch block, the upper snatch<strong>SKIDDING</strong>1.2.3.Draw the cable to the load but avoid twitches.Do not draw out too much cable to avoid loosespaces when the cable is reeled in.Start the tractor, turn the PTO on. Use thewinch with the control rope and stand in a safeplace at a distance of at least 2 m (6 ft) fromthe winch. Use the upper snatchblock whenwinching.clutch to avoid warming of the clutch. Stopwinching by letting go of the control rope forthe leave. The clutch will slip when the load is4.191.2.3.Turn the P.T.O on. Pull the clutch control ropeand winch the logs to the pulley. Keep thetension on the cable and pull the thinner ropethat operates the brake ratchet. Stop pullingin place. Alternatively the skidding chains canbe attached to the notched beam.Turn off the P.T.O.Raise the 3-point hitch so that the logs comeMove the logs to the desired place.
<strong>JL</strong> <strong>601T</strong>IF YOU GET STUCK WITH THE TRACTOR1.2.Winch in the load.If you cannot move the tractor, release theload and winch the tractor out. When winchingthe tractor out, always run the cable underthe lower pulley.WORKING IN ROUGH TERRAINDrop the load before you reach bad terrain. Drivethrough the bad spot. Winch in the load again(Fig. 13.).DROPPING THE LOAD1.2.Let down the 3-point hitch.Pull the clutch rope until the brake ratchetreleases, then stop pulling the clutch rope.The logs drop to the ground.WRONGTRANSPORTATIONThe cable should be run under lower snatchblockand locked in place for transportation of thewinch.RIGHT20
<strong>JL</strong> <strong>601T</strong>MAINTENANCECLUTCH ADJUSTMENTSAFETY!DANGER!LUBRICATIONDisengage the P.T.O and turnthe tractor off before youservice the winch, removethe keys so the tractor cannotbe started up accidentally.1.2.3.4.Loosen the nuts A and B at both ends of thedrum axle. Wrench opening 1 7/16” (36 mm).Adjust the clutch by turning the axle C with9/16” or 14 mm wrench. The clutch tightensclockwise, loosens counterclockwise. Turnmax. 1/4 turn.After adjustment retighten the nuts A and B onthe ends of the drum axle.Pull the control rope. The lever should moveup 1.5” (4 cm) before the clutch engages. Ifthe clutch engages earlier loosen the clutchsetting.!Do not oil the drive chain,because the oil will work itsway to the clutch!CAUTION!The cable drum, main sprocket and snatchblockFollowing points require lubrication:A B C1.2.3.Grease the drum clutch parts after every 500working hours. Always use good quality lubricationgrease.Grease the PTO-shaft regularly and awaysGrease the drum chain lightly (not with oil)after every 50 working hours with spray type,hardening chain grease.Wipe off the excessive grease.Swing joints sideways for greasing8h8hWhen used in winterthe guard tubes mustbe greased to avoidfreezing.20hApply grease inside theh= working hours21
<strong>JL</strong> <strong>601T</strong>ADJUSTING THE ROLLER CHAINTIGHTNESSRoller chains tightness adjustment is carried out1.2.3.4.Loosen the two bolts holding the chain tightener(11/16” or 17 mm wrench).Adjust the chain tightness by moving the chaintightener towards or away from center.Tighten the nuts.Check that the chain tightener runs on therollers.NOTE! Do not over tighten the chain.REMOVING THE <strong>WINCH</strong> MECHANISMThe whole winch mechanism can be removed inone piece from the frame. To remove the winchmechanism from the winch (e.g. in order to changethe roller chain) follow the instructions below:1.2.3.4.5.6.Park the winch on a level, stable ground so thatit leans a little backwards.Remove the cable.dethe drive shaft. Socket size 24 mm (15/16”).peredge of the cover plate. Socket size 24 mm(15/16”).the washer. Socket size 36 mm (1 7/16”)Pull out the winch mechanism. Weight 242,5 lbs(110 kg).TightenLoosenCADJUSTING THE DRUM BRAKEAdjust the drum brake so that it slows down thedrum slightly while pulling out the rope. This willreduce risk of tangling and backlash.• To increase the braking effect tighten thebraking effect loosen the adjustment bolt.ABFriction pieceLock nutDrum brake adjustment bolt22
<strong>JL</strong> <strong>601T</strong>FUNCTION AND ADJUSTMENT OFTHE SAFETY BRAKEFUNCTIONWhen the safety brake is ready for use, the brakeband on the whole distance must touch the drumwithout clearance.When the safety brake is free, the clearance willbe 0,5 mm - 2 mm (M).When you check theof the drum.It is important that the clearance is correct so thatthe pulling of the cable will not require unnecessarypower. Too big a clearance also reduces theholding power of the brake.G H MADJUSTMENT• Loosen the lock nut G. Turn the adjustmentnut H (19 mm) little at time. Test occasionallythe adjustment. Pulling tight (in the clockwisedirection) increases the braking force, loosening reduces it and increasesthe clearance of the safety brake.• Position the brake band with the limiters(2 pieces).• When the brake is adjusted, fasten the locknut G and test the adjustment.brake24
<strong>JL</strong> <strong>601T</strong>TROUBLE SHOOTINGCONDITION POSSIBLE CAUSE REMEDYHard to pull the cable out Drum brake is too tight. Loosen the drum brake. Seeinstructionsfrom item ”Adjustingthe drum brake”.Cable gets tangled on the drum.Cable too loose on the drum.The cable is pressed betweenloose loops.Loosen the pin and pull thecable from the reel with thehelp of a tractor. Reel the cabletightly back in with the help ofthe load.Cable develops kinks. Cable brake too loose Tighten the drum brake.Tightencable on the drum by pulling outthe cable and by winching witha heavy load.Roller chain comes off.Rattling soundTractor slides backwards whenwinchingRoller chain too loose, somepart is broken or the aligning isincorrect.Roller chain too tight, somepart is broken or the aligning isincorrect.Normal wear of the clutch.Minimum thickness of the clutchplates is 7 mm.Oil or grease in the clutchClutch too loosely adjustedParking brakes are not on.Dozer blade does not anchor theCheck the aligment of thechain. Check possible damages.Adjust the roller chain, changeif necessary. See chapter”Adjusting the roller chain”.Check the aligment of thechain. Check possible damages.Adjust the roller chain, changeif necessary. See chapter”Adjusting the roller chain”.See chapter ”Clutchadjustment”Disassemble and clean theparts.Adjustment of the clutch. Seechapter ”Clutch adjustment”Lock on the parking brakes.Lower the winch all way to theground.Safety brake slips Adjustment too loose Tighten the safety brake. Seechapter Function and adjustmentof the safety brake.Oil or grease in the brake band Disassemble and cleanthe partsSafety brake is too heavy torelease with the load.Brake band does not touch thedrum correctly.Adjustment too tightCheck and repair or exchangepartsLoosen the safety brake. Seechapter Function and adjustmentof the safety brake.25
<strong>JL</strong> <strong>601T</strong>FRAME277.171411819108121392022210211518526242345.1 5.3 5.625315.25.5 5.461716156.16.36.66.2 6.66.56.46.96.7 6.826
<strong>JL</strong> <strong>601T</strong>FRAMEPart Order no Description Remarks Qty1 23400030 Frame 12 92820190 Pin 23 03151410 Chain + ring cotter + cotter 24 43401199 Support leg 25 33120015 Diverting pulley complete 15.1 33120023 Frame 15.2 43120039 Diverting pulley incl. part 5.3 15.3 54511241 Slotted sealed ball bearing 25.4 43120088 Finger guard 15.5 52856283 Pin 15.6 52813235 Split pin 6X50 DIN94 ZN 16 03035200 Lower diverting pulley complete 16.1 23130206 Frame 16.2 43120039 Diverting pulley 16.3 54511241 Slotted sealed ball bearing 26.4 43130210 Screw 16.5 52062440 Screw M24X240 DIN931 10.9ZN 16.6 52117249 Lock nut M24 DIN985 8ZN 26.7 43401025 Adjusting bracket 16.8 03403110 Locking device 16.9 52200102 Washer M24 DIN126 58ZN 17 33130071 Lower protective screen 17.1 52060209 Screw M10X16 DIN933 88ZN 28 52060233 Screw M10X30 DIN933 88ZN 29 52200045 Washer M10 DIN126 58ZN 410 52110046 Nut M10 DIN934 8ZN 211 43130376 Hook for the universal shaft 112 43130145 Counter plate 40X50 113 52060175 Screw M8X25 DIN933 88ZN 214 52110038 Nut M8 DIN934 88ZN 215 43401640 Cover 216 43401215 Axle 217 52813102 Split pin 4X20 DIN94 ZN 218 42721050 Snatch block 119 43020775 Snatch block complete 120 54824545 Brake rope 5,0 m 121 54824099 Clutch rope 5,80 m 122 33130303 Protective screen 123 52060050 Screw M6X40 DIN933 88ZN 224 52117066 Lock nut M6 DIN985 8ZN 225 52848403 Rivet 5X16 226 52401015 Grease nipple AR1/8 127 43130137 Snatch block 127
<strong>JL</strong> <strong>601T</strong>281109875432112019181716 151413122130 292827262524232231403938373635 3433 32415049484746454443425157565554535266.106.13 6.126.116.16.56.96.46.86.36.76.26.66.35859604920504942495.25.15.19621057 524.44.14.24.343 6136.336.136.255MACHINERY
<strong>JL</strong> <strong>601T</strong>MACHINERYPart Order no Description Remarks Qty1 23110019 Frame 12 43110337 Front plate 13 33100066 Axle 14 43110700 Sprocket complete 14.1 33100109 Sprocket 14.2 54562053 Slide bearing 24.3 42722744 Friction piece 84.4 52830015 Rivet 1/4X3/4 MS DIN 7338-B 165 33110040 Drum complete 15.1 54562053 Slide bearing 35.2 52390820 Felt seal 16 43100478 Drum brake complete 16.1 43100680 Frame 16.2 43100690 Roll 16.3 43190860 Bushing 26.4 43100536 Axle 16.5 42723197 Friction piece 16.6 52060258 Screw M10X40 DIN933 88ZN 16.7 52110046 Nut M10 DIN934 8ZN 16.8 52117108 Lock nut M10 DIN985 8ZN 16.9 52813094 Split pin 4X25 DIN94 ZN 16.10 52200045 Washer M10 DIN126 58ZN 16.11 52060514 Screw M10X20 DIN933 88ZN 26.12 94624046 Torsion spring DU32,5 16.13 43010412 Fastening 17 43401750 Spined shaft 18 43100437 Chain tightener 19 54542063 Ball thrust bearing 210 54511340 Slotted sealed ball bearing 211 54642194 Cup spring 412 43100155 Bushing 113 42723163 Key 114 32722779 Clutch half 115 33100165 Clutch half 116 40660235 Roll 317 33110073 Clutch lever 118 33110107 Drum cover 119 52813052 Split pin 3X25 DIN94 ZN 120 94602075 Spring DU18 221 54820840 Roller chain 122 54820568 Chain link 123 33110214 Lever 129
<strong>JL</strong> <strong>601T</strong>301109875432112019181716 151413122130 292827262524232231403938373635 3433 32415049484746454443425157565554535266.106.13 6.126.116.16.56.96.46.86.36.76.26.66.35859604920504942495.25.15.19621057 524.44.14.24.343 6136.336.136.255MACHINERY
<strong>JL</strong> <strong>601T</strong>MACHINERYPart Order no Description Remarks Qty24 33110263 Brake band 125 43000942 Brake regulator 126 43110329 Spring fastener 127 43000678 Ring D65 128 52230067 Circlip 35X2,5 DIN471 129 43110352 Pin 130 43110360 Pin 131 43110394 Bushing 132 43110444 Guide 133 43110485 Bushing 134 43110477 Bushing 135 43110170 Spring guide 136 43401900 Chain tightener lock complete 136.1 43401910 Chain tightener lock 136.2 52060944 Screw M10X60 DIN933 88ZN 136.3 52110046 Nut M10 DIN934 8ZN 137 52060100 Screw M8X12 DIN933 88ZN 138 52060134 Screw M8X40 DIN933 88ZN 139 52060209 Screw M10X16 DIN933 88ZN 140 52060514 Screw M10X20 DIN933 88ZN 141 52060225 Screw M10X25 DIN933 88ZN 542 52060258 Screw M10X40 DIN933 88ZN 243 52062015 Screw M12X20 DIN933 88ZN 244 52062023 Screw M12X30 DIN933 88ZN 445 52062627 Screw M12X50 DIN931 88ZN 146 52062098 Screw M16X25 DIN933 88ZN 147 52062106 Screw M16X30 DIN933 88ZN 148 52117082 Lock nut M8 DIN985 8ZN 149 52110046 Nut M10 DIN934 8ZN 850 52110053 Nut M12 DIN934 8ZN 551 52110079 Nut M16 DIN934 8ZN 152 52110103 Nut M24 DIN934 8ZN 253 52200037 Washer M8 DIN126 58ZN 154 52200045 Washer M10 DIN126 58ZN 255 52200052 Washer M12 DIN125 58ZN 556 52200078 Washer M16 DIN126 58ZN 157 52200102 Washer M24 DIN126 58ZN 258 52200219 Washer DIN988 159 43001248 Brake lever 160 54924014 Handle black, pvc 161 52211059 Washer M12 DIN127 ZN 162 52117108 Lock nut M10 DIN985 8ZN 231
<strong>JL</strong> <strong>601T</strong>CABLE WINDER PLL6001246 3 7 5Part Order no Description Remarks Qty43120542 Cable winder complete 11 43120559 Frame 12 43030790 Diverting pulley 13 54511159 Slotted sealed ball bearing 24 92823269 Pin 15 52854585 Pin 25X100 16 52813219 Split pin 6X40 DIN94 ZN 27 52401015 Grease nipple AR1/8 1COVER OF THE UNIVERSAL SHAFT3 4 1 2Part Order no Description Remarks Qty1 43511780 Cover of the universal shaft 12 43110920 Fastener 13 52060100 Screw M8X12 DIN933 88ZN 24 52200235 Washer M8 DIN9021 58ZN 232
<strong>JL</strong> <strong>601T</strong>33
<strong>JL</strong> <strong>601T</strong>ACCESSORIESLLHOF-4SVASVATPPLLTP14IHJKNK1NK45W2200LK34
<strong>JL</strong> <strong>601T</strong>ACCESSORIESPart Order no DescriptionJK 351 03190469 Machinery 3,5 tJK 501 03010501 Machinery 5 tJK 501T 03010519 Machinery 5 t, with brakeJK 601 03100006 Machinery 6 tJK<strong>601T</strong> 03110005 Machinery 6 t, with brakeATP 500 33032012 Lower pulley D = 105 mmATP 500T 33031378 Lower pulley D = 153 mmATP 501 03032400 Lower pulley with frame, D = 105 mmATP 501T 03032410 Lower pulley with frame, D = 153 mmATP <strong>601T</strong> 03035200 Lower pulley with frame, D = 180 mmATP650T 03402000 Lower pulley with frame, D = 180 mmW 2100 54807706 PTO-shaft, 14 kWW 2200 54807714 PTO-shaft, 24 kWW 2300 54821012 PTO-shaft, 34 kWW 2400 54823060 PTO-shaft, 47 kWBelt TP14 54713037 Belt for TP14TP14 IH 30118120 Self releasing pulley, max. 3,5 t, without beltLK2-TK10 54817077 Notched hookNK 1 42381558 HookNK 45 54824370 Rope drumJK 208 54827019 Skidding chain L = 2,0 mJK 248 54827043 Skidding chain L = 2,4 mLL 2 54813159 Choker (cable 8-12 mm)LL 4 54813167 Choker (cable 14 mm)VAIJ D8 54824677 Cable, D = 8 mm, F = 44 kNmVAIJ D10 54824032 Cable, D = 10 mm, F = 63 kNmVAIJ D12 54824040 Cable, D = 12 mm, F = 90,7 kNmVAIJ D14 54824057 Cable, D = 14 mm, F = 123,5 kNmSV 300T 43181577 Protective screenSV 600T 33130303 Protective screenPLL 500 33031196 Cable winder (<strong>JL</strong> 501) D = 90 mmPLL 600 43120542 Cable winder (<strong>JL</strong> 601/650) D = 90 mmASV 400 43020502 Lower protective screenHOF-4 03151930 Hydraulic control, 2 cylindersHOF-4G 03151940 Hydraulic control, 2 cylindersHOF 501 03151280 Mounting kitHOF <strong>601T</strong>/650T 03151290 Mounting kitHOF ALP 55-85 03151920 Mounting kit35
<strong>JL</strong> <strong>601T</strong>36
WARRANTY<strong>Farmi</strong> <strong>Forest</strong> Oy grants a 12-month warranty on all of its products, coveringmaterial and manufacturing faults. The warranty comes into effect onthe product’s delivery date.The manufacturer is not liable for damages caused by:• misuse of the product• alterations or repairs made without the manufacturer’s permission• • non-original partsThe warranty does not cover wearing parts.Send faulty parts, carriage paid, to the manufacturer for inspection. Repairs willbe conducted by <strong>Farmi</strong> <strong>Forest</strong> Oy or an authorized expert. The warranty is validwithin 14 days of receipt of the product.understood the instruction manual that came with the product.<strong>Farmi</strong> <strong>Forest</strong> CorporationAhmolantie 6FIN-74510 IISALMIFINLAND
Date of delivery:_____/_____ 20_____Dealer:Dealer’s address:Dealer’s tel:Product and type:Serial number:Return to the manufacturerDate of delivery:_____/_____ 20_____Dealer:Dealer’s address:Dealer’s tel:Customer:Customer’s address:Customer’s tel:Product and type:Serial number:
<strong>Farmi</strong> <strong>Forest</strong> CorporationAhmolantie 6FIN-74510 Iisalmi, FinlandPuh. +358 (0)17 83 241Fax. +358 (0)17 8324 372