download free pattern here - Makower
download free pattern here - Makower
download free pattern here - Makower
- No tags were found...

You also want an ePaper? Increase the reach of your titles
YUMPU automatically turns print PDFs into web optimized ePapers that Google loves.
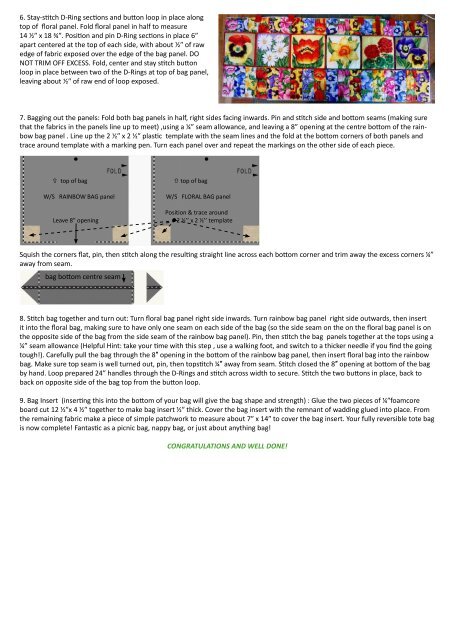
6. Stay-stitch D-Ring sections and button loop in place alongtop of floral panel. Fold floral panel in half to measure14 ½″ x 18 ¾″. Position and pin D-Ring sections in place 6″apart centered at the top of each side, with about ½″ of rawedge of fabric exposed over the edge of the bag panel. DONOT TRIM OFF EXCESS. Fold, center and stay stitch buttonloop in place between two of the D-Rings at top of bag panel,leaving about ½″ of raw end of loop exposed.7. Bagging out the panels: Fold both bag panels in half, right sides facing inwards. Pin and stitch side and bottom seams (making surethat the fabrics in the panels line up to meet) ,using a ¼” seam allowance, and leaving a 8” opening at the centre bottom of the rainbowbag panel . Line up the 2 ½″ x 2 ½″ plastic template with the seam lines and the fold at the bottom corners of both panels andtrace around template with a marking pen. Turn each panel over and repeat the markings on the other side of each piece. top of bagW/S RAINBOW BAG panelLeave 8” opening top of bagW/S FLORAL BAG panelPosition & trace around•2 ½’’ x 2 ½’’ templateSquish the corners flat, pin, then stitch along the resulting straight line across each bottom corner and trim away the excess corners ¼”away from seam.bag bottom centre seam8. Stitch bag together and turn out: Turn floral bag panel right side inwards. Turn rainbow bag panel right side outwards, then insertit into the floral bag, making sure to have only one seam on each side of the bag (so the side seam on the on the floral bag panel is onthe opposite side of the bag from the side seam of the rainbow bag panel). Pin, then stitch the bag panels together at the tops using a¼” seam allowance (Helpful Hint: take your time with this step , use a walking foot, and switch to a thicker needle if you find the goingtough!). Carefully pull the bag through the 8″ opening in the bottom of the rainbow bag panel, then insert floral bag into the rainbowbag. Make sure top seam is well turned out, pin, then topstitch ¼″ away from seam. Stitch closed the 8″ opening at bottom of the bagby hand. Loop prepared 24″ handles through the D-Rings and stitch across width to secure. Stitch the two buttons in place, back toback on opposite side of the bag top from the button loop.9. Bag Insert (inserting this into the bottom of your bag will give the bag shape and strength) : Glue the two pieces of ¼″foamcoreboard cut 12 ½″x 4 ½″ together to make bag insert ½″ thick. Cover the bag insert with the remnant of wadding glued into place. Fromthe remaining fabric make a piece of simple patchwork to measure about 7″ x 14″ to cover the bag insert. Your fully reversible tote bagis now complete! Fantastic as a picnic bag, nappy bag, or just about anything bag!CONGRATULATIONS AND WELL DONE!