
Create successful ePaper yourself
Turn your PDF publications into a flip-book with our unique Google optimized e-Paper software.
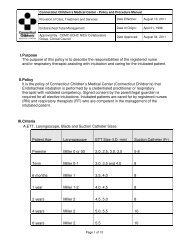
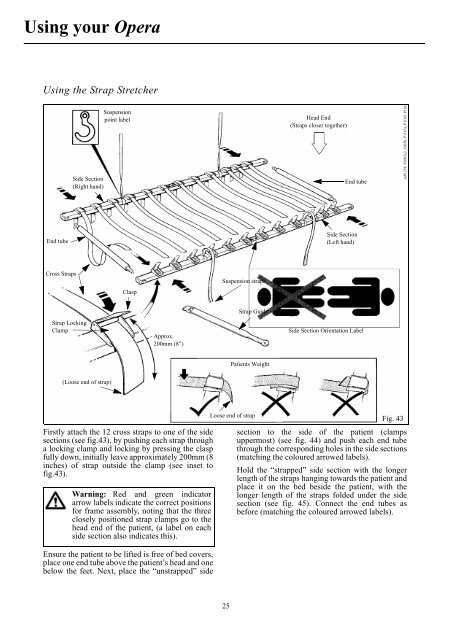
Using your OperaUsing the Strap StretcherSide Section(Right hand)Suspensionpoint labelHead End(Straps closer together)End tubemP1278: P1005a2, 1005b, P1167a, P1169, P1265End tubeSide Section(Left hand)Cross StrapsClaspSuspension strapsStrap GuideStrap LockingClampApprox.200mm (8”)Side Section Orientation LabelPatients Weight(Loose end <strong>of</strong> strap)Firstly attach the 12 cross straps to one <strong>of</strong> the sidesections (see fig.43), by pushing each strap througha locking clamp and locking by pressing the claspfully down, initially leave approximately 200mm (8inches) <strong>of</strong> strap outside the clamp (see inset t<strong>of</strong>ig.43).Warning: Red and green indicatorarrow labels indicate the correct positionsfor frame assembly, noting that the threeclosely positioned strap clamps go to thehead end <strong>of</strong> the patient, (a label on eachside section also indicates this).Ensure the patient to be lifted is free <strong>of</strong> bed covers,place one end tube above the patient’s head and onebelow the feet. Next, place the “unstrapped” sideLoose end <strong>of</strong> strapFig. 43section to the side <strong>of</strong> the patient (clampsuppermost) (see fig. 44) and push each end tubethrough the corresponding holes in the side sections(matching the coloured arrowed labels).Hold the “strapped” side section with the longerlength <strong>of</strong> the straps hanging towards the patient andplace it on the bed beside the patient, with thelonger length <strong>of</strong> the straps folded under the sidesection (see fig. 45). Connect the end tubes asbefore (matching the coloured arrowed labels).25