Protocols for field and laboratory rodent studies - HAL
Protocols for field and laboratory rodent studies - HAL
Protocols for field and laboratory rodent studies - HAL

Create successful ePaper yourself
Turn your PDF publications into a flip-book with our unique Google optimized e-Paper software.
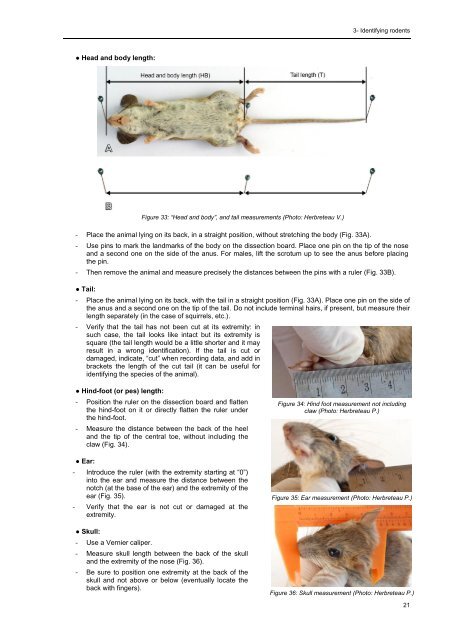
3- Identifying <strong>rodent</strong>s● Head <strong>and</strong> body length:Figure 33: “Head <strong>and</strong> body”, <strong>and</strong> tail measurements (Photo: Herbreteau V.)- Place the animal lying on its back, in a straight position, without stretching the body (Fig. 33A).- Use pins to mark the l<strong>and</strong>marks of the body on the dissection board. Place one pin on the tip of the nose<strong>and</strong> a second one on the side of the anus. For males, lift the scrotum up to see the anus be<strong>for</strong>e placingthe pin.- Then remove the animal <strong>and</strong> measure precisely the distances between the pins with a ruler (Fig. 33B).● Tail:- Place the animal lying on its back, with the tail in a straight position (Fig. 33A). Place one pin on the side ofthe anus <strong>and</strong> a second one on the tip of the tail. Do not include terminal hairs, if present, but measure theirlength separately (in the case of squirrels, etc.).- Verify that the tail has not been cut at its extremity: insuch case, the tail looks like intact but its extremity issquare (the tail length would be a little shorter <strong>and</strong> it mayresult in a wrong identification). If the tail is cut ordamaged, indicate, “cut” when recording data, <strong>and</strong> add inbrackets the length of the cut tail (it can be useful <strong>for</strong>identifying the species of the animal).● Hind-foot (or pes) length:- Position the ruler on the dissection board <strong>and</strong> flattenthe hind-foot on it or directly flatten the ruler underthe hind-foot.- Measure the distance between the back of the heel<strong>and</strong> the tip of the central toe, without including theclaw (Fig. 34).● Ear:- Introduce the ruler (with the extremity starting at “0”)into the ear <strong>and</strong> measure the distance between thenotch (at the base of the ear) <strong>and</strong> the extremity of theear (Fig. 35).- Verify that the ear is not cut or damaged at theextremity.● Skull:- Use a Vernier caliper.- Measure skull length between the back of the skull<strong>and</strong> the extremity of the nose (Fig. 36).- Be sure to position one extremity at the back of theskull <strong>and</strong> not above or below (eventually locate theback with fingers).Figure 34: Hind foot measurement not includingclaw (Photo: Herbreteau P.)Figure 35: Ear measurement (Photo: Herbreteau P.)Figure 36: Skull measurement (Photo: Herbreteau P.)21