Polaris Universal Quick Start Guide - Air Techniques, Inc.
Polaris Universal Quick Start Guide - Air Techniques, Inc.
Polaris Universal Quick Start Guide - Air Techniques, Inc.
You also want an ePaper? Increase the reach of your titles
YUMPU automatically turns print PDFs into web optimized ePapers that Google loves.
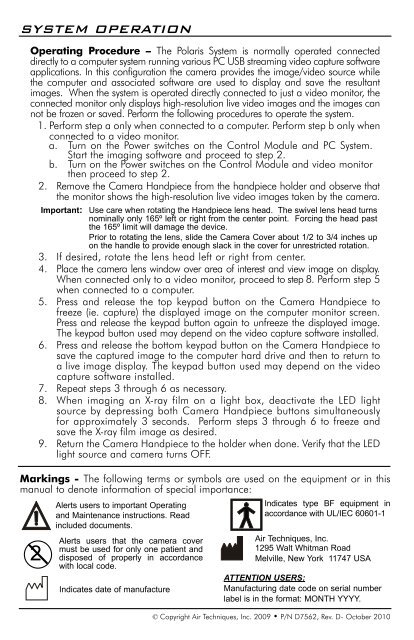
SYSTEM OPERATIONOperating Procedure – The <strong>Polaris</strong> System is normally operated connecteddirectly to a computer system running various PC USB streaming video capture softwareapplications. In this configuration the camera provides the image/video source whilethe computer and associated software are used to display and save the resultantimages. When the system is operated directly connected to just a video monitor, theconnected monitor only displays high-resolution live video images and the images cannot be frozen or saved. Perform the following procedures to operate the system.1. Perform step a only when connected to a computer. Perform step b only whenconnected to a video monitor.a. Turn on the Power switches on the Control Module and PC System.<strong>Start</strong> the imaging software and proceed to step 2.b. Turn on the Power switches on the Control Module and video monitorthen proceed to step 2.2. Remove the Camera Handpiece from the handpiece holder and observe thatthe monitor shows the high-resolution live video images taken by the camera.Important: Use care when rotating the Handpiece lens head. The swivel lens head turnsnominally only 165º left or right from the center point. Forcing the head pastthe 165º limit will damage the device.Prior to rotating the lens, slide the Camera Cover about 1/2 to 3/4 inches upon the handle to provide enough slack in the cover for unrestricted rotation.3. If desired, rotate the lens head left or right from center.4. Place the camera lens window over area of interest and view image on display.When connected only to a video monitor, proceed to step 8. Perform step 5when connected to a computer.5. Press and release the top keypad button on the Camera Handpiece tofreeze (ie. capture) the displayed image on the computer monitor screen.Press and release the keypad button again to unfreeze the displayed image.The keypad button used may depend on the video capture software installed.6. Press and release the bottom keypad button on the Camera Handpiece tosave the captured image to the computer hard drive and then to return toa live image display. The keypad button used may depend on the videocapture software installed.7. Repeat steps 3 through 6 as necessary.8. When imaging an X-ray film on a light box, deactivate the LED lightsource by depressing both Camera Handpiece buttons simultaneouslyfor approximately 3 seconds. Perform steps 3 through 6 to freeze andsave the X-ray film image as desired.9. Return the Camera Handpiece to the holder when done. Verify that the LEDlight source and camera turns OFF.Markings - The following terms or symbols are used on the equipment or in thismanual to denote information of special importance:2Alerts users to important Operatingand Maintenance instructions. Readincluded documents.Alerts users that the camera covermust be used for only one patient anddisposed of properly in accordancewith local code.Indicates date of manufactureIndicates type BF equipment inaccordance with UL/IEC 60601-1<strong>Air</strong> <strong>Techniques</strong>, <strong>Inc</strong>.1295 Walt Whitman RoadMelville, New York 11747 USAATTENTION USERS:Manufacturing date code on serial numberlabel is in the format: Month YYYY.© Copyright <strong>Air</strong> <strong>Techniques</strong>, <strong>Inc</strong>. 2009 • P/N D7562, Rev. D- October 2010


