Venting Instructions - Jaga
Venting Instructions - Jaga
Venting Instructions - Jaga
- No tags were found...

You also want an ePaper? Increase the reach of your titles
YUMPU automatically turns print PDFs into web optimized ePapers that Google loves.
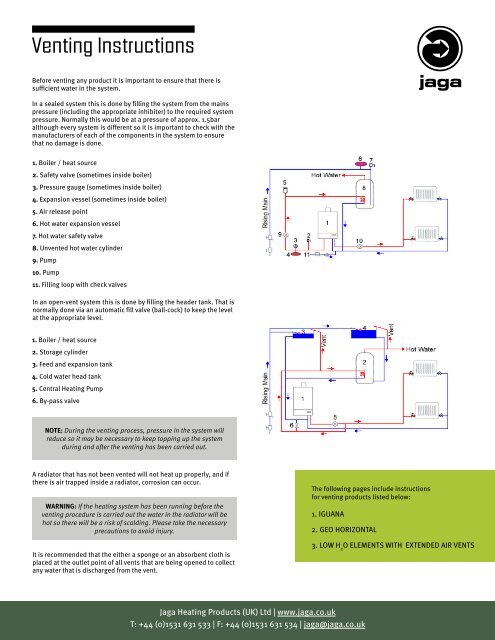
<strong>Venting</strong> <strong>Instructions</strong>Before venting any product it is important to ensure that there issufficient water in the system.In a sealed system this is done by filling the system from the mainspressure (including the appropriate inhibiter) to the required systempressure. Normally this would be at a pressure of approx. 1.5baralthough every system is different so it is important to check with themanufacturers of each of the components in the system to ensurethat no damage is done.1. Boiler / heat source2. Safety valve (sometimes inside boiler)3. Pressure gauge (sometimes inside boiler)4. Expansion vessel (sometimes inside boiler)5. Air release point6. Hot water expansion vessel7. Hot water safety valve8. Unvented hot water cylinder9. Pump10. Pump11. Filling loop with check valvesIn an open-vent system this is done by filling the header tank. That isnormally done via an automatic fill valve (ball-cock) to keep the levelat the appropriate level.1. Boiler / heat source2. Storage cylinder3. Feed and expansion tank4. Cold water head tank5. Central Heating Pump6. By-pass valveNOTE: During the venting process, pressure in the system willreduce so it may be necessary to keep topping up the systemduring and after the venting has been carried out.A radiator that has not been vented will not heat up properly, and ifthere is air trapped inside a radiator, corrosion can occur.WARNING: If the heating system has been running before theventing procedure is carried out the water in the radiator will behot so there will be a risk of scalding. Please take the necessaryprecautions to avoid injury.It is recommended that the either a sponge or an absorbent cloth isplaced at the outlet point of all vents that are being opened to collectany water that is discharged from the vent.The following pages include instructionsfor venting products listed below:1. IGUANA2. GEO HORIZONTAL3. LOW H 2O ELEMENTS WITH EXTENDED AIR VENTS<strong>Jaga</strong> Heating Products (UK) Ltd | www.jaga.co.ukT: +44 (0)1531 631 533 | F: +44 (0)1531 631 534 | jaga@jaga.co.uk
1. IguanaTools required to carry out venting:• Flat bladed screwdriver• Sponge or absorbent cloth• Allen key (suitably sized to close lockshield)This procedure assumes that the radiator has been installed,pressure tested and drained and is now empty1. Close TRV and lockshield2. Open air vent (picture on right) that ison the opposite side to the TRV3. Open TRV to approx. 10% to fill radiator slowly4. When water is present in the air vent, close the air vent5. Open TRV and lockshield fully6. Run pump for approx. 2 hrs7. Switch off pump8. Close TRV, leaving lockshield open9. Open both air vents until water is present then close air vents10. Repeat steps 5-9 until all air is vented11. Open TRV and run system normallyIt is very common to get air trapped in the Iguana from filling theradiator too fast. This will result in the radiator only partly heating up.If this is the case, the radiator will need to be drained and then theabove procedure should be followed.<strong>Jaga</strong> Heating Products (UK) Ltd | www.jaga.co.ukT: +44 (0)1531 631 533 | F: +44 (0)1531 631 534 | jaga@jaga.co.uk
2. Geo HorizontalTools required to carry out venting:• Flat bladed screwdriver• Sponge or absorbent cloth• Allen key (suitably sized to close lockshield)• 3mm allen key to remove top grille• 10mm spannerThis procedure assumes that the radiator has been installed,pressure tested and drained and is now empty.1. Close TRV and lockshield2. Remove top grille3. Using a flat bladed screwdriver, open air vent on heat exchanger(positioned on right hand side, below the grille pictured below)6. When water is present close the plug7. Open TRV and lockshield fully8. Run pump for approx. 2 hrs9. Switch off pump10. Close TRV, leaving lockshield open11. Open both air vents until water is presentthen close air vents12. Repeat steps 7. to 11. until all air is vented13. Replace top grille14. Open TRV and run system normally4. Open TRV to approx. 10% to fill radiator slowly5. When water is present at the air vent, close the air vent and openthe air vent in the stone (pictured below). This is positionedapprox. 100mm in and 50 mm down from the top left hand corner,and is opened using a 10mm spannerDo not remove the bolt as it will be very difficult to getback in once water is in the radiator. Once hissing is heardthrough the vent, then it is opened sufficiently.<strong>Jaga</strong> Heating Products (UK) Ltd | www.jaga.co.ukT: +44 (0)1531 631 533 | F: +44 (0)1531 631 534 | jaga@jaga.co.uk
3. Low H2O Products with Extended Air VentsTools required to carry out venting:• Flat bladed screwdriver• Sponge or absorbent cloth• Allen key (suitably sized to close lockshield)• 10mm spannerIn addition to the above, further tools might be required to removethe casing of the radiator if access to the air vent is difficult.This procedure assumes that the radiator has been installed,pressure tested and drained and is now empty.1. Close TRV and lockshield2. Using a flat bladed screwdriver, open air vent on heat exchanger.This can normally be done by pushing the screwdriver through theopening in the top grille, but it might be necessary to remove the topgrille or the casing. Please refer to the appropriate fitting instructionsfor the methodology to carry out this if required.Check that the plastic tube is attached to the spigot of the airvent to ensure that any water can be collected underthe casing. See pictures3. Open TRV to approx. 10% to fill radiator slowly4. When water is present at the air vent, close the air vent5. Open TRV and lockshield fully6. Run pump for approx. 2 hrs7. Switch off pump8. Close TRV, leaving lockshield open9. Open air vent until water is presentthen close air vent10. Repeat steps 5. to 9. until all air is vented11. Open TRV and run system normally<strong>Jaga</strong> Heating Products (UK) Ltd | www.jaga.co.ukT: +44 (0)1531 631 533 | F: +44 (0)1531 631 534 | jaga@jaga.co.uk