Quick Hoops⢠Bender manual - Johnny's Selected Seeds
Quick Hoops⢠Bender manual - Johnny's Selected Seeds
Quick Hoops⢠Bender manual - Johnny's Selected Seeds

You also want an ePaper? Increase the reach of your titles
YUMPU automatically turns print PDFs into web optimized ePapers that Google loves.
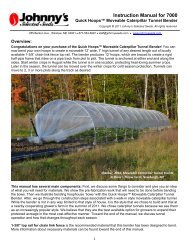
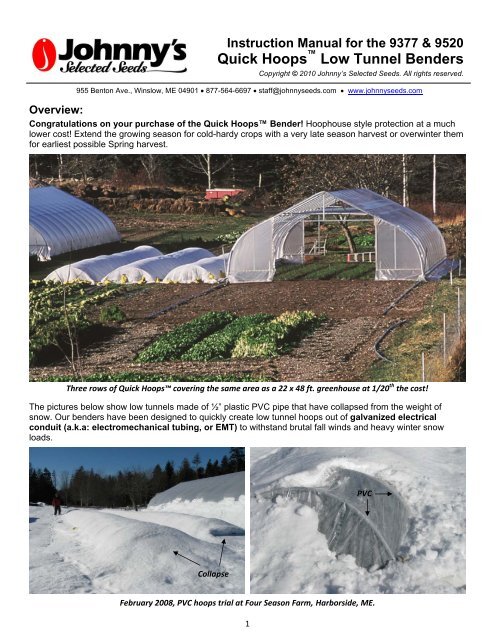
Instruction Manual for the 9377 & 9520<strong>Quick</strong> Hoops Low Tunnel <strong>Bender</strong>sCopyright © 2010 Johnny’s <strong>Selected</strong> <strong>Seeds</strong>. All rights reserved.955 Benton Ave., Winslow, ME 04901 877-564-6697 staff@johnnyseeds.com www.johnnyseeds.comOverview:Congratulations on your purchase of the <strong>Quick</strong> Hoops <strong>Bender</strong>! Hoophouse style protection at a muchlower cost! Extend the growing season for cold-hardy crops with a very late season harvest or overwinter themfor earliest possible Spring harvest.Three rows of <strong>Quick</strong> Hoops covering the same area as a 22 x 48 ft. greenhouse at 1/20 th the cost!The pictures below show low tunnels made of ½” plastic PVC pipe that have collapsed from the weight ofsnow. Our benders have been designed to quickly create low tunnel hoops out of galvanized electricalconduit (a.k.a: electromechanical tubing, or EMT) to withstand brutal fall winds and heavy winter snowloads.PVCCollapseFebruary 2008, PVC hoops trial at Four Season Farm, Harborside, ME.1
½” EMT conduit is recommended for most applications, and can be purchased at your local homeimprovement store or electrical supply house for about $2 per 10 ft length.These benders will also bend ¾” or 1” conduit, which can be useful to provide extra strength for tunnel ends, orfor fabricating small seed starting chambers and mini greenhouses. The <strong>Quick</strong> Hoops <strong>Bender</strong>s come in 4- or6-ft diameter configurations, so <strong>Quick</strong> Hoops can span one or two beds at a time (as shown below).When frost is expected, <strong>Quick</strong> Hoops are installed over the beds by inserting them into the soil about 10”and then covered with spun-bonded row cover; see below for Agribon brand, in varying frost protection levelsand lengths; 10 - 15 ft widths are recommended.When real winter threatens, row cover is topped with UV resistant Tufflite Nursery Clear polyethylenegreenhouse film. Covers are usually secured with sand bags or some other type of weight placed at the edgeof each hoop.Contents:Curved benderLever bar (for “finishing” the bend)with removable inserts installed, toaccommodate ½”, ¾” or 1”electrical conduit (EMT)Two 1/4" x 5" lag screws for mounting to woodsurfaces and two 1/4" x 4-1/2" carriage bolts, nuts,and washers for mounting to metal surfacesDetailed instructions2
Mounting:<strong>Quick</strong> Hoops <strong>Bender</strong>s may be mounted to any solid surface, such as the corner of a shop workbench, apicnic table, hay wagon, etc. It may be lag-screwed or thru-bolted into place. There are two 5/16” mountingholes benders for ¼” lag screws, bolts, etc. that are also included. By securing the bender in a fixed position,and pulling the tubing around the bender, the operator can maintain precise control of the tubing being bent.Optionally, it can be mounted to your farm truck’s hitchreceiver using our #9852 <strong>Bender</strong> Hitch Mount, forconvenience and portability. This provides an extremelysturdy base at an ergonomic working height for either <strong>Quick</strong>Hoops <strong>Bender</strong>, allowing you to fill your truck with conduitand bend hoops easily and conveniently, right there in thefield. Fits any standard 2” trailer hitch receiver.Operation:1. Mount your <strong>Quick</strong> Hoops <strong>Bender</strong> securely asshown above or to any flat work surface that is stableand will not move. Ensure there is adequate room oneither end of the bender for the tubing to be inserted andslide through.2. Prepare the lever bar (included only with the 6 ftbender 9520). The end of the lever bar with two techscrews is used to accommodate ½” or ¾” thin-wallelectrical conduit (EMT) tubing. This end of the lever bararrives ready to bend ½” EMT. As you bend the tubing andapproach the end of the tube, you will need extra leverage.a. For ½” EMT, simply slide this end ofthe lever bar over the tubing until itcontacts the first set screw, then finishthe bend as shown in laterillustrations.3
. For ¾” EMT, back out the first setscrew as shown and remove theinnermost insert. Then slide the leverbar over the tubing until it contacts thesecond set screw, and finish bending.c. For 1” EMT, simply turn the lever bararound, slide the lever bar over thefirst four or five inches of the 1” EMTand finish the bend.The lever bar and inserts are the only parts that will wear and need to be replaced in time. Don’tworry. They will produce many hoops before that ever occurs. The lever bar is made entirelyfrom stock tubing sizes available at most hardware stores, and is easily maintained by the user.Complete replacement lever bars may also be purchased later on.3. Bending the tubing.a. If you have the 9520 <strong>Quick</strong> Hoops <strong>Bender</strong> for 6 ft. diameters…from 10 ft. longEMT, you can create 6 ft. wide hoops, 3 ft tall (before insertion into the ground), that willeasily span two 30” beds with a footpath between.i. Insert a 10 ft. length of EMT into the holding strap, so it is even with end of the bender asshown. The operator stands at the end of the bender indicated in the photo below right.ii. On the first bending stroke, pull the tubing towards you around the bender, bending allthe way around until the tubing touches the operator’s end of the bender.iii. Release pressure on the tubing and pushonly about half of the portion you justbent through the holding strap to makethe next bending stroke. It is important tonot push any more than ½ the bent lengththrough at a time, in order to maintain asmooth, consistent radius. At this point,vertical support of the bent end comingout of the bender is also needed, either bya helper or outfeed table, in order to keepthe hoop in a single flat plane, so it will notcorkscrew or twist.iv. For subsequent bending strokes, stopthe bending stroke 4-6” before the tubingreaches the operator’s end of the bender.4
v. Continue with the above procedure, pushing ½ through and bending to 4-6” from theoperator end of the bender, until you near the end of the tubing being bent. At this point,employ the lever bar for the final bend by inserting over the end of the tubing andpositioning the tubing so that end of the lever bar will just miss the end of the bender.Then, use the lever bar to finish the bend. This time however, bend all the way arounduntil the tubing touches the operator’s end of the bender.vi. Slide the tubing out, and you have completed a 6 ft. hoop!b. If you have the 9377 <strong>Quick</strong> Hoops <strong>Bender</strong> for 4 ft. diameters…from 10 ft. longEMT, you can create 4 ft. wide hoops, roughly 4 ft tall (before insertion into the ground), thatwill easily span a single 36” wide bed.i. Insert a 10 ft. length of EMT into the holding strap so it extends 16” beyond the end ofthe bender as shown. The operator stands at the end of the bender indicated below.5
ii. On the first bending stroke, pull the tubing towards you around the bender, bending allthe way around until the tubing touches the operator’s end of the bender.iii. Remove the tubing and repeat steps i. and ii. above for the opposite end of the tubing.iv. With each end of the tubing now pre-bent, slide the tubing through the holding strap untilthe mid-point of the tubing is aligned with the middle assembly screw of the bender.v. With one hand on one end of the tubing and one on the other, squeeze the tubing togetheraround the form, momentarily creating a horseshoe shape, so that when allowed to springback, the ends of the tubing are visually parallel.vi. Remove from the tubing from the bender and <strong>manual</strong>ly adjust if necessary until the sidesof the hoop are parallel and pointing straight down as shown below. You have justcompleted a 4 ft. hoop!c. Truly <strong>Quick</strong> Hoops! After just a few tries, you will find that you will be able to completeindividual hoops in less than a minute each.6
Some thoughts:Not all tubing is manufacturedwith the exact same base alloysor wall thicknesses. Therefore, ifusing tubing from two differentsources, you may notice adifference in finished hoop widths.Hoops can easily be madeuniform by compressing theminward or expanding themoutward, using your foot andhands as shown here.Also, along those same lines, youwill find that when bending largerdiameter pipes, you will not haveto bend as close to the bender(stay more on the 6” end of the 4-6” guidelines above) to achievethe same radius bend, as theselarger diameters have bettershape memory and less elasticity.Some practice and trial and errorwill inevitably result in perfectingyour technique.Use in the field:<strong>Quick</strong> Hoops are generally driven about 10” into the ground and spaced 5 to 6 ft. apart. You may find ithelpful to use a digging bar to prepare holes to accept the tubing, if your soil is not very loose or is rocky.Cover with Agribon spun-bonded row cover and eventually top with greenhouse film for overwinter protection.Please see the following page for ordering information.A great deal of information on the use and implementation of the <strong>Quick</strong> Hoops growing system, includingsuggested varieties and planting dates can be found in Eliot Coleman’s newest book:9698 The Winter Harvest Handbook.A comprehensive handbook for raising crops throughout thewinter. Choosing locally grown organic food is a sustainable livingtrend thats taken hold throughout North America. Celebrated farmingexpert Eliot Coleman helped start this movement with The NewOrganic Grower published 20 years ago. He continues to lead theway, pushing the limits of the harvest season while working his worldrenownedorganic farm in Harborside, Maine. With The WinterHarvest Handbook, anyone can have access to his hard-wonexperience. Coleman offers clear, concise details on greenhouseconstruction and maintenance, planting schedules, crop management,harvesting practices, and even marketing methods in this complete,meticulous, and illustrated guide. His painstaking research andexperimentation with more than 30 different crops will be valuable tosmall farmers, homesteaders, and experienced home gardeners whoseek to expand their production seasons.7
Materials and their uses:In early Spring, <strong>Quick</strong> Hoops can be covered with AGRIBON+ AG-19 spun-bonded row cover to protectcrops from both frost and insect damage.In Summer, <strong>Quick</strong> Hoops can be covered with AGRIBON+ AG-15 spun-bonded row cover as an insectbarrier or knitted shade cloth to reduce heat and light intensity for sensitive crops.When frost is expected, <strong>Quick</strong> Hoops can be used to extend the season by covering with AGRIBON+ AG-19 or heavier spun-bonded row covers.When real winter threatens, the row cover is then topped with UV resistant Tufflite Nursery Clear greenhousefilm to allow very late harvest, over-wintering, or earliest possible spring germination. The plastic film is usuallysecured with sand bags or some other type of weight placed at the edge of each hoop to prevent tearing.Coverings in general can be held down by a variety of methods, including (but not limited to) sandbags(available at www.uline.com, among other sources), snap clamps, heavy duty row cover hand pegs, rocks, or adug trench along the edge of the hoops to bury the edges of the cover.Agribon+ Spun-Bonded Row Cover<strong>Quick</strong> Hoops in Summer at Four Season Farm<strong>Quick</strong> Hoops in March at Johnny’s Research FarmAG-15: Lightweight grade for insect control. 90%light transmission. 0.45 oz./sq.yd.9057 AG-15 ROW COVER – 118” x 50' roll9051 AG-15 ROW COVER – 118” x 250' roll9050 AG-15 ROW COVER – 118” x 1500' rollAG-19: Standard grade for general frost protection.Frost protection down to 28°F. 85% lighttransmission. 0.55 oz./sq.yd.9065 AG-19 ROW COVER - 10' x 50' roll9066 AG-19 ROW COVER - 10' x 250' roll9544 AG-19 ROW COVER - 10' x 500' roll9545 AG-19 ROW COVER - 10' x 1000' rollAG-30: Overwintering protection in moderateclimates. Frost protection down to 26°F. 70% lighttransmission. 0.9 oz./sq.yd.9563 AG-30 ROW COVER - 14' x 800' rollAG-50: Overwintering protection in colder climates.Frost protection down to 24°F. 50% lighttransmission. 1.5 oz./sq.yd.9605 AG-50 ROW COVER - 10' x 500' roll9611 AG-50 ROW COVER - 10' x 1500' rollAG-70: Heaviest overwintering and freezeprotection. Frost protection down to 24°F andbelow. 30% light transmission. 2.0 oz./sq.yd.9628 AG-70 ROW COVER - 13' x 100' roll9639 AG-70 ROW COVER - 13' x 300' roll8
Clear Polyethylene Greenhouse FilmThe preferred winter covering for <strong>Quick</strong> Hoops.UV resistant and ultra clear, this 4 mil, high-quality,high-tech film designed specifically for greenhousesis perfect for use with low tunnels. Unlikeconstruction grade poly which yellows quickly, itprovides optimum light transmission and resistsyellowing. Extremely durable for long winters.9464 TUFFLITE TM ‘NURSERY CLEAR’GREENHOUSE FILM - 10’ x 100’ rollKnitted Shade ClothReduces heat and light intensity, resulting in betterquality and higher yields for crops like peppers andeggplant; speeds growth of cool weather fall crops,prevents bolting and bitterness of heat-sensitivecrops (such as lettuce and spinach); and protectsagainst wind damage and dessication. 100% UVstabilized black polyethylene; naturally rot andmildew proof. This lock-stitch knitted shade cloth islighter weight, and has better ventilation and waterpermeation than woven shade cloth, and can be cutwithout unraveling. 5-7 year lifespan. Can reduceambient temperature by 10 deg F or more. Musthang high enough above plants and provideadequate side ventilation to prevent heat build up.10’ width is used over <strong>Quick</strong> Hoops low tunnels,with the sides uncovered for maximum ventilation;and secures easily with Snap Clamps (see below).Guidelines: For solonaceous crops such astomatoes and peppers, use 30% shade cloth inareas with very hot summers; for cold-lovinglettuce, spinach and cole crops, use 50% in hot,southern areas, 30% in northern zones. For shadelovingplants, use 50%.Row Cover Hand PegsExtra row cover holding power for low tunnels.Holds row cover firmly in place, even in thestrongest winds. For8” large prong;6” wide handle.best performance,place at the base ofhoop support with thelong prong puncturingjust inside the rollededge of the row cover,with one small barbthrough the fabric andthe other directly intothe soil.9151 Pkg of 259814 Case of 250Density equals percent light blocked.30% cloth allows 70% light transmission, etc.9558 KNITTED BLACK SHADE CLOTH – 30%shade; 10' x 100' roll9570 KNITTED BLACK SHADE CLOTH – 50%shade; 10' x 100' rollSnap Clamps<strong>Quick</strong>ly fasten greenhouseplastic, row cover, or shadecloth to <strong>Quick</strong> Hoopsand other low tunnels madeof electrical conduit (EMT)or plastic (PVC) pipe. Spaceclamps about 1' apart orcloser in windy situations.UV stabilized and frostresistant for years ofdependable use.Packages of 10.9608 For ½” EMT only.9150 For either 3/4” EMTor ½” PVC.9
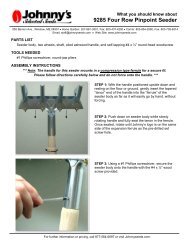
Over-Winter Set Up:Extra care must be taken to prepare <strong>Quick</strong> Hoops for service through the winter. Once a bed is planted,<strong>Quick</strong> Hoops made of ½” EMT are generally placed at intervals of five feet and driven 8-10” into the ground.If your soil is dense or rocky, you may find the use of a digging bar to “pre-drill” holes for the hoops helpful. Ifyou are using 10 x 100’ greenhouse film, you will want the tunnels to be no more than 85 ft long from end hoopto end hoop (18 hoops total), in order to allow for enough excess material at each end. It is important to notethat longer tunnels will have a lower surface area to volume ratio and will be on average effectively warmeroverall for the crops within them.A good solid stake of some kind should be placed at each end at about a 45 degree angle pointing away fromthe tunnel; wood is preferable over rebar, unless driven very deep, because rebar will slice through wet soiland often pull out in wet spring storms.For extra support and to prevent crops from being crushed, we add a cord or rope from the top of each endhoop down to the neighboring stake as shown above. In our experience, the EMT hoops will not bend undersnow load, but due to their thin nature, they will (like the rebar) slice through the soil when under load,particularly the end hoops, which carry the load of the entire tunnel.Fill sand bags with sand or rocks,not soil. Soil will dry out and thebags will become too light tofunction properly, especially in highwind.Spread the row cover over thehoops; 10 to 15 ft wide is ideal. Donot cut to length yet. Bunch up theend that is opposite to the roll andtie it off to the stake nearest it.Return to the opposite end. Pull therow cover tight lengthwise, with thelogo lettering in the top center of thehoops – not because it looks good,but because it indicates the center,and you will have equal overlap oneach side for sand bags to sit on.10
While pulling it tight lengthwise, hold it just past the stake on that end and neatly gather each side of the fabricto the stake, then tie that end off and cut the fabric to length.Add sand bags at the base of each hoop and on each side between the end hoop and end stake. Soil may alsobe added intermittently between hoops to prevent wind from catching fabric.Keep this covering on until “real winter” threatens, then add plastic right on top of the row cover by repeatingthe same procedure.Bunch together and tie to the stake (separately from the row cover). If you were to untie the row cover, bunchthem together, then tie them, the coverings will slip over each other in the not and become loose, causing thetunnel to collect snow rather than shed it.Repeat for the other end, centering the plastic, and pulling it as tightly as possible lengthwise, before tying.Cut to length. Then add sand bags. The side bags should be on top of both coverings, against the hoops.Side bagsEnd hoop bagsA little breezy area at the end is easily sealed up.11
Storm preparation tips: Difficulties in keeping coverings on are generally encountered during late fall or earlyspring storms. Once snowfall occurs, there will be added weight to hold down the plastic and the tunnelsshould be maintenance free until the snow melts.If you have an unprotected field that tends to catch a lot of wind, 1” x 1” grade stakes may be added to allowlacing in a criss-cross pattern over of the plastic (see upper right). This should enable the tunnels to weathermost tough storms without previously having accumulated snow. You may find it necessary (as we did in ourtrials) to only add this to a portion of the tunnels furthest from the tree line. Good luck!<strong>Quick</strong> Hoops in January at Johnny’s Research Farm<strong>Quick</strong> Hoops in March at Johnny’s Research FarmRevised 02.03.11 ACL12