

Installation Instructions for IDH Max Cylindrical Locks - Best Access ...
Installation Instructions for IDH Max Cylindrical Locks - Best Access ...
Installation Instructions for IDH Max Cylindrical Locks - Best Access ...

You also want an ePaper? Increase the reach of your titles
YUMPU automatically turns print PDFs into web optimized ePapers that Google loves.
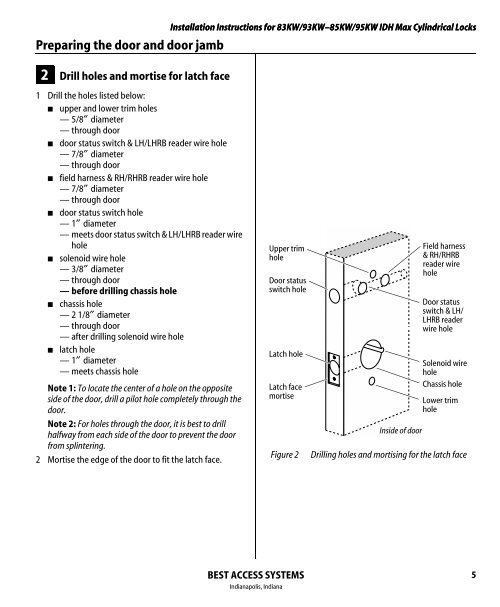
Preparing the door and door jamb<strong>Installation</strong> <strong>Instructions</strong> <strong>for</strong> 83KW/93KW–85KW/95KW <strong>IDH</strong> <strong>Max</strong> <strong>Cylindrical</strong> <strong>Locks</strong>2 Drill holes and mortise <strong>for</strong> latch face1 Drill the holes listed below:■ upper and lower trim holes—5/8″ diameter— through door■ door status switch & LH/LHRB reader wire hole—7/8″ diameter— through door■ field harness & RH/RHRB reader wire hole—7/8″ diameter— through door■ door status switch hole—1″ diameter— meets door status switch & LH/LHRB reader wirehole■ solenoid wire hole—3/8″ diameter— through door— be<strong>for</strong>e drilling chassis hole■ chassis hole—21/8″ diameter— through door— after drilling solenoid wire hole■ latch hole—1″ diameter— meets chassis holeNote 1: To locate the center of a hole on the oppositeside of the door, drill a pilot hole completely through thedoor.Note 2: For holes through the door, it is best to drillhalfway from each side of the door to prevent the doorfrom splintering.2 Mortise the edge of the door to fit the latch face.Upper trimholeDoor statusswitch holeLatch holeLatch facemortiseFigure 2Inside of doorField harness& RH/RHRBreader wireholeDoor statusswitch & LH/LHRB readerwire holeSolenoid wireholeChassis holeLower trimholeDrilling holes and mortising <strong>for</strong> the latch faceBEST ACCESS SYSTEMSIndianapolis, Indiana5


![B.A.S.I.S. G Service Manual [T63300] - Best Access Systems](https://img.yumpu.com/48375082/1/190x245/basis-g-service-manual-t63300-best-access-systems.jpg?quality=85)

