night vision scope NZT-1M2 - Newcon Optik
night vision scope NZT-1M2 - Newcon Optik
night vision scope NZT-1M2 - Newcon Optik

Create successful ePaper yourself
Turn your PDF publications into a flip-book with our unique Google optimized e-Paper software.
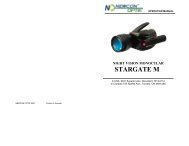
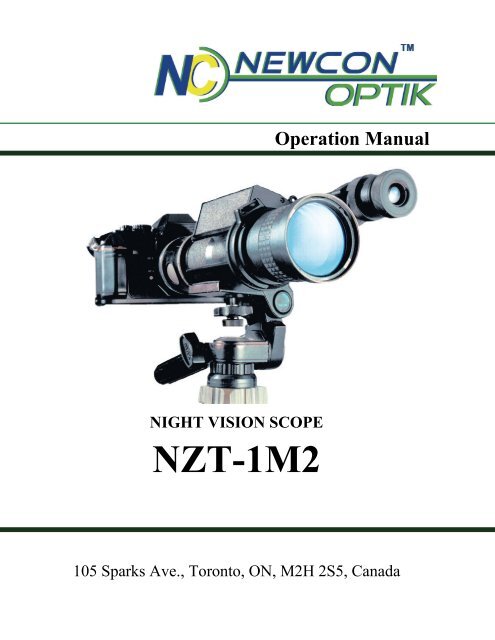
Operation ManualNIGHT VISION SCOPE<strong>NZT</strong>-<strong>1M2</strong>105 Sparks Ave., Toronto, ON, M2H 2S5, Canada
IMPORTANT INFORMATIONRead prior to activationYou have just purchased a complicated electronic device.To operate it properly, please read this manual carefully.Here are some common Precautions that must be noted.• NEVER expose the opened objective lens of an activeunit in daylight. At daytime objective lens must becovered by caps. There is a tiny hole in the cap toprovide enough light for day time operation.• NEVER aim active unit at intense light sources (i.e.lights, headlamps, campfires, the Moon, etc.)• NEVER reverse the polarity of a battery• NEVER disassemble the unit• NEVER connect the unit to external power sources• ALWAYS remove batteries when not in use for a longperiod• ALWAYS keep the objective lenses covered when notin use• ALWAYS store in a warm dry place when not in use
Table of contents1. Overview .........................................................11.1 Features............................................................21.2 Warning ...........................................................21.3 Precautions ......................................................32. Delivery set .....................................................43. Specifications ..................................................54. Design..............................................................65. Operation Instructions .....................................87.1 Pre-starting procedures ...............................87.1 Testing of operation....................................87.1 Operation at <strong>night</strong> .......................................96. USING WITH CAMERA .............................107. TROUBLESHOOTING ................................127.1 The <strong>scope</strong> does not work. .........................127.2 The image does not appear in focus..........127.3 Image flashes ............................................127.4 Condensation accumulates on the parts. ...127.5 Visibility decreases and / or disappears....138. WARRANTY................................................139. CUSTOMER SUPPORT...............................1510. ACCEPTANCE CERTIFICATE ..................16
Thank you for purchasing <strong>NZT</strong> <strong>1M2</strong>Please read all the instructions carefully prior to use.Failure to follow the instructions may void the warranty.1. OverviewThe <strong>night</strong> <strong>vision</strong> <strong>scope</strong> <strong>NZT</strong>-<strong>1M2</strong> is an observational opticoelectronicmonocular device intended for examining distantobjects and orientation at <strong>night</strong>time conditions. The unitutilizes an image intensifier which amplifies availablemoonlight, starlight or man-made light. The viewer wasdesigned to be easy to use, and provide many years ofoperation.Some of the typical activities where the <strong>NZT</strong>-<strong>1M2</strong> NightVision Tele<strong>scope</strong> will be useful:• wildlife observation• <strong>night</strong> time photography• security• boating• search and rescue• law enforcement1
1.1 Features• The <strong>NZT</strong>-<strong>1M2</strong> tele<strong>scope</strong> is camera adaptable. It is attacheable toPentax screw type cameras or to other cameras through anoptional adapter. It allows to use any lenses with working lengthof 45.5 mm and screw type thread;• A self-contained AP-7 Infra Red illuminator with adjustablefocus and angle is included. It allows observations in totaldarkness (i.e basement or cave);• One stage image intensifier tube with multi alkaline photocathodeensures observation at 1/4 moon and better conditions;• The eye piece allows Dioptric adjustment for the eyes of theviewer;• Soft rubberized eye piece makes the viewing more comfortable;• Standard and commonly available 9V battery ensure nonstopoperation of the device for no less than 10 hours.1.2 WarningAfter transportation or keeping the device at temperaturelower than -15°C (5°F), the device must be warmed up toambient temperature, from -10°C (14°F) to +40°C (104°F),relative humidity of 80% max. at 20°C (68°F).2
1.3 Precautions<strong>NZT</strong>-<strong>1M2</strong> is a sophisticated precision optical instrumentequipped with electronics.Therefore, it should be handled with due care.• Keep your device away from direct sunlight, impacts, dust,moisture, and sudden changes of temperatures.• Do not touch the optical surfaces with fingers. Doing so maydamage the anti-reflection coating.• Cleaning of optical surfaces is possible only with professionalcamera lens cleaning supplies.• To clean the exterior of the device, use only a soft clean cloth.• Do not take the cover off the lens if not necessary.• Keep away from heating appliances and central heating.• Make sure to switch off the unit during periods of non-operationand when storing the device for long period of time.• Do not apply superfluous efforts at work with lens assembly,agile elements and thread connections.• Due to considerable optical magnification of the eye-piece somesmall structures inside the tube coating in the form of dark and/orwhite points may be seen in the field of view which does notaffect the serviceability of the device.• The resolving power (resolution) may change in the directionfrom the center towards the perimeter of the field of view. This is aninherent feature of the image tube type utilized in the device. Wewould recommend to place the scene of observation in the center ofthe field of view3
2. Delivery set<strong>NZT</strong>-<strong>1M2</strong> supplied with the following components:Quantity<strong>NZT</strong>-<strong>1M2</strong> unit 1Case 1Carrying strap 1Lens caps 1AP-7 I/R illuminator 1AP-7 lens cover 1Tripod doubler 1Lens cloth 1Camera adapter 1Byonet adapter (optional) 1Manual 1Warranty Registration Card 14
3. SpecificationsMagnification, x 2.4Field of view, degrees 15°Lens aperture 1.5Dyoptric correction ± 5Operating illuminationsFrom moon light tostar’s lightPower supply;Scope9VAP-7 I/R Illuminator3V 2xAABattery life, hours 10Dimensions, mm 100×120×260Weight, kg 1.15
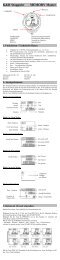
4. Design2. Locking Screw9. Eye-pieceFocusing Ring1. Body3. Lens4. IR Illuminator8. BatteryHouse Cover7. On/Off Switch5. LensFocusing Ring6. Tripod Socket1 – Body 2 – Locking screw3 – Lens 4 – IR Illuminator5 – Lens focusing Ring 6 – Tripod socket7 – On / Off switch 8 – Battery house cover9 – Eye-piece focusing ring6
5. Adjustable AngleLocking Ring2. On/off Switch 4. Mount Screw6. Lensfocusing ring1. Body 3. BatteryHouse CoverPic. 21- Body 2 - On / off switch3 - Battery house cover 4 - Mount screw5 - Adjustable angle locking 6 - Lens focusing ringring7
5. Operation InstructionsWARNING!Never operate your <strong>night</strong> <strong>vision</strong> device at daylight withoutthe lens cover on! Never direct the lens to bright light!7.1 Pre-starting proceduresUnpack the device. In order to install the battery, open batteryhouse cover (8), and install the battery.Check the functioning of the device by switching it on (clickswitch 7) and looking through eye-piece (9). If power supplyand the batteries are O.K., you will see greenish lit screen. Ifthe screen is not lit, check the batteries. Replace the batteriesif necessary. if everything works, now is a great time to fillthe warranty card.Note: The <strong>scope</strong> will remain on for up to several minutes afterreleasing the ON button. This is normal.7.1 Testing of operationThe <strong>scope</strong> can be switched on by short pushes on the button(7) during 1-2 seconds. The lens cap must be on the lens (3).8
Direct the device on an object placed within 10-20 m from theviewer. Turning the eye-piece (9) and the lens (3) try toachieve the sharpest image on the screen of the image tube.7.1 Operation at <strong>night</strong>AT MOON LIGHTTake off the lens cover from the lens (3). Turn on the deviceusing switch (7). Turning the eye-piece (9) adjust to achievethe most clear image on the screen. Then obtain the mostclear-cut image of the object focusing with ring (5). Repeatthe steps of focusing if necessary.As a battery saving measure, the unit has an automatic delayedshut off. When brightness of the image is being lowered,press the switch again. If brightness of the screen isdecreasing, replace the batteries.Take out the batteries duringlong periods of non-operation.AT INSUFFICIENT AMBIENT ILLUMINATIONAt insufficient ambient illumination use the AP-7 Infra/Redilluminator. Attach AP-7 Infra/Red illuminator unit using themount screw (4) to the tripod socket of the tele<strong>scope</strong> lens<strong>NZT</strong>, then switch on AP-7 (2). Focusing of the beam is doneby rotation of the lens ring (6). The angle of the beam can beadjusted as well (5).9
6. USING WITH CAMERA(Refer to camera diagram page 12)To use a camera with the <strong>NZT</strong>-<strong>1M2</strong>, use a camera with PentaxScrew type thread. Adapters for most other cameras should beavailable in your local camera store.A camera adapter is supplied with your <strong>night</strong> <strong>vision</strong> <strong>scope</strong>.PhotographyWhen using the <strong>NZT</strong>-<strong>1M2</strong> for photography, you are notsupposed to obtain the same quality of pictures as taken in thedaytime. But you will have the possibility to get an image ofthe object that normally could not be seen in the dark by thenaked eye.The user has a wide range of possibilities for experiments inthe photography field by selecting different photo materialsand changing of optics. Quality of pictures taken with a newlens or eyepiece may be estimated approximately by theobject’s image when observing through the view-finder ofyour SLR cameral.10
Camera Diagramoptional byonet adapter11
7. TROUBLESHOOTING7.1 The <strong>scope</strong> does not work.Check that the batteries are installed properly.Check the charge of the batteries. Replace if they are weak.Do not use old batteries with new ones.7.2 The image does not appear in focus.Bring the inspected object to the center of the image. Turningthe eye-piece (9) adjust to achieve the clearest image on thescreen. Then obtain the most clear-cut image of the objectfocusing with ring,(5). Repeat the steps of focusing ifnecessary7.3 Image flashesIt is normal for the unit to flash within the first 2 minutes ofactivation.Continued flashing may be caused by bright light environment(even with the cap closed).7.4 Condensation accumulates on the parts.It is O.K. to use the <strong>scope</strong> in cold. However, when the unit isbrought from the cold into a warm environment, it has towarm up for up to 5 hours (not minutes!). Only then, it can beturned on again.12
7.5 Visibility decreases and / or disappears.Bright light sources (moon, projectors or headlights) mayresult in visibility degradation or even completedisappearance. If this happens move the <strong>scope</strong> away from thelight source immediately. The image should be restored inwithin 2 minutes.Poor atmospheric conditions such as fog, haze or extremelydark environments, will decrease the visibility distance aswell.8. WARRANTYNEWCON warrants this product against defects in materialand workmanship for one year from the date of the originalpurchase, but no more than 18 months from the date ofmanufacturing. Longer warranty is available, subject to theterms of the specific sales contract. Should your <strong>Newcon</strong>product prove to be defective during this period, please deliverthe product securely packaged in its original container or anequivalent, along with the proof of the original purchase date,to your <strong>Newcon</strong> Dealer.<strong>Newcon</strong> will repair (or at its option replace with the same orcomparable model), the product or part thereof, which, oninspection by <strong>Newcon</strong>, is found to be defective in materials orworkmanship.13
What This Warranty Does Not Cover:NEWCON is not responsible for warranty service should theproduct fail as a result of improper maintenance, misuse,abuse, improper installation, neglect, damage caused bydisasters such as fire, flooding, lightning, improper powersupply, or service other than by a NEWCON AuthorizedService.Postage, insurance, and shipping costs incurred whilepresenting your NEWCON product for warranty service areyour responsibility.If shipping from North America, please, include a cheque ormoney order payable to NEWCON OPTIK for the amount of$15.00 to cover handling and return shipping.14
9. CUSTOMER SUPPORTShould you experience any difficulties with your NEWCONOPTIK product, consult the enclosed manual. If the problemremains unresolved, contact our customer support departmentat (416) 663-6963 or toll free at 1-877-368-6666. Ouroperating hours are 9am-5pm, Monday - Friday, EasternStandard Time. At no time should equipment be sent back to<strong>Newcon</strong> without following the instructions of our technicalsupport department.NEWCON OPTIK accepts no responsibility for unauthorizedreturns.To locate NEWCON Authorized Dealer call:Tel: (416) 663-6963 Fax: (416) 663-9065Email: newconsales@newcon-optik.comWeb: www.newcon-optik.comThe defective products should be shipped to:From the USA only:2331 Superior Ave. Cleveland, OH 44114From all other countries:105 Sparks Ave., Toronto, ONM2H 2S5, CANADA15
10. ACCEPTANCE CERTIFICATENIGHT VISION DEVICE <strong>NZT</strong>-<strong>1M2</strong>Serial number: _________________________________Complies with all technical specifications and has passed theinspection.Date of production: _________________________________Quality Inspector: __________________________________Quality Assurance Seal16
NEWCON OPTIK 2010Printed in Canada