Installation Instructions for Wall-Hung Bidets
Installation Instructions for Wall-Hung Bidets
Installation Instructions for Wall-Hung Bidets
- No tags were found...

Create successful ePaper yourself
Turn your PDF publications into a flip-book with our unique Google optimized e-Paper software.
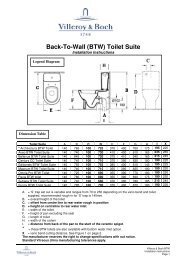
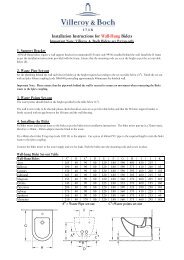
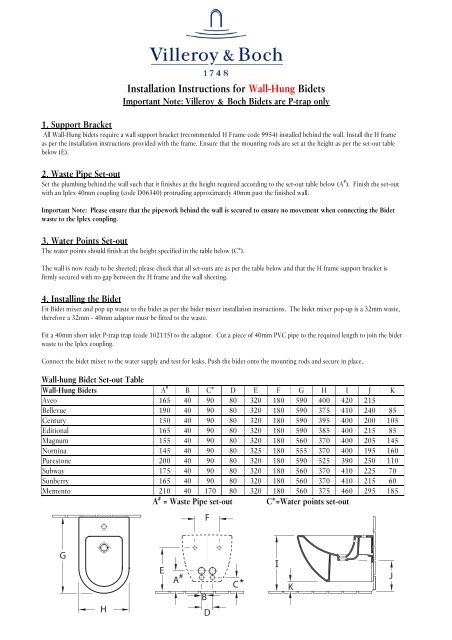
<strong>Installation</strong> <strong>Instructions</strong> <strong>for</strong> <strong>Wall</strong>-<strong>Hung</strong> <strong>Bidets</strong>Important Note: Villeroy & Boch <strong>Bidets</strong> are P-trap only1. Support BracketAll <strong>Wall</strong>-<strong>Hung</strong> bidets require a wall support bracket (recommended H Frame code 9954) installed behind the wall. Install the H frameas per the installation instructions provided with the frame. Ensure that the mounting rods are set at the height as per the set-out tablebelow (E).2. Waste Pipe Set-outSet the plumbing behind the wall such that it finishes at the height required according to the set-out table below (A # ). Finish the set-outwith an Iplex 40mm coupling (code D06340) protruding approximately 40mm past the finished wall.Important Note: Please ensure that the pipework behind the wall is secured to ensure no movement when connecting the Bidetwaste to the Iplex coupling.3. Water Points Set-outThe water points should finish at the height specified in the table below (C*).The wall is now ready to be sheeted; please check that all set-outs are as per the table below and that the H frame support bracket isfirmly secured with no gap between the H frame and the wall sheeting.4. Installing the BidetFit Bidet mixer and pop up waste to the bidet as per the bidet mixer installation instructions. The bidet mixer pop-up is a 32mm waste,there<strong>for</strong>e a 32mm – 40mm adaptor must be fitted to the waste.Fit a 40mm short inlet P-trap trap (code 102115) to the adaptor. Cut a piece of 40mm PVC pipe to the required length to join the bidetwaste to the Iplex coupling.Connect the bidet mixer to the water supply and test <strong>for</strong> leaks. Push the bidet onto the mounting rods and secure in place.<strong>Wall</strong>-hung Bidet Set-out Table<strong>Wall</strong>-<strong>Hung</strong> <strong>Bidets</strong> A # B C* D E F G H I J KAveo 165 40 90 80 320 180 590 400 420 215Bellevue 190 40 90 80 320 180 590 375 410 240 85Century 150 40 90 80 320 180 590 395 400 200 105Editional 165 40 90 80 320 180 590 385 400 215 85Magnum 155 40 90 80 320 180 560 370 400 205 145Nornina 145 40 90 80 325 180 555 370 400 195 160Purestone 200 40 90 80 320 180 590 525 390 250 110Subway 175 40 90 80 320 180 560 370 410 225 70Sunberry 165 40 90 80 320 180 560 370 410 215 60Memento 210 40 170 80 320 180 560 375 460 295 185A # = Waste Pipe set-out C*=Water points set-outFGHE#ABDCIKJ
<strong>Installation</strong> <strong>Instructions</strong> <strong>for</strong> Floor-Mounted <strong>Bidets</strong>Important Note: Villeroy & Boch <strong>Bidets</strong> are P-trap only1. Waste Pipe Set-outSet the plumbing behind the wall such that it finishes at the height required according to the set-out table below (A # ). Finish the set-out withan Iplex 40mm coupling (code D06340) protruding approximately 40mm past the finished wall.Important Note: Please ensure that the pipework behind the wall is secured to ensure no movement when connecting the Bidet wasteto the Iplex coupling.2. Water Points Set-outThe water points should finish with a 15mm female thread at the height specified in the table below (C*).The wall may now be sheeted, please check that the plumbing and water set out heights are as per the table below.3. Installing the BidetFit Bidet mixer and pop up waste to the bidet as per the bidet mixer installation instructions. The bidet mixer pop up is a 32mm waste,there<strong>for</strong>e a 32mm – 40mm adaptor must be fitted to the waste.Fit a 40mm short inlet P-trap trap (code 102115) to the adaptor. Cut a piece of 40mm PVC pipe to the required length to join the bidetwaste to the Iplex coupling.If you are installing an Omnia Pro bidet, place it into position and mark the position of the screw holes. Remove the bidet and drill holes <strong>for</strong>the screws. Refit the bidet and screw into place. All other bidets are supplied with fixing brackets. In these casespush the bidet into position to mark the position of the fixing brackets.Place the bidet in the position in which it is to be installed and mark the outline of the bidet on the floor under thefastening holes. Mark a point on the drawn line under the position of the centre of the fastening holes (see Fig 1).Fig.1Remove the bidet and join the two marked points with a line. Mark two drilling holes on this line at a distance of45mm from the outer edge of the bidet. Drill the two marked fastening holes and attach the supplied plasticbrackets as shown in the drawing (see Fig 2). Ensure that the outer contour of the bidet is parallel with the outersurface of the mounting bracket.Fig.2Place the bidet over the fastening brackets, check that it is in the correct position <strong>for</strong> installation (see Fig 3).Remove the bidet and connect the water points to the bidet mixer. All wall-faced bidets are supplied with aninstallation kit (code 92083100) to help connect the water. The support bracket supplied with this kit is notrequired. Install the 2 stop taps and the flexible hoses that are provided with the kit. Attach to the bidet mixer; slidethe bidet into position ensuring the waste is securely connected. Test that the bidet functions correctly, with noleaks, be<strong>for</strong>e securing the bidet to the brackets and sealing around the base with a bead of silicon.Fig.3Floor-mounted Bidet Set-Out TableFloor-Mounted <strong>Bidets</strong> A # B C* D E F G HAveo 145 40 90 80 570 410 400 195Bellevue 190 40 90 80 560 375 410 240Century 160 40 90 80 570 385 410 210Editional 165 40 90 80 570 385 400 215Magnum 140 40 90 80 570 375 390 190Omnia 135 40 90 80 620 370 390 185Subway 165 40 90 80 570 370 400 215Sunberry 165 40 90 80 570 375 400 215A # = Waste Pipe set-out C*=Water points set-outEFA #BDCGH