AIRMIX ® PUMP 20-15 - Kremlin Rexson Sames
AIRMIX ® PUMP 20-15 - Kremlin Rexson Sames
AIRMIX ® PUMP 20-15 - Kremlin Rexson Sames
- No tags were found...

Create successful ePaper yourself
Turn your PDF publications into a flip-book with our unique Google optimized e-Paper software.
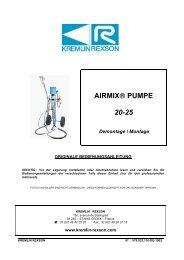
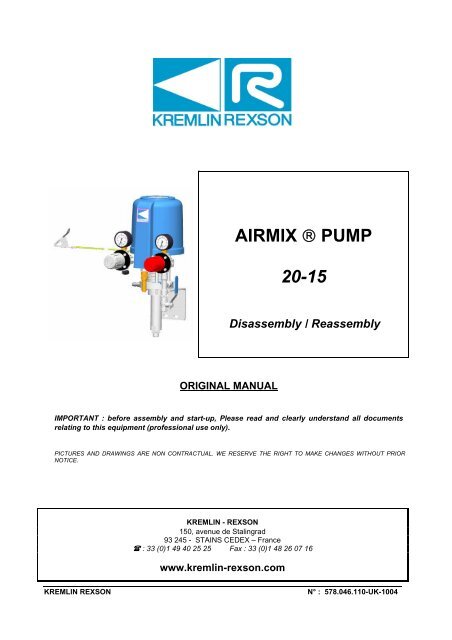
<strong>AIRMIX</strong> <strong>®</strong> <strong>PUMP</strong><strong>20</strong>-<strong>15</strong>Disassembly / ReassemblyORIGINAL MANUALIMPORTANT : before assembly and start-up, Please read and clearly understand all documentsrelating to this equipment (professional use only).PICTURES AND DRAWINGS ARE NON CONTRACTUAL. WE RESERVE THE RIGHT TO MAKE CHANGES WITHOUT PRIORNOTICE.KREMLIN - REXSONl<strong>15</strong>0, avenue de Stalingrad93 245 - STAINS CEDEX – France : 33 (0)1 49 40 25 25 Fax : 33 (0)1 48 26 07 16www.kremlin-rexson.comKREMLIN REXSONN° : 578.046.110-UK-1004
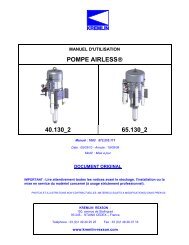
CAUTION :Before any action on the pump, shut off the compressed air supply anddepressurize the systems.• FLUID SECTION OR AIR MOTOR REPLACEMENTThe pump is manufactured under the ATEX agreement and can not be modified.KREMLIN REXSON will not be held responsible for any failure to comply with thatinstruction.Guards (motor cover, coupling shields, connectors,…) have been designed for asafe use of the equipment.The manufacturer will not be held responsible for bodily injury or failure and / orproperty damage due to destruction, the overshadowing or the partial or totalremoval of the guards.Position the air motor piston in a high position before shutting off the compressed air and beforedepressurizing the system.Disassemble the pump from its bracket by removing the 2 nuts and put aside the pump.Remove the third nut that holds on the third rod.Unscrew the screw located on the protection housingwith an Allen wrench of 5. Slide the transparent part ofthe protection housing to access to the parts of thecoupling.Extract the pin and the coupling axis. Disassemble the air motor from the fluid section.When changing the air motor :Remove the hood of the old air motor by unscrewing the 3 screws and put aside the 2 air regulatorsand the gauges.Remove the hood of the new air motor by unscrewing the 3 screws .Disassemble the collector equipped with the 2 nipples by unscrewing the 4 screws .Assemble the air regulators and the gauges on the 2 nipples.Fix the assembly on the bare air motor. Replace the hood and fix it by means of the 3 screws.Place the protection housing on the material flange of the fluid section, assemble the air motor andthe fluid section with the coupling axis and the pin, the rods and the nuts.Slide the transparent part of the protection housing to close it. Align the hole located on thetransparent part of the protection housing and the srew of the protection housing. Screw the screwwith an Allen wrench of 5 to fix the protection housing.Assemble the new air motor and the fluid section. Place the pump on the bracket.When changing the fluid section :Place the protection housing on the material flange of the new fluid section, assemble the air motorand the fluid section with the coupling axis and the pin, the rods and the nuts.Slide the transparent part of the protection housing to close it. Align the hole located on thetransparent part of the protection housing and the srew of the protection housing. Screw the screwwith an Allen wrench of 5 to fix the protection housing.Position the whole on the wall mounted unit.KREMLIN REXSONN° : 578.046.110-UK-1004
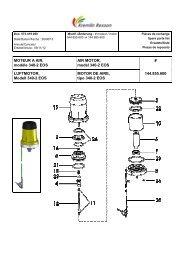
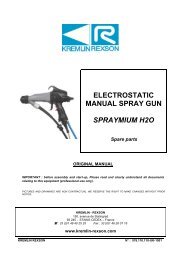
• MOTOR302423262119<strong>20</strong><strong>15</strong>45141332252127292816171826<strong>15</strong>61097101211Disassemble the hood (23) by removing the 3 screws (24).Disassemble the cover (19) by removing the 4 screws (21).Unscrew motor valve (<strong>15</strong>) by holding on the control fork assembly (9).Reinstall the new air motor valve (<strong>15</strong>) and block it on the control rod (9) via the two flat parts locatedat its end.Reinstall the cover (19) and fix it by means of the 4 screws (21).Reinstall the hood (23) with its 3 screws (24).Before reassemblying the different components :- Clean the parts with the appropriate cleaning solvent.- Install new seals if it is necessary after having lubricated them with PTFE grease.- Install new parts if it is necesssary.KREMLIN REXSONN° : 578.046.110-UK-1004
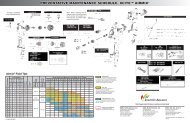
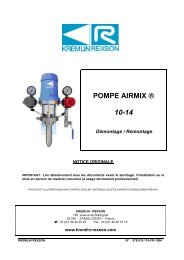
• FLUID SECTION<strong>20</strong>A 18A 1A 2C 1371A <strong>15</strong>A 1144131219181716A 1C 11110A 1Index Instruction Description Part numberA1PTFE grease 'TECHNILUB' grease (10 ml) 560.440.101A2Graphite greaseGraphite grease box(1 kg / 2.<strong>20</strong>4 lb )560.4<strong>20</strong>.005C1Medium strengthAneorobic Pipe sealantLoctite 577‣ SUCTION VALVEUnscrew the ball seat (10), the valve comes out the cylinder.The ball cage (14) is secured on the seat (10) by means of the circular rush (13).Reinstall the ball seat (10) and check if the seal is worn or damaged (11).‣ EXHAUST VALVEUnscrew the cylinder (7) and pull it downwards.Unscrew the exhaust seat (16) by holding on the valve support (19).Check if the valve seal (18) is not worn or damaged.KREMLIN REXSONN° : 578.046.110-UK-1004
‣ CARTRIDGEUnscrew the cylinder (7) and pull it downwards.Disassemble the piston rod (<strong>20</strong>) from the air motor by means of the axis.Remove the circlips (3) placed into the flange cup (1) and pull the cartridge (4) downwards toremove it.When reassemblying :- Insert the piston rod (<strong>20</strong>) from top to bottom into the new cartridge (4) to avoid damaging theinside seal.- Place the whole into the pump flange (1). The cartridge is equipped with a seal (5).- Fix the cartridge by means of the circlips (3).- Reinstall the other parts and check if the seals are installed.Before reassemblying the different components :- Clean the parts with the appropriate cleaning solvent.- Install new seals if it is necessary after having lubricated them with PTFE grease.- Install new parts if it is necesssary.KREMLIN REXSONN° : 578.046.110-UK-1004