CALIBRE-KALIBER-CALIBRE 1665 - Cousins UK
CALIBRE-KALIBER-CALIBRE 1665 - Cousins UK
CALIBRE-KALIBER-CALIBRE 1665 - Cousins UK

Create successful ePaper yourself
Turn your PDF publications into a flip-book with our unique Google optimized e-Paper software.
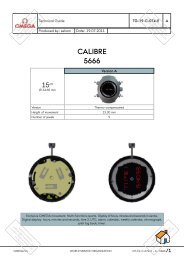
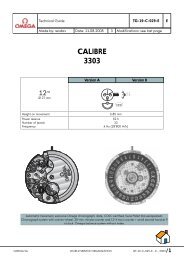
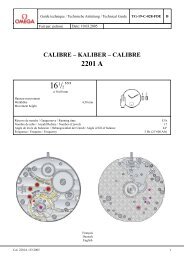
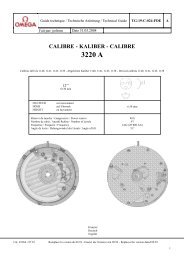
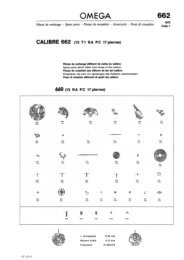
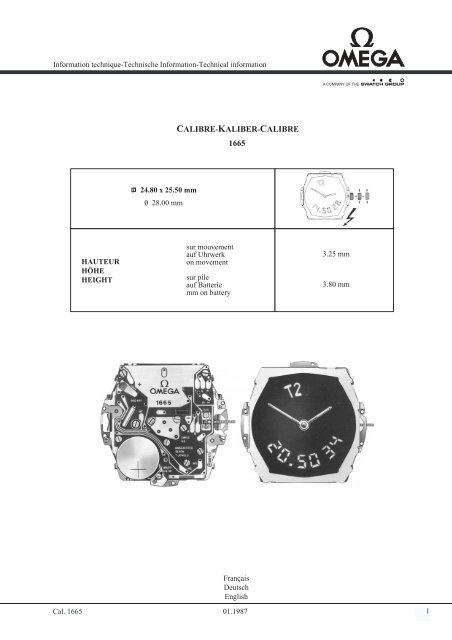
Information technique-Technische Information-Technical information<strong>CALIBRE</strong>-<strong>KALIBER</strong>-<strong>CALIBRE</strong><strong>1665</strong>/ 24.80 x 25.50 mm0 / 28.00 mmHAUTEURHÖHEHEIGHTsur mouvementauf Uhrwerkon movementsur pileauf Batteriemm on battery3.25 mm3.80 mmFrançaisDeutschEnglishCal. <strong>1665</strong> 01.19871
IDENTIFICATIONThe following components are different on the new calibre <strong>1665</strong>B:• Main plate• Electronic module• Time display• Rotor• Screw for contact stripSPARE PARTSCalibre <strong>1665</strong>AOld version722 <strong>1665</strong> 100 Main plate722 <strong>1665</strong> 4000Electronic module722 <strong>1665</strong> 9447 Time display722 <strong>1665</strong> 4211 Rotor722 0000 3141 Screw for contact strip600 <strong>1665</strong> H0B600 <strong>1665</strong> H0NComplete movement600 <strong>1665</strong> H0TBNote !- The above-mentioned parts, as well as complete movements, are available whilestocks last- All other parts remain available and can be used for both versionsWORLD SERVICE ORGANIZATION <strong>CALIBRE</strong>S NO 24 - PAGE 2/2
600 <strong>1665</strong>B 0B600 <strong>1665</strong>B 0N600 <strong>1665</strong>B 0TBCalibre <strong>1665</strong>BNew versionComplete movement722 <strong>1665</strong>B 3527 Screw for contact stripNote!- The new version is only available as a complete movement replacement- There is only limited availability of individual parts. See table for calibre<strong>1665</strong>A, old version under notesSTANDARD REPLACEMENTOMEGA will replace calibre <strong>1665</strong>A with the new version <strong>1665</strong>B at a special price.The movements to be replaced must be sent to Omega SA, Spare Parts International, 2500 Bienne 4,Switzerland.WORLD SERVICE ORGANIZATION <strong>CALIBRE</strong>S NO 24 - PAGE 3/2
SEAMASTER NO. 01 CS03-19-C-001-E AMade by: pelrom Date: 15.04.04Seamaster Multifunction / Calibre <strong>1665</strong>Ref. DB/DR 386.0822PROBLEMS1. Intermittent display on the LCD2. The alarm does not work3. Water-resistanceSOLUTIONS1. Intermittent display on the LCD• Ensure that the module cover <strong>1665</strong>/9628 is correctly fitted or replace it with the new display modulecover <strong>1665</strong>/9628 modified as follows:• Material: spring steel.• Shape of the spring part at 9 o’clock, modified• Attachment hooks have been adjusted.• Ensure that the connector <strong>1665</strong>/4820 is in the correct position.• Replace the display.2. The alarm does not work• Check the holding of the alarm coil.• Check the contact between the circuit and the buzzer.• Check the position of the back.• Check the buzzer.3. Water-resistance• Gasket 088 NS 0330.• Thicker case back.• Tube 090-4206 (Ensure tube 090 ST 4206 is held in place using Loctite 290 glue).• Crown 069 ST 42127 M.WORLD SERVICE ORGANIZATION SEAMASTER NO. 01 - PAGE 1/1
SEAMASTER NO. 02 CS03-19-C-002-E AMade by: pelrom Date: 15.04.04Seamaster Multifunction / Calibre <strong>1665</strong>Ref. DB/DR 386.0822CautionGLUEING THE BUZZER <strong>1665</strong>/4451• The surfaces to be glued must be perfectly clean.Glue application• Apply a uniform film of Asulab E 2830 (ref. 504 300 0002) over the entire surface of the buzzer.Glueing• Place the buzzer in its recess.• Exert pressure with a slight rotating movement until the surfaces adhere.• Leave to dry for 24 hours.WORLD SERVICE ORGANIZATION SEAMASTER NO. 2 - PAGE 1/1
Cal. <strong>1665</strong> 01.19872
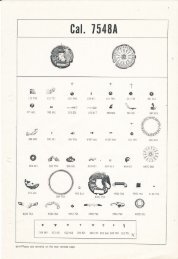
Montage du mouvement de base.(Liste des fournitures par ordre d'assemblage).Zusammenstellen des Basiswerkes.(Bestandteilliste in Montagereihenfolge).Assembling of the basic movement.(Part listed in order of assembly).100407405443/114453143 (1 x)3142 (1 x)Huile fineDünnflüssiges Öl Moebius 9030Fine oilHuile épaisse à viscositéélevée ou graisseDickflüssiges drukfestesÖL oder FettThick, pressure-resistantoil or greaseD5Cal. <strong>1665</strong> 01.19873
Montage du mouvement de base.(Liste des fournitures par ordre d'assemblage).Zusammenstellen des Basiswerkes.(Bestandteilliste in Montagereihenfolge).Assembling of the basic movement.(Part listed in order of assembly).4793143 (1x)44053141 (1x)402 142112502602012031103140 (2x)Huile fineDünnflüssiges Öl Moebius 9030Fine oilHuile épaisse à viscositéélevée ou graisseDickflüssiges drukfestesÖL oder FettThick, pressure-resistantoil or greaseD5Cal. <strong>1665</strong> 01.19874
Montage du module électronique.(Liste des fournitures par ordre d'assemblage).Zusammenstellen der Elektronik-Baugruppe.(Bestandteilliste in Montagereihenfolge).Assembling of the electronic module.(Part listed in order of assembly).406040003140 (4x)3140 (3x)Cal. <strong>1665</strong> 01.19875
Montage du module d'affichage.(Liste des fournitures par ordre d'assemblage).Zusammenstellen der ZeitanzeigeBaugruppe.(Bestandieilliste in Montagereihenfolge).Assembling of the display module.(Part listed in order of assembly).4411404644013141 (1x)48204885944796289945Cal. <strong>1665</strong> 01.19876
Pose des aiguillesRECOMMANDATIONS POUR LA POSE DES AIGUILLESL'emploi d'un porte-pièce est indispensable, pourprotéger les brides de contact et soutenir le pivotinférieur du pignon de centre. Le porte-pièce No4080.36.814 est recommandé.La pose des aiguilles doit être faiteobligatoirement sur des mouvements en marcheavec pile.6. Pendant que les chiffres clignotent : presser àfond sur la couronne.Les chiffres indiquant les secondes sont remis àzéro.1 . Poser le cadran (2 fixateurs).2. Poser la pile, la couronne étant en positionneutre. La cellule d'affichage passe en mode "Allon ". (Tous les segments de l'affichage sontvisibles).7. Durant les 30 secondes qui suivent, c'est-àdireavant le prochain saut du moteur, poserl'aiguille des minutes bien centrée sur le repère de12 heures.8. Synchroniser les deux affichages analogique(aiguilles) et numérique.A cet effet :- Sélectionner l'affichage neutre du cadran (voirmode d'emploi), sans aucune indicationnumérique, en tourant la couronne.3. Tourner légèrement la couronne.La cellule d'affichage passe en mode "Heurelocale" (voir mode d'emploi) tous chiffres mis àzéro.- Tirer la couronne,- Tourner la couronne, en avant ou en arrièrejusqu'à ce que les aiguilles indiquent exactementla même heure que celle affichée par le cadran.- Repousser la couronne.9. Effectuer la mise à l'heureA cet effet :La montre commence à fonctionner.4. Poser l'aiguille des heures, bien centrée sur lerepère situé à 12 heures, le centrage peut êtreéventuellement corrigé en tournant la couronneen position tirée.5. Tirer et repousser la couronne.Les chiffres indiquant les secondes se mettent àclignoter.- Revenir à l'affichage de l'heure locale entournant la couronne (voir mode d'emploi).- Tirer la couronne (les chiffres indiquant lesheures et les minutes se mettent à clignoter).- Mettre la montre à l'heure en tournant lacouronne en avant ou en arrière (une rotationrapide permet de faire avancer les aiguilles d'uneheure entière).- Repousser la couronne.Cal. <strong>1665</strong> 01.19877NB :Dans les cas où l'on souhaiterait poser les pilesd'avance on peut, sans autre, interrompre leprocessus aussi longtemps que nécessaire, entreles opérations 3 et 4. Les aiguilles seront toujoursposées sur 12 heures, le décalage entre les deuxaffichages étant rattrapé lors de l'opération 8 desynchronisation.Dépose des aiguillesEnlever les aiguilles uniquement avec un outilBergeon Réf. 30.671.7.
ZeigersetzenDie Verwendung eines Werkträgers ist notwendigum die Kontaktbügel zu schützen und den Zapfendes Zentrumrades zu stützen. Empfohlen wird derWerkträger Nr. 4080.36.814.Das Setzen der Zeiger muss bei laufendem Werkmit Batterie durchgeführt werden.1. Zifferblatt setzen (2 Halter).EMPFEHLUNGEN ZUM ZEIGERSETZEN6. Während die Anzeige blinkt : die Krone biszum Anschlag drücken.Die Sekundenanzeige wird auf null gestellt.2. Batterie setzen bei Krone in Neutralstellung.Die numerische Anzeige zeigt "All on" (alleSegmente der Anzeige sind in Funktion).7. Während der 30 folgenden Sekunden, dasheisst vor dem nächsten Schritt des Motors, denMinutenzeiger genau auf die 12-Uhr-Markierungsetzen.8. Synchronisieren der beiden Anzeigen analog(Zeiger) und numerisch :- Neutrale Anzeige des Zifferblatts (siehe :Gebrauchanweisung) wählen (ohne numerischeAnzeige) durch Drehen der Krone.3. Krone ein wenig drehen. Die Anzeigewechselt auf "Ortszeit- (siehe:Gebrauchanweisung), alle Ziffern sind auf null.- Krone ziehen.- Krone vor- oder Rückwärts drehen bis dieZeiger die gleiche Zeit anzeigen wie dienumerische Anzeige.- Krone drücken.9. Einstellen der Uhrzeit- Durch Drehen der Krone wieder auf "Ortszeit"(siehe : Gebrauchanweisung) einstellen.Die Uhr beginnt zu laufen.4. Den Stundenzeiger genau auf die 12-Uhr-Markierung ausrichten und setzen (dieGenauigkeit kann im Bedarfsfall durch Drehender Krone in gezogener Stellung korrigiertwerden).5. Krone ziehen und zurückdrücken. DieAnzeige zeigt die Sekunden an und beginnt zublinken.- Krone ziehen (die Stunden- und Minutenanzeigeblinkt).- Uhrzeit einstellen durch vor- oderRückwärtsdrehen der Krone (durch eine schnelleDrehung der Krone lässt sich die Zeit um jeweilseine volle Stunde verstellen).- Krone drücken.Anmerkung :Falls die Batterien vorher gesetzt werden, kannzwischen den Arbeitsvorgängen 3 und 4 beliebiglange unterbrochen werden. Die Zeiger werdenauch dann auf 12 Uhr gesetzt. Die Zeitdifferenzzwischen den beiden Anzeigen wird dann durchdie Synchronisierung (Arbeitsvorgang 8)ausgeglichen.ZeigerentfernenNur mit einem Bergeon-Werkzeug Ref. 30.671-7.Cal. <strong>1665</strong> 01.19878
Fitting the handsThe use of a movement holder is indispensablefor protecting the contact spring and forsupporting the lower pivot of the center wheel.The movement holder No 4080.36.814 isrecommended.RECOMMENDATIONS FOR FITTING THE HANDSThe hands must be fitted on a running movementi.e. with the battery in place.6. While the numerals flash : Press the crownin. The seconds are brought back to zero.1 . Fit the dial (2 fasteners).2. Fit the battery with the crown in neutralposition.The numerical display passes automatically to the"ALL ON" mode.7. Fit within the next 30 seconds i.e. before thenext jump of the motor, the minute hand preciselyat the 12 o'clock mark.8. Synchronising the analog and the numericaldisplay.Proceed as follows :- Select the neutral numerical display of the dial(see : Instructions for use), without anyindication, by turning the crown.3. Turn the crown slightly.The display passe to the "Local time- mode (seeInstructions for use). All the numerals indicatezero.- Pull the crown out.- Turn the crown forwards or backwards till thehands indicate precisely the same lime as shownby the numerical display.- Push the crown back in.9. Setting the limeProceed as followsThe watch starts functioning.4. Fit the hour hand by centering it precisely etthe 12 o'clock mark. (Slight displacement of thehand can be, if needed, corrected by turning thecrown in the pulled out position.5. Pull the crown out and then push it back in.The numerical display indicates flashing seconds.- Bring back the numerical display to the "Locallime" (see : Instructions for use), by turning thecrown.- Pull the crown out (the numerals indicating thehours and the minutes start flashing).- Set the watch to lime by turning the crownbackwards or forwards (a rapid rotation causesthe hands to move one full hour).- Push the crown back in.NAB :In case the batteries are fitted in advance, then theprocess between the point 3 and the point 4 canbe interrupted without any problem - even for along lime, if so desired. The hands will still befitted at 12 o'clock and the lime lapse between thetwo displays will be overcome with thesynchronisation operation as described in point 8.Removal of handsOnly with Bergeon tool ref. 30.671-7.Cal. <strong>1665</strong> 01.19879
Contrôles électriques - Elektrische Kontrollen - Electrical tests* Les mesures sur positions 2 et 3 doivent être faites uniquement avec mouvement en marche(affichage numérique visible); au besoin, tourner la couronne.Messungen mit Messpunkten 2 und 3 dürfen nur bei laufendem Werk gemacht werden (nummerischeAnzeige sichtbar); wenn nötig die Krone drehen.When using positions 2 and 3 for measurements, marke sure that the movement is running (numericaldisplay visible); if necessary, turn the crown.Cal. <strong>1665</strong> 01.198710
Cal. <strong>1665</strong> 01.198711