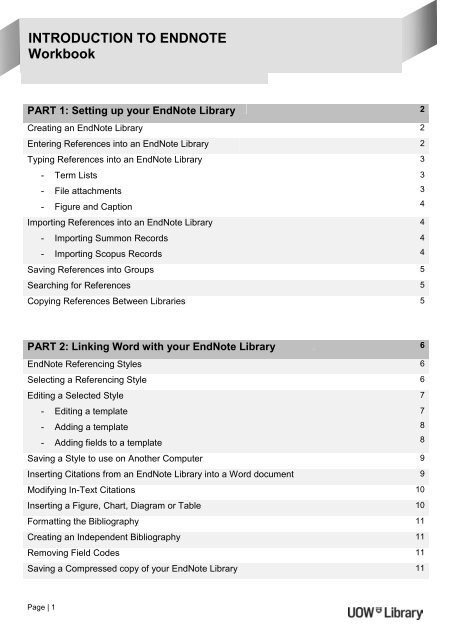
Introduction to EndNote Workbook - Library
Introduction to EndNote Workbook - Library
Introduction to EndNote Workbook - Library

You also want an ePaper? Increase the reach of your titles
YUMPU automatically turns print PDFs into web optimized ePapers that Google loves.
INTRODUCTION TO ENDNOTE<strong>Workbook</strong>Overview<strong>EndNote</strong> is software that allows you <strong>to</strong> s<strong>to</strong>re, organise and manage your references in a database calledan <strong>EndNote</strong> library. These references can be linked <strong>to</strong> your word documents <strong>to</strong> instantly create in-textcitations and bibliographies in the referencing style that you require.Software<strong>EndNote</strong> software can be downloaded from the <strong>Library</strong>’s <strong>EndNote</strong> guide: <strong>Library</strong> homepage / Guides /Endnote / SoftwarePart 1: Setting up your <strong>EndNote</strong> <strong>Library</strong>An <strong>EndNote</strong> library is a collection of references. All elements of a reference i.e. author, title,publisher, journal details etc. As well as the PDF, notes, abstracts and tables can be saved <strong>to</strong>gether.Creating an <strong>EndNote</strong> <strong>Library</strong>Save all your references in ONE library.1. Open the <strong>EndNote</strong> program2. Select Create a new library3. Name and save your libraryNote:<strong>EndNote</strong> will au<strong>to</strong>matically create a .DATA folder for your new library. Do not delete this folder, <strong>EndNote</strong>uses the .DATA folder <strong>to</strong> s<strong>to</strong>re term lists and any attachments (pdfs, images etc.) saved in your library.Entering References in<strong>to</strong> an <strong>EndNote</strong> <strong>Library</strong>References can be added manually or imported from databases.Punctuation• Do not include any punctuation or formatting eg. brackets ( ), or quotation marks “”• Text should remain as ‘plain text’ unless a special font is required for a term or character eg.species names may need <strong>to</strong> be italicisedAuthors• Enter one author per line, separate initials with a fulls<strong>to</strong>p and a space eg. Smith, M. T.• Include a comma after the surname. The comma is important as it identifies the surname• For corporate authors include the comma after the last word eg. World Health Organisation,• Do not use hyphens in first names eg. Mak, Wai Ming not Mak, Wai-Ming• Hyphens can be used in surnames / family names eg. Toh-Sung, Li• Authors such as de Young, eg. enter as de Young, J. R.Other fields• Use the keywords field <strong>to</strong> describe the content of the reference. Enter one keyword per line.• Use the URL field <strong>to</strong> add a live URL link.• The Notes, Research Notes, and Abstract fields can s<strong>to</strong>re many pages of text• Use the File Attachments field <strong>to</strong> s<strong>to</strong>re PDF files and other file typesPage | 2
INTRODUCTION TO ENDNOTE<strong>Workbook</strong>Typing References in<strong>to</strong> an <strong>EndNote</strong> <strong>Library</strong><strong>EndNote</strong> contains inbuilt reference types including book, conference proceedings and journalarticles. Additional reference types can be created1. From the References menu, select New Reference2. Use the drop down menu <strong>to</strong> change the reference type <strong>to</strong> match your reference eg. journal article3. Type information in<strong>to</strong> the appropriate fieldsTerm ListsTerm lists help maintain consistency and accuracy. Terms lists are au<strong>to</strong>matically created for theAuthor, Journal title and Keywords fields. Additional term lists can be created.To insert a term from a term list1. In the reference window, select the field you wish <strong>to</strong> enter the term in<strong>to</strong> eg. Keywords2. From the Tools menu, select Open Term Lists / Keywords Term List. Keywords previously used willbe listed3. Double click on a term <strong>to</strong> copy it in<strong>to</strong> the field you have chosen in the reference windowAbbreviated journal titlesSome referencing styles require abbreviated journal titles. Enter the full name of the journal in thereference and then add the journal title abbreviation <strong>to</strong> the Journals Term List. When creating yourbibliography you can choose <strong>to</strong> display either the full or abbreviated journal title.1. From the Tools menu select Open Term Lists / Journal Term List2. Click on a journal title, click on Edit Term3. Type in the journal title abbreviation in the Abbreviation entry box4. Click on Close <strong>to</strong> close the Term Lists boxImporting a journal title list<strong>EndNote</strong> contains lists of journal names and abbreviations a range of disciplines. These lists canbe imported in<strong>to</strong> your <strong>Library</strong>’s Journal Term List.In <strong>EndNote</strong>1. From the Tools menu, select Open Term Lists / Journals Term List2. Click on the Lists tab / Import List3. Locate the Term List folder e.g. (C / Program Files / <strong>EndNote</strong> / Term Lists)4. Select the required list, click Open5. Click OK, close the Term List box, then click Open6. View the journal list from the Tools menu, select Open Term Lists / Journals ListFile AttachmentsUse the File Attachments field <strong>to</strong> s<strong>to</strong>re PDF files and other file types.Attach a file1. Open the reference2. Click in the File Attachments field3. Right click and select File Attachments4. Browse for the fileNote: A copy of the original file is saved in the DATA folder.Page | 3
INTRODUCTION TO ENDNOTE<strong>Workbook</strong>Figure and CaptionThe Figure field in any reference type can contain one graphic file. Use the Figure ReferenceType <strong>to</strong> s<strong>to</strong>re a graphic. A related Caption field appears directly under the Figure field in areference for a short description of the image or file.Attach a figure1. Open the reference2. Click in the Figure field3. Right click and select Figure4. Browse for the fileNote: A copy of the original file is saved in the .DATA folder.Importing References in<strong>to</strong> an <strong>EndNote</strong> <strong>Library</strong>Database records can be imported directly in<strong>to</strong> your <strong>EndNote</strong> <strong>Library</strong>.Instructions for individualdatabases are available from the <strong>EndNote</strong> guide: http://uow.libguides.com/endnoteSee: Importing references in<strong>to</strong> <strong>EndNote</strong>Importing Summon records1. Search Summon, then mark records <strong>to</strong> be saved – <strong>to</strong>p right of each record2. Select Saved Items – bot<strong>to</strong>m right of the screen3. Select <strong>EndNote</strong> and OpenImporting ScopusRecords1. Search Scopus, then markrecords <strong>to</strong> be saved2. Click on Export3. Select RIS format4. Choose preferred Outputeg. Abstract format5. Click on Export and OpenNote: Imported References is a temporary group within your <strong>EndNote</strong> <strong>Library</strong>. It is replaced each time anew set of references are imported and is deleted when the library is closed.Page | 4
INTRODUCTION TO ENDNOTE<strong>Workbook</strong>Saving References in<strong>to</strong> GroupsGroups enable you <strong>to</strong> organise your <strong>Library</strong> in<strong>to</strong> smaller groups for easier viewing. A group is asubset of references that exist in your main library.Deleting a reference from the subgroup does not delete it from your main library. However,deleting a reference from All References will delete it from all groups in your library.To create a new group and add References1. Right click on My Groups2. Select Create Group3. Name your group4. Select references <strong>to</strong> be copied in<strong>to</strong> the Group5. From the Groups menu, select Add References <strong>to</strong>Smart GroupsSmart groups use search criteria <strong>to</strong> au<strong>to</strong>matically update groups as existing references are editedor new references are added. Create smart groups from the Group menu.To create a Smart group1. Right click on My Groups2. Select Create Smart Group3. Name your group. Add search criteria, click CreateSearching for References1. From the Tools menu, select Search <strong>Library</strong>2. Select specific fields <strong>to</strong> search such as author, keyword or journal title3. Enter search terms. Additional search boxes can be added using the Add but<strong>to</strong>nNote:<strong>EndNote</strong> truncates au<strong>to</strong>matically eg. evaluat will retrieve references with evaluate, evaluation,evaluatingCopying References between Libraries1. Select the references <strong>to</strong> be copied2. From the Edit menu, select Copy3. Open the library <strong>to</strong> which you want <strong>to</strong> add the references. From the Edit menu, select PastePage | 5
INTRODUCTION TO ENDNOTE<strong>Workbook</strong>Part 2: Linking Word with your <strong>EndNote</strong> <strong>Library</strong>Cite While You Write links Microsoft Word and <strong>EndNote</strong> references <strong>to</strong> instantly create in-textcitations and bibliographies in the referencing style that you require.<strong>EndNote</strong> Referencing StylesThe <strong>EndNote</strong> output style controls the way bibliographic data such as an author's name, journal orbook title is displayed in your bibliography. <strong>EndNote</strong> includes many commonly used referencingstyles (Output Styles) such as Author-Date, APA and MLA as well as styles for specific journals.Additional styles can be downloaded from the <strong>EndNote</strong> website.Note: Author-Date is the closest <strong>to</strong> the Harvard style used at UOW.Selecting a Referencing Style: Example Author-Date1. From the Edit menu, selectOutput Styles/ Author Date2. Additional styles are listed in theStyle Manager3. From the Edit Menu, selectOutput Styles / Open StyleManager4. To select an Output Style click inthe box <strong>to</strong> the left of the stylename5. Close the dialog box6. The selected style is added <strong>to</strong>your Output Styles listThese are the default stylesThe selected Output Style (BMJ) isadded <strong>to</strong> the listPreviewing a selected style1. Single click on a reference in your <strong>EndNote</strong> library2. Click on the Preview tab in the far right panel <strong>to</strong> display the reference in the selected Output style.Page | 6
INTRODUCTION TO ENDNOTE<strong>Workbook</strong>Editing a Selected StyleTo change how references will appear in your document (ie. in-text citations and bibliography),modifications <strong>to</strong> the Output Style must be made within <strong>EndNote</strong>.1. Select the style you want <strong>to</strong> edit in the styles window2. From the Edit menu, select Output Styles / Edit Author-Date3. Editing options are listed on the left-hand sideEditing a templateEdit the bibliography template <strong>to</strong> modify how references will appear in your bibliography.1. Click Templates under the Bibliography heading2. Each reference type has a separate template3. Highlight the part of the template <strong>to</strong> bechanged ie. Journal4. From the Edit menu, selectStyle / Italics and deselectUnderline5. To save changes close theTemplates Window box.Click Yes, name your styleand save6. To view changes select yoursaved style from the stylemanagerAdditional Reference TypesDefault reference typesPage | 7
INTRODUCTION TO ENDNOTE<strong>Workbook</strong>Output style bibliography templatebibliographyDocumentThe style of the reference in thewill match the style in the template.In this example the Journal is underlined inthe template and is therefore underlined inthe documentAdding a template1. Select Newspaper Article from the Reference Types drop down menu2. A new blank template for that reference type is added at the bot<strong>to</strong>m of the default list3. Highlight and copy the contents of the Generic template4. Paste in<strong>to</strong> the blank template. Fields associated with the new template will au<strong>to</strong>matically be assigned5. To save changes close the Templates Window box. Click Save when promptedAdding fields <strong>to</strong> a template1. Place the cursor in the template where the new field is <strong>to</strong> be displayed2. Click on the Insert Field but<strong>to</strong>n and select the appropriate field eg. URL3. To save changes close the Templates Window box. Click Yes and then Save when promptedTable 1: <strong>EndNote</strong> Special Formatting CharactersSymbol Name Purpose How <strong>to</strong> create• Space Makes a space in the citation Press space bar| Forcedseparation◊^LinkAdjacentTextSingular/Plural termSepara<strong>to</strong>rDivides the citation in<strong>to</strong> sections that are not dependan<strong>to</strong>n other parts of the citation (e.g. issue number andpage numbers). These sections may or may notcontain any information.Links parts of the citation <strong>to</strong>gether <strong>to</strong> act as a singleunit and au<strong>to</strong>matically creates a spaceA common example is <strong>to</strong> link punctuation with text e.g.|:◊Pages |If page numbers are not provided in the reference ofthe <strong>EndNote</strong> library, associated punctuation will notProvides either singular or plural labels for edi<strong>to</strong>r/s orpage number/se.g. |:◊p. ^pp. ◊Pages|. will show as: p. 23.OR: pp. 23-27. in the citation.Click on Insert Field.SelectForced Separation.Click on Insert Field.Select Link AdjacentText.Click on Insert Field.SelectSingular/Plural.`AccentgraveSometimes you may need <strong>to</strong> use text in a template thatis also a field name, for example URL. To force<strong>EndNote</strong> <strong>to</strong> interpret a word as text enclose it with theaccent grave character, eg. `URL`This character isfound in the upperleft corner of mostkeyboards on thesame key as the tilde(~).Page | 8
INTRODUCTION TO ENDNOTE<strong>Workbook</strong>Saving a Style <strong>to</strong> use on another ComputerIf you do not have a dedicated computer or use a computer that has security settings that won’t allow you<strong>to</strong> modify the style template you will need <strong>to</strong> save your style template <strong>to</strong> USB, then redirect <strong>EndNote</strong> <strong>to</strong>read from it.Saving a style1. Edit the output style as required. Name and save the style when promptedA copy of your modified output style will be saved <strong>to</strong> My Documents2. Open My Documents and locate the style file. The file will have an .ENS extension3. Paste the file in<strong>to</strong> a folder titled Styles on your USBAccessing a styleIn <strong>EndNote</strong>1. Select Preferences from the Edit menu2. Click on Folder Locations3. Click on Select Folder, select the e: USB drive4. Double click on Styles folder5. Click on Select Folder6. Click on Apply, then OKInserting Citations from an <strong>EndNote</strong> <strong>Library</strong> in<strong>to</strong> a Word DocumentAn example of a Word document with in-text citations and a bibliographyWilliams (1988) claims another problematic area of student learning is the development of professional values andunderstanding of clients’ and colleagues’ needs. A study in the context of veterinary science (Heath 1990, p.34)found that both teachers and students regard these aspects of professional competence highly, but students andnovice veterinarians complain that they feel inadequate in their dealings with clients and superiors (Barnett 1983;Watkins 1983).BibliographyBarnett, S. A. (1983). "The theory of biology. A case study." Studies in Higher Education 8: 23-32. Heath, T. (1990).Education. Bos<strong>to</strong>n, McGraw-Hill Higher EducationWatkins, D. A. (1983). "Depth of processing and the quality of learning outcomes." Instructional Science 12: 49-58.Williams, B. (1988). Review of the Discipline of Engineering. Canberra, Australian Government PublishingService.To cite references and create the bibliography1. Open the <strong>EndNote</strong> library2. Open your Word document, place the cursor in the text where the citation is <strong>to</strong> appear3. Select the <strong>EndNote</strong> tab and click on Insert Citation / Insert4. In the Find box enter the author’s name (eg. Smith), click Find5. Click Insert and the selected citation will appear in your document, and the full reference added <strong>to</strong> thebibliography at the end of the document6. The in-text citation and bibliography will au<strong>to</strong>matically format in the selected output stylePage | 9
INTRODUCTION TO ENDNOTE<strong>Workbook</strong>Modifying In-Text CitationsModify in-text citations <strong>to</strong> include page numbers, see also references or exclude an author’s name1. Click on the citation, <strong>to</strong> highlight it2. From the <strong>EndNote</strong> <strong>to</strong>olbar select Edit & Manage Citation(s)3. Select from available options, then click OKInsert See also inthe Prefix fieldInsert page numbersin the Suffix fieldNote: The Pages field is used for footnoting stylesExclude the authorusing the drop-down<strong>to</strong>ols menuInserting a Figure, Chart, Diagram or TableA graphic or file from the Image field of an <strong>EndNote</strong> reference can be inserted in<strong>to</strong> a document.1. Open your Word document, place the cursor in the text where the image is <strong>to</strong> appear2. Select the <strong>EndNote</strong> tab, click Insert Citation / Figure3. Locate the appropriate citation4. Click Insert and the selected image will appear in your document5. The figure number will appear within the textPage | 10
INTRODUCTION TO ENDNOTE<strong>Workbook</strong>Formatting the BibliographyThe bibliography may be modified. Modifications include text font and size, bibliography title, line spacingand indents.1. Open your Word document2. Select the <strong>EndNote</strong> tab, click on Bibliography arrow3. Click the Layout tabGive the bibliography a headingInclude spaces between referencesRemove hanging indents(Change <strong>to</strong> 0.000 cm)Creating an Independent BibliographyIn <strong>EndNote</strong>1. Highlight the required references2. Click on Edit / Copy Formatted3. Open a Word document and PasteRemoving Field CodesRemove <strong>EndNote</strong> field codes from a Word document <strong>to</strong> enable the document <strong>to</strong> be opened on acomputer that does not have the <strong>EndNote</strong> program. Some publishers require the removal of field codesprior <strong>to</strong> article submission.In Word1. Select the <strong>EndNote</strong> tab, click on Convert Citations and Bibliography / Convert <strong>to</strong> Plain Text2. At the prompt, click OK3. A new document will be created without <strong>EndNote</strong> coding, leaving the original with <strong>EndNote</strong> codingSaving a Compressed copy of your <strong>EndNote</strong> <strong>Library</strong>You can save your complete library <strong>to</strong> a single compressed file <strong>to</strong> easily back up your library, send acopy <strong>to</strong> a colleague or <strong>to</strong> move between different computersIn <strong>EndNote</strong>1. Click on File / Compressed <strong>Library</strong>(.enlx)…2. Select required option3. Choose a location <strong>to</strong> save the Compressed <strong>Library</strong>4. Save compressed <strong>Library</strong>Note: The compressed file contains both the .ENL library and the .DATA folder and its contents.Page | 11