Extra Information And Advice Booklet. Read Me Before ... - Npower
Extra Information And Advice Booklet. Read Me Before ... - Npower
Extra Information And Advice Booklet. Read Me Before ... - Npower
- No tags were found...

You also want an ePaper? Increase the reach of your titles
YUMPU automatically turns print PDFs into web optimized ePapers that Google loves.
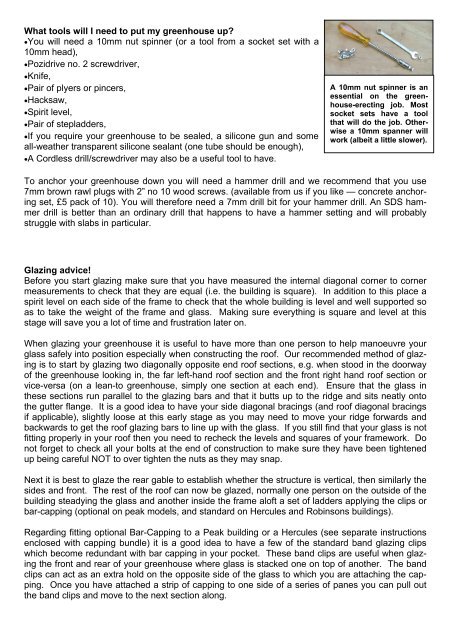
What tools will I need to put my greenhouse up?•You will need a 10mm nut spinner (or a tool from a socket set with a10mm head),•Pozidrive no. 2 screwdriver,•Knife,•Pair of plyers or pincers,•Hacksaw,•Spirit level,•Pair of stepladders,•If you require your greenhouse to be sealed, a silicone gun and someall-weather transparent silicone sealant (one tube should be enough),•A Cordless drill/screwdriver may also be a useful tool to have.A 10mm nut spinner is anessential on the greenhouse-erectingjob. Mostsocket sets have a toolthat will do the job. Otherwisea 10mm spanner willwork (albeit a little slower).To anchor your greenhouse down you will need a hammer drill and we recommend that you use7mm brown rawl plugs with 2” no 10 wood screws. (available from us if you like — concrete anchoringset, £5 pack of 10). You will therefore need a 7mm drill bit for your hammer drill. An SDS hammerdrill is better than an ordinary drill that happens to have a hammer setting and will probablystruggle with slabs in particular.Glazing advice!<strong>Before</strong> you start glazing make sure that you have measured the internal diagonal corner to cornermeasurements to check that they are equal (i.e. the building is square). In addition to this place aspirit level on each side of the frame to check that the whole building is level and well supported soas to take the weight of the frame and glass. Making sure everything is square and level at thisstage will save you a lot of time and frustration later on.When glazing your greenhouse it is useful to have more than one person to help manoeuvre yourglass safely into position especially when constructing the roof. Our recommended method of glazingis to start by glazing two diagonally opposite end roof sections, e.g. when stood in the doorwayof the greenhouse looking in, the far left-hand roof section and the front right hand roof section orvice-versa (on a lean-to greenhouse, simply one section at each end). Ensure that the glass inthese sections run parallel to the glazing bars and that it butts up to the ridge and sits neatly ontothe gutter flange. It is a good idea to have your side diagonal bracings (and roof diagonal bracingsif applicable), slightly loose at this early stage as you may need to move your ridge forwards andbackwards to get the roof glazing bars to line up with the glass. If you still find that your glass is notfitting properly in your roof then you need to recheck the levels and squares of your framework. Donot forget to check all your bolts at the end of construction to make sure they have been tightenedup being careful NOT to over tighten the nuts as they may snap.Next it is best to glaze the rear gable to establish whether the structure is vertical, then similarly thesides and front. The rest of the roof can now be glazed, normally one person on the outside of thebuilding steadying the glass and another inside the frame aloft a set of ladders applying the clips orbar-capping (optional on peak models, and standard on Hercules and Robinsons buildings).Regarding fitting optional Bar-Capping to a Peak building or a Hercules (see separate instructionsenclosed with capping bundle) it is a good idea to have a few of the standard band glazing clipswhich become redundant with bar capping in your pocket. These band clips are useful when glazingthe front and rear of your greenhouse where glass is stacked one on top of another. The bandclips can act as an extra hold on the opposite side of the glass to which you are attaching the capping.Once you have attached a strip of capping to one side of a series of panes you can pull outthe band clips and move to the next section along.