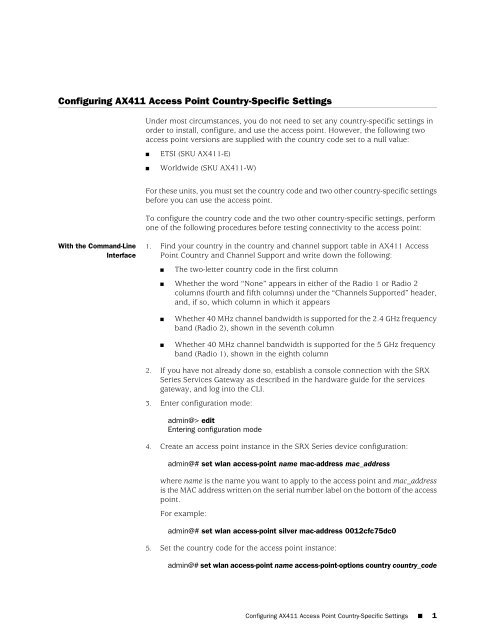
Configuring AX411 Access Point Country-Specific Settings
Configuring AX411 Access Point Country-Specific Settings
Configuring AX411 Access Point Country-Specific Settings

You also want an ePaper? Increase the reach of your titles
YUMPU automatically turns print PDFs into web optimized ePapers that Google loves.
<strong>Configuring</strong> <strong>AX411</strong> <strong>Access</strong> <strong>Point</strong> <strong>Country</strong>-<strong>Specific</strong> <strong>Settings</strong>Under most circumstances, you do not need to set any country-specific settings inorder to install, configure, and use the access point. However, the following twoaccess point versions are supplied with the country code set to a null value:■■ETSI (SKU <strong>AX411</strong>-E)Worldwide (SKU <strong>AX411</strong>-W)For these units, you must set the country code and two other country-specific settingsbefore you can use the access point.To configure the country code and the two other country-specific settings, performone of the following procedures before testing connectivity to the access point:With the Command-LineInterface1. Find your country in the country and channel support table in <strong>AX411</strong> <strong>Access</strong><strong>Point</strong> <strong>Country</strong> and Channel Support and write down the following:■The two-letter country code in the first column■ Whether the word “None” appears in either of the Radio 1 or Radio 2columns (fourth and fifth columns) under the “Channels Supported” header,and, if so, which column in which it appears■■Whether 40 MHz channel bandwidth is supported for the 2.4 GHz frequencyband (Radio 2), shown in the seventh columnWhether 40 MHz channel bandwidth is supported for the 5 GHz frequencyband (Radio 1), shown in the eighth column2. If you have not already done so, establish a console connection with the SRXSeries Services Gateway as described in the hardware guide for the servicesgateway, and log into the CLI.3. Enter configuration mode:admin@> editEntering configuration mode4. Create an access point instance in the SRX Series device configuration:admin@# set wlan access-point name mac-address mac_addresswhere name is the name you want to apply to the access point and mac_addressis the MAC address written on the serial number label on the bottom of the accesspoint.For example:admin@# set wlan access-point silver mac-address 0012cfc75dc05. Set the country code for the access point instance:admin@# set wlan access-point name access-point-options country country_code<strong>Configuring</strong> <strong>AX411</strong> <strong>Access</strong> <strong>Point</strong> <strong>Country</strong>-<strong>Specific</strong> <strong>Settings</strong> ■ 1
where country_code is the two-letter country code for your location, entered inuppercase letters.For example:admin@# set wlan access-point silver access-point-options country GB6. If either 2.4 GHz or 5 GHz operation is not allowed in your country, as indicatedby the word “None” in either the fourth or fifth column of the table, use thefollowing CLI command to disable either the 2.4 GHz radio (Radio 2) or the 5GHz radio (Radio 1) as appropriate:admin@# set wlan access-point name radio 1|2 radio-options radio-off7. If 40 MHz channel bandwidth is not supported for the 2.4 GHz frequency bandin your country, as indicated by an “N” in the seventh column of the table, usethe following CLI command to set the 2.4 GHz channel bandwidth to 20 MHz.The default channel bandwidth is 40 MHz, so if the column contains “Y” youcan skip to the next step:admin@# set wlan access-point name radio 2 radio-options channel bandwidth208. If 40 MHz channel bandwidth is not supported for the 5 GHz frequency band inyour country, as indicated by an “N” in the eighth column of the table, use thefollowing CLI command to set the 5 GHz channel bandwidth to 20 MHz. Thedefault channel bandwidth is 40 MHz, so if the column contains “Y” you canskip to the next step:admin@# set wlan access-point name radio 1 radio-options channel bandwidth209. Commit your changes:admin@#> commitcommit completeWith the J-Web Interface 1. Find your country in the country and channel support table in <strong>AX411</strong> <strong>Access</strong><strong>Point</strong> <strong>Country</strong> and Channel Support and write down the following:■ Whether the word “None” appears in either of the Radio 1 or Radio 2columns (fourth and fifth columns) under the “Channels Supported” header,and, if so, which column it appears in■Whether 40 MHz channel bandwidth is supported for the 2.4 GHz frequencyband (Radio 2), shown in the seventh column■Whether 40 MHz channel bandwidth is supported for the 5 GHz frequencyband (Radio 1), shown in the eighth column2. If you have not already done so, start the J-Web interface by browsing to the IPaddress or hostname of the SRX Series device.3. In J-Web, choose Configure > Wireless LAN > <strong>Settings</strong> to open the Wlan <strong>Settings</strong>pane.2 ■ <strong>Configuring</strong> <strong>AX411</strong> <strong>Access</strong> <strong>Point</strong> <strong>Country</strong>-<strong>Specific</strong> <strong>Settings</strong>
4. On the Wlan <strong>Settings</strong> pane, click the Add button above the access point list.5. On the Add - <strong>Access</strong> <strong>Point</strong> dialog box:a. In the <strong>Access</strong> point name box, type a name for the access point.b. In the MAC address box, enter the MAC address printed on the serial numberlabel on the bottom of the access point.c. In the <strong>Country</strong> menu, choose the country in which the access point isoperating.6. At the bottom of the Add - <strong>Access</strong> <strong>Point</strong> dialog box, click OK.7. On the lower part of the Wlan <strong>Settings</strong> pane, click the Add button above the radiolist. The Add - Radio dialog box opens with the Radio tab at the front.8. On the Add - Radio dialog box Radio tab:a. From the Radio Type menu, choose Radio 1 (the 5 GHz radio).b. If 5 GHz operation is not allowed in your country, as indicated by the word“None” in the fifth column of the table, mark the Disabled radio button belowthe Radio Type menu.c. Click the Radio <strong>Settings</strong> tab to bring it to the front.d. If 40 MHz channel bandwidth is not supported for the 5 GHz frequency bandin your country, as indicated by an “N” in the eighth column of the table,click the Channel Bandwidth menu and choose 20 to set the 5 GHz channelbandwidth to 20 MHz. The default channel bandwidth is 40 MHz, so if thecolumn contains “Y” you can skip this step.9. At the bottom of the Add - Radio dialog box, click OK.10. On the lower part of the Wlan <strong>Settings</strong> pane, click the Add button above the radiolist. The Add - Radio dialog box opens with the Radio tab at the front.11. On the Add - Radio dialog box Radio tab:a. From the Radio Type menu, choose Radio 2 (the 2.4 GHz radio).b. If 2.4 GHz operation is not allowed in your country, as indicated by the word“None” in the fourth column of the table, mark the Disabled radio buttonbelow the Radio Type menu.c. Click the Radio <strong>Settings</strong> tab to bring it to the front.d. If 40 MHz channel bandwidth is not supported for the 2.4 GHz frequencyband in your country, as indicated by an “N” in the seventh column of thetable, click the Channel Bandwidth menu and choose 20 to set the 2.4 GHzchannel bandwidth to 20 MHz. The default channel bandwidth is 40 MHz,so if the column contains “Y” you can skip this step.12. At the bottom of the Add - Radio dialog box, click OK.13. At the top of the J-Web window, choose Commit Options > Commit.<strong>Configuring</strong> <strong>AX411</strong> <strong>Access</strong> <strong>Point</strong> <strong>Country</strong>-<strong>Specific</strong> <strong>Settings</strong> ■ 3
Related Topics■■■<strong>AX411</strong> <strong>Access</strong> <strong>Point</strong> <strong>Country</strong> and Channel Support<strong>AX411</strong> <strong>Access</strong> <strong>Point</strong> Wireless LAN Initial Software Configuration OverviewTesting Connectivity to the <strong>AX411</strong> <strong>Access</strong> <strong>Point</strong> Wireless LANPublished: 2010-03-164 ■ <strong>Configuring</strong> <strong>AX411</strong> <strong>Access</strong> <strong>Point</strong> <strong>Country</strong>-<strong>Specific</strong> <strong>Settings</strong>