Instruction Manual for DISH® Users - Winegard
Instruction Manual for DISH® Users - Winegard
Instruction Manual for DISH® Users - Winegard

Create successful ePaper yourself
Turn your PDF publications into a flip-book with our unique Google optimized e-Paper software.
<strong>Instruction</strong> <strong>Manual</strong> <strong>for</strong> DISH ®<strong>Users</strong>www.winegard.com/mobileFor receivers and programming, call 1-866-609-9374For up-to-date in<strong>for</strong>mation on receiver compatibility andprogramming, visit www.winegard.com/receiversFor help, email help@winegard.com or call 1-800-788-4417Do not return antenna to place of purchase2452276
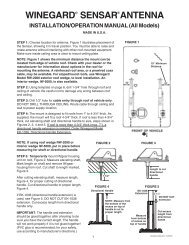
Parts of the AntennaAntenna in Deployed PositionSupports up to two receiversFollow the instructions on this side of the manual if setting up the Anser® antenna<strong>for</strong> use with DISH programming. If setting up the Anser <strong>for</strong> use with DIRECTVProgramming, follow the instructions on the reverse side of the manual.Reflector coverProtects inner componentsfrom environmentSecondary portConnects tosecondary receiver(or dual tuner)Includes 25 ft power cableand 25 ft coaxial cableUnit weight: 16 lbsStowed height: 15 inBe<strong>for</strong>e Installing the AntennaCongratulations on purchasing the <strong>Winegard</strong> ® Carryout ® Anser antenna! The Anser antenna is a portable satellitesystem that requires a user elevation setting to automatically acquire the desired satellite. As the user, you willneed to know which satellite you would like to view and the corresponding elevation angle <strong>for</strong> that satellite. Under“Compatible Satellites,” different popular satellite options are outlined along with the programming offered via eachsatellite. Elevation and coverage maps are also included to help you determine the correct elevation angle andcoverage <strong>for</strong> certain satellites.Elevation lockSecures rotating housingat desired elevationMain portConnects toprimary receiverQuick disconnect socketConnects to power sourceMax. height deployed: 20.75 inDiameter: 21 inReflector size: 18 inThe Anser antenna requires the following simple steps be<strong>for</strong>e operation:1. Find elevation angle via receiver menu or provided maps*.2. Hook up the antenna, and manually set the elevation to the correct elevation angle <strong>for</strong> your area.3. Get to the signal meter screen on your receiver.4. Plug in the unit—the unit will search and find the strongest signal.5. If the system stops on a signal but is not on the desired satellite <strong>for</strong> viewing, the unit will move to the next signalfound in 45 seconds. Once you have signal on your desired satellite, unplug the power to the unit.6. Watch TV!Antenna in Stowed PositionElevation range: 15–65°*Elevation angles may not be displayed in the receiver menu <strong>for</strong> satellite 72° (recommended as a single satellitesolution <strong>for</strong> DISH ® HD programming) or 129°. If the elevation angle is not displayed in the receiver menu, use theprovided elevation and coverage maps to find the elevation angle <strong>for</strong> your current location.Compatible SatellitesReceiversHandleEnables easycarrying of antennaEyeletEnables securing ofantenna to siteRotating housingRotates to desiredelevation settingElevation housingIncludes elevationmarkings <strong>for</strong>easy pointingUV-protected plastic reflector coverMax amperage: 5.0 AUnit operating voltage: 10.5–13.8 VSupply voltage: 12–13.8 VGray plastic baseAntenna Feet72°: Eastern satellite, recommended<strong>for</strong> HD programming129°: Western satellite, majority ofHD programming82°: HD programming91°: Standard programmingThe 72° and 129° satellites requirean HD receiver.The antenna has four feet onthe bottom of the unit. Each foothas two mounting spots on theunderside of the antenna. Theantenna will come with the feet inthe inside holes.Feet in inside holesFeet in outside holes119°: Majority of std. programming110°: Some standard programming,limited HD programmingAlso compatible: Satellites 61.5° & 77°TIPThe 72° satellite is recommended as a single satellite solution <strong>for</strong>DISH ® HD programming. In the Northwest, the extremely low elevationangle may present issues in getting clear line-of-sight to the satellite. In thosecircumstances, use one of the western satellites (110°, 119°, or 129°). Notethat the 72° and 129° satellites require an HD receiver.If mounting the antenna on<strong>Winegard</strong> Model TR-1518 tripod,mount the feet in the inside holes.For extra support, mount the feet inthe outside holes.
WARNINGThe Carryout Anser antenna is meant <strong>for</strong> stationary use only and will not function while in motion. The Anser antennais not intended <strong>for</strong> permanent mounting on any vehicle.The Anser antenna is not meant <strong>for</strong> use with the Carryout ladder mount. Installing the antenna on the Carryout laddermount may lead to serious injury and/or equipment and property damage.Do not install or operate the antenna in winds of 35 mph or greater. The Anser antenna will roll in winds ≥35 mph.DISH Receiver SetupDISH receivers will often not show when they are on signal if they haveincorrect “Check Switch” in<strong>for</strong>mation. For this reason, DISH users must cleartheir current settings be<strong>for</strong>e pointing. To do this <strong>for</strong> most DISH receivers,follow the steps below. The following instructions are based on a Solo ViP ®211k receiver. If your receiver differs from the options shown, consult yourreceiver manual.TIPCheck out online receiversetup guides <strong>for</strong> yourantenna at www.winegard.com/receivers/setupguide.php.Do not place the antenna in water >2 inches deep, or the water may damage the electronics.Care should be taken when transporting and setting up the Anser antenna. Do not toss or drop the antenna.Do not paint this antenna. Painting the antenna may cause signal degradation and will void your warranty.Be<strong>for</strong>e starting receiver setup, make sure the coaxial cable is disconnected from “Sat In” on the back of the receiver.1 2 3Selecting a Location <strong>for</strong> the AntennaChoose a location with a clear, unobstructed view of the southern sky. Avoid obstructions such as trees, hills,vehicles, or buildings—these can block the signal from the satellite.Make sure the antenna is not placed in the path of people or vehicles; otherwise, the antenna may be knocked off ofthe signal if run into, or cables may be disconnected from the unit.Press “Menu” on your remote.Select option 6, “System Setup.”Select option 1, “Installation.”Select option 1, “Point Dish.”Try to select a location that will allow the Carryout Anser antenna to sit within three degrees of level.Finding the Elevation Angle <strong>for</strong> the Current LocationFind the elevation angle <strong>for</strong> your current location—the elevation angle isneeded to point the antenna. To find the elevation angle <strong>for</strong> your currentlocation, continue with “DISH Receiver Setup.” Even if you know theelevation angle <strong>for</strong> your current location, you must still complete receiversetup upon first use of the antenna.For additional help determining the elevation angle <strong>for</strong> your currentlocation, refer to the elevation and coverage maps included with this unit, ordownload the free <strong>Winegard</strong> Mobile App compatible with your smartphone.If using the provided maps or smartphone app to determine your elevationangle, you must still complete receiver setup. However, on step 10 of “DISHReceiver Setup,” you do not need to enter the zip code or dish system.NOTESatellite signal will notpass through solid objects.For this reason, it is vital to select alocation with a clear, unobstructedview of the southern sky.NOTEA 25 foot power cable and25 foot coaxial cable areincluded with the antenna. Keep thisin mind when selecting a location<strong>for</strong> the antenna.Finding the elevationjust got easier!Download the FREE<strong>Winegard</strong> MobileApp compatible withyour smartphone4 5 6Select “Check Switch.” (Make surethe coaxial cable is disconnectedfrom “Sat In” on the back of thereceiver be<strong>for</strong>e proceeding.)If it warns that fewer satellites weredetected, select “Save.”Make sure that there are nocheckmarks by “SuperDISH” or“Alternate.” Select “Test.”7 8 9Then, select “Save” again.The receiver will go through anumber of steps to detect yoursatellite settings.This should clear out any previouslyinstalled devices. Select “Done” toreturn to the Point Dish Menu.Receiver setup instructions are accurate at time of printing and may change without notice.
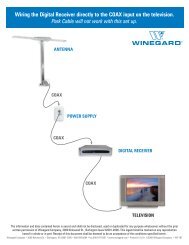
101. Input the zip code of your current location. (If using a 311 or previous modelreceiver, select “Peak Angles” to enter your satellite and zip code.)Searching <strong>for</strong> SatellitesSetting the ElevationAlign the antenna so that the cable connections are pointing approximately North.Turn the rotating housing until the elevation mark aligns with the elevationangle given by the receiver or provided elevation maps. If the unit is not level,the elevation may be slightly off.After setting the elevation, tighten the elevation lock until fingertight. Donot overtighten.Hooking up the Antenna2. Select “Dish 300” <strong>for</strong> the dish system.3. Select “21” <strong>for</strong> the transponder.4. Select the satellite that you want to point at. The 72° satellite is recommendedas a single satellite solution <strong>for</strong> DISH HD programming. See “CompatibleSatellites” <strong>for</strong> help.With all in<strong>for</strong>mation entered, an elevation angle* should be displayed. You will need this angle to set the elevation.*Elevation angles may not be displayed <strong>for</strong> satellites 72° and 129°. In this case, refer to the provided elevation and coverage maps <strong>for</strong> an elevation angle.TIPIf a first search does notsuccessfully find thedesired satellite, simply adjust theelevation <strong>for</strong> another search. See“Searching <strong>for</strong> Satellites.”Once powered on, the antenna will begin searching <strong>for</strong> satellites. The antenna will cycle through qualifying signalsbe<strong>for</strong>e returning to the correct satellite.Watch the signal meter on the receiver to confirm when the appropriate satellite is found; the signal bar should begreen and indicate “LOCKED” on the desired satellite. Upon finding a satellite, the unit will make adjustments to finetunethe signal.If pointed at the desired satellite, make sure the unit has finished fine-tuningthe signal, and disconnect the power from the power source. Once powerhas been removed, do not move the satellite dish, or the signal may be lost.If not pointed at the correct satellite, the Anser antenna will move to the nextstrongest satellite after 45 seconds of inactivity. If the Anser antenna cyclesthrough all satellites but the desired satellite has not been found, disconnectthe power from the power source, set the elevation <strong>for</strong> 2–3 degrees higher orlower, and connect the power to the power source again.Minimum signal strength should be at least 15–20. If signal is inadequate, an elevation adjustment may be necessary.When adjusting the elevation, the azimuth will also be adjusted. To compensate <strong>for</strong> the azimuth adjustment, eithercomplete a new search or (manually) slightly rotate the unit.DISH Receiver SetupNOTEWhen fine-tuning, theantenna will make slowmovements back and <strong>for</strong>th.NOTEIf the power is notdisconnected from thesource quickly enough, the antennawill cycle to other satellites.After the unit has locked onto the desired satellite and the power has been disconnected, complete receiver setup below.11 12 13Connect a coaxial cable from themain port of the base to the “Sat In”port on the back of the receiver thatwill be used most often. The mainport should always be connectedwhen the Anser antenna is in use.If applicable, remove the capfrom the secondary port, and runa second coaxial cable from thesecondary port on the base to the“Sat In” port on a second receiver(or second input on dual tuner).Plug one end of the power cable intothe quick disconnect socket. Thecable should click into place. Then,plug the other end into a 12 V outletor into a 110 V to 12 VDC converter,such as <strong>Winegard</strong> Model GM-1200power converter (sold separately).Select “Check Switch.”Select “Test.”The receiver will go through anumber of steps to detect yoursatellite settings.14 15 16Coax cable connected to main port Coax cable connected to sec. port Power cable connected to quickdisconnect socketTIPTIPRun the coaxial cable directly from the satellite receiver to the Anserantenna when searching <strong>for</strong> signal.If the receiver is used <strong>for</strong> DIRECTV HD programming, check that theB-Band converter has been removed prior to connecting the antenna.NOTEThe 12 VDC power sourceor 110 V to 12 VDCconverter must meet power supplyspecifications. See “Parts of theAntenna” <strong>for</strong> specifications.Press “Cancel” to exit the PointDish menu.The receiver will acquire signal.A program guide may download.You are now ready to watch TV!
Transporting the AntennaWhen transporting the antenna, return the unit to the stowed position. The elevation arrow should align with “STOW.”Once in the stowed position, tighten the lock until fingertight.Using Outside ReceptacleCableAccessories (sold separately)If your outside TV receptacle is wired <strong>for</strong> satellite, you’ll need to locate wherethat receptacle leads, and connect that directly to your satellite receiver.If the outside TV receptacle is wired <strong>for</strong> cable, the wiring will have to bemodified <strong>for</strong> use with satellite. The coaxial cable cannot run through anyother devices or switches BEFORE the satellite receiver.Typically, if wired <strong>for</strong> cable, the wiring will either run through a <strong>Winegard</strong>power supply or video switch. The easiest way to fix this is to disconnect thecable from that device, use a barrel connector, and connect a new cable thatruns directly to the receiver, bypassing the power supply or video switch.WINEGARD MOBILE PRODUCTS LIMITED WARRANTY(2 YEARS PARTS; 1 YEAR LABOR)<strong>Winegard</strong> Company warrants this product against defects in materials or workmanship <strong>for</strong> a period of two (2) years from the dateof original purchase. During year one (1) of such warranty, <strong>Winegard</strong> Company will also pay authorized labor costs to an authorized<strong>Winegard</strong> dealer to repair or replace defective products. No warranty claim will be honored unless at the time the claim is made,Customer presents proof of purchase to an authorized <strong>Winegard</strong> dealer (to locate the nearest authorized <strong>Winegard</strong> dealer, contact<strong>Winegard</strong> Company, 3000 Kirkwood Street, Burlington, Iowa 52601, Telephone 800-288-8094 or visit www.winegard.com). Customermust provide proof of purchase with a dated sales receipt <strong>for</strong> the <strong>Winegard</strong> product to verify the product is under warranty. If the date ofpurchase cannot be verified, the warranty period shall be considered to begin thirty (30) days after the date of manufacture.If a defect in material or workmanship is discovered, Customer may take the product to an authorized <strong>Winegard</strong> dealer <strong>for</strong> service.Customer must provide proof of purchase to verify the product is under warranty. If the product is brought to an authorized <strong>Winegard</strong>dealer <strong>for</strong> service prior to expiration of year one (1) of the warranty period and a defect in material or workmanship is verified by<strong>Winegard</strong> Technical Services, <strong>Winegard</strong> Company will cover the <strong>Winegard</strong> dealer’s labor charges <strong>for</strong> warranty service. The <strong>Winegard</strong>dealer must contact <strong>Winegard</strong> Technical Services in advance <strong>for</strong> pre-approval of the service. Approval of the service is at the solediscretion of <strong>Winegard</strong> Company.Alternatively, Customer may ship the product prepaid to <strong>Winegard</strong> Technical Services (located at 3111 Kirkwood Street, Burlington,Iowa 52601, Telephone 800-788-4417). Customer must return the product along with a brief description of the problem and provide<strong>Winegard</strong> Technical Services with Customer’s name, address, and phone number. Customer must also provide proof of purchase to verifythe product is under warranty. If the product is returned be<strong>for</strong>e the expiration of the warranty period, <strong>Winegard</strong> Company will (at itsoption) either repair or replace the product.This Limited Warranty does not apply if the product has been damaged, deteriorates, malfunctions or fails from: improper installation,misuse, abuse, neglect, accident, tampering, modification of the product as originally manufactured by <strong>Winegard</strong> in any mannerwhatsoever, removing or defacing any serial number, usage not in accordance with product instructions or acts of nature such asdamage caused by wind, lightning, ice or corrosive environments such as salt spray and acid rain. This Limited Warranty also does notapply if the product becomes unable to per<strong>for</strong>m its' intended function in any way as a result of the television signal provider making anychanges in technology or service.RETURN AUTHORIZATION POLICYA Return Material Authorization (RMA) is required prior to returning any product to <strong>Winegard</strong> Company or <strong>Winegard</strong> Warranty Servicesunder this warranty policy. Please call our Technical Services Department at 800-788-4417 or send an email to warranty@winegard.com to obtain the RMA number. Please furnish the date of purchase when requesting an RMA number. Enclose the product in a prepaidpackage and write the RMA number in large, clear letters on the outside of the package. To avoid confusion or misunderstanding, ashipment(s) without an RMA number(s) or an unauthorized return(s) will be refused and returned to Customer freight collect.WINEGARD COMPANY DOES NOT ASSUME ANY LIABILITIES FOR ANY OTHER WARRANTIES, EXPRESS OR IMPLIED, MADE BY ANYOTHER PERSON.ALL OTHER WARRANTIES WHETHER EXPRESS, IMPLIED OR STATUTORY INCLUDING WARRANTIES OF FITNESS FOR A PARTICULARPURPOSE AND MERCHANTABILITY ARE LIMITED TO THE TWO YEAR PERIOD OF THIS WARRANTY.In states that do not allow limitations on implied warranties, or the exclusion of limitation of incidental or consequential damages, theabove limitations or exclusions do not apply.Some states do not allow limitations on how long an implied warranty lasts, or the exclusion of limitation of incidental or consequentialdamages, so the above limitations or exclusions may not apply to you.This warranty gives Customer specific legal rights. Customer may also have other rights that may vary from state to state.SATELLITE RECEIVER WARRANTY:See manufacturer’s limited warranty policy.WS-MOBWARREV2Rev. 1/10RP-GM52Model RP-GM52 50’ 12 V power cord istwice the length of the included powercable, giving more flexibility whenhooking up to a 12 V power source.<strong>Winegard</strong> Company • 3000 Kirkwood Street • Burlington, IA 52601 • 1-800-288-8094 • Fax 319-754-0787 • www.winegard.comPrinted in U.S.A. ©2012 <strong>Winegard</strong> Company Rev6 6/13 2452276TR-1518Model TR-1518 tripod mount hasadjustable height and levelingsettings of 14.5”–22” and quicklydisassembles <strong>for</strong> compact storage.GM-1200Model GM-1200 AC/DC powerconverter enables you to hook upto a 110 V power source when a 12V power source is unavailable.<strong>Winegard</strong>, Carryout, and Anser are registered trademarks of <strong>Winegard</strong> Company. DISH and ViP are registered trademarks of DISH Network L.L.C.Bell TV is a registered trademark of Bell Canada, Inc. DIRECTV is a registered trademark of DIRECTV, LLC.Disclaimer: Although every ef<strong>for</strong>t has been made to ensure that the in<strong>for</strong>mation in this manual is correct and complete, no company shall be held liable <strong>for</strong> any errors oromissions in this manual. In<strong>for</strong>mation provided in this manual was accurate at time of printing.