View Catalog - Tri-Net Technology
View Catalog - Tri-Net Technology
View Catalog - Tri-Net Technology
- No tags were found...

Create successful ePaper yourself
Turn your PDF publications into a flip-book with our unique Google optimized e-Paper software.
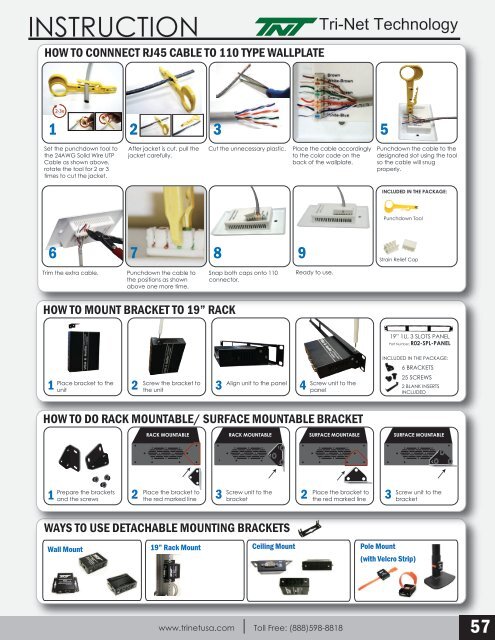
INSTRUCTIONHOW TO CONNNECT RJ45 CABLE TO 110 TYPE WALLPLATE<strong>Tri</strong>-<strong>Net</strong> <strong>Technology</strong>12-3x23 4 5Set the punchdown tool tothe 24AWG Solid Wire UTPCable as shown above,rotate the tool for 2 or 3times to cut the jacket.After jacket is cut, pull thejacket carefully.Cut the unnecessary plastic.Place the cable accordinglyto the color code on theback of the wallplate.Punchdown the cable to thedesignated slot using the toolso the cable will snugproperly.INCLUDED IN THE PACKAGE:Punchdown Tool6 78 9Strain Relief Cap<strong>Tri</strong>m the extra cable.Punchdown the cable tothe positions as shownabove one more time.Snap both caps onto 110connector.Ready to use.HOW TO MOUNT BRACKET TO 19” RACK19” 1U, 3 SLOTS PANELPart Number: R02-SPL-PANELPlace bracket to theScrew the bracket to Align unit to the panel1 2 3 4unitthe unitScrew unit to thepanelINCLUDED IN THE PACKAGE:6 BRACKETS25 SCREWS2 BLANK INSERTSINCLUDEDHOW TO DO RACK MOUNTABLE/ SURFACE MOUNTABLE BRACKETRACK MOUNTABLE RACK MOUNTABLE SURFACE MOUNTABLE SURFACE MOUNTABLEPrepare the bracketsPlace the bracket to1 2 3and the screwsthe red marked lineScrew unit to thePlace the bracket tobracket2the red marked line3Screw unit to thebracketWAYS TO USE DETACHABLE MOUNTING BRACKETSWall Mount19” Rack MountCeiling MountPole Mount(with Velcro Strip)www.trinetusa.com Toll Free: (888)598-881857