Storing and Managing Code with CVS
Storing and Managing Code with CVS
Storing and Managing Code with CVS

You also want an ePaper? Increase the reach of your titles
YUMPU automatically turns print PDFs into web optimized ePapers that Google loves.
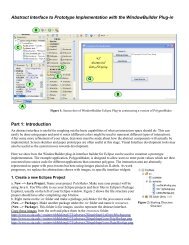
<strong>Storing</strong> <strong>and</strong> <strong>Managing</strong> <strong>Code</strong> <strong>with</strong> <strong>CVS</strong>One of the most important things you do, as a software developer, is version source code<strong>and</strong> other project files. What does it mean to “version” a file? According to MerriamWebster, a version is a variant or type of an original, <strong>and</strong> that’s exactly what we mean inprofessional software development. In an iterative development process (like ExtremeProgramming) files undergo numerous changes during <strong>and</strong> after each iteration. Sincecode is owned by the team, everyone will need access to the latest version. In thish<strong>and</strong>out we will examine a freely available open source tool for storing, sharing <strong>and</strong>managing code: <strong>CVS</strong><strong>CVS</strong>, the Concurrent Versioning System, is an open source versioning software system.<strong>CVS</strong> originated as UNIX shell scripts <strong>and</strong> was eventually rewritten as <strong>CVS</strong> in the late1980’s. <strong>CVS</strong> was originally a comm<strong>and</strong> line tool, but many development environmentssuch as NetBeans <strong>and</strong> Eclipse provide client-side user interfaces to access <strong>CVS</strong>repositories.<strong>CVS</strong> uses a client-server model to allow multiple users to access a code repository storedon a <strong>CVS</strong> server. This h<strong>and</strong>-out describes several common <strong>CVS</strong> operations using Eclipseas the client for accessing projects stored on the <strong>CVS</strong> server. To begin <strong>with</strong>, we assumethat you have an existing Java project that you would like place into <strong>CVS</strong>. Furthermore,we assume that the <strong>CVS</strong> repository has already been created. Eventually you may need tocreate a repository <strong>and</strong> this step is explained near the end of the h<strong>and</strong>out.Information Required to Connect to the <strong>CVS</strong> ServerThe following details are needed ( do not type { }s indicate your specific information )• Host : lab.cs.siu.edu• Repository path :/spare1/cvsroots/{repository name}• User/Password :{enter your Unix username / password}• Connection type : pserver• Leave Use Default Port checked.Putting an existing project into the repository:When your are ready to connect to the repository you can add your project to the <strong>CVS</strong>repository by following these steps1. Change to Java Perspective (Window->Open perspective->java). Right click onthe existing java project, <strong>and</strong> select Team->Share Project.cvsHO435S05.01, Prepared by K. Gundamaraju & M. Wainer 1
2. (Only in Linux systems) In the share project dialog select <strong>CVS</strong> <strong>and</strong> click next.3. In the Share Project <strong>with</strong> <strong>CVS</strong> Repository dialog box that appears, make sure thatUse Existing Repository location is checked <strong>and</strong> the repository location youentered earlier for <strong>CVS</strong> server is selected <strong>and</strong> click next.4. By default, the <strong>CVS</strong> module name is the same as the Eclipse project name. Checkthe Use an existing module radio button. This will list the modules present in thecurrent repository, select the module for your group <strong>and</strong> click next, like forexample TTTx as shown in the figure below5. In the select tag to synchronize <strong>with</strong> dialog box, make sure head is selected <strong>and</strong>then click next.cvsHO435S05.01, Prepared by K. Gundamaraju & M. Wainer 2
2. In the Share Project resources window, exp<strong>and</strong> the project tree <strong>and</strong> right click onbuild directory <strong>and</strong> select Add to .cvsignore… option. Make sure the resource(s)by name option is selected <strong>and</strong> click OK. Similarly add, local.properties file <strong>and</strong>dist directory, to .cvsignore …. Then Click Finish. The reason this is done is toprevent certain types of files from being stored on the repository. For instance, thedist directory holds information generated from other files so we don’t want towaste space (<strong>and</strong> download time) by storing this in the repository.3. In the Commit Changes Dialog, click yes.4. In the Add the <strong>CVS</strong> Version control dialog, Click Yes.5. In the Commit dialog, enter a comment as prompted. There’s usually not much tosay the first time around, so Initial revision will suffice. And click OK.Checking out a project of <strong>CVS</strong>:Lets change our point of view for a moment <strong>and</strong> see how a co-worker would obtain theproject you’ve just made available on <strong>CVS</strong>. First of all, your co-worker needs to create arepository in <strong>CVS</strong> Repository Explorer view. Then she should following these steps (ifshe is checking out the project for the first time <strong>and</strong> she doesn’t have any files in her localworkspace)1. Exp<strong>and</strong> the HEAD entry in the repository. Doing so shows <strong>CVS</strong>ROOT directory(<strong>CVS</strong>’s administration directory) <strong>and</strong> any modules that have been checked in tothis repository.cvsHO435S05.01, Prepared by K. Gundamaraju & M. Wainer 3
2. Select the module you are interested in, right click on it, <strong>and</strong> select check out asfrom the context menu.3. In the check out as dialog, check the check out as a project in the workspace <strong>and</strong>change the project name to a different one if you wish to <strong>and</strong> click finish.After checking out, the project will be created as a new Eclipse project. Since thelocal.properties file is not stored in the repository, the first problem you’ll encounter isthat local class path variables which the project requires will not been defined. You willneed to create the local.properties file (or modify from a team member’s). Refer to thefirst lab h<strong>and</strong>out (Core XP Practices <strong>with</strong> Java <strong>and</strong> Eclipse) to help solve any problems.You do the above steps if you are new to the project <strong>and</strong> want to check out the project.If you have some files already in your workspace <strong>and</strong> want to get the latest files from therepository then follow these steps (Your work will be overwritten <strong>with</strong> files fromrepository):1. Select the project in the navigator view. Right click on it select Team->ShareProject. Enter your user name <strong>and</strong> password.cvsHO435S05.01, Prepared by K. Gundamaraju & M. Wainer 4
2. Right click on the project again <strong>and</strong> this time select Replace With -> Latest FromHead. (Head represents the main development path of the project.)3. In the Confirm Overwrite dialog, click OK.NOTE:Eclipse displays additional <strong>CVS</strong> information in the package explorer view, so you cansee the version <strong>and</strong> other information for the shared files. <strong>CVS</strong> label decoratorsindicate which files <strong>and</strong> folders are under <strong>CVS</strong> version control (a golden cylindricalicon decorating the resource’s icon, indicating it’s under version control),their currentrevision number, <strong>and</strong> whether they have been changed locally(a greater than signindicating the resource being changed locally) <strong>and</strong> the file type.To display the <strong>CVS</strong> label decorators, follow these steps:• Select Windows->Preferences.• Go to Workbench->Label Decorations• Check the <strong>CVS</strong> checkbox <strong>and</strong> click OK.Adding a new file to <strong>CVS</strong>:It takes two steps to check in a new file to <strong>CVS</strong>.1. Add the file to <strong>CVS</strong>.(Right click on the file then select Team->Add to VersionControl)2. Commit the file. (Right click on the file then select Team->Commit).Enter anycomments in the Commit Dialog <strong>and</strong> click OK.Adding a file doesn’t actually cause the file to appear in the <strong>CVS</strong>; it just sends anotification to <strong>CVS</strong>, which schedules the file for addition. The second step, committingthe file, causes the file to appear in the <strong>CVS</strong> Repository <strong>and</strong> be made available to others.NOTE:• It’s not a good idea to make changes <strong>and</strong> simply commit them in to <strong>CVS</strong>.Obviously, you should first make sure your changes compile <strong>and</strong> pass thejunit tests.• You also need to make sure you don’t overwrite other changes which mayhave been made since you checked out the file. See UPDATE below.• You should also commit frequently – work on small tasks <strong>and</strong> build up yoursoftware incrementally.Updating files from Repository:Refreshing your copy of code from the repository is called updating it. Right click thefile, <strong>and</strong> select Team -> Update, <strong>and</strong> then resolve any conflicts (if you have changed thesame lines that someone else has changed). Alternatively if you just want to replace yourversion <strong>with</strong> what’s in the <strong>CVS</strong> repository, right click on the file/project <strong>and</strong> selectReplace With -> Latest from Head.cvsHO435S05.01, Prepared by K. Gundamaraju & M. Wainer 5
If you update <strong>and</strong> some of the changes conflict - Eclipse combines the changes in a singlefile that you need to edit by h<strong>and</strong>. This is a messy error prone process. It’s moreconvenient to perform merging using the Eclipse’s Synchronize Repository feature.1. Select the project in the Package Explorer <strong>and</strong> right-click on it.2. Select Team->Synchronize <strong>with</strong> Repository from the context menu.Then double click the file on the structure compare view to take a look at thesynchronization issues for that file. Note the side by side comparison going on; here thelocal file is compared to that of the repository. Lines appear connecting the differences.You can use the up <strong>and</strong> down arrow buttons in the Java Source Compare view to navigatebetween changes. You can also use the two arrow buttons next to the navigation buttonsto accept or make changes. The button <strong>with</strong> the left facing arrow copies the currentchange from the repository to your local code, <strong>and</strong> the button <strong>with</strong> the right facing arrowcopies the current change from your local file to the repository.After you have synchronized your version of code <strong>with</strong> that in the repository, right clickon the file name in the Synchronize view (if not open, then open it <strong>with</strong> Window->OpenPerspective->Team Synchronizing View) <strong>and</strong> select Mark as Merged to indicate thatyou’ve resolved the conflict. Commit the file by right clicking on either the file name orthe project name <strong>and</strong> selecting Commit. Enter a comment when prompted.Committing files to Repository (from local workspace):To commit files to repository select the individual files or the project.1. Right click on the resource (individual file/project) <strong>and</strong> select Team->Update.(To properly update you need to open the Team Synchronization perspective <strong>and</strong>resolve any conflicts before updating a file.)2. Again Right Click on the resource (individual file/project) <strong>and</strong> select Team->Commit.You should notice a change in the version numbers of the files updated.Creating a Repository:A code repository is a piece of software whose job is to keep track of our files, <strong>and</strong> thedifferent versions <strong>and</strong> revisions of our files as well as any milestones we define <strong>and</strong>comment history we enter.To create a repository you need to know about the <strong>CVS</strong> server, the path of the <strong>CVS</strong>repository on it, <strong>and</strong> the protocol it is using. You also must have a valid username <strong>and</strong>password for the server or the repository. Follow these steps in Eclipse 3.01. From the main menu select Window->Open perspective->Other.2. Select <strong>CVS</strong> Repository Exploring <strong>and</strong> click ok.3. In the <strong>CVS</strong> Repository view, right click <strong>and</strong> select New->Repository LocationcvsHO435S05.01, Prepared by K. Gundamaraju & M. Wainer 6
4. Enter the following details• Host : lab.cs.siu.edu• Repository path :/spare1/cvsroots/{enter repository name}• User/Password :{enter your Unix username password}• Connection type : pserver• Leave Use Default Port checked.5. Click Finish.Disconnecting a project from <strong>CVS</strong>Disconnect is not like a logout. Disconnect is only used to disconnect a project from<strong>CVS</strong>, to disable the <strong>CVS</strong> operations that can be performed on the project <strong>and</strong> itsresources <strong>and</strong> optionally to remove the <strong>CVS</strong> information (stored in the <strong>CVS</strong> folders)associated <strong>with</strong> the project. This might be done after a project due date for instance.To disconnect a project from <strong>CVS</strong>:1. In the Navigator view, select the project to be disconnected.2. Select Team > Disconnect from the project's pop-up menu. The ConfirmDisconnect from <strong>CVS</strong> dialog opens.3. In the dialog, click yes to disconnect the project.NOTE: Please don’t disconnect when the project is active.cvsHO435S05.01, Prepared by K. Gundamaraju & M. Wainer 7
Some useful Tips:• Never commit files <strong>with</strong> fatal compilation errors.• Commit only after Update. (If you try to commit a file <strong>with</strong>out updating it firstyou will sometimes get an error while performing the <strong>CVS</strong> commit. It says thatUp- to-date check failed for the file. This is because the file you have locally is anold version <strong>and</strong> it is not in sync <strong>with</strong> the file in the repository. So first you have toupdate your file locally before committing it)\• Once you have files on the local directories, never commit the whole project,commit the individual files separately.References:• http://www.eclipse.org/• Professional Java Tools for Extreme programming, 2004 Edition-Wroxpublications• Eclipse Cookbook – Steve Holzner, O’Reilly publications• https://www.cvshome.org/cvsHO435S05.01, Prepared by K. Gundamaraju & M. Wainer 8