2012 drifter ids⢠kite user manual manuel d'utilisation ... - Cabrinha
2012 drifter ids⢠kite user manual manuel d'utilisation ... - Cabrinha
2012 drifter ids⢠kite user manual manuel d'utilisation ... - Cabrinha

You also want an ePaper? Increase the reach of your titles
YUMPU automatically turns print PDFs into web optimized ePapers that Google loves.
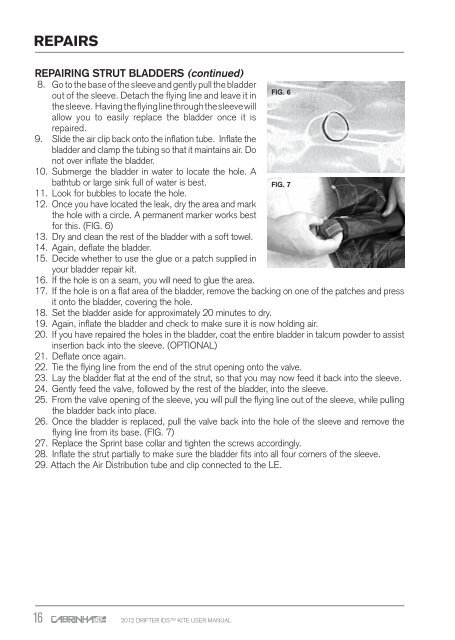
REPAIRSREPAIRING STRUT BLADDERS (continued)8. Go to the base of the sleeve and gently pull the bladderFIG. 6out of the sleeve. Detach the flying line and leave it inthe sleeve. Having the flying line through the sleeve willallow you to easily replace the bladder once it isrepaired.9. Slide the air clip back onto the inflation tube. Inflate thebladder and clamp the tubing so that it maintains air. Donot over inflate the bladder.10. Submerge the bladder in water to locate the hole. Abathtub or large sink full of water is best.FIG. 711. Look for bubbles to locate the hole.12. Once you have located the leak, dry the area and markthe hole with a circle. A permanent marker works bestfor this. (FIG. 6)13. Dry and clean the rest of the bladder with a soft towel.14. Again, deflate the bladder.15. Decide whether to use the glue or a patch supplied inyour bladder repair kit.16. If the hole is on a seam, you will need to glue the area.17. If the hole is on a flat area of the bladder, remove the backing on one of the patches and pressit onto the bladder, covering the hole.18. Set the bladder aside for approximately 20 minutes to dry.19. Again, inflate the bladder and check to make sure it is now holding air.20. If you have repaired the holes in the bladder, coat the entire bladder in talcum powder to assistinsertion back into the sleeve. (OPTIONAL)21. Deflate once again.22. Tie the flying line from the end of the strut opening onto the valve.23. Lay the bladder flat at the end of the strut, so that you may now feed it back into the sleeve.24. Gently feed the valve, followed by the rest of the bladder, into the sleeve.25. From the valve opening of the sleeve, you will pull the flying line out of the sleeve, while pullingthe bladder back into place.26. Once the bladder is replaced, pull the valve back into the hole of the sleeve and remove theflying line from its base. (FIG. 7)27. Replace the Sprint base collar and tighten the screws accordingly.28. Inflate the strut partially to make sure the bladder fits into all four corners of the sleeve.29. Attach the Air Distribution tube and clip connected to the LE.16 <strong>2012</strong> DRIFTER IDS KITE USER MANUAL