

QR4174-418 QSWeb.pdf - Q-See
QR4174-418 QSWeb.pdf - Q-See
QR4174-418 QSWeb.pdf - Q-See

You also want an ePaper? Increase the reach of your titles
YUMPU automatically turns print PDFs into web optimized ePapers that Google loves.
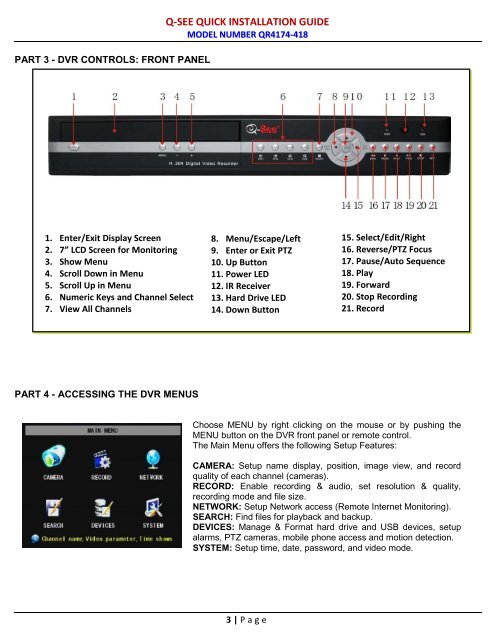
PART 3 - DVR CONTROLS: FRONT PANELQ-SEE QUICK INSTALLATION GUIDEMODEL NUMBER <strong>QR4174</strong>-<strong>418</strong>1. Enter/Exit Display Screen2. 7” LCD Screen for Monitoring3. Show Menu4. Scroll Down in Menu5. Scroll Up in Menu6. Numeric Keys and Channel Select7. View All Channels8. Menu/Escape/Left9. Enter or Exit PTZ10. Up Button11. Power LED12. IR Receiver13. Hard Drive LED14. Down Button15. Select/Edit/Right16. Reverse/PTZ Focus17. Pause/Auto Sequence18. Play19. Forward20. Stop Recording21. RecordPART 4 - ACCESSING THE DVR MENUSChoose MENU by right clicking on the mouse or by pushing theMENU button on the DVR front panel or remote control.The Main Menu offers the following Setup Features:CAMERA: Setup name display, position, image view, and recordquality of each channel (cameras).RECORD: Enable recording & audio, set resolution & quality,recording mode and file size.NETWORK: Setup Network access (Remote Internet Monitoring).SEARCH: Find files for playback and backup.DEVICES: Manage & Format hard drive and USB devices, setupalarms, PTZ cameras, mobile phone access and motion detection.SYSTEM: Setup time, date, password, and video mode.3 | P age


