Create successful ePaper yourself
Turn your PDF publications into a flip-book with our unique Google optimized e-Paper software.
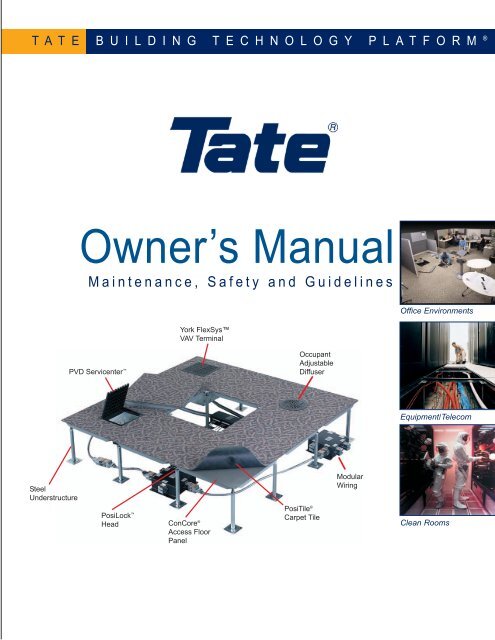
TATE B U I L D I N G T E C H N O L O G Y P L A T F O R M ®Owner’s <strong>Manual</strong>Maintenance, Safety and GuidelinesYork FlexSysVAV TerminalOffice EnvironmentsPVD Servicenter OccupantAdjustableDiffuserEquipment/TelecomSteelUnderstructureModularWiringPosiLock HeadConCore ®<strong>Access</strong> FloorPanelPosiTile ®Carpet TileClean Rooms
Table of ContentsI. Care and Use of the <strong>Tate</strong> <strong>Access</strong> Floor SystemMoving Precautions 1Adjustments fo Floor system 2Removal and Reinstallation 2Special Precautions 2II. Floor CoveringsPosiTile® 3Conductive and Static Dissipative 3Standard High Pressure Laminate 4III. Panel Cutting ProceduresRectangular Cutouts, External & Internal 5Round Cutouts 5Installing 6Safety Requirements 6IV. Electrical GuidelinesFloor Static Control, Computer Rooms 7Grounding, Bonding & Electro-Static Discharge Control 7V. Test StandardsStatic Load 8Dynamic Loads 8
Care and Use of the <strong>Tate</strong> <strong>Access</strong> Floor System<strong>Access</strong> floor systems are supplied and inst alled in conformance with the requirements set forth by individualproject specifications and approved submittal documents. It is important to clearly understand the designcapabilities of the <strong>Tate</strong> access floor system as installed in specific projects.Equipment Moving PrecautionsThe access floor must be protected from overloads andcircumstances that exceed its specifications. Movement ofheavy loads and equipment may require protection of thefloor system through the use of plywood or other suit ableload-distributing materials.•The All Steel panel is a hollow steel panel designedprimarily for static loads. Please consult your <strong>Tate</strong>representative before heavy loads are exerted on thefloor.*• The ConCore ® panel, similar in design to the All Steelpanel, is filled with a structural cementitious material.It has excellent static and rolling load capabilities.*• The Floating <strong>Floors</strong> ® by <strong>Tate</strong> panel is a diecastaluminum panel with excellent static and rolling loadcapabilities. It is designed to meet the needs oftoday's high-tech environments such as clean roomsand laboratories. *All Steel Panel* Please contact an authorized <strong>Tate</strong> dealer or call the <strong>Tate</strong>Technical Hotline at 1-800-231-7788 for procedures to followwhen wheel sizes and loads differ from those identified in<strong>Tate</strong> product specifications.ConCore ® PanelFloating <strong>Floors</strong> ® Panel1
Care and Use of the <strong>Tate</strong> <strong>Access</strong> Floor SystemAdjustments to the Floor SystemIt is advisable for the floor owner or owner ’srepresentative to get a demonstration of the use ofpedestal height adjustment and leveling mechanismby a representative of the floor provider before makingadjustments to the system. Periodically inspect theinstalled floor and make adjustments for the followingconditions:Rocking Panels1. Check to assure that pedestal head gaskets arepositioned correctly and/or stringers are securelyfastened. Make sure that no carpet pile or dirtprevents panels from seating correctly.2. Adjust the pedestal leveling nut after confirming thatthe pedestal is sitting flat on the subfloor.3. For persistent problems with tiled p anels, tryrotating the panels by 90 degrees.Tipping at Perimeter PanelsTipping generally occurs when the perimeter p anel isimproperly supported. Adjust the leveling nut on thepedestal support, raising or lowering the pedest al headuntil the panel sits firmly on the pedestal head orstringer.Panels with Factory-Laminated Carpet1. Check to see that the carpet grain runs in the samedirection for all panels; arrows on the bottom of thepanels should all be facing the same direction.Rotate panels as necessary to obtain uniform graindirection.2. Trim any loose tufts of carpet.3. Check for trapped yarn fiber at the edges of thepanel. Use an approved lifting device to remove thepanel, then remove the trapped yarn fiber. Use acarpet shoe- horn when reinstalling panels to avoidpile trapping and trim damage.Removal and Reinstallation of PanelsWhen accessing underfloor space, remove onlythose panels directly over the area of concern.Remove the first panel with the appropriate liftingdevice Place the lifter in the corner of the p aneland lift up vertically. Once the panel is far enoughabove the plane of the adjacent p anels, removethe panel by hand. Adjacent panels may be liftedas necessary by hand.Types of Lifting DevicesSuction Cup Lifterfor use on bare panels and panelswith a hard surface floor covering.Claw Lifterfor use on panels with cut pile carpet laminated to thepanel.Velcro Lifterfor use on panels with level loop carpet laminated tothe panel.Special Precautions1. The use of screwdrivers, pliers or other object s to pry or lift panels should be prohibited.2. Do not disturb the level adjustment of the support pedest als and position of the stringers while floor p anelsare out of the floor system.3. When panels with factory-laminated carpet are reinstalled, use a carpet shoehorn to ensure that carpet pile isnot trapped.4. When reinstalling panels with trim, use a carpet shoehorn to ensure the life of the trim.5. Always make a final check to see that p anels are correctly in place, level and secure.2
Floor CoveringsPosiTile ®PosiTile carpet tiles are precisely cut to fit the modular 2'x2' size of <strong>Tate</strong>'s ConCore ® access floor panels. Each tilehas positioning buttons that precisely align with holes in the top of each floor p anel. This eliminates the need foradhesives, except at perimeter locations.InstallationWhen installing carpet tiles, the access floor surfaceshould be free of dirt, debris and excessive dust.Remove plastic plugs from panels’ surface beforeinstalling PosiTile® carpet tile.Perimeter TilesCarpet tiles can be easily cut to fit perimeter locationsand areas around columns. If positioning buttons areeliminated when tile is cut, adhere carpet with areleasable adhesive or double faced tape.Conductive and Static DissipativeThe access floor covered with either conductive or st atic dissipative vinyl tile is designed for years of service byfollowing these guidelines:Damp Mopping for Conductive andStatic Dissipative Vinyl TileWhen light soiling is widespread, use this dampmoppingprocedure:1. Sweep or vacuum floor thoroughly.2. Damp-mop with warm water and mild multipurposeammoniated floor cleaner.3. Dip sponge mop into warm water, wring outthoroughly, and push sponge across the floor,pressing hard enough to loosen surface dirt.4. Damp-mop a small area at a time, wringing thesponge out frequently.5. When damp-mopping a large floor, change waterfrequently.6. A sponge mop with a nylon scrubbing p ad attachedto the front edge is recommended.7. Rinsing is important. Although detergent directionsmay that state rinsing is unnecessary, any detergentfilm left on a floor will attract dirt.8. Ideally, use separate sponge mops for cleaningand rinsing.3DO:1. Keep floor clean by damp-mopping with a neutralcleaner.2. Protect from tracked in sand and chemicals byproviding mats at entrances.3. Rotate panels between high- and low-traffic areas.4. Use a diluted commercial stripping agent on heavilysoiled areas.DO NOT:1. Flood with liquid, or use anything other than a dampmop. Large amounts of water can weaken adhesiveand cause delamination.2. Use strong abrasives or scrapers to remove st ains.
Standard High Pressure LaminateThe access floor covered with high pressure laminate floor tile is designed for years of service with aminimum of care and cleaning. Gain maximum life from this floor surface by following theseguidelines:Damp Mopping for Standard HighPressure Laminate Floor TileWhen light soiling is widespread, use this dampmoppingprocedure:1. Sweep or vacuum floor thoroughly.2. Damp-mop with warm water and mildmultipurpose ammoniated floor cleaner.3. Dip sponge mop into warm water, wring outthoroughly, and push sponge across the floor,pressing hard enough to loosen surface dirt.4. Damp-mop a small area at a time, wringing thesponge out frequently.5. When damp-mopping a large floor, change waterfrequently.6. A sponge mop with a nylon scrubbing p adattached to the front edge is recommended.7. Rinsing is important. Although detergentdirections may that state rinsing is unnecessary,any detergent film left on a floor will attract dirt.8. Ideally, use separate sponge mops for cleaningand rinsing.DO:1. Keep floor clean by damp-mopping with a mild multipurposeammoniated floor cleaner.2. Protect from tracked in sand and chemicals byproviding mats at entrances.3. Rotate panels between high- and low-traffic areas.4. Use a non-flammable organic solvent on soiledspots.DO NOT:1. Use wax seal—it is not necessary.2. Flood with liquid, or use anything other than a dampmop. Large amounts of water can weaken adhesiveand cause delamination.3. Use strong abrasives or scrapers to remove st ains.4
Panel Cutting ProcedureGuidelines for Cutting PanelsWhen it is necessary to penetrate and/or modify the floor p anels, follow these guidelines:1. Use proper equipment and follow the equipment manufacturer ’s recommended safety precautions.2. Use protective trim around exposed edges for cutout s within a panel and cutouts through the panel edge.Rectangular Cutouts, External &InternalPanels with cutouts extending to the edge of thepanel can be cut with a handsaw. Cutouts insidethe perimeter of the panel can be cut with aheavy-duty handheld reciprocating saw. A cutoutshould be at least 3 inches from the p aneledge to maintain a reasonable degree ofstructural integrity.Use bi-metal saw blades with approximately 14teethper inch. (Cutout sizes for <strong>Tate</strong> accessories areshown in figure 15).Round CutoutsRound or grommet cutouts can be made with ahole saw up to 6" in diameter. A drill press isrecommended for this operation. Use a very slowspeedheavy-duty drill with a bi-metal cutting holesaw blade. With a hand-held drill, pre-drill a hole atthe center of the cutout location. For round holeslarger than 6", lay out the circle on the p anel. Drillone entry hole along the edge of the circle justinside of the line and cut out the p anel with areciprocating saw, thendeburr all sharp edges.For a rectangular inside cutout:I. Lay the cutout on the p anel (see Figure 16).2. Drill pilot holes in two opposite corners. Be surethe holes are large enough for the saw blade topass through without binding.3. Cut out the hole.4. Deburr all cutouts made for grills or electricalboxes where no trim will be used.6 3/8”10 1/2”6 3/4”1 7/8”3”Pilot HolesPilot HolesPVD Cutout HoleSizes10 1/2”5”Grommet CutoutHole SizesFigure 16 Laying Out Internal Cutout sFactory Made CutoutsIt is advisable to have internal cutouts (round andrectangular) cut in the factory whenever the sizeand location is known in advance. Doing this willsave you considerable time during installation.Figure 15 Cutout Sizes for <strong>Tate</strong><strong>Access</strong>ories5
Installing Protective Trim around CutEdgesAll rectangular cutouts to be used as a p assagewayfor cables or other services must have protective trimalong the cut edges. <strong>Tate</strong>'s cable cutout trimcomponents include universal cutout trim in 4-footlengths, molded corners and screws. An optional foamplenum seal is available to seal the opening.Before cutting the trim, note how the molded cornershold the trim in place. Cut the vinyl trim pieces straightat each end so that the ends can fit under the corners(figure 17).Secure each molded corner in place with a screwfastened into the panel. If the cutout extends to theedge of the panel,attach the trim nearthe edge of the panelwithout moldedcorners. To do this,attach the straightpiece directly to thepanel with a pop(blind) rivet or screw.If a screw is used,countersink the screwin the trim piece.Safety Requirements for Panel CuttingWhen using a hand-held heavy duty (industrial)reciprocating saw, follow the guidelines below:a) Use a bench or worktable to cut the panels,i.e. a B&D Workmate bench with clamps.b) Work in a well-lighted areac) Be sure tools are properly grounded and dry.d) Use the correct saw blade (14 to 20 teeth perinch metal cutting blade).e) Be sure the entry hole is large enough to st artthe saw blade without binding.f) Use common sense to avoid personal injuryg) Always use safety equipment including:- Ear protection- Safety glasses and full face shield (clearplastic)- Long sleeve shirt or sleeve protectors- Lightweight work gloves for protection fromsharp metal edges and hot saw dust)- Steel toe safety shoes or bootsSupporting a Cut Panel:When it is necessary to retain the design load capacity of a panel after it has been cut, an ef fectivesolution is to use additional pedestal supports. Guidelines for the number and location of additionalsupports are outlined below:6
Electrical GuidelinesFloor Static Control for Computer RoomsStandard HPL coverings are classified as antistaticcoverings and provide the necessary st atic protectionfor most computer rooms. According to industrystandards, to ensure a proper balance betweeninsulation and conductivity in anti-static floor coverings,the electrical resistance range of the floor coveringshould range from 150,000 to 20 billion ohms. S tandardhigh-pressure laminates offered by <strong>Tate</strong> adhere to theseguidelines.*Static buildup and discharge can be minimized by• providing a conductive path to ground from ametallic raised floor structure, including the met alpanels;• ensuring that a maximum resistance for the flooringsystem is 2 x 10 10 ohms, measured between thefloor surface and the building (or an applicable• ground reference). Flooring material with a lowerresistance will further decrease static buildup anddischarge. For safety, the floor covering and flooringsystem shall provide a resistance of not less than150 kilohms (150,000 ohms) when measuredbetween any two points on the floor space 1m (3 ft)apart.Maintenance of antistatic floor coverings should followthe individual supplier's recommendations.*Based on IBM Resistivity Range,from the IBM General Information <strong>Manual</strong>, Second Edition, publication numbers GC22-7072-1,dated January 1987.
Test StandardsThere are no industry standards for access floor loading performance. However,The Ceilings & Interiors SystemsConstruction Association (CISCA) has published Recommended Test Procedures for <strong>Access</strong> <strong>Floors</strong> for concentrated,ultimate, rolling, stringer, pedestal axial and pedestal overturning moment loads. <strong>Tate</strong> utilizes CISCA guidelines in thedevelopment of all test procedures.Static LoadsConcentratedThese loads are applied on a small area of the p anelsurface,i.e. from a deskleg or computer frame. Theconcentrated load is applied on a 1"x1" indentor , anddeflection is measured at the top surface under the load.Permanent set (rebound) is measured after the loadis removed.Dynamic LoadsRollingThese loads are applied by wheeled vehicles carryingloads across the floor, i.e. chair casters, pallet jacks,and electronicmail carts. Dynamic loads are defined bywheel size and hardness, weight of vehicles, content s,and number of passes.UniformUniform loads, expressed in pounds per square foot,are applied over the entire surface of the p anel, i.e. a filecabinet.ImpactImpact loads are achieved by dropping object s on thefloor, i.e. a box of computer p aper dropped from waistheight. Impact loads are defined by weight, imp actsurface area and distance dropped.UltimateThese loads are reached when the p anel has failedstructurally and cannot accept additional load.8
All Steel PanelConCore ® PanelFloating <strong>Floors</strong> ® PanelPosiTile ® PanelCorporate Headquarters<strong>Tate</strong> <strong>Access</strong> <strong>Floors</strong>, Inc.7510 Montevideo RoadJessup, MD 20794www.tateaccessfloors.comTel: 410-799-4200Fax: 410-799-4207Production Facilities<strong>Tate</strong> <strong>Access</strong> <strong>Floors</strong>, Inc.7510 Montevideo RoadJessup, MD 20794<strong>Tate</strong> <strong>Access</strong> <strong>Floors</strong>, Inc.52 Springvale RoadRed Lion, PA 17356<strong>Tate</strong> ® Building Technology Platform ® , ConCore ® , PosiLock ® and PosiTile ® are registered trademarks of <strong>Tate</strong> <strong>Access</strong> <strong>Floors</strong>, Inc.PVD Servicenter is a trademark of <strong>Tate</strong> <strong>Access</strong> <strong>Floors</strong>, Inc.© 2001 <strong>Tate</strong> <strong>Access</strong> <strong>Floors</strong>, Inc.9


