PowerPoint: Pack and Go
PowerPoint: Pack and Go
PowerPoint: Pack and Go

Create successful ePaper yourself
Turn your PDF publications into a flip-book with our unique Google optimized e-Paper software.
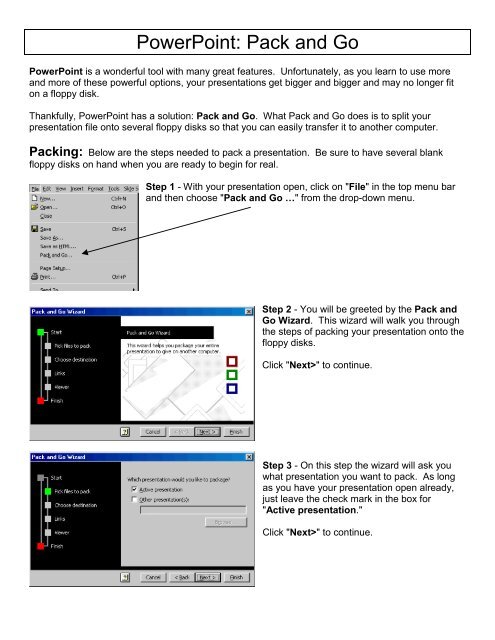
<strong>PowerPoint</strong>: <strong>Pack</strong> <strong>and</strong> <strong>Go</strong><strong>PowerPoint</strong> is a wonderful tool with many great features. Unfortunately, as you learn to use more<strong>and</strong> more of these powerful options, your presentations get bigger <strong>and</strong> bigger <strong>and</strong> may no longer fiton a floppy disk.Thankfully, <strong>PowerPoint</strong> has a solution: <strong>Pack</strong> <strong>and</strong> <strong>Go</strong>. What <strong>Pack</strong> <strong>and</strong> <strong>Go</strong> does is to split yourpresentation file onto several floppy disks so that you can easily transfer it to another computer.<strong>Pack</strong>ing: Below are the steps needed to pack a presentation. Be sure to have several blankfloppy disks on h<strong>and</strong> when you are ready to begin for real.Step 1 - With your presentation open, click on "File" in the top menu bar<strong>and</strong> then choose "<strong>Pack</strong> <strong>and</strong> <strong>Go</strong> …" from the drop-down menu.Step 2 - You will be greeted by the <strong>Pack</strong> <strong>and</strong><strong>Go</strong> Wizard. This wizard will walk you throughthe steps of packing your presentation onto thefloppy disks.Click "Next>" to continue.Step 3 - On this step the wizard will ask youwhat presentation you want to pack. As longas you have your presentation open already,just leave the check mark in the box for"Active presentation."Click "Next>" to continue.
Step 4 - Now the wizard asks where to copythe presentation. Since we are trying to put thepresentation onto floppy disks you just want tomake sure that "A:\ drive" is selected.Click "Next>" to continue.Step 5 - Next the wizard wants to know whatextra files you would like to include in thepacked presentation.Choose "Include linked files" to pack video<strong>and</strong> audio clips along with your presentation.Choose "Embed TrueType fonts" to includethe fonts you used, so your presentation isguaranteed to look the way you designed it.Click "Next>" to continue.Step 6 - You now have the option to include a<strong>PowerPoint</strong> Viewer with your presentation.This would only be needed if the computer youare taking the presentation to does not have<strong>PowerPoint</strong>. Usually it is best to just leave"Don't include the Viewer" selected.Click "Next>" to continue.Step 7 - Now <strong>PowerPoint</strong> is ready to pack yourpresentation.Be sure to insert a blank formatted floppy diskinto you’re "A drive" if you have not alreadydone so.Click "Finish" to continue.<strong>PowerPoint</strong>: <strong>Pack</strong> <strong>and</strong> <strong>Go</strong> - Page 2
Step 8 - <strong>PowerPoint</strong> will now begin to put your presentation onto yourfloppy disk. The process can take quite a while.If <strong>PowerPoint</strong> needs more disks it will ask you to insert another one. Besure to number the disks so you can keep them in the proper order forlater.Step 9 - When <strong>PowerPoint</strong> is done packingyour presentation you will get this message.Click "OK" <strong>and</strong> remove your final disk. Be surethey are all properly numbered.Unpacking: Below are the steps needed when you are ready to unpack your presentation onanother computer.Step 1- Begin by making sure you have all thefloppy disks in the proper order from the <strong>Pack</strong><strong>and</strong> <strong>Go</strong> operation. Insert Disk #1 into yourfloppy drive.Now find the "My Computer" icon on yourdesktop <strong>and</strong> double click it to open it up.You will get something like the window on theleft.Now double click on the icon for "3 1/2 Floppy(A:)"Step 2 - When the window for the floppy drive opensyou should get something like the picture to the left.Locate the icon labeled "Pngsetup" <strong>and</strong> double clickit. This will begin the unpacking procedure.<strong>PowerPoint</strong>: <strong>Pack</strong> <strong>and</strong> <strong>Go</strong> - Page 3
Step 3 - Now you will be asked where to unpack thepresentation to. It is probably easiest to simply allow itto be unpacked to the root directory of your hard drive,which is Drive C.Just click "OK" to continue.Step 4 - You will now probably get this warning,which is perfectly fine. Just click "Yes" to proceed.Step 5 - If <strong>Pack</strong> <strong>and</strong> <strong>Go</strong> needs another disk, it will ask you to insert thenext one. Make sure to insert the disks in order.Step 6 - When the presentation is unpacked you willget a message telling you it was a success.If you wish to run the presentation now, you can click"Yes"If you wish to open the presentation later, you will find it in the root directory of your hard drive, whichis Drive C. It will NOT be in the "My Documents" directory, where you are probably used to finding allOffice files.In <strong>PowerPoint</strong>, click "File" <strong>and</strong>then "Open…" from the dropdown menu.Click on the down black arrow atthe end of the "Look in:" box.Click on the hard drive icon (C:)to look at what is on your harddrive.You will now be able to scrollthrough the files to find yourunpacked presentation.Questions, comments, concerns? Email me at:tech@viking.stark.k12.oh.us or ecurts@neo.rr.comCopyright 2001 – Eric Curts<strong>PowerPoint</strong>: <strong>Pack</strong> <strong>and</strong> <strong>Go</strong> - Page 4