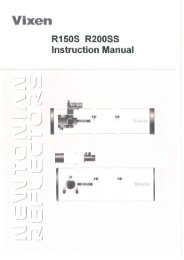
Instruction Manual for XY Dot Finder - Vixen Optics
Instruction Manual for XY Dot Finder - Vixen Optics
Instruction Manual for XY Dot Finder - Vixen Optics

Create successful ePaper yourself
Turn your PDF publications into a flip-book with our unique Google optimized e-Paper software.
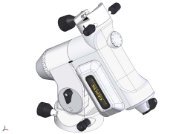
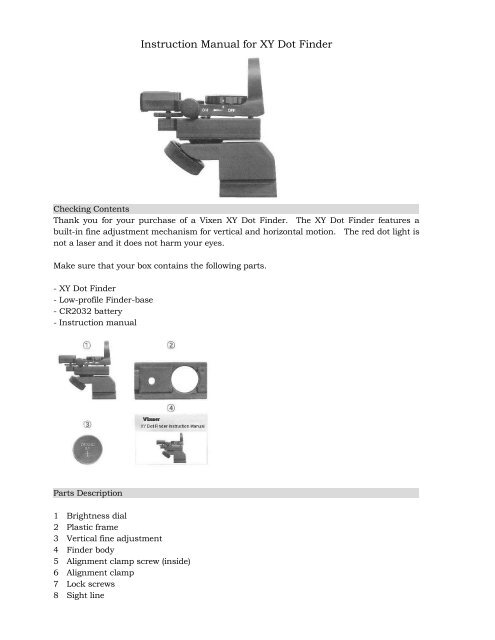
<strong>Instruction</strong> <strong>Manual</strong> <strong>for</strong> <strong>XY</strong> <strong>Dot</strong> <strong>Finder</strong>Checking ContentsThank you <strong>for</strong> your purchase of a <strong>Vixen</strong> <strong>XY</strong> <strong>Dot</strong> <strong>Finder</strong>. The <strong>XY</strong> <strong>Dot</strong> <strong>Finder</strong> features abuilt-in fine adjustment mechanism <strong>for</strong> vertical and horizontal motion. The red dot light isnot a laser and it does not harm your eyes.Make sure that your box contains the following parts.- <strong>XY</strong> <strong>Dot</strong> <strong>Finder</strong>- Low-profile <strong>Finder</strong>-base- CR2032 battery- <strong>Instruction</strong> manualParts Description1 Brightness dial2 Plastic frame3 Vertical fine adjustment4 <strong>Finder</strong> body5 Alignment clamp screw (inside)6 Alignment clamp7 Lock screws8 Sight line
9 Horizontal fine adjustment10 Zero-power objective lens (inside)11 Guidepost (inside)12 <strong>Finder</strong> holding plate (underneath)13 <strong>Finder</strong> bracket14 Mounting block15 Battery container coverAttaching the <strong>XY</strong> <strong>Dot</strong> <strong>Finder</strong> to the telescope tube1) Loosen the finder bracket fixing screw fully to allow insertion of the dovetail mountingblock of the <strong>XY</strong> <strong>Dot</strong> <strong>Finder</strong> unit.2) Attach the <strong>XY</strong> <strong>Dot</strong> <strong>Finder</strong> to the telescope as shown in the figure 2, tighten the finderbracket fixing screw securely (The mounting block is made of plastic and over tightening thefixing screw may cause damage.).
3) Unfasten the alignment clamp by turning counter-clockwise and set the finder bodyroughly in parallel with the telescope tube. Then, fasten the alignment clamp by turningclockwise.4) Choose a conspicuous target in the distance and place the target in the center of the field ofview of the telescope at low power.Please read the instruction manual supplied with the telescope to understand how to align the finderscope.Adjusting and Aligning the <strong>XY</strong> <strong>Dot</strong> <strong>Finder</strong>1) Activate the red dot by turning the brightness dial to clockwise. The brightness of the reddot can be adjusted freely by turning it to obtain brightness suitable <strong>for</strong> viewing.The red dot goes off when the dot marked on the brightness dial is aligned with the dot on the finderbody.2) Confirm the red dot can be seen in alignment with the sight line and the guidepost in thelower middle of the zero-power objective lens. Then, point the red dot toward your targetobject as you look through the telescope in order to align the field of view of the <strong>XY</strong> <strong>Dot</strong> <strong>Finder</strong>with the field of view of the telescope.
The red dot comes into focus when you view infinity.3) Position the red dot by using the fine adjustments, which can move the finder in verticaland horizontal directions independently. Place the target and the red dot so they overlapeach other.4) After you finish the alignment, turn off the red dot by turning the brightness dialcounter-clockwise until it clicks.Now the <strong>XY</strong> <strong>Dot</strong> <strong>Finder</strong> is ready <strong>for</strong> use. Turn on the red dot when you begin your observingsession.Do not <strong>for</strong>ce the brightness dial. This may damage your adjustments <strong>for</strong> alignment.Replacing the BatteryThe <strong>XY</strong> <strong>Dot</strong> <strong>Finder</strong> comes with the CR2032 battery.1) Make sure that the brightness dial is in off position. Open the top battery container coverby turning counter-clockwise while holding down the brightness dial as shown in the figure 1right.
2) Push down the rim of the battery to squeeze out the battery from the battery container.Remove it and replace with a fresh battery.3) Put the battery container cover back in place and close it.Using the <strong>XY</strong> <strong>Dot</strong> <strong>Finder</strong> in the daytime (e.g. Digi-scoping) exhausts the battery very quickly as the reddot is apt to be set at its maximum brightness. Carry an extra battery, just in case.Attaching the Low-profile <strong>Finder</strong>-base (at your option)The low-profile finder-base has a 1/4-20 thread <strong>for</strong> general use.1) You will need the low-profile finder-base and a Phillips screw driver together with the <strong>XY</strong><strong>Dot</strong> <strong>Finder</strong>. (The mounting block is preset to the <strong>XY</strong> <strong>Dot</strong> <strong>Finder</strong> at <strong>Vixen</strong>’s factory as shownin the figure.)
2) Loosen the two screws on the side of the finder body to detach the finder bracket from the<strong>XY</strong> <strong>Dot</strong> <strong>Finder</strong>. (The finder bracket can be removed with a back and <strong>for</strong>th slide motion as youloosen the screws.)3) Attach the low-profile finder-base on the back of the finder body and tighten the two screwssecurely. (The low-profile finder-base has a front and rear, but you can attach it either wayaccording to your needs.)4) This <strong>XY</strong> <strong>Dot</strong> <strong>Finder</strong> is not compatible with the previous <strong>Vixen</strong> <strong>Dot</strong> <strong>Finder</strong> models.Tips on using the <strong>XY</strong> <strong>Dot</strong> <strong>Finder</strong>Loosening the alignment clamp will allow you to turn the <strong>XY</strong> <strong>Dot</strong> <strong>Finder</strong> to 180 degreeslaterally. This may facilitate your viewing through the eyepiece if the alignment clamp causesinterference. Please change the orientation of the alignment clamp if this is the case.