ContentsSafety Instructions Page 1Introduction Page 2Features Page 2What’s in the Box Page 3Unpacking Page 3<strong>Setup</strong> and Operation Page 6-10Troubleshooting Page 11Specifications Page 13Contact Us Page 14Warranty Information Page 15Basic Safety Instructions• Read these instructions for all components before using thisproduct.• Keep these instructions for future reference.• Heed all warnings on the product and in the owner's guide.• Follow all instructions.• Do not use this apparatus near water or moisture. Do not usethis product near a bathtub, washbowl, kitchen sink, laundrytub, in a wet basement, near a swimming pool, or anywhereelse that water or moisture are present.• Clean only with a dry cloth and as directed by themanufacturer. Unplug this product from the wall outletbefore cleaning.• Do not block any ventilation openings. Install in accordancewith the manufacturer's instructions. To ensure reliableoperation of the product and to protect it from overheating,put the product in a position and location that will notinterfere with its proper ventilation. For example, do notplace the product on a bed, sofa, or similar surface that mayblock the ventilation openings. Do not put it in a built-insystem, such as a bookcase or a cabinet that may keep air• Do not install near any heat sources, such as radiators, heatregisters, stoves or other apparatus that produce heat.• Do not defeat the safety purpose of the polarized orgrounding-type plug. A polarized plug has two blades withone wider than the other. A grounding-type plug has twoblades and a third grounding prong. The wider blade or thirdprong are provided for your safety. If the provided plug doesthe obsolete outlet.• Protect the power cord from being walked on or pinched,particularly at plugs, convenience receptacles, and the pointwhere they exit from the apparatus.•manufacturer.• Use only with the cart, stand, tripod, bracket or tableWhen a cart is used, use caution when moving the cart/apparatus combination to avoid injury from tip-over.• Unplug this apparatus during lightning storms or whenunused for long periods of time to prevent damage to thisproduct.•• Servicing is required when the apparatus has been damagedin any way such as power supply cord or plug is damaged,liquid has been spilled or objects have fallen into theapparatus, the apparatus has been exposed to rain ormoisture, does not operate normally, or has been dropped.Do not attempt to service this product yourself. Opening orremoving covers may expose you to dangerous voltages orother hazards. Please contact the manufacturer to be referredto an authorized service center near you.•wall outlets, extension cords, or integral conveniencereceptacles .• Do not let objects or liquids enter the product as they maytouch dangerous voltage points or short out parts that could• See product enclosure bottom for safety related markings.• Use Proper Power Sources. Plug the product into a properpower source, as described in the operating instructions or asmarked on the product.• Avoid power lines– Use extreme care when installing anoutside antenna system to keep from touching power lines orcircuits, as contact with them may be fatal. Do not installexternal antennas near overhead power lines or other electriclight or power circuits, nor where an antenna can fall intosuch circuits or power lines.This device complies with part 15 of the FCC Rules.Operation is subject to the following two conditions: This devicemay not cause harmful interference and this device must acceptany interference received, including interference that may causeundesired operation.CAUTIONRISK OF ELECTRICAL SHOCKDO NOT OPENCAUTION: TO REDUCE THE RISK OF ELECTRIC SHOCK,DO NOT REMOVE COVER (OR BACK.)NO USER-SERVICABLE PARTS INSIDE.REFER SERVICING TO QUALIFIED PERSONNELAVISRISQUE DE CHOC ÉLECTRIQUENE PAS OUVRIRATTENTION: POUR RÉDUIRE LE RISQUE DE DÉCHARGEÉLECTIQUE, NE RETIREZ PAS LE COUVERCLE (OUL’ARRIÈRE.) IL NE SE TROUVE ÀL’INTÉRIEURAUCUNEPIÉCE POUVANT ÊTRE RÉPARÉE PAR L’USAGER.S’ADRESSER ÀUN REÉPARATEUR COMÉTENT.audioengine A5+ setup guideaudioengine A5+ setup guide1
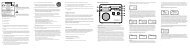
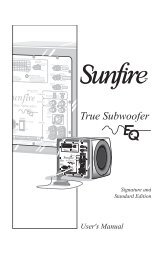
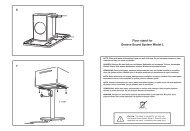
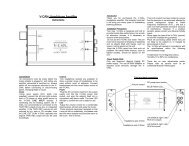
IntroductionWelcome to the Audioengine family and congratulations on yourpurchase of the Audioengine 5+ Premium Powered Speakers!The Audioengine team is dedicated to bringing you the highest-qualitylistening experience possible and the Audioengine 5+ (A5+) speakerswere designed with the same attention to detail and operationalsimplicity as all other Audioengine products. As with our other pastefforts we thank our customers, distributors and resellers for the inspirationto create another great Audioengine product.Features• Built-in power amplifiers• Dual RCA and mini-jack audio inputs• USB power charge port• Remote control• Front panel volume control• Variable preamp audio output• Gold-plated connectors• Full-size 5-way speaker binding posts• Custom Kevlar woofers and silk tweeters• Hand-built MDF wood cabinets• Magnetically-shielded• Cables includedWhat’s in the Box(1) A5+ powered (left) speaker(1) A5+ passive (right) speaker(1) Remote control(1) Speaker wire (16AWG), 3.75 meters (~12.3ft)(1) Detachable AC power cord(1) 3.5mm mini-jack to mini-jack audio cable, 2 meters (~6.5ft)(1) RCA to RCA audio cable, 2 meters (~6.5ft)(2) Cloth speaker bag(1) Cloth cable bag(1) <strong>Setup</strong> guide(1) Product line brochureWorks With• Any computer (Mac or PC)• iPod, iPhone, and iPad (all iDevices)• Audioengine wireless audio adapters• Apple Airport Express + Airplay• Any product with mini-jack or RCA audio outputsUnpackingYour Audioengine 5+ speakers were carefully tested and inspectedbefore packaging and shipping. After unpacking please check for anydamage. It is rare that any damage occurs during shipping, but if thisdoes happen contact the shipping company immediately. We alsorecommend that you keep the original carton and packing material.2 audioengine A5+ setup guideaudioengine A5+ setup guide3