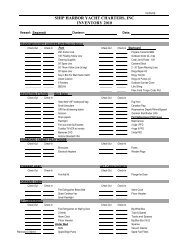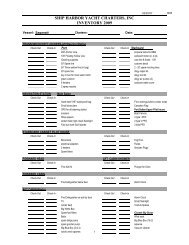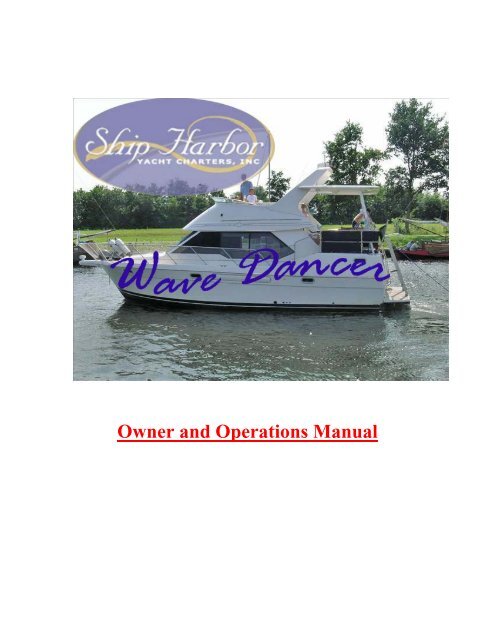
Owner and Operations Manual - Ship Harbor Yacht Charters
Owner and Operations Manual - Ship Harbor Yacht Charters
Owner and Operations Manual - Ship Harbor Yacht Charters

Create successful ePaper yourself
Turn your PDF publications into a flip-book with our unique Google optimized e-Paper software.
<strong>Owner</strong> <strong>and</strong> <strong>Operations</strong> <strong>Manual</strong>
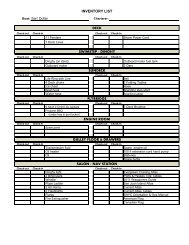
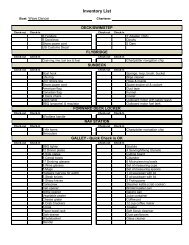
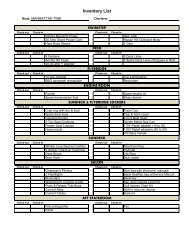
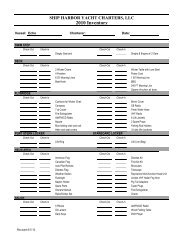
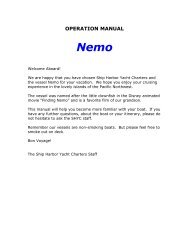
OPERATION MANUALWave DancerWelcome Aboard!We are happy that you have chosen <strong>Ship</strong> <strong>Harbor</strong> <strong>Yacht</strong> <strong>Charters</strong> <strong>and</strong>the vessel Wave Dancerfor your vacation. We hope you enjoy yourcruising experience in the lovely isl<strong>and</strong>s of the Pacific Northwest.This manual will help you become more familiar with your boat. If youhave any further questions, about the boat or your itinerary, please donot hesitate to ask the SHYC staff.Remember our vessels are non-smoking boats. But please feel free tosmoke out on deck.Bon Voyage!The <strong>Ship</strong> <strong>Harbor</strong> <strong>Yacht</strong> <strong>Charters</strong> Staff1
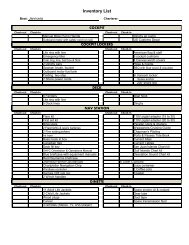
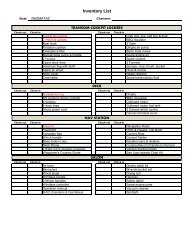
TABLE OF CONTENTSBoat OperationPageEngine Inspection 4Start-UpShutdownGetting Underway 5CruisingDockingFuelingBoat ElectricalA.C. (Shore) Power 6InverterD.C. (House) SystemsBatteriesSanitation System 7Marine ToiletHolding Tank(s)Y-ValveWater Systems 8Fresh Water TanksFresh Water PumpHot WaterShowerGalley 9PropaneRefrigeration/ Ice MakerStove/ OvenHeating Systems 9Diesel Heater (DC)Electric Cabin Heat (AC)Engine Generated (DC)Electronics 10VHF Radio, Depth Sounder, RadarGPS2
Anchoring 10EntertainmentStereo/ CD PlayerCD RadioTVBar-B-QueDingy/ Outboard 11SafetyCruising RestrictionsM.O. B.Dead Heads/ DebrisCrabbing/FishingThru-Hull Diagram 13Fill Diagram 143
BOAT OPERATIONEngine InspectionRemember your “WOBBS” every morning. (Water (Coolant), Oil, Bilges (Inspect <strong>and</strong>Pump-out), Belts, <strong>and</strong> Sea Strainer. Check the level of COOLANT in the expansiontanks. Check the level of your engine oil with the dipsticks. Your dipsticks arelocated central isle aft quarter of each engine. Look at the etch mark on eachdipstick that indicate proper levels. DO NOT OVERFILL! Only fill if oil levels are belowthe ½ mark. Check the general condition of the hoses <strong>and</strong> belts. Pump the oil waterseparator before you crank the engines.Ensure the valves on each RAW WATER THRU-HULL are OPEN! (Lever in-line withvalve). Observe through the glass of each sea strainer for debris. If necessary,close the thru-hull, open the strainer lid, clean out debris, <strong>and</strong> reassemble. REOPENthe Thru-hull!Start UpHaving finished your inspection, start your engines from the lower helm station.Ensure that Gearshifts are in neutral or the engines will not start (neutral lockout)Run your throttles up <strong>and</strong> bring back to just above the idle position. Inset both keysinto the ignition <strong>and</strong> turn the key starting with the either engine.Turn the key clockwise until the engine alarm sounds <strong>and</strong> pre-heat the engine. Afterpre heat buzzer stops turn key fully to engage the engine. If the engine does notturn over, move the gearshift slightly while turning the key until the engine engages.If the engine cranks slowly, check the condition of your batteries at the electricalpanel. If the battery is low, engage the Battery Parallel Switch located on helm toconnect other batteries. After the engine has started, return Battery Parallel Switchto “Off”.After the engine starts, warm it up at about 1000rpms for about 5 minutes. Observeyour gauge readings. Oil pressure reads around 20-30 psi <strong>and</strong> water temp around100 degrees. Engine temperature should rise very slowly.Note: If water temp.is high or oil pressure low, shut down engine <strong>and</strong> look forproblem. Was there a lack of water exiting with exhaust? Are thru-hulls open <strong>and</strong>debris cleared from sea-strainer? If problem keeps occurring, call SHYC Service.Shut DownBefore shutting down, let engines idle for about 5 minutes letting them cool. Ensureeach gearshift is in the neutral position <strong>and</strong> each throttle is in idle. Turn off theengines by turning off the keyed ignition switches on the lower helm.4
Getting UnderwayDisconnect the shore power cord (see AC Power next page). Close portholes,windows, <strong>and</strong> hatches. Turn on VHF <strong>and</strong> electronics. Assign crewmembers to theirtasks. Once outside marina, have crew members bring in fenders <strong>and</strong> put lines away.CruisingAll close quarter maneuving should always take place at the upper helm. Makecertain the throttles are in idle <strong>and</strong> engage the gearshifts. Slowly come up tocruising speed of 2100 rpms. If you run at 2100 rpms, you will cruise at approx. 15knots, using only 10 gallons of diesel/hour. Your speed may vary depending onweight, load, <strong>and</strong> weather conditions. Trim Tabs can bring the bow down to the idlecruising position. Watch your speed on the GPS as you adjust.Note: Avoid high engine speeds as it causes the engine to overheat causing damageas well as high fuel consumption.DockingDuring docking, use the upper helm for the best visibility. Give clear instructions tothe crew on what you will expect of them i.e. with lines <strong>and</strong> fenders.Ensure trim tabs are rocked back up for slow speed backing. While moving slowlytowards the dock, center the wheel <strong>and</strong> use the gears <strong>and</strong> throttles to maneuver thevessel. Throttles should only be used in moderate to windy conditions. Otherwise,the use of the transmission should be sufficient.Fueling UpOpen filler caps located outside on either side of deck with the deck-fitting key keptnear the lower helm. MAKE SURE YOU HAVE DIESEL! Make sure it is going into theright deck fill! DOUBLE-CHECK! Before pumping, have your oil/fuel sorb ready tosoak up any spilled fuel. You should have a rough idea of how many galleons youwill need, but have someone check the fuel gauge periodically by turning on the key.Put Diesel nozzle into the deck fitting <strong>and</strong> pump slowly listening to the sound of theflow. Pumping too fast may not allow excess air to escape, which will lead to spillageout the vent. As the tank fills, the sound will rise in pitch or gurgle. Pay attention tothe vent that it does not spill fuel into the water. Top off carefully, catching anyspillage with your sorb.Check your gauges. Replace the deck fill caps <strong>and</strong> turn on the engine room blowersfor a few minutes. Clean up any spatter <strong>and</strong> wash h<strong>and</strong>s thoroughly.5
BOAT ELECTRICALThe electrical system is divided into two distribution systems: 110 volt or AC <strong>and</strong> 12volt or DC. The systems are controlled from the electrical panel located next to thestairs to the aft stateroom <strong>and</strong> the battery switches located in the cabinet next to thelower helm.When not connected to shore power your batteries provide most of your electricalpower. Therefore the use of onboard electricity needs to be monitored verycarefully. Turn off electrical devices when they are not being used (lights,instruments, etc.)110 Volt or AC (Alternating Current)Shore Power supports all AC equipment <strong>and</strong> receptacles on board as well as thebattery charger.To connect to shore power, plug the power cord into the boat <strong>and</strong> then into the dockreceptacle. Check your power rating/plug size of the dock receptacle (i.e. 30amp, 20amp etc.) If necessary, add an adaptor located in the aft storage locker. Secure thecord around the shore power electrical receptacle <strong>and</strong> off the bow (i.e. wrap aroundbowline a few times) turn the dock power breaker on.On the boat, turn the shore circuit breaker on at the electrical panel. Turn onappropriate breakers for battery charger, refrigeration, water heater, Watch yourvoltmeter for load. If the load exceeds the voltage, it will pop the breaker. If thisoccurs, wait to turn on one of your systems (i.e. water heater) until the use of powerdecreases.InverterThe inverter provides AC power to the 110 receptacle plugs (i.e. microwave) whenthe boat is disconnected from shore power. The inverter does not supply power tothe water heater or battery charger. Your inverter panel is located next to the stairsto the aft stateroom with an on/off switch. Make certain it is on. The actual inverteris located in the rear lazarette. Your inverter also acts as a battery charger so makesure there is enough shore power available. The Inverter is powered by batterieslocated in the lazarett. The amount of DC power is limited to the capacity of thesebatteries so use it very sparingly!!! This means use of the toaster, hair dryer,microwave, coffee maker etc. must be limited!When connected to shore power, the inverter acts as a battery charger for theinverter batteries. To charge the house batteries, check the circuit breaker on theAC panel <strong>and</strong> the inverter panel to make certain that it is on. There is usually acircuit breaker located on the inverter itself that can get tripped during a surge ofpower.Only one circuit should be on at any given time. I.E. charge or invert not both.6
House 12-volt SystemFour battery banks support your 12 volt system: #1 Port Engine Start #2 StarboardEngine Start #3 House Battery Bank #4 Inverter BankYour battery switches are located next to the lower helm station. Normally you willleave the switches in the on position. Note: Changing the position of the batteryswitches with the engine running will cause damage! Only change positions with theengine off!Your 12-volt panel shows all the systems supported by your batteries. Primarily youwill be turning on these breakers for lights, water pressure, electronics, etc. Bilgepumps will always be left on. When disconnected from shore power, the 12–voltsystems will drain the battery especially when at anchor. Monitor your batteries verycarefully. The DC voltmeter on the DC panel can be switched between your batterybanks to measure battery voltage. Typically the bank should read from about 13.0to 14.5 volts when being charged. While at rest, your voltage will drop as indicatedin the figures below.All your batteries are charged while underway by the alternator. The engine <strong>and</strong>house batteries are charged by the battery charger while connected to shore power.Ensure that the charger is on as well as the inverter charger.Voltage Battery State of Charge12.65 volts 100%12.47 volts 75 %12.25 volts 50 %11.95 volts 25 %11.70 volts 0 %SANITATION SYSTEMMarine ToiletIt is imperative that every member of the crew be informed on the proper use of amarine head. The valves, openings, <strong>and</strong> pumps are small <strong>and</strong> will clog easily. If thehead gets clogged, it is your responsibility! Always pump the head for small childrenso you can be certain of what is being flushed. Note: Never put in paper towels,napkins, sanitary products, household T.P., or food into marine heads. Use onlymarine T.P. provided by SHYC.To use toilet, move selector switch to the “wet bowl” position. Pump the h<strong>and</strong>le 3-5times to wet the bowl. After using head, pump to remove waste from bowl (approx.20 times). Then return selector back to “dry bowl” position <strong>and</strong> pump for a fewtimes until bowl is dry.Your toilet raw water intake is located near mid bilge for the forward head <strong>and</strong> undershelf on aft wall of aft cabin for aft head, if you should need to shut off the water tothe toilet.Should the toilet squeak or be a bit sticky to pump, lubricate with a couple of squirtsof dish soap or salad oil. Put in bowl <strong>and</strong> pump 2-3 times to get it to pump <strong>and</strong>leave overnight. Again, leave in the “dry bowl” position.7
Holding TanksYour sanitation holding tanks holds approximately 25 gallons. Be aware of the rateof waste production (about 1 gallon/flush). If you overfill your tank, you will break ahose, clog a vent, or burst the tank, which is an indescribable catastrophe! And avery expensive fix for you. Empty the tank at least every other day to avoid anyproblems.The holding tank is located forward under steps to front berth <strong>and</strong> rear under thefloor in rear stateroom. Some may be subject to a visual check with a flashlight orthe “watermelon test” by thumping it. There is a tank watch warning light located ineach bathroom. But do not rely on this as they are subject to being inaccurate.The holding tank is emptied in one of two ways:#1 at the pump-out station, remove the deck waste cap located starboard side fore<strong>and</strong> aft. Insert the pump-out nozzle into the waste opening. Double-check that youhave the right deck opening! Turn on the pump on the dock <strong>and</strong> open the valve onthe h<strong>and</strong>le of the hose. When pumping is finished, close lever on h<strong>and</strong>le <strong>and</strong> turn offpump. Remove from deck fill.If there is a fresh water hose on the dock, rinse the tank by adding water for 1-2minutes. Then re-pump to leave the tank rinsed <strong>and</strong> clean for the benefit of the nextcharterer. This also eliminates any head odors.#2 the tank’s contents can also be discharged at sea by using the macerator(Seal<strong>and</strong> pump). To operate the macerator, depress macerator switch, <strong>and</strong> pumpuntil pitch becomes higher indicating an empty tank. This should take about 2minutes. Discharge can be seen on the starboard side of the boat. Note:Overboard discharge is only allowed in Canadian waters. It is illegal to dischargeoverboard within U.S. waters.Y-ValveThe Y valve directs the flow of waste into the holding tank or directly overboard. TheY Valve is located under floor in front <strong>and</strong> near through hull in aft. To flush directlyoverboard, move the h<strong>and</strong>le in line with the overboard hose. Usually, because ofCoast Guard regulations the Y- Valve will be wire-tied to the holding tank position.WATER SYSTEMFresh Water Tank/ Pump/ Hot Water HeaterThe fresh water tank(s) holds approximately 30 gallons <strong>and</strong> is located under the aftstateroom berth. Observe the water level by gauge on the electric panel. To fill thetank, remove the deck water fill cap located starboard side of stairs from lazarett.Fill the tank avoiding flushing debris into the tank. Do not fill water <strong>and</strong> diesel at thesame time. Wastewater from the sinks <strong>and</strong> showers drains overboard throughvarious thru-hulls usually located under the sinksThe water pressure pump is located under the aft berth. Activate the pump byturning on the breaker at the DC panel. If when in use, the pump continues to run,8
you are either out of water or have an air lock, which can be corrected by opening afaucet. If you run out of water, shut off pump <strong>and</strong> turn off hot water heater on ACpanel. You can cause serious damage to the heating element.The hot water heater has an 11-gallon capacity. It is heated when the AC breaker ison while connected to shore power or running the starboard engine. Do not use thewater heater if the water level is low. The water heater is located under the lowerhelm location.ShowerBefore taking a shower, make sure the water pressure <strong>and</strong> shower sump pumpbreakers are on. Take short “boat” showers by turning off the water betweensoaping <strong>and</strong> rinsing. Please wipe down the shower stall <strong>and</strong> floor when finished tokeep shower tidy. Pick up any accumulation of hair in the drains as it clogs thehoses. Ensure that the faucets are tightly turned off after each shower to savewater. Whenever you visit a harbor fill up the water <strong>and</strong> plug into power.GALLEYPropaneThe boat is equipped with a low-pressure propane system for cooking. The propanetank is located in the aft storage locker. Open the tank valve. Turn on the propanesolenoid switch in the galley. When lighting the first time, allow a few seconds forthe gas to travel from the tank to the stove. You might need to keep the stovetop orthe oven in the light position for a few more seconds while the thermo-couplerwarms up. Do not leave any thing on the stove that can catch fire!To ensure safety, turn off the propane solenoid switch, the propane at the bottle.RefrigeratorThe refrigerator is dual voltage (12 volt <strong>and</strong> 110). It will automatically use the 110-volt power when shore power is on <strong>and</strong> the AC breaker flipped on. Carefully monitorthe use of the refrigerator when the engines are not charging the 12-volt system aswhen you are at anchor. Use a cooler when possible for all your drinks to keep therefrigerator door closed as much as possible.The power switch is located below the front door of the fridge. It can be turneddown at night to conserve energy while anchored or moored.HEATThe Webasto diesel heater is located in the lazarett. It provides heat much like yourhousehold furnace. Turn on the toggle switch in the main salon <strong>and</strong> set thetemperature at the desired temperature. Check the exhaust port on the portamidships to make certain that no obstruction such as a fender or line exists. Letthe furnace run at least 15 minutes before turning it off. Turn the furnace off backat the thermostat.9
Cabin heat is also available through a “red Dot” heat system when the engine isrunning. Press the rocker switch located on the wall near the front berthcompanionway to the appropriate setting. When the engine is not running, turn offto conserve heat.ELECTRONICSThere are two VHF radios located near each helm station. Make sure the breaker ison at the DC Panel. Always monitor Channel 16 while underway.There are two depth sounders located on the upper <strong>and</strong> lower helm. To activate,ensure that the DC breaker is on. Turn on the depth sounder by pressing <strong>and</strong>holding the on button. Both sounders use the same transducer <strong>and</strong> only one can beon at any given time.The sounder is reliable in waters less then 200 feet <strong>and</strong> at slower speeds. If yourreading is blinking, it might be a false reading due to excessive depths or strongcurrents! Watch your depth carefully in cruising unknown waters that might haverocks or obstacles.To operate the radar press <strong>and</strong> hold the power button. To turn off, hold the powerbutton for about 3 seconds. Remember you are not allowed to travel in fog or atnight.A fixed type GPS is located at the upper helm. Turn on by depressing the powerbutton. Press the “page” button to scroll through the functions.3 Stereos/one with a CD in the main salon / 2 TV’s with VHS, one in fore <strong>and</strong> aftstateroomsANCHORINGYour primary working anchor, a Bruce, is attached to 80feet of chain <strong>and</strong> 100 feet ofline.Turn on the anchor windlass on the AC panel <strong>and</strong> proceed to raise <strong>and</strong> lower theanchor as needed. Be sure to always have your engines running. WindlassInstructions here. See page 9 in the White Binder for further anchoring instructions.Turn off the breaker when finished.A spare Danforth anchor is located in the aft lazarett with spare rode <strong>and</strong> rope for afttie-ups.10
BARBEQUEThe Barbeque <strong>and</strong> mounting bracket are stored in the aft lazarett or on the aft rail.Place mounting bracket on by insertion in port fishing rod holder.Attach the propane bottle <strong>and</strong> regulator usually found in the lazarett,Carefully light the unit. This Barbeque cooks fairly hot <strong>and</strong> fast so keep a good eyeon your food. Store the barbeque back in the storage bag when it has cooled.Please wipe it down with a rag or paper towel before storing. Note: Propane bottlesare not stocked by SHYC so you will need to purchase a bottle if one is not found onboard during your checkout. Ensure that outboard gas or any other flammables arenot near barbeque.DINGHY AND OUTBOARD MOTORYour Avon dinghy is equipped with a 9.9 hp Yamaha engine. It has a capacity of 500pounds or about four people.To deploy the dinghy,Use the Sewise davit system on the boat, be careful not to pinch your fingers.After the dinghy is in the water <strong>and</strong> readied to go (PFDs etc), open the vent in thefuel tank <strong>and</strong> choke the engine once while starting. Make sure outboard is inneutral. While there is extra outboard gas on board, if you need to add more mixgasoline with 2-cycle motor oil at a ratio of 50 to 1. Note: Failure to use proper mixwill damage outboard.Please use extreme care in beaching your dinghy. Make sure the engine gets tiltedup a safe distance from shore so the prop does not hit the bottom or shear the pin.Do not drag the boat on the beach. Please lift it up with your crew. Make sure it issecured as the tide comes in fast in these here parts.When returning to the boat, leave your shore shoes in the cockpit <strong>and</strong> slip on yourdeck shoes or slippers to keep the boat neat <strong>and</strong> tidy.OTHER NOTESSafety should be paramount to your daily cruising. A man overboard drill (person?)should be discussed <strong>and</strong> practiced with an unlucky PFD as the victim. (Please rinse<strong>and</strong> dry afterward before stowing). Remember that your lifejackets are stowed inthe aft locker <strong>and</strong> under the port seating on the fly bridge. A few should always bereadily available. Flares <strong>and</strong> other safety equipment are located under theRefrigerator in the main saloon.Always have a sharp lookout posted for logs, deadheads, or other flotsam <strong>and</strong>jetsam. A log hitting your prop can ruin your vacation. As you are traveling, thedebris does seem to gather along current lines. It is sometimes best to go aroundthese areas <strong>and</strong> miss the “mine fields”.11
Wave Dancer is equipped with numerous automatic bilges pumps that can beactivated on the DC panel. <strong>and</strong> at the lower helm station. The switch shouldnormally be left in the “Auto” position can be switched for a minute or so to “manual”to pump the bilge. If you continually hear the bilge pump running, check your bilge!You may have a serious problem!An auxiliary h<strong>and</strong>-operated bilge pump is located in the rear lazarett. This is used inan emergency situation.The engine spares are located aft engine room <strong>and</strong> in the storage under the dinette<strong>and</strong> salon sofa. They include extra oil filters, impellers, head pump, etc. Extra oil<strong>and</strong> coolant is located in the engine room. A spare macerator pump is also on board<strong>and</strong> located under the dinette seat.Crabbing is fun but requires the correct license <strong>and</strong> season. Please be sure not tocrab off the stern as the crab line can easily get tangled in your prop as you swingwith wind or current. You certainly don’t want to be the person who has to dive over<strong>and</strong> cut the line out of the propeller. It is best to use the dinghy to set your crabpot/ring away from the boat. A partially open can of seafood cat food works well asany other bait <strong>and</strong> is less messy. Please clean up any seaweed or crab shellsafterwards to keep the boat neat <strong>and</strong> tidy. A pulley on a pole holder attachment is onboard to keep the line from being pulled across the Gel Coat. Use it to help bring uplines, it’s easier.12
Location of thru hull’s13
Location of fills <strong>and</strong> pump out’s14