Detailed Installer Guide - media
Detailed Installer Guide - media
Detailed Installer Guide - media

You also want an ePaper? Increase the reach of your titles
YUMPU automatically turns print PDFs into web optimized ePapers that Google loves.
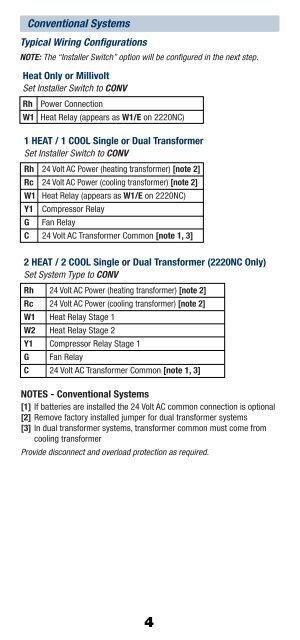
Conventional SystemsTypical Wiring ConfigurationsNOTE: The “<strong>Installer</strong> Switch” option will be configured in the next step.Heat Only or MillivoltSet <strong>Installer</strong> Switch to CONVRh Power ConnectionW1 Heat Relay (appears as W1/E on 2220NC)1 HEAT / 1 COOL Single or Dual TransformerSet <strong>Installer</strong> Switch to CONVRh 24 Volt AC Power (heating transformer) [note 2]Rc 24 Volt AC Power (cooling transformer) [note 2]W1 Heat Relay (appears as W1/E on 2220NC)Y1 Compressor RelayG Fan RelayC 24 Volt AC Transformer Common [note 1, 3]2 HEAT / 2 COOL Single or Dual Transformer (2220NC Only)Set System Type to CONVRh 24 Volt AC Power (heating transformer) [note 2]Rc 24 Volt AC Power (cooling transformer) [note 2]W1 Heat Relay Stage 1W2 Heat Relay Stage 2Y1 Compressor Relay Stage 1G Fan RelayC 24 Volt AC Transformer Common [note 1, 3]NOTES - Conventional Systems[1] If batteries are installed the 24 Volt AC common connection is optional[2] Remove factory installed jumper for dual transformer systems[3] In dual transformer systems, transformer common must come fromcooling transformerProvide disconnect and overload protection as required.4