Guide to Replacing Key Parts on an Aussie Poly ... - Aussie Pumps
Guide to Replacing Key Parts on an Aussie Poly ... - Aussie Pumps
Guide to Replacing Key Parts on an Aussie Poly ... - Aussie Pumps

Create successful ePaper yourself
Turn your PDF publications into a flip-book with our unique Google optimized e-Paper software.
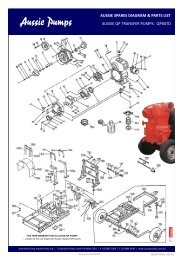
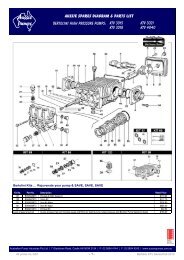
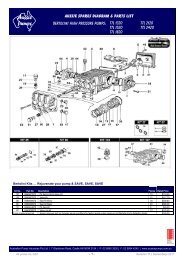
INSTRUCTIONS FOR CONVERTING PUMP SEALS ON AUSSIE POLY PUMPSAUSSIE SMART PUMP …. FOR FUEL & CHEMICAL TRANSFERCONVERSION KITS (includes shaft seal, check valve, all o-rings <str<strong>on</strong>g>to</str<strong>on</strong>g> c<strong>on</strong>vert pump)Pos Descripti<strong>on</strong> Part number Qty Descripti<strong>on</strong> Part number Qty1 O-RING BODY BUNA N 58.0719.71 1 S2 & 3 BUNA N (SUITS DIESEL FUEL AND LIGHT OIL TRANSFER) 58.0014 11 O-RING BODY EPDM 58.0719.72 1 S2 & 3 EPDM (SUITS MOST AG CHEMS) 58.0005 11 O-RING BODY VITON 58.0719.73 1 S2 & 3 VITON (UNIVERSAL SEALS) 58.0017 16 BACK CASING 58.0703.3B 1 (check Chemical Compatibility Chart for full details - download www.aussiepumps.com.au)13-14 MECHANICAL SEAL BUNA N 316SS CARBON CERAMIC 58.0714.11 113-14 MECHANICAL SEAL EPDM 316SS CARBON CERAMIC 58.0714.12 1 PUMP REPAIR KIT (includes shaft seal & most o-rings (except body o-ring& check valve)13-14 MECHANICAL SEAL VITON 316SS CARBON CERAMIC 58.0714.14 1 impeller screw, volute screws, shims <str<strong>on</strong>g>to</str<strong>on</strong>g> repair pump )15 IMPELLER HIGH VOLUME 4 VANE 975 58.0975.30 1 S2 & 3 Vi<str<strong>on</strong>g>to</str<strong>on</strong>g>n Seal repair kit 58.0026 115 IMPELLER HIGH HEAD 5 VANE 706 58.0706.30 117 VOLUTE HIGH VOLUME (975) 58.0977.30 1 ACCESSORIES17 VOLUTE HIGH HEAD (706) 58.0702.30 1 PROTEK MOTOR PROTECTION KIT 58.0015 120 CHECK VALVE BUNA N 58.0705.71 1 GALVANISED ROLL FRAME AFRAMEL48GAL 120 CHECK VALVE EPDM 58.0705.72 120 CHECK VALVE VITON 58.0705.73 123 DRAIN PLUG 58.0723.30 124 FILLER PLUG 58.0722.30 142 FRONT CASING 2” 58.0784.30 142a FRONT CASING 3” 58.0877.30B 146 SHAFT SLEEVE 58.0882.90 156 PLASTIC PEDESTAL KIT – CARBON STEEL SHAFT 58.0001 156b CAST IRON PEDESTAL KIT-STAINLESS STEEL SHAFT RKIT097 170a OPTIONAL DELIVERY ELBOW 2” BSP 58.1367.40 170b OPTIONAL DELIVERY ELBOW 3” BSP 58.1368.40 1For further assist<strong>an</strong>ce c<strong>on</strong>tract <strong>Aussie</strong> <strong>Pumps</strong> …02 8865 3500
INSTRUCTIONS FOR CONVERTING PUMP SEALS ON AUSSIE POLY PUMPSRejuvenati<strong>on</strong> Kit / O-ring replacementC<strong>on</strong>tents of C<strong>on</strong>versi<strong>on</strong> KitCounterfaceSlingerDrain capo-ringFiller capo-ringCheck valveMec sealCase bolt &impeller bol<str<strong>on</strong>g>to</str<strong>on</strong>g>-ringsVolute rope1. Lay engine <strong>on</strong> it’s back <strong>an</strong>d unscrew pump body. Remove volute,impeller, back plate <strong>an</strong>d all seals.2. Place new slinger over the engine shaft3. Place new bolt seals over the engine bolts, fit back casing <strong>an</strong>d securewith four bolts. Fill the bolt holes with silic<strong>on</strong> <strong>an</strong>d wipe off <strong>an</strong>y excess.Check clear<strong>an</strong>ce4. Fit new mech seal <str<strong>on</strong>g>to</str<strong>on</strong>g> back casing. Use a plastic hammer <strong>an</strong>d pipe <str<strong>on</strong>g>to</str<strong>on</strong>g>gently press the mec seal in<str<strong>on</strong>g>to</str<strong>on</strong>g> place. Use silic<strong>on</strong> spray.5. Replace the counter face <str<strong>on</strong>g>to</str<strong>on</strong>g> the mec seal in the back of the impeller. D<strong>on</strong>ot use a hammer, it will break, use silic<strong>on</strong> spray.For further assist<strong>an</strong>ce c<strong>on</strong>tract <strong>Aussie</strong> <strong>Pumps</strong> …02 8865 3500
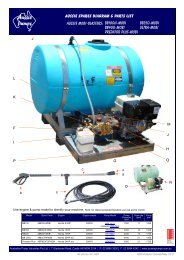
INSTRUCTIONS FOR CONVERTING PUMP SEALS ON AUSSIE POLY PUMPS6. Place the impeller over the shaft. Press down <strong>on</strong> it <str<strong>on</strong>g>to</str<strong>on</strong>g> compress themec seal. Rotate the impeller <str<strong>on</strong>g>to</str<strong>on</strong>g> see if it rubs. If it does, insert shims <strong>on</strong>the engine shaft <strong>an</strong>d repeat this process.7. Remove the impeller, place the impeller key in the shaft <strong>an</strong>d fit theimpeller. Replace the o-ring <strong>on</strong> the impeller screw <strong>an</strong>d use the screw <str<strong>on</strong>g>to</str<strong>on</strong>g>secure the impeller.8. Fit the volute rope <str<strong>on</strong>g>to</str<strong>on</strong>g> the back casing. It fits in<str<strong>on</strong>g>to</str<strong>on</strong>g> a grove as depicted inthe pho<str<strong>on</strong>g>to</str<strong>on</strong>g>.9. Fit the volute <str<strong>on</strong>g>to</str<strong>on</strong>g> the back casing. Line up locating pins <strong>an</strong>d secure it inplace. Use <strong>an</strong> electric screw driver <str<strong>on</strong>g>to</str<strong>on</strong>g> tighten the screws.Turn the mo<str<strong>on</strong>g>to</str<strong>on</strong>g>r over <str<strong>on</strong>g>to</str<strong>on</strong>g> ensure there is no rubbing between the impeller<strong>an</strong>d the volute. If there is, adjust by removing shims.10. Fit the large o-ring around the outside of the back casing. Use silic<strong>on</strong>spray <str<strong>on</strong>g>to</str<strong>on</strong>g> prevent o-ring from getting pinched.11. Fit the check valve <str<strong>on</strong>g>to</str<strong>on</strong>g> the volute. Use silic<strong>on</strong> spray if tight.12. Fit the pump body <str<strong>on</strong>g>to</str<strong>on</strong>g> the back casing, secure in place. Tighten bolts inopposite sequence. HAND TIGHTEN ONLY.13. Fit the rem<strong>an</strong>ning o-rings <str<strong>on</strong>g>to</str<strong>on</strong>g> the drain <strong>an</strong>d filler plugs.14. Fit the plugs <str<strong>on</strong>g>to</str<strong>on</strong>g> the pump body.For further assist<strong>an</strong>ce c<strong>on</strong>tract <strong>Aussie</strong> <strong>Pumps</strong> …02 8865 3500
INSTRUCTIONS FOR CONVERTING PUMP SEALS ON AUSSIE POLY PUMPSTrouble Shooting <str<strong>on</strong>g>Guide</str<strong>on</strong>g> for <strong>Aussie</strong> <strong>Poly</strong> <strong>Pumps</strong>Symp<str<strong>on</strong>g>to</str<strong>on</strong>g>ms Cause Acti<strong>on</strong>Pump does not turn over Impeller jamming Adjust impeller spacing, disassemble <strong>an</strong>d cle<strong>an</strong>Failure <str<strong>on</strong>g>to</str<strong>on</strong>g> pump Sucti<strong>on</strong> air leak Check <strong>an</strong>d correct hose <strong>an</strong>d couplingsPump not properly primedSpeed <str<strong>on</strong>g>to</str<strong>on</strong>g>o low or head <str<strong>on</strong>g>to</str<strong>on</strong>g>o highNot enough head <str<strong>on</strong>g>to</str<strong>on</strong>g> open check valveAir leakBlocked sucti<strong>on</strong>Excessive sucti<strong>on</strong> liftPrime pump correctlyC<strong>on</strong>sult pump specialistC<strong>on</strong>sult pump specialistCheck <strong>an</strong>d rework sucti<strong>on</strong> lineUnblock sucti<strong>on</strong>C<strong>on</strong>sult pump specialistReduced perform<strong>an</strong>ce Air pockets or small air leaks in sucti<strong>on</strong> line Locate <strong>an</strong>d correctEngine or mo<str<strong>on</strong>g>to</str<strong>on</strong>g>r overloadedObstructi<strong>on</strong> in sucti<strong>on</strong> line or impellerInsufficient submergence of the sucti<strong>on</strong> pipeExcessively worn impeller or wear ringExcessive sucti<strong>on</strong> liftWr<strong>on</strong>g directi<strong>on</strong> of rotati<strong>on</strong>Speed higher th<strong>an</strong> pl<strong>an</strong>nedLiquid specific gravity <str<strong>on</strong>g>to</str<strong>on</strong>g>o highLiquid h<strong>an</strong>dled of greater viscosity th<strong>an</strong> waterToo large <strong>an</strong> impeller diameterLow voltageStress in pipe c<strong>on</strong>necti<strong>on</strong> <str<strong>on</strong>g>to</str<strong>on</strong>g> pumpPacking <str<strong>on</strong>g>to</str<strong>on</strong>g>o tightRemove obstructi<strong>on</strong>C<strong>on</strong>sult pump specialistReplace impeller <strong>an</strong>d/or wear ringC<strong>on</strong>sult pump specialistSee start-up instructi<strong>on</strong>sReduce speedC<strong>on</strong>sult pump specialistC<strong>on</strong>sult pump specialistTrim impellerC<strong>on</strong>sult power supplierSupport piping properlyLoosen packing gl<strong>an</strong>d nutsExcessive noise Misalignment Align all rotating partsExcessive sucti<strong>on</strong> liftMaterial lodged in impellerWorn bearingsImpeller screw loose or brokenCavitati<strong>on</strong> (improper sucti<strong>on</strong> design)Wr<strong>on</strong>g directi<strong>on</strong> of rotati<strong>on</strong>C<strong>on</strong>sult pump specialistDislodge obstructi<strong>on</strong>Replace bearingsReplaceCorrect sucti<strong>on</strong> pipingSee start-up instructi<strong>on</strong>sPremature bearing failure Bal<strong>an</strong>ce line plugged or pinched Unplug or replaceWorn wear ringsMisalignmentSucti<strong>on</strong> or discharge pipe not properly supportedBent shaftWater or c<strong>on</strong>taminates entering bearingsLubricati<strong>on</strong> <str<strong>on</strong>g>to</str<strong>on</strong>g> bearings not adequateWr<strong>on</strong>g type of lubricati<strong>on</strong>ReplaceAlign all rotating partsCorrect supportsReplace shaftProtect pump from envir<strong>on</strong>mentCheck m<strong>an</strong>ualCheck m<strong>an</strong>ualElectric mo<str<strong>on</strong>g>to</str<strong>on</strong>g>r failure High or low voltage Check voltage with voltage metreRapid wear <strong>on</strong> couplingcushi<strong>on</strong>High electric surgePoor electric c<strong>on</strong>necti<strong>on</strong>OverloadsBearing failureCooling vent plugged (rodent, leaves, dirt, etc.)Moisture or water in mo<str<strong>on</strong>g>to</str<strong>on</strong>g>rMisalignmentBent shaftM<strong>on</strong>i<str<strong>on</strong>g>to</str<strong>on</strong>g>r voltage <strong>an</strong>d c<strong>on</strong>sult power supplierTurn power off, cle<strong>an</strong> <strong>an</strong>d check c<strong>on</strong>necti<strong>on</strong>sCheck amperage. Do not exceed nameplate full load amperageCh<strong>an</strong>ge bearings in mo<str<strong>on</strong>g>to</str<strong>on</strong>g>rInstall proper screensProtect pump from envir<strong>on</strong>mentAlignReplace shaftFor further assist<strong>an</strong>ce c<strong>on</strong>tract <strong>Aussie</strong> <strong>Pumps</strong> …02 8865 3500

![diesel fire fighting pumps PDF [261KB] - Aussie Pumps](https://img.yumpu.com/48798897/1/184x260/diesel-fire-fighting-pumps-pdf-261kb-aussie-pumps.jpg?quality=85)
![view spec sheet [pdf - 32KB] - Aussie Pumps](https://img.yumpu.com/48771802/1/184x260/view-spec-sheet-pdf-32kb-aussie-pumps.jpg?quality=85)