
You also want an ePaper? Increase the reach of your titles
YUMPU automatically turns print PDFs into web optimized ePapers that Google loves.
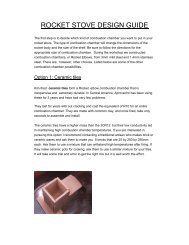
BUILD YOUR OWN<strong>ROCKET</strong> <strong>STOVE</strong>Why? – Rocket Stoves are:Fuel Efficient: Because they direct all the heat energy (from the flames)upward, most of the heat actually goes into heating the food, rather thanbeing radiated outward (like most campfires).Hot: Rocket Stoves have been measured at 1200° F (649° C). That iseasily hot enough to melt some metals (lead, bismuth, tin, indium, antimony,and a few others [it's not quite hot enough to melt Aluminum at 1220° F]). Itis also hot enough to ignite magnesium.Safe: If you should abandon your Rocket Stove, or leave it unattended, itwill go out within a minute or two.Easy to Build: You can build your own Rocket Stove with materials that arejust laying around at home, and inexpensive things that you can easily obtainfrom the hardware store. (see accompanying list of materials for your RocketStove).Outdoor: Caution -- For outdoor use only!STEP 1 -- To Start:1) All you need is two standard “#10 cans” (commonly called “institutionalsized”cans). They are about 6 inches wide at the top, and about 7 inches tall.You can get these for free by asking at restaurants, bakeries, schoolcafeterias, etc. They often throw many of these cans away every week.2) Save the can lid when you open the can. You will need one of the can lidsfor your Rocket Stove.3) Watch the video on Google Video that shows how to make a RocketStove. My demonstration here (in the photo) is an adapted version of thestove that is featured on Google Video. (type in the search terms “rocketstove” and choose the video that is 20 minutes long and has at least than 76ratings).
List of Materials to build yourRocket StoveQuantityItem2 #10 cans1 tin snips1 or 2 regular tin cans (you'll cut part of the top off with the tin snips to make the potrack)1 straight 4-inch stove pipe (an 18-inch or 24-inch length is OK for this)1 elbow section of 4-inch stove pipe1 awl (for starting holes for the screws)4 small pie tins (or small 2-inch by 2-inch pieces of THICK aluminum foil)1 package of JB Weld (NOT the similar-looking “JB Kwik”). JB Weld is heatresistant to 500° F, but JB Kwik is only heat resistant to 200° F)1 sharp ½-inch chisel (or ¾ inch chisel)1 6 inches of aluminum foil, (only in case it is necessary) to fill in gaps around thethe hole where the elbow joint protrudes from the side of the can. This willprevent insulation from falling out.1 piece of wood to work over.1 screwdriver (Robertson, Phillips or regular, depending on which screws youhave)10-20 metal screws (if you want to install a built-in pot rack)10-20 nuts for screws (if you want to install a built-in pot rack)1 small package of vermiculite. (You can also use crushed pumice or ashes)1 pencil or pen (for marking things before cutting, etc)1 pair of gloves. Be careful. If you don't wear gloves, the sharp metal edgescan easily cut you.1 metal file1 hammerseveral (6-8) dry twigs to burn in the stove (small, 20-30 cm long, and only about ½ cm indiameter)1 small diameter cooking pot (or 64 oz. can or 32 oz. can (2-litre can or 1-litre can)to use as a cooking pot.)Watch the video on Google Video that shows how to make a Rocket Stove.My demonstration here (on display) is an altered version of the stove featured on Google Video.(Type in the search terms “rocket stove” and choose the video that is 20minutes long and has at least than 56 ratings).
BUILD YOUR OWN<strong>ROCKET</strong> <strong>STOVE</strong>STEP 2:1) Cut a 4-inch hole in the side of one of the #10 cans, with tin snips, about2.5 cm from the bottom of the can. Do this over some newspapers, so youdon't accidentally drop sharp pieces of metal onto your carpet (you don't wantto cut your foot later, right?)2) If you cut the hole to the exact size, you will be able to barely fit theelbow-piece of 4-inch stovepipe through the hole (from the inside of the can).Be sure the 'corrugated' part of the elbow remains inside the can, pointedupwards.3) With a can opener, cut the top and bottom off the other #10 can, so thatyou can see completely through it.4) Using a sharp chisel and a hammer, cut a 4-inch hole out of the middle ofone of the can lids. Do this against the piece of wood that you brought. Thatway you won't damage your floor (or the chisel).
BUILD YOUR OWN<strong>ROCKET</strong> <strong>STOVE</strong>STEP 3:1) Using the JB Weld, glue the two #10 cans together, making sure that thelid-less one is on the top. Leave this to dry. It takes 24 hours for JB Weld toset completely.To reinforce this, you can later bolt the two cans together if you want.2) Cut off a 6- to 6 1/2-inch section of the straight stove pipe (from thesmooth end). Fit it to the top of the elbow piece of stove pipe in the RocketStove.3) Fill the interior of the Rocket Stove (inside the stove, but NOT inside thestove pipe. This will be insulation that will keep most of the heat of theflame from radiating outward) with the vermiculite (or ashes or pumice). Fillit up to about 2-2.5 cm from the top of the stove pipe. Pack the vermiculitedown tight.4) place the donut-shaped can lid over the stove pipe and slide it down as faras it will go. This will prevent the vermiculite from 'leaking' or falling out.
BUILD YOUR OWN<strong>ROCKET</strong> <strong>STOVE</strong>STEP 4:1) Now you can cut strips of metal off the tops of tin cans to create the'spacers' (pot rack) that you need to keep your cooking pot far enough fromthe top of the stove pipe so that it won't smother the flame (3-5 cm wideshould be sufficient).Using an awl, poke training holes in the #10 can, and in the metal strips,where you want to insert the machine screws, where you need them to be.Then you insert the screws and tighten them.2) Cut off a 6-inch section of the straight stove pipe (from the corrugatedend). Insert the corrugated end of this stovepipe into the elbow end thatprotrudes from the side of the Rocket Stove.3) Cut another piece of metal from another tin can. It needs to be 4-incheswide (10 cm)(except the very top ½ inch) and about 5 or 6 inches long (13-16cm). Make sure the very top of this piece of metal forms a slight 't-shape',with the top being about 4 ½ inches wide. Clip the corners off to get rid ofthe points, and file all the edges with the file to minimize the danger ofcutting yourself. This is the tray where you will lay the sticks that youwill burn. Slide it into the horizontal stovepipe that protrudes from the sideof the Rocket Stove.4) Now you are READY TO BURN! Go outside and test your RocketStove. Boil some water and see how fast it boils.