
Create successful ePaper yourself
Turn your PDF publications into a flip-book with our unique Google optimized e-Paper software.
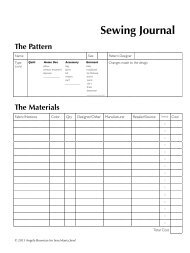
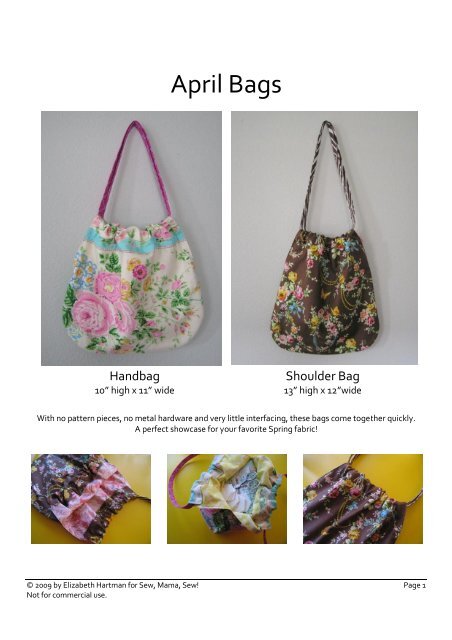
<strong>April</strong> <strong>Bags</strong>Handbag10” high x 11” wideShoulder Bag13” high x 12”wideWith no pattern pieces, no metal hardware and very little interfacing, these bags come together quickly.A perfect showcase for your favorite Spring fabric!© 2009 by Elizabeth Hartman for <strong>Sew</strong>, <strong>Mama</strong>, <strong>Sew</strong>! Page 1Not for commercial use.
Suppliesfor the handbagtwo 13” pieces fabric for exteriortwo 13” pieces fabric for liningtwo 2.5” x 25” pieces fabric for handlestwo 2.5” x 25” pieces lightweight fusible interfacing forhandlesfor the shoulder bagtwo 15” x 18” pieces fabric for exteriortwo 15” x 18” pieces fabric for liningtwo 2.5” x 35” pieces fabric for handlestwo 2.5” x 35” pieces lightweight fusible interfacing forhandlesfor both styles:Rotary Cutting Supplies (Mat, Cutter & Ruler)6.5” - 8” Bread/Salad PlateDisappearing Ink Marker or similar Marking ToolThreadHand <strong>Sew</strong>ing NeedleMaking the BagDirections are the same for both styles.Fuse interfacing to the wrong side of handles.Press one handle in half, as shown above.© 2009 by Elizabeth Hartman for <strong>Sew</strong>, <strong>Mama</strong>, <strong>Sew</strong>! Page 2Not for commercial use.
On the wrong side of each lining piece, measure 6.5”from the top and 1/2” from the side and make a dot withyour marking tool. Do this on both the left and rightside of each of the two lining pieces (four dots total).Stack your two lining and two exterior panels on yourcutting mat, making sure they are all oriented the sameway and that edges are lined up.Use your bread plate as a guide to cut the bag’s curvedbottom corners. Line the plate up in one of the bottomcorners, as shown.Use your rotary cutter or a marking tool and scissors tocut the curve. Repeat for the other bottom corner.Starting in the top left corner, measure and mark 1” in(along the top of the panels) and 6” down the side. Useyour ruler and rotary cutter to connect the two pointsand cut through all layers, as shown above.Repeat the last step on the upper right corner. Your fourpanels should now look something like the above photo,with rounded bottom corners and slightly tapered tops.© 2009 by Elizabeth Hartman for <strong>Sew</strong>, <strong>Mama</strong>, <strong>Sew</strong>! Page 4Not for commercial use.
Place together the right sides of one lining panel andone exterior panel. Starting from one of the dots youmarked earlier, use a 1/2” seam allowance to sew aroundthe top of the panels, from one dot to the other, asshown above. Stitch back and forth at each dot toreinforce.Repeat the last step to join the other lining panel with theother exterior panel. Clip top corners as shown above.Lay one of your sets of joined panels on your worksurface, as shown above.Fold the lining to the right, as shown above.Fold your other set in the same way and lay it on top ofthe first, matching the bottoms of the two exteriorpanels and keeping the lining and the top part of thepanels folded to the right, as shown above.Pin the bottom of the two exterior panels together.Starting and finishing just shy of your earlier stitching (asshown above) sew together using a 1/2” seam allowanceStitch back and forth at each end to reinforce.© 2009 by Elizabeth Hartman for <strong>Sew</strong>, <strong>Mama</strong>, <strong>Sew</strong>! Page 5Not for commercial use.
Lay your bag back on your work surface, as shown.Now fold the top part of the panels to the left, leaving justthe bottom of the lining panels on the right.Pin and sew the bottom of the lining panels togetherusing a 5/8” seam allowance and, again, stopping andstarting just shy of your earlier stitching as shown in theabove photo. Leave a 3” opening in the bottom forturning. Stitch back and forth at each end to reinforce.Your bag should now look something like this.Clip the rounded corners of both the lining and exterior.Using the opening you left on the bottom of the lining,turn your bag right-side-out. Use a chopstick or turningtool to press out the top corners and use your fingers tosmooth out the curved bottom corners.© 2009 by Elizabeth Hartman for <strong>Sew</strong>, <strong>Mama</strong>, <strong>Sew</strong>! Page 6Not for commercial use.
Hand or machine sew the opening closed.Your bag should now look something like this. Press.Stitch near the edge of the top vents, turning andstitching back and forth where they meet the bag’s sideseam, as shown above.Create handle casing by folding 2” of the top of one sideof the bag to the inside, as shown above.Slide handle under fold and pin in place. Keeping handleout of the way, sew across the top of the bag, close tothe edge of the casing. Repeat with the other side.Pull handles to gather top of bag.That’s it! Enjoy your new bag.© 2009 by Elizabeth Hartman for <strong>Sew</strong>, <strong>Mama</strong>, <strong>Sew</strong>! Page 7Not for commercial use.