
You also want an ePaper? Increase the reach of your titles
YUMPU automatically turns print PDFs into web optimized ePapers that Google loves.
1. Steering Wheel - Bolt steering wheel to anchor plate securely with the fasteners.2. Seat - Bolt seat to vehicle frame. Adjust seat for operator. Then, install the seat cushion, if it is separate.3. Bolts - Check the screws, nuts, and bolts on your vehicle to see that all are tightened securely. For safe operatingconditions, do periodic checks and tighten securely.4. Engine - Fill the crankcase with oil as directed in the engine owner’s manual provided. Follow all warnings, cautions,and procedures contained in that manual.5. Custom Bar Cage (CBC) - Assemble the CBC (and light kit, if provided) using the instructions provided in the CBC box.6. WARNING—Tire Pressure – The air pressure in each tire should be checked carefully. The proper air pressure foreach type of tire is printed on the the side of the tire. Some vehicles with different tires on the front and rear may alsohave different air pressures. Ensure each tire is properly inflated. Tires that are under or overinflated can createdangerous conditions that could result in loss of control and serious injury or death. WARNING - Perform this pre-ride inspection prior to operating the vehicle. If not performed, seriousdamage to the vehicle or personal injury may result.1. ENGINE OIL LEVEL - Add oil if required. Check for leaks.Tighten filler cap securely.2. FUEL LEVEL - Add fuel as necessary. Do not overfill (no fuelin the filler neck). Replace cap tightly. Check for leaks. Donot mix oil with gas.WARNING - Do not refill engine while it is hot. It is possiblefor spilled fuel to ignite resulting in a fire. Do not fill gas tank ina closed area such as a garage. After filling the tank move thevehicle at least 15 feet away from spot of filling before starting.3. BRAKES - PERFORM A BRAKE TEST: Have the operator sitin the seat, then push the vehicle from behind. Once thevehicle is rolling, have the operator apply the brake pedal.The vehicle should come to a stop. WARNING- Do notoperate this vehicle unless the brake is working properly.NOTE: Band brake systems typically require a short break-inperiod to operate at full efficiency. Some wear on the lining ofthe brake pads will increase the coefficient of friction andimprove their effectiveness. That can be accomplished bymaking a series of gentle stops. Hard usage of the brakeswithout a break-in period can result in shortened brake pad lifeand decrease braking ability.4. TIRES - Check condition and pressure.6. THROTTLE - CHECK FOR SMOOTH OPERATION. Assurethrottle "snaps" back to idle. Also, check for frayed cable ordamaged cable conduit. If either condition exists replace thecable assembly before riding.7. TOGGLE KILL SWITCH - PERFORM THIS TEST (only formodels without electric starter): While the engine is running,move the toggle kill switch on the steerring column to the"OFF" position. If this does not stop the engine, check toensure that the toggle kill switch wire is attached to theterminal on the engine. WARNING- DO NOT OPERATETHIS VEHICLE WITH A TOGGLE KILL SWITCH THAT ISNOT FUNCTIONING PROPERLY.8. ALL NUTS, BOLTS, AND FASTENERS - Check wheels tosee that all axle nuts and lug nuts are tightened properly.Check and tighten all other fasteners as necessary.9. GUARDS - Ensure all protective guards are in place. NEVEROPERATE THIS VEHICLE WITHOUT ALL CHAIN, CLUTCH,OR DRIVE ASSEMBLY COVER GUARDS IN PLACE. Eachof these covers have a protective purpose, if removed, couldendanger the personal safety of the operator or passenger (ifany).10. STEERING SYSTEM - Ensure that it turns freely.5. DRIVE CHAIN - Check condition, tension, lubricate asnecessary.CORRECT any discrepancies according to the <strong>Owner's</strong> <strong>Manual</strong> before riding. If a problemcannot be corrected, contact an authorized dealer/retailer for assistance.
NOTE: Do not attempt to start or operate this machine without being completely familiar with all controlsnecessary to operate this vehicle safely. Do not start the engine before reading and understandingall the rules, warnings, and instructions in this manual, as well as the engine owner’s manual. Westrongly recommend that all supervisors, operators and passengers veiw the safety video prior tooperation. TURNING MANEUVERSA new operator must learn to shift his or her weight and control thethrottle to allow the rear tires to negotiate the turn. This is theprimary technique to be mastered in riding this vehicle. Practiceturning at slow, constant speeds. Defer increased speeds until youare confident of your proficiency and are intimately familiar withthe terrain.Steer in the direction of the turn, and lean your body to the insideof the turn in order to maximize front tire traction. Use the throttleto maintain power throughout the turn.Once this technique is learned, turning maneuvers can beperformed within a relatively small area.Incorrect turning techniques may cause the front wheels to slidestraight ahead without affecting the vehicle's direction of travel. Ifthis should occur, come to a stop, then resume the techniqueoutlined above.If the front wheels tend to skid in mud, sand, or snow, you may beable to improve control by releasing the throttle and allowing thevehicle to coast through the turn.If the rear wheels inadvertently skid sideways, correct your slide bysteering in the direction of the skid, if you have room to performthis maneuver safely. Avoid braking or accelerating until you havecontrol.To avoid skids while traveling on slippery terrain, the operatormust exercise a high degree of caution. Turning maneuvers onslippery terrain are more hazardous than those performed underfull traction and must be done slowly.Surface composition is a major factor affecting skidding. It iseasier to slide on packed snow than in deep sand. It is dangerousto skid on ice, because you may lose all directional control, and itis dangerous to skid on pavement, because you may regaintraction suddenly and unexpectedly, which can cause the vehicleto overturn.CLIMBING HILLSPractice climbing on evenly surfaced slopes of less than 20degrees. The vehicle's capability in climbing hills or traversing anyspecific terrain is dependent upon operator skill and vehicle load.As you gain experience in handling this vehicle, and learn thehazards to be encountered and your own limitations you may thenproceed to drive more challenging terrain. However, you must firstbe able to discern and avoid any hill or hazard that would causethis vehicle to overturn.Take a running start, at the appropriate speed for the ascent, andclimb at a steady rate of speed.WARNING - Do not apply power suddenly by opening the throttlewhile ascending a hill or the front wheels may rise from theground. If the front wheels lift, the operator’s control will belessened and the vehicle may overturn backwards.If you should find that you have incorrectly estimated climbingcapability and lack the power or traction to continue the ascent, ifspace permits, turn the vehicle around while you still have theforward speed to do so and descend. Avoid stalling part way up ahill, as maneuvering will then become more difficult.CAUTION - Before attempting a turn on a hillside, the operatorshould first master turning technique on level ground.If you do lose all forward speed, and can neither continue uphillnor maneuver the vehicle under its own power, turn off the engine,dismount, and physically turn the machine around.CAUTION - To avoid overturning, the operator must exercise ahigh degree of caution when dismounting or moving this vehicle ona hillside.DESCENDING HILLSIt is usually advisable to descend hills with the vehicle pointeddirectly downhill, avoiding angles that would cause the vehicle tolean sharply to one side. As you approach the point of descent,stop and survey the terrain below. Never drive headlong past yourlimit of visibility. When you have picked a safe path of descent,descend slowly with the throttle closed. Sit back on the seat, witharms extended and braced on the steering wheel.When descending it is recommended that the operator apply thebrakes intermittently to further reduce forward speed.Braking effectiveness is reduced while descending any incline witha loose surface.RIDING THROUGH WATERDo not cross any stream with fast flowing water. The tires mayfloat, making it difficult to maintain control. Do not drive thevehicle through water for prolonged periods.The vehicle can cross water to a depth of approximately 4-6inches, although the operator must be careful to avoid getting thespark plug or air cleaner wet.When crossing shallow streams, choose a course where bothbanks have gradual inclines. Proceed at a slow, steady speed,and take care to avoid submerged obstacles and slippery rocks.If loss of forward motion or pulling power is noticed when drivingthrough water, it indicates the torque converter belt has becomewet. When this occurs, the operator should immediately headtoward shore at minimum throttle required to maintain motion.Once on shore, the torque converter belt will dry quickly if operatorwill sit for a few moments with the engine idling.After driving through water, the brakes may be less effective thannormal. Test the brakes after traveling through any water, and ifnecessary, apply the brakes repeatedly until the heat of frictionhas dried them and the brakes retain their normal effectiveness.WARNING - Do not operate vehicle at high speeds until brakesare dry and effective.
STORAGEIn the event your vehicle is not to be operated for a period in excess of 30 days and at the end of each riding season prepare for storage asfollows:WARNING - Do not drain fuel while engine is hot. Be sure to move vehicle outside before draining fuel.1. Drain fuel tank and remove all fuel remaining in the tank by using a suction device or by soaking up with a clean rag or towel. Remove allfuel remaining in the carburetor by allowing engine to run out of fuel. Do not perform any fuel removal procedure while smoking or near anopen flame. Dispose of any rags or towels properly.2. Lubricate engine cylinder by removing the spark plug and pouring one ounce of clean lubricating oil through the spark plug hole into thecylinder. Crank the engine slowly to spread oil and replace spark plug.3. Do not save or store gasoline over winter. Using old gasoline which has deteriorated from storage will cause hard starting and affect engineperformance.4. Monthly charging of the battery (if applicable) is recommended in the off-season.WARNING - Battery may generate explosive gases after filled with acid and during charging or use. Keep sparks, flame, cigarettes, oranything flammable away. Ventilate when charging or using battery in an enclosed space, and ensure that the battery vent path is alwaysopen.5. When the vehicle is removed from storage re-read the owner's manual, perform any assembly required, and perform a pre-ride inspection.See Pre-Ride Inspection section of this manual.GENERALJust as your automobile needs professional, mechanical maintenance from time to time, so does this vehicle. Replacement of the spark plugand ignition points is made necessary by normal use. Professional air cooled engine service is easily obtained. Check your phone book yellowpages under "Engines-Gasoline."
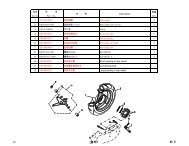
ENGINE LUBRICATION – Ensure that you follow the proceduresoutlined in the engine owner’s manual that is provided as asupplement to this manual. Failure to follow procedures couldreduce the life of your engine.VEHICLE LUBRICATION - Every two or three hours of uselubricate the following items with several drops of oil; steeringbearing points, brake rod pivot points, pedal pivot points, steeringspindles, and steering rod ends. Use the same grade oflubricating oil that is used in the engine crankcase.CHAIN LUBRICATION - For the best chain life, it should belubricated with a graphite type lubricant such as the spray-on typewhich evaporates leaving the graphite on the chain. Using oil orgrease on the chain in dusty or sandy riding conditions may causedirt particles to stick to the chain resulting in rapid wear fromabrasion.TORQUE CONVERTER LUBRICATION - Although the TorqueConverter has been designed for many hours of use, periodiccleaning and lubrication is necessary for optimum life andperformance. Extremely dust, dry climates would require morefrequent maintenance checks.Here are the steps to take to maintain the Torque Converter:Examine the sheaves surfaces of both the front and rear unit.Clean all dust, dirt and belt residue from surfaces. This must bedone with an evaporative solvent. The belt and belt surfaces mustbe free of dirt and grease.Remove the cover from the front drive unit. Clean all dust and dirtfrom internal parts, and re-lubricate with a dry lubricant such asmolybdenum disulfide. Reassemble unit and be sure cover issecurely replaced.CENTRIFUGAL CLUTCH LUBRICATION - There are two mainelements that can shorten the life of a clutch - poor lubrication anddirt/sand.The clutch contains an oil-impregnated bronze bushing (part '3' onillustration). It is press fitted inside on the sprocket and surroundsa steel sleeve onto which a snap ring clips. The small snap ring atthe end of the sprocket holds the clutch together, and for thisreason the snap ring should not be removed.With the engine off, apply oil (SAE 30 motor oil) to the snap ringarea. (See illustration 2 for details.) To make it easier for the oilto work its way into the bushing area, try to manually roll thevehicle along while applying the oil. If you lift the rear end andsupport it on the frame you can rotate the rear wheels to work theoil into the bushing. Never apply grease to this bushing, becauseit clogs the pores and retards proper lubrication. For best results,oil every two hours of running time. (4 or 5 drops).Illustration 2Dirt and sand areabrasive and can actlike sandpaper toprematurely wear thebushing, thesprocket, the chain,and other parts ofyour vehicle. Sincethese vehicles aredriven on all kinds ofterrain, it's often hardto keep the moving parts dirt free. A clean vehicle can prolong thelife of the clutch's bushing and sprocket as well as the chain andother bearings on the vehicle. Try wiping or brushing away asmuch dirt as possible from these areas after each use.If you find that the drum and sprocket assembly wobbles on thesteel sleeve, this is an indication of a worn bushing. You shouldget a new clutch or replacement bushing. A worn bushing canlead to a thrown chain. Replacing the bushing early when you firstsee the excessive wear will prevent the sleeve from becomingworn and damaged.FRONT WHEEL REPLACEMENT - Care must be used whenreplacing wheels. DO NOT OVER-TIGHTEN AXLE NUTS. It isonly necessary to tighten the nuts so that the wheel turns freely onthe axle with minimum end play. If the wheel does not turn freelythe nut is too tight.REAR WHEEL REPLACEMENT - Loosen the large locknut in thecenter of the wheel to remove the rear wheel.Illustration 1CHAIN ADJUSTMENT - After the first two hours of operation,check the chain adjustment and readjust it if it has more than 3/8"flex. Loosen the engine clamp nuts and slide the engine and jackshaft assembly rearward to tighten the chain. Allow about 3/8" flexfor proper adjustment. Tighten the nuts securely. On modelsequipped with a centrifugal clutch, the engine may need to bemoved forward to tighten the chain.RECORD THE MODEL NUMBER AND SERIAL NUMBER OF YOUR VEHICLE IN SPACES PROVIDED BELOWFOR REFERENCE WHEN ORDERING REPLACEMENT PARTS.Model No. _________________________________________________ Color _______________Serial No. ________________________________________________________________________________(red and silver tag attached to go-kart frame)EngineNo. ________________________________________________________________________________(from engine)
A.C.E. Sports Power Sports Warranty Information1-866-816-5060Warranty Protect provides Manufacturers and Distributors in North America with world-class warrantyservicing and underwriting. WP builds customized warranty programs and web-interfaces for its customers,utilizing 24/7 x 365 day call center coverage across nearly 1,000 agents in 22 locations. Recent call centerawards include: 2006 – Contact Center World’s Best in the World Award for Best Technology Innovation;2004 - One of Inc 500 fastest growing companies; 2003 - Member’s Choice Award for best outsourcingservices; and 2002 – Users Choice Award’s Best-In-Class winner.WP’s customized claim servicing and service provider locator allow our customers to offer warranty servicesto the consumer in a seamless manner. In addition, Warranty Protect has the ability to tow any on-roadPower Sports unit to the service facility through it own roadside assistance dispatch system in the US,Canada and Puerto Rico.The Warranty Group’s proprietary approach to administering service plans delivers benchmark satisfaction –for your customers and your balance sheet. With trained product experts and systematic trend analysis,claims are adjudicated quickly utilizing innovative technology.Warranty Protect adds value through:Peace of mind– no out of pocket expense to the consumer for repair costs on covered items.Convenience– we provide pick-up and delivery of the disabled vehicle ( 50 mile limit ) to one of our localprofessional network technicians through our national towing network or if you prefer you may deliver it inperson.Technology - by utilizing state-of-the-art technology to assure service exceeds customer expectations.Limited Warranty Coverage - 6 months (180 days) from date of purchase WP coverage includes parts,labor and roadside assistance, if needed, for your registered A.C.E. Sports product. This is a zero deductibleplan that insures you the best service after the sale.Items Not Covered – Wearable parts such as tires, belts, hoses, bulbs, sprockets, chains, clutches; throttlecable, brake cable, seat, fasteners, air filters, brake pads, oil changes & any item that has been abused,neglected OR used in a manner for which it is not designed. Modifications to your product that are notA.C.E. Sports approved will void the warranty. Defective parts are subject to recall by Warranty Protect and/ or A.C.E. Sports upon failure and are required to be held by the service center until the warranty claim issettled. Our go karts, atv’s & buggies are designed for off-road use only.How To Register My Product – Complete the warranty registration form and fax to 1-888-562-8223 or mailto: Warranty Protect Registration 239 County Road 4435 Brundidge, Al. 36010. Product must beregistered within 10 days of purchase.It is the little things that matter most when operating a top level Warranty Program. When dealing withWarranty Protect you can rest assured we are always looking to provide the best service possible to thecustomer! As our slogan says: “Providing the Peace of Mind You Expect!” A.C.E. Sports is the ONLYmanufacturer to provide such a great plan!Warranty Protect Service Center Locator – to locate a Warranty Protect Service Center for your A.C.E.Sports power sports product, please call 1-866-816-5060 to speak to a Warranty Protect representative orview http://www.warrantyprotect.com/dealer_database/dealer-locator.aspA.C.E. Sports, LLC 239 County Road 4435 Brundidge, Al. 36010 – info@acesportsonline.com