Castout files and the Weave » Make Castout File dialog
Castout files and the Weave » Make Castout File dialog
Castout files and the Weave » Make Castout File dialog

You also want an ePaper? Increase the reach of your titles
YUMPU automatically turns print PDFs into web optimized ePapers that Google loves.
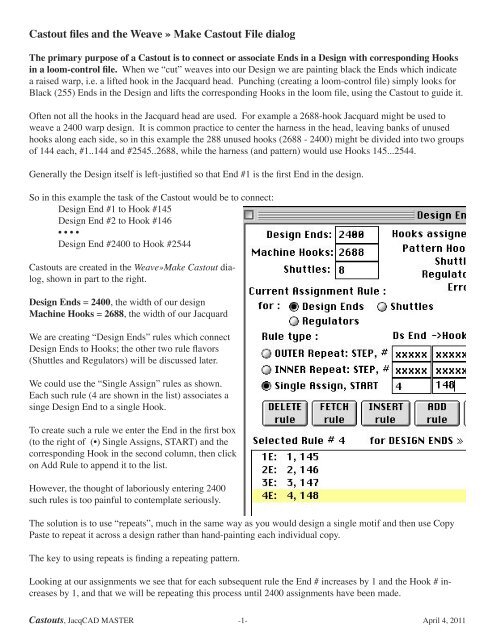
<strong>Castout</strong> <strong>files</strong> <strong>and</strong> <strong>the</strong> <strong>Weave</strong> » <strong>Make</strong> <strong>Castout</strong> <strong>File</strong> <strong>dialog</strong>The primary purpose of a <strong>Castout</strong> is to connect or associate Ends in a Design with corresponding Hooksin a loom-control file. When we “cut” weaves into our Design we are painting black <strong>the</strong> Ends which indicatea raised warp, i.e. a lifted hook in <strong>the</strong> Jacquard head. Punching (creating a loom-control file) simply looks forBlack (255) Ends in <strong>the</strong> Design <strong>and</strong> lifts <strong>the</strong> corresponding Hooks in <strong>the</strong> loom file, using <strong>the</strong> <strong>Castout</strong> to guide it.Often not all <strong>the</strong> hooks in <strong>the</strong> Jacquard head are used. For example a 2688-hook Jacquard might be used toweave a 2400 warp design. It is common practice to center <strong>the</strong> harness in <strong>the</strong> head, leaving banks of unusedhooks along each side, so in this example <strong>the</strong> 288 unused hooks (2688 - 2400) might be divided into two groupsof 144 each, #1..144 <strong>and</strong> #2545..2688, while <strong>the</strong> harness (<strong>and</strong> pattern) would use Hooks 145...2544.Generally <strong>the</strong> Design itself is left-justified so that End #1 is <strong>the</strong> first End in <strong>the</strong> design.So in this example <strong>the</strong> task of <strong>the</strong> <strong>Castout</strong> would be to connect:Design End #1 to Hook #145Design End #2 to Hook #146• • • •Design End #2400 to Hook #2544<strong>Castout</strong>s are created in <strong>the</strong> <strong>Weave</strong>»<strong>Make</strong> <strong>Castout</strong> <strong>dialog</strong>,shown in part to <strong>the</strong> right.Design Ends = 2400, <strong>the</strong> width of our designMachine Hooks = 2688, <strong>the</strong> width of our JacquardWe are creating “Design Ends” rules which connectDesign Ends to Hooks; <strong>the</strong> o<strong>the</strong>r two rule flavors(Shuttles <strong>and</strong> Regulators) will be discussed later.We could use <strong>the</strong> “Single Assign” rules as shown.Each such rule (4 are shown in <strong>the</strong> list) associates asinge Design End to a single Hook.To create such a rule we enter <strong>the</strong> End in <strong>the</strong> first box(to <strong>the</strong> right of (•) Single Assigns, START) <strong>and</strong> <strong>the</strong>corresponding Hook in <strong>the</strong> second column, <strong>the</strong>n clickon Add Rule to append it to <strong>the</strong> list.However, <strong>the</strong> thought of laboriously entering 2400such rules is too painful to contemplate seriously.The solution is to use “repeats”, much in <strong>the</strong> same way as you would design a single motif <strong>and</strong> <strong>the</strong>n use CopyPaste to repeat it across a design ra<strong>the</strong>r than h<strong>and</strong>-painting each individual copy.The key to using repeats is finding a repeating pattern.Looking at our assignments we see that for each subsequent rule <strong>the</strong> End # increases by 1 <strong>and</strong> <strong>the</strong> Hook # increasesby 1, <strong>and</strong> that we will be repeating this process until 2400 assignments have been made.<strong>Castout</strong>s, JacqCAD MASTER -1- April 4, 2011
Which very neatly brings us to <strong>the</strong> need for “Inner Repeat” rulesWe still begin by entering our first End(#1) <strong>and</strong> its associated Hook (#145) in<strong>the</strong> bottom row “START”.We select (•) INNER Repeat for <strong>the</strong> Ruletype.Into its STEP,# row we enter1 for <strong>the</strong> amount to step <strong>the</strong> Design End1 for <strong>the</strong> amount to step <strong>the</strong> Hook2400 for <strong>the</strong> # of repetitionsThen click on ADD or UPDATE Rule.This rule still begins by connecting End #1 to Hook 145but <strong>the</strong>n increases <strong>the</strong> End by 1 to #2 <strong>and</strong> <strong>the</strong> Hook by 1 to 146 <strong>and</strong> makes that connection<strong>the</strong>n again increases <strong>the</strong> End by 1 to #3 <strong>and</strong> <strong>the</strong> Hook by 1 to 147 <strong>and</strong> makes that connection<strong>and</strong> repeats on <strong>and</strong> on until it has created 2400 connections, <strong>the</strong> last of which connects End 2400 to Hook 2544.Quite a significant improvement over Single Assigns!To solidify our underst<strong>and</strong>ing of INNER Repeat rules lets work a few more examples:The direction doesn’t matter. For example we could start at <strong>the</strong>right edge (End 2400 to Hook 2544) <strong>and</strong> assign right-to-left using:Note that <strong>the</strong> End <strong>and</strong> Hook numbers are decreased in each repetition so 2400-> 2544, 2399-> 2543... 1-> 145Suppose that we wanted to End-mirror <strong>the</strong> design. That means we want End 1 -> 2544, 2->2543,...,2400->145Easy to do using this rule which increases <strong>the</strong> End # while decreasing<strong>the</strong> Hook number on each repetition. So 1-> 2544, 2-> 2543, 3->2542, ..., 2400-> 145Sometimes looms that are set up for “full count” warp are used to weave “half count” fabric. One simply loadsin half as much warp using only every o<strong>the</strong>r heddle. I.e., End #1-> Hook 145 but End #2-> Hook 147, End #3->Hook 149, etc., for 1200 Ends <strong>and</strong> warps. This rule still increments <strong>the</strong>Ends by 1, but increments <strong>the</strong> Hooks by 2 so while <strong>the</strong> Ends are going1,2,3,4,5... <strong>the</strong> Hooks are going 145,147,149,151,153... for a total of 1200 repetitions. Of course our “design”needs to be only 1200 Ends wide to match <strong>the</strong> 1200 warps <strong>and</strong> hooks that are active in this half-count fabric.Sometimes <strong>the</strong> hooks to be used are not in a single contiguous block - for instance if a modern head <strong>and</strong> harnesswas set up so designs for an older dual-head mechanical setup could be woven unchanged. In such a case<strong>the</strong> used hooks might be #73..1272 <strong>and</strong> #1417..2616. Here we need 2 rules, <strong>the</strong> first to connect Ends 1..1200 toHooks 73..1272 <strong>and</strong> <strong>the</strong> second to connect Ends 1201..2400 to Hooks 1417..2616.Now for an example which can’t be h<strong>and</strong>led efficiently by an IN-NER Repeat rule. “Casting out”, often used to spread a narrower harness across <strong>the</strong> width of a wider head, is<strong>the</strong> process of skipping over (casting out) some hooks. For example with a 14-deep head one might use <strong>the</strong> first12 hooks <strong>and</strong> skip 2 in each column of hooks. Using only INNER Repeat rules we would need a separate rulefor each group of 12 hooks - 192 rules to assign 2304 Ends to 192 rows of 12 hooks each. OUCH!<strong>Castout</strong>s, JacqCAD MASTER -2- April 4, 2011
Which very neatly brings us to <strong>the</strong> need for OUTER Repeat rulesA Staubli CX860 head is arranged incolumns of 14 hooks; a 2688 wide headcontaining 192 such columns.The hook numbering is thus 1..14 fromback to front in <strong>the</strong> first column, 15..28 in<strong>the</strong> second, 29..42 in <strong>the</strong> third, <strong>and</strong> so on.Suppose <strong>the</strong> harness was designed to “castout” 2 out of every 14 hooks in each column,resulting in a total of 192 columns of12 hooks each for a total of 2304 connected hooks.A 2304 End design needs to be connected to those hooks as followsEnds 1..12 to Hooks 1..12Ends 13..24 to Hooks 15..26Ends 25..36 to Hooks 29..40 <strong>and</strong> so on for <strong>the</strong> 192 columns.Using only INNER Repeat rules we would need1E: 1, 1 | 1, 1 x 122E: 13, 15 | 1, 1 x 123E: 25, 29 | 1, 1 x 12 <strong>and</strong> so on all <strong>the</strong> way up to 192E:Looking once again for patterns of repetition we see that for each of those INNER Repeat rules, <strong>the</strong> START Endis increasing by 12 while <strong>the</strong> START Hook is increasing by 14 because of <strong>the</strong> 2 skipped hooks.The OUTER Repeat provides a way of adjusting <strong>the</strong> START values for each execution of <strong>the</strong> INNER Repeat.In <strong>the</strong> example shown above, <strong>the</strong> INNER Repeat makes 12 assignments, incrementing <strong>the</strong> End <strong>and</strong> Hook eachby 1. Then <strong>the</strong> OUTER Repeat adjusts <strong>the</strong> START values (Ends by 12 <strong>and</strong> Hooks by 14) before restarting <strong>the</strong>INNER Repeat. It does this for a total of 192 repetitions (each of which makes 12 assignments).So, <strong>the</strong> first time through <strong>the</strong> INNER Repeats does: 1-> 1, 2-> 2, ..., 12-> 12<strong>the</strong>n <strong>the</strong> OUTER Repeat adjusts <strong>the</strong> START values to 13 (1+12), 15 (1+14)so <strong>the</strong> INNER Repeat now does 13-> 15, 14-> 16, ..., 24-> 26<strong>the</strong>n <strong>the</strong> OUTER Repeat adjusts <strong>the</strong> START values to 25 (13+12), 29 (15+14)INNER Repeat: 25-> 29, 26-> 30, ..., 36-> 40<strong>and</strong> so on through 192 repetitions of <strong>the</strong> INNER Repeat, each of which makes 12 assignments for a total of 192x 12 = 2304 assignments.Again note that <strong>the</strong> order doesn’t matter. This rule creates exactly <strong>the</strong> same 2304 assignments, but goes left-torightfirst assigning to one hook in each of <strong>the</strong> 192 columns before moving down to <strong>the</strong> next row.Study this rule <strong>and</strong> work examples until youunderst<strong>and</strong> why it produces <strong>the</strong> same set of assignments as <strong>the</strong> previous one. It is important to underst<strong>and</strong> thatyou often can use any repeating pattern you can find, no matter which direction it runs, to reduce a large numberof Single Assign or INNER Repeat rules into a smaller number of OUTER repeat rules... Nei<strong>the</strong>r End nor Hookincrement needs to be one - as long as <strong>the</strong>re is some constant step you can make use of it in a Repeating rule.<strong>Castout</strong>s, JacqCAD MASTER -3- April 4, 2011
The designer is sometimes <strong>the</strong> last to be consulted about a new harness, which leads to a need for especially“interesting” castouts.For example Terry cloth is woven with alternating “ground” <strong>and</strong> “pile” warps; <strong>the</strong> ground warps coming undernormal tension from one beam <strong>and</strong> <strong>the</strong> pile warps under very little tension from a second beam. The warps arearranged across <strong>the</strong> loom <strong>and</strong> Design in alternation, G P G P G P G P..., but often <strong>the</strong> hooks are divided intoseparate front <strong>and</strong> back groups, one for <strong>the</strong> ground <strong>the</strong> o<strong>the</strong>r for <strong>the</strong> pile. Certainly makes drawing-in easier.In such an arrangement <strong>the</strong> hook sequence might be G G G G G G G P P P P P P P back to front in <strong>the</strong> first columnof 14 hooks (#1..14) <strong>and</strong> similarly in all o<strong>the</strong>r columns.So <strong>the</strong> <strong>Castout</strong> needs to connect:Ends 1..14 to Hooks 1, 8, 2, 9, 3, 10, 4, 11, 5, 12, 6, 13, 7, 14 ( G P G P... )Ends 15..28 to Hooks 15, 22, 16, 23, 17, 24, 18, 25, 19, 26, 20, 27, 21, 28 ( G P G P... )<strong>and</strong> so on.There are several “patterns of repetition” here which could be exploited: alternate Ends to sequentially numberedhooks (1-> 1, 3-> 2, 5-> 3,...), adjacent Ends to Hooks that differ by 7 (1-> 1, 2-> 8), <strong>and</strong> <strong>the</strong> difference of14 between columns. Lets look at some possible approaches:First thinking only in terms of INNER Repeats we can see <strong>the</strong> following possible forms of repetition1,1 | 1, 7 x 2 1-> 1, 2-> 81,1 | 2, 1 x 7 1-> 1, 3-> 2, 5-> 3, 7-> 4, 9-> 5, 11-> 6, 13-> 71,1 | 14, 14 x 192 1-> 1, 15-> 15, 29-> 29, ... for all 192 columnsNow looking at ways to use <strong>the</strong>se with an added OUTER Repeat:1) a difference of 7 in <strong>the</strong> hook numbers between adjacent Ends, but this only repeats for 2 assignments(End 1 -> Hook 1, End 2 -> Hook 8) so E: 1,1 | 1, 7 x 2 || 2, 2 x 7 would do one columnbut only one column, so 192 rules would be needed to cover all 192 columns, not very attractive2) we could use <strong>the</strong> same difference of 7 to do 2 hooks in each column but <strong>the</strong>n repeat across <strong>the</strong> columns:E: 1 ,1 | 1, 7 x 2 || 14, 14 x 192 does Hooks 1 & 8 in each columnE: 3, 2 | 1, 7 x 2 || 14, 14 x 192 does Hooks 2 & 9 in each columnE: 5, 3 | 1, 7 x 2 || 14, 14 x 192 does Hooks 3 & 10 in each columnE: 7, 4 | 1, 7 x 2 || 14, 14 x 192 does Hooks 4 & 11 in each columnE: 9, 5 | 1, 7 x 2 || 14, 14 x 192 does Hooks 5 & 12 in each columnE: 11, 6 | 1, 7 x 2 || 14, 14 x 192 does Hooks 6 & 13 in each columnE: 13, 7 | 1, 7 x 2 || 14, 14 x 192 does Hooks 7 & 14 in each columnwhich is only 7 rules, a big improvement over <strong>the</strong> 192 rules3) use <strong>the</strong> INNER Repeat to do 7 hooks in <strong>the</strong> column, OUTER Repeat to do <strong>the</strong> columnsE: 1, 1 || 2, 1 x 7 || 14, 14 x 192 does Ends 1, 3, 5, ... , 13 to Hooks 1..7 in each columnE: 2, 8 || 2, 1 x 7 || 14, 14 x 192 does Ends 2, 4, 6, ... , 14 to Hooks 8..14 “which is clearly <strong>the</strong> best solution!The “take home” point is to first look for all <strong>the</strong> patterns of repetitions you can spot, <strong>the</strong>n think about <strong>the</strong> variousways you might be able to exploit <strong>the</strong>m in repeating rules...<strong>Castout</strong>s, JacqCAD MASTER -4- April 4, 2011
So far we have been considering only “pattern hooks’, i.e., those hooks which control heddles <strong>and</strong> lift warpends. These are by far <strong>the</strong> most numerous <strong>and</strong>, as we’ve seen, can require complicated castouts.However, Jacquard mechanisms normally include a small number of “control” hooks, whe<strong>the</strong>r real physicalhooks or electronic functions, used for weft selection, <strong>and</strong> controls such as regulators, fringe, pile height, weftdensity, loom speed, or o<strong>the</strong>r special functions.From <strong>the</strong> perspective of a loom control file <strong>the</strong>se are simply o<strong>the</strong>r hooks, no different from <strong>the</strong> pattern hooks;at <strong>the</strong> loom instead of connecting to heddles <strong>the</strong>y connect to o<strong>the</strong>r mechanisms. In modern looms <strong>the</strong>y neveractually lift a physical hook, being instead rerouted into <strong>the</strong> electronics. In an older loom <strong>the</strong>y will literally lift ahook which in turn pulls on a lever to, say, select a weft or disengage a pawl on a gear (regulator).A common approach is to simply add some extra Ends, usually to <strong>the</strong> right side of <strong>the</strong> Design, in which one canpaint <strong>the</strong> desired actions for <strong>the</strong> controls.In <strong>the</strong> example to <strong>the</strong> right we are looking at <strong>the</strong>right edge of a design (with weaves cut in) followedby a dozen added Ends (colored orange for contrast)in which has been painted a “box motion” (Wefts 32 3 2 3...) <strong>and</strong> a Regulator on <strong>the</strong> top pick (# 9 in <strong>the</strong>controls).^ 2401If our pattern was 2400 Ends wide, <strong>the</strong>se added Ends might start at 2401 (as indicated in <strong>the</strong> figure).Since <strong>the</strong>se “controls” are simply extra Ends, we again use a “Design End” rule to connect <strong>the</strong>m to <strong>the</strong> appropriate“hooks”. Often Hooks 1..32 are reserved for such controls, with Hooks 1..8 being <strong>the</strong> Weft Selectors <strong>and</strong>Hook 9 being <strong>the</strong> Regulator, so our rule could beE: 2401, 1 | 1, 1 x 9 connects Ends 2401..2409 to Hooks 1...9Sometimes separate <strong>files</strong> are “punched”, one for pattern hooks <strong>and</strong> ano<strong>the</strong>r for controls - often used with StaubliJC4 controllers. In this case we simply have 2 separate castouts, one for punching <strong>the</strong> pattern file <strong>and</strong> a secondfor punching <strong>the</strong> controls. The latter castout would consist only of <strong>the</strong> above rule for copying our painted incontrols on Ends 2401... into Hooks 1... of <strong>the</strong> control file.In most cases I recommend this “painted in” approach. It has <strong>the</strong> great merit of making everything visible -both <strong>the</strong> pattern (weaves) <strong>and</strong> <strong>the</strong> weft selection <strong>and</strong> o<strong>the</strong>r controls - in a single easy to underst<strong>and</strong> <strong>and</strong> to checkformat. There is no need to worry if <strong>the</strong> box motion (weft sequence) is aligned correctly, or if <strong>the</strong> o<strong>the</strong>r controlsare active where <strong>the</strong>y should be - it is all <strong>the</strong>re in plain sight.And it is quite easy to use. A single repeat of box motions, such as shown above, can be painted with <strong>the</strong> Pencil,<strong>the</strong>n selected <strong>and</strong> loaded as a Brush to fill in <strong>the</strong> entire height. JacqCAD’s Lookup in Notebook can be used toenter hard to remember hook patterns, e.g., for setting weft densities, etc.One limitation is that JacqCAD is not smart enough to separate <strong>the</strong> actual design from <strong>the</strong> area being used forcontrols - <strong>and</strong> this interferes with Repeat View <strong>and</strong> Window of Repeats by including both areas in <strong>the</strong> repeats.Consequently it is best to first complete <strong>the</strong> editing of <strong>the</strong> design by itself, using Repeat View or Window ofRepeats as needed to correct <strong>the</strong> seams, before adding <strong>the</strong> extra Ends into which you will paint <strong>the</strong> weft selector<strong>and</strong> controls.<strong>Castout</strong>s, JacqCAD MASTER -5- April 4, 2011
However, <strong>the</strong>re are some types of design in which simply painting <strong>the</strong> weft selection <strong>and</strong> controls into addedEnds is not <strong>the</strong> best solution.These arise most often when Complex Expansion or Color-Strip Expansion is used to create a complex fabric.In such designs each Pick in <strong>the</strong> original (condensed) design exp<strong>and</strong>s into a variable number of actual weftinsertions depending on <strong>the</strong> colors seen in <strong>the</strong> Design (Complex Expansion) or in its associated expansion colorstrip (Color Strip Expansion).Some of <strong>the</strong> weft insertions occur in every exp<strong>and</strong>ed Pick (“Always Active”) while o<strong>the</strong>rs may occur only insome exp<strong>and</strong>ed Picks (“Conditional”). The latter ‘tissue picks’ are often ‘Regulated’ in order to prevent fabricadvance since <strong>the</strong>y purely decorative ra<strong>the</strong>r than being an integral part of <strong>the</strong> fabric’s structure. In addition, <strong>the</strong>weft selection is usually determined by <strong>the</strong> expansion rules.In o<strong>the</strong>r situations assigning box motions (weft sequences) via JacqCAD’s <strong>Weave</strong>»Assign Boxes & Regulators ismore efficient than painting in long <strong>and</strong> complex sequences.Ei<strong>the</strong>r situation makes use of JacqCAD’s exp<strong>and</strong>ed Pick / Logical Shuttle / Box assignment information, shownin JacqCAD’s Results Window.A condensed (unexp<strong>and</strong>ed) design displays only <strong>the</strong> cursor’sX,Y (End, Pick) position plus <strong>the</strong> color.An exp<strong>and</strong>ed design in addition displays <strong>the</strong> Pick (#141), Card(#178), Logical Shuttle (#3), Physical Shuttle, Box, or WeftSelector (#5) <strong>and</strong> Regulator (F) settings.The Pick, Card <strong>and</strong> Logical Shuttle values are established solely by <strong>the</strong> Expansion process. The PhysicalShuttle (Box/Weft Selector) <strong>and</strong> Regulator values, initially set during Expansion, can be modified in variousways using <strong>the</strong> tools provided via <strong>Weave</strong>»Assign Boxes & Regulators.When being used, Box / Weft Selector <strong>and</strong> Regulator values need to be included in <strong>the</strong> ‘punched’ loom controlfile; which means <strong>the</strong>y must be specified in <strong>the</strong> <strong>Castout</strong> via Shuttle <strong>and</strong> Regulator rules.Shuttle Rules are used to connect aphysical shuttle value (range of 1..16) to<strong>the</strong> appropriate hooks.Regulator Rules are used to connect <strong>the</strong>regulators (#1 <strong>and</strong> #2) to <strong>the</strong>ir hooks.The format of <strong>the</strong>se rules is <strong>the</strong> same asfor Design End rules, <strong>the</strong> only differencebeing in <strong>the</strong> flavor of <strong>the</strong> rule as indicatedby <strong>the</strong> leading “nE:” for Design End,“nS:” for Shuttle or “nR:” for Regulatorrules, where “n” is simply <strong>the</strong> sequentialrule number.For example, <strong>the</strong> Shuttle Rule shownabove connects Physical Shuttle / Box/Weft 1...8 to Hooks 1..8 in <strong>the</strong> punched file.While this Regulator Rule would connect Regulators 1 <strong>and</strong> 2 to Hook 9 (i.e.,if ei<strong>the</strong>r or both Regulators were enabled <strong>the</strong>y would lift Hook #9):<strong>Castout</strong>s, JacqCAD MASTER -6- April 4, 2011
Having explored how <strong>the</strong> rules are defined <strong>and</strong> what <strong>the</strong>y do, we now turn to a brief review of <strong>the</strong> rest of <strong>the</strong><strong>Make</strong> <strong>Castout</strong> <strong>File</strong> <strong>dialog</strong>.First stop is <strong>the</strong> <strong>dialog</strong>’s upper left corner where you set up some dimensions:Design Ends: here you specify <strong>the</strong> width of <strong>the</strong> exp<strong>and</strong>ed design from whichyou will be punching. In <strong>the</strong> example at <strong>the</strong> right I have specified 2416 whichwould be appropriate for a 2400 End wide design which also included 16extra Ends which I might be using for painted-in weft selectors & o<strong>the</strong>r controls. Any rules you enter will bechecked to make sure <strong>the</strong>y don’t ask for a Design End higher than what you enter. Also, if you try to punchfrom a design that is a different width, you will get an error warning. Just set it to match your design’s width.Machine Hooks: this is <strong>the</strong> “width” of <strong>the</strong> loom control file to be created. It must match <strong>the</strong> loom’s requirements.For example, Bonas .EP <strong>files</strong> always begin with 32 “Electronic Function” hooks followed by <strong>the</strong> normalpattern hooks - so for a 2688-hook Bonas Jacquard <strong>the</strong> Machine Hooks (file width) must be 32 + 2688 = 2720.A Staubli JC5 file often includes electronic functions, ei<strong>the</strong>r as <strong>the</strong> first or last 32 hooks depending on how ithas been set up, but sometimes does not. In short, check with <strong>the</strong> loom’s operators. The most reliable approachis to get a loom file that is known to weave on that loom <strong>and</strong> use JacqCAD’s <strong>Weave</strong> » Card Image From... toinspect it.Shuttles: this is only relevant if you are using Shuttle Rules, in which case your Shuttle Rules will be checkedto make sure <strong>the</strong>y don’t ask for a higher-numbered shuttle than what you have entered here. Maximum value is16, <strong>and</strong> you can ignore this entry if you are not using Shuttle Rules.Next stop, <strong>the</strong> Rule Editing area <strong>and</strong>Rule List.Clicking on a rule in <strong>the</strong> Rule Listselects <strong>and</strong> highlights it in yellow.Double-clicking on a rule, or selecting it<strong>and</strong> <strong>the</strong>n clicking on <strong>the</strong> Fetch Rule button,loads it into <strong>the</strong> Editing area abovewhere you can make changes (as shownwith rule 2E)After changes have been made you canclick on:UPDATE rule to copy those changesinto <strong>the</strong> currently selected ruleINSERT rule to create a new rulecontaining <strong>the</strong> edited values in front of(above) <strong>the</strong> currently selected ruleADD rule to append a new rule containing <strong>the</strong> edited values to <strong>the</strong> end of <strong>the</strong> listNote that <strong>the</strong> changes you make in <strong>the</strong> Edit Rule area have no effect until you use INSERT, ADD or UPDATE tocopy those changes into <strong>the</strong> rules in <strong>the</strong> List area.DELETE rule simply deletes <strong>the</strong> currently selected rule.The Rule kinds (Ends, Shuttles or Regulators) <strong>and</strong> Types have already been discussed in detail.When you enter <strong>the</strong> <strong>dialog</strong> <strong>the</strong>re are some default rules - mostly as a reminder. Simply replace <strong>the</strong>se with yourown rules.<strong>Castout</strong>s, JacqCAD MASTER -7- April 4, 2011
You must use CALCULATE ALL RULES & DISPLAY RESULTS before using SAVE(or LIST or PRINT) - it is what actually uses your rules to create a castout <strong>and</strong> updates<strong>the</strong> display of <strong>the</strong> hook assignments which result.Calc & Disp Selected Rule Only only calculates <strong>and</strong> displays <strong>the</strong> currently selected rule;it is very useful for verifying that a rule does what you wanted <strong>and</strong> for trouble-shooting.For example, if we had selected this rule:<strong>the</strong>n Calc & Disp Selected Rule Only would display <strong>the</strong> results of only thatsingle rule - which, as expected, assigns Shuttles 1..8 to Hooks 1..8 as shown by<strong>the</strong> list to <strong>the</strong> right.Reviewing <strong>the</strong> results of each rule one-by-one is <strong>the</strong> most effective way oftracking down mistakes in your rules.Each time you use ei<strong>the</strong>r Calculate button <strong>the</strong> assignmentsdisplays are updated (ei<strong>the</strong>r for <strong>the</strong> selected rule or for allrules depending which button you clicked). These have 2parts, a summary section near <strong>the</strong> <strong>dialog</strong>’s top center (shownat right) <strong>and</strong> a detailed section along <strong>the</strong> right edge.“Errors” would include out of bounds (higher than maximumor lower than 1) Ends or Hooks, <strong>and</strong> End being used multiple times, etc. However, multiple assignments to <strong>the</strong>same hook are not considered an error since <strong>the</strong>y are sometimes intentional - for example when assigning ei<strong>the</strong>rRegulator to lift <strong>the</strong> same hook so you don’t have to remember which is which...The detailled listing along <strong>the</strong> right edge can be sorted in several ways:End»Hook(s) sorts <strong>the</strong> assignments by End #, showing only <strong>the</strong> Ends orcontrols which have been assigned to hooksHook«End sorts instead by Hook #, useful when you want to find outwhich End or control is being assigned to a particular hook. A “+” indicatesthat several Ends are connecting to <strong>the</strong> same hook, of which only <strong>the</strong>first is listed.Shuttles/Regs»Hooks(s) limits <strong>the</strong> listing to Shuttles <strong>and</strong> RegulatorsUNASSIGNED Ends || Hooks lists only <strong>the</strong> Ends (first column) <strong>and</strong> Hooks (2nd column) which have NOTbeen used in assignments. Used to double check that nothing important has been forgotten...Here are examples of <strong>the</strong> 4 different sortings: End»Hook Hook«End Shuttles/Regs UNASSIGNEDNote in <strong>the</strong> Hook«End listing that 9:R 2+ indicatesEnd || Hook<strong>the</strong> multiple assignements to Hook 9 via+.The Unassigned listing shows that Ends 2401-2416 were not used, <strong>and</strong> Hooks 10..28 (...) werenot assigned to.SAVE creates <strong>the</strong> castout (.Hook) file neededfor punching. LIST <strong>and</strong> PRINT provide documentationof <strong>the</strong> castout. LIST will optionallyprovide a “comber board” layout which is usefulfor comparing with <strong>the</strong> actual harness.LOAD let one load in an existing castout file.SAVE DEFAULTS provides comedy relief, sometimes needed by <strong>Castout</strong> creators...<strong>Castout</strong>s, JacqCAD MASTER -8- April 4, 2011