Marmox Showerlay Onto Wooden Floors Guide - Tile Fix Direct
Marmox Showerlay Onto Wooden Floors Guide - Tile Fix Direct
Marmox Showerlay Onto Wooden Floors Guide - Tile Fix Direct

Create successful ePaper yourself
Turn your PDF publications into a flip-book with our unique Google optimized e-Paper software.
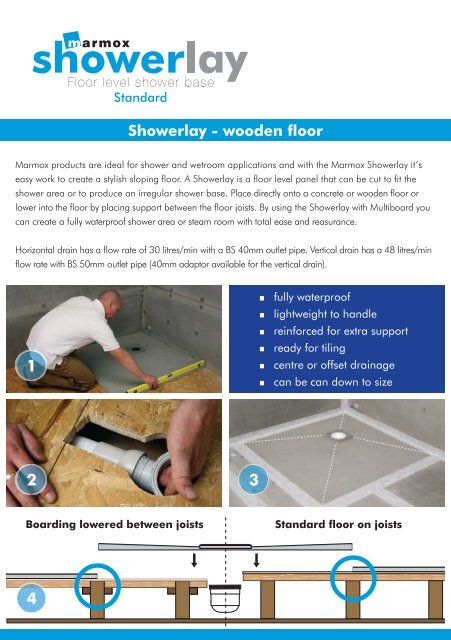
<strong>Marmox</strong> products are ideal for shower and wetroom applications and with the <strong>Marmox</strong> <strong>Showerlay</strong> it’seasy work to create a stylish sloping floor. A <strong>Showerlay</strong> is a floor level panel that can be cut to fit theshower area or to produce an irregular shower base. Place directly onto a concrete or wooden floor orlower into the floor by placing support between the floor joists. By using the <strong>Showerlay</strong> with Multiboard youcan create a fully waterproof shower area or steam room with total ease and reasurance.Horizontal drain has a flow rate of 30 litres/min with a BS 40mm outlet pipe. Vertical drain has a 48 litres/minflow rate with BS 50mm outlet pipe (40mm adaptor available for the vertical drain).fully waterprooflightweight to handlereinforced for extra supportready for tilingcentre or offset drainagecan be can down to sizeBoarding lowered between joistsStandard floor on joists
Centre drainOffset drainsize (mm)800 x 800900 x 9001000 x 10001200 x 7601200 x 9001200 x 12001500 x 1500perimeter (mm)20202020202024weight (kg)3.504.205.005.005.207.0010.50size (mm)1000 x 10001300 x 8001500 x 8001200 x 7601200 x 9001200 x 12001850 x 900perimeter (mm)20202420202024weight (kg)5.005.206.005.005.207.008.50PreparationMake sure floor is dust and dirt free.<strong>Fix</strong>ing1) Position the <strong>Showerlay</strong> on the wooden floor and drawaround the drain hole, marking the floor. The <strong>Showerlay</strong>can be laid onto the existing floor or lowered to joist level.If lowering then make sure to place support boardingbetween and flush with the top of the joists (minimum18mm wood). The <strong>Showerlay</strong> needs to be fully supported.Cut out a key hole shape 10mm larger than the2) circumference of the drain and big enough to allow theDallmer drain knuckle to move upwards freely.3) Position in the drain and the pipework making sureeverything lines up and that the floor is level.4) Place the black rubber ring on top of the drain.5) Stick the <strong>Showerlay</strong> to the floor with a full bed of cementbased flexible tile adhesive.6 Check again by using a spirit level on all edges of the<strong>Showerlay</strong>.7) Screw the plastic ring through into the Dallmer drain,using the tool provided for a very tight seal.8) Place the hair trap and funnel into the drain and thenthe grill on top.These 2 sizes are also availablewith centre drain positionJointsBe sure to tape all the edges and joints with <strong>Marmox</strong> SelfAdhesive Waterproof tape and all corners with <strong>Marmox</strong>Waterproof Corners.Final touchNow coat the surrounding walls and floor with <strong>Marmox</strong>Multiboard and tiling can begin.