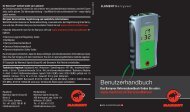
15 To separate the cartridge from the adapter, press the ventbut<strong>to</strong>n or open the pressure release valve on the adap<strong>to</strong>r.16 Remove the protective cap, and submerge the fullcart ridge in water. Use a soft brush <strong>to</strong> remove all air bubbles.After 5 minutes, without removing the cartridge from thewater check for any air bubbles that have developed – theymay be quite small. If any are present, wipe them off andsubmerge again. If, after another 5 minutes, there are new airbubbles present, the cartridge should not be used. If thereare no air bubbles the cartridge is good <strong>to</strong> use.17 Thoroughly dry the cartridge. Use a small amount ofHuskey HVS-100 silicone grease on a rag, and wipe thison the threads and all exposed surfaces of the connec<strong>to</strong>r,including in the recess and on the burst disc, making sure<strong>to</strong> wipe off any excess grease.18 Put “Protective Housing” back on cartridge19 Be sure <strong>to</strong> check the pressure-level on the cartridgegauge before EVERY use.15 Zum Abtrennen der Kartusche vom Adapter den Ventilknopfdrücken oder das Druckablassventil am Adapteröffnen.16 Schutzkappe abnehmen und die volle Kartusche inWasser eintauchen. Mit einer weichen Bürste alle Luftblasenentfernen. Nach 5 Minuten (ohne Herausnehmen derKartusche aus dem Wasser) kontrollieren, ob sich neueLuftblasen – auch sehr kleine – gebildet haben. Falls Luftblasenvorhanden sind, diese abwischen und die Kartuscheerneut ins Wasser legen. Wenn nach weiteren fünf Minutenneue Luftblasen vorhanden sind, darf die Kartusche nichtverwendet werden. Wenn keine Luftblasen vorhanden sind,kann die Kartusche verwendet werden.17 Kartusche sorgfältig abtrocknen. Eine kleine MengeHuskey HVS-100 Silikonfett auf einen Lappen geben unddamit auf die Gewinde und alle Oberflächen des Verbindungsstücksauftragen, einschliesslich der Aussparung unddem Abdeckplättchen. Überschüssiges Fett abwischen.18 Das Schutzgehäuse wieder auf die Kartusche setzen.19 Druckanzeige an der Kartusche vor JEDER Verwendungprüfen.15 Pour séparer la car<strong>to</strong>uche de l’adaptateur, appuyez surle bou<strong>to</strong>n d’évacuation ou sur la soupape de décharge depression située sur l’adaptateur.16 Ôtez le bouchon de protection et immergez <strong>to</strong>ute lacar<strong>to</strong>uche dans l’eau. Utilisez une brosse souple pourenlever <strong>to</strong>utes les bulles d’air. Après 5 minutes, sans sortirla car<strong>to</strong>uche de l’eau, vérifiez si des bulles d’air se sontformées, même très petites. S’il y en a, essuyez-les etimmergez à nouveau la car<strong>to</strong>uche. Si, après 5 nouvellesminutes, de nouvelles bulles se sont formées, la car<strong>to</strong>uchene doit pas être utilisée. S’il n’y a pas de bulles, la car<strong>to</strong>uchepeut être utilisée.17 Séchez soigneusement la car<strong>to</strong>uche. Déposez une petitequantité de graisse à base de silicone Huskey HVS-100sur un chiffon et appliquez-la sur les filetages et <strong>to</strong>utes lessurfaces exposées au connecteur, notamment dans lelogement et sur le disque de rupture, en veillant à essuyer<strong>to</strong>ut excès de graisse.18 Replacez la coque de protection sur la car<strong>to</strong>uche19 Vérifiez le niveau de pression sur la jauge de la car<strong>to</strong>ucheavant CHAQUE utilisation.15 16 17 18
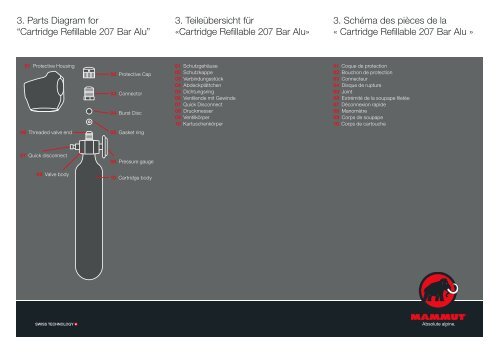
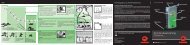
3. Parts Diagram for<strong>“Cartridge</strong> <strong>Refillable</strong> <strong>207</strong> Bar <strong>Alu</strong>”3. Teileübersicht für«Cartridge <strong>Refillable</strong> <strong>207</strong> Bar <strong>Alu</strong>»3. Schéma des pièces de la« Cartridge <strong>Refillable</strong> <strong>207</strong> Bar <strong>Alu</strong> »01 Protective Housing 01 Schutzgehäuse02 Protective Cap 02 Schutzkappe03 Verbindungsstück04 Abdeckplättchen03 Connec<strong>to</strong>r05 Dichtungsring06 Ventilende mit Gewinde07 Quick Disconnect04 Burst Disc08 Druckmesser09 Ventilkörper10 Kartuschenkörper06 Threaded valve end05 Gasket ring01 Coque de protection02 Bouchon de protection03 Connecteur04 Disque de rupture05 Joint06 Extrémité de la soupape filetée07 Déconnexion rapide08 Manomètre09 Corps de soupape10 Corps de car<strong>to</strong>uche07 Quick disconnect09 Valve body08 Pressure gauge10 Cartridge body